- Исправлено: ms-windows-store: приложение purgecaches не запускалось —
- Способ 1. Восстановление разрешений через редактор реестра
- Способ 2. Устранение неполадок в сборке вместе с полезной командой
- Способ 3: полное обновление Windows
- альтернатива
- Способ 4. Переустановка приложений Windows по умолчанию с помощью PowerShell
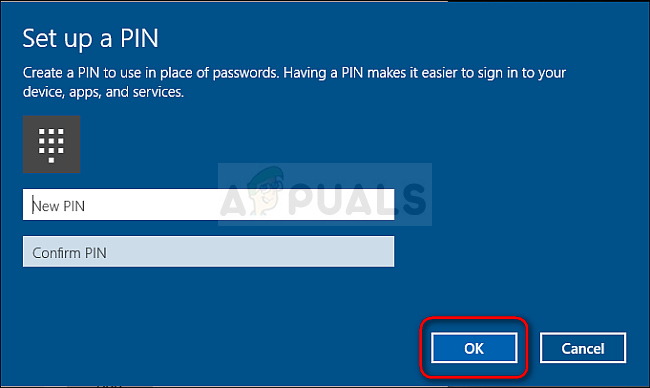
- Метод 5: Используйте новую учетную запись, чтобы исправить положение
- Fix: ms-windows-store:purgecaches app didn’t start
- Method 1: Repairing permissions via Registry Editor
- Method 2: In-Build Troubleshooting Along with a Helpful Command
- Method 3: Update Windows Completely
- Alternative
- Method 4: Reinstalling Windows Default Apps Using PowerShell
- Method 5: Use a New Account to Fix Things
- Method 6: Resetting Permissions
Исправлено: ms-windows-store: приложение purgecaches не запускалось —
ms-windows-store: purgecaches — это функция настроек, которая очищает и очищает локально сохраненный кеш для Магазина Windows, который накапливается со временем.
Следующий код ошибки обычно появляется, когда есть проблема с Магазином Windows, на которую пользователи обычно отвечают, используя wsreset.exe полезность. Это сообщение об ошибке, о котором наиболее часто сообщают затронутые пользователи:
«MS-Windows-магазин: PurgeCaches
Приложение не запустилось.«
Однако существуют другие контексты, в которых может появляться ошибка, и все они связаны с ошибками, связанными с Windows Store. Из того, что мы собрали, эта ошибка увеличилась по частоте после определенного обновления Windows 10 и иногда может быть вызвана процессом обновления до Windows 10.
Если вы в настоящее время боретесь с тем жеMS-Windows-магазин: PurgeCaches, эта статья предоставит серию надежных руководств по устранению неполадок. Ниже представлен набор методов, которые другие пользователи в аналогичной ситуации использовали для решения этой проблемы. Чтобы обеспечить наилучшие результаты, следуйте приведенным ниже методам, пока не последуете метод, позволяющий устранить или обойти проблему. Давайте доберемся до этого!
Способ 1. Восстановление разрешений через редактор реестра
Поскольку ошибка в основном возникает из-за того, что Windows не может сбросить кэш приложения, мы можем обойти проблему с помощью обходного пути к реестру. Вот быстрая проблема по исправлению MS-Windows-магазин: PurgeCaches ошибка при восстановлении разрешений пакетов с помощью Редактор реестра:
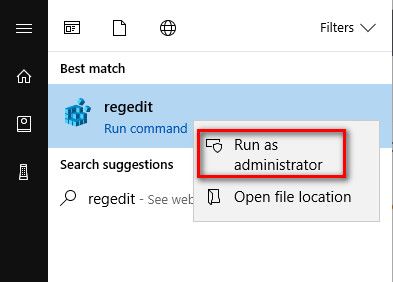
- Нажмите Windows ключ + R открыть окно Run. Далее введите «смерзаться«, удар Войти и выбрать да на Контроль учетных записей (UAC) предложить открыть редактор реестра Административные привилегии.

- В редакторе реестра используйте левую панель, чтобы перейти к следующему местоположению:
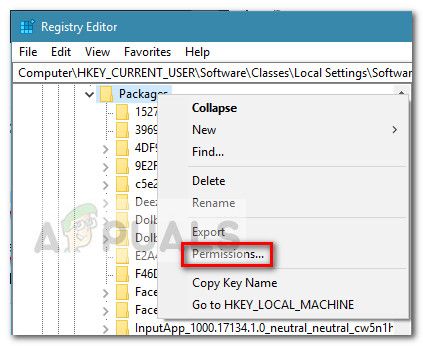
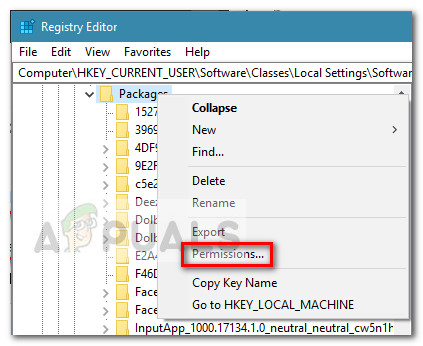
HKEY_CURRENT_USER \ Программное обеспечение \ Классы \ Локальные настройки \ Программное обеспечение \ Microsoft \ Windows \ CurrentVersion \ AppModel \ Repository \ Packages - Щелкните правой кнопкой мыши на пакеты ключ и выберите права доступа.
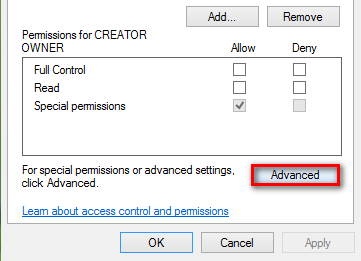
- Затем в следующем окне нажмите на продвинутый кнопка.
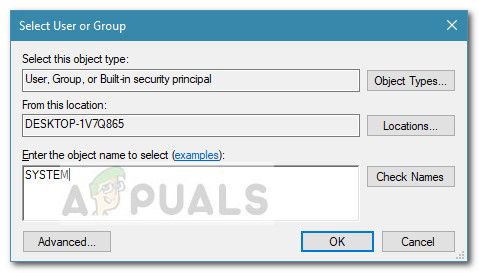
- Нажми на + Изменить кнопка в верхней части Расширенные настройки безопасности за пакеты и убедитесь, что владелец устанавливается как Система. Если не установлено система, тип система в следующем окне, затем нажмите на Проверьте имена а затем на Хорошо.
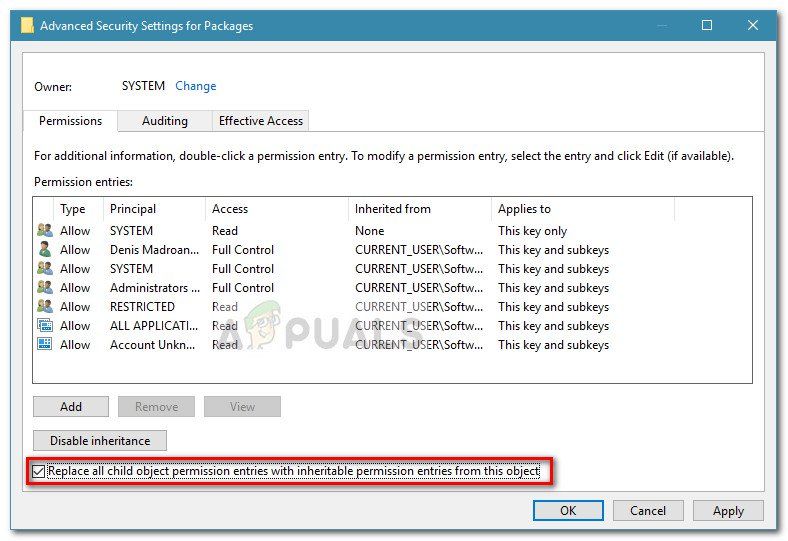
- Однажды владелец установлен в система, прокрутите вниз до конца экрана и установите флажок, связанный с Замените все записи разрешений дочернего объекта на наследуемые записи разрешений этого объекта..
- Далее нажмите Применять а потом Хорошо. Наконец, закройте редактор реестра и перезагрузите компьютер, чтобы увидеть, будет ли проблема решена при следующем запуске.

Если вы все еще сталкиваетесь с тем жеMS-Windows-магазин: PurgeCaches ошибка, продолжайте с Способ 2.
Способ 2. Устранение неполадок в сборке вместе с полезной командой
Это решение было предложено профессионалом Microsoft и помогло многим людям, в отличие от других общих ответов, которые обычно получают пользователи. Это решение весьма полезно, так как вы сначала запустите встроенное средство устранения неполадок приложений Windows, которое попытается определить и устранить ошибку. После этого вы попытаетесь запустить команду Powershell, которая попытается перерегистрировать приложение Windows Store. Внимательно следуйте инструкциям:
- Ищи настройки в меню Пуск и нажмите на первый результат, который появляется. Вы также можете нажать непосредственно на кнопку передач в нижней левой части меню «Пуск».
- Найдите обновление раздел безопасности в нижней части окна настроек и нажмите на него.
- Перейдите на вкладку «Устранение неполадок» и проверьте под «Найти и исправить другие проблемы».
- Средство устранения неполадок с приложениями Магазина Windows должно находиться прямо внизу, поэтому обязательно нажмите на него и следуйте инструкциям на экране.
- Кроме того, вы можете повторить тот же процесс для средства устранения неполадок подключений к Интернету, чтобы проверить, является ли ваше подключение к Интернету причиной проблем с Магазином Windows.
Следующая часть этого решения состоит из запуска этой команды PowerShell, которая перерегистрирует Магазин Windows. Убедитесь, что обновления приложений для Windows не запущены.
- Откройте PowerShell, щелкнув правой кнопкой мыши по кнопке меню «Пуск» и выбрав опцию Windows PowerShell (Admin), чтобы открыть инструмент с правами администратора. Если вы видите командную строку в этом месте, вы также можете искать ее вручную.

- Скопируйте и вставьте следующую команду и убедитесь, что вы нажимаете Войти после этого.
$ manifest = (Get-AppxPackage Microsoft.WindowsStore) .InstallLocation + ‘\ AppxManifest.xml’; Add-AppxPackage -DisableDevelopmentMode -Register $ manifest
- Перезагрузите компьютер и проверьте, решена ли проблема Магазина Windows.
Способ 3: полное обновление Windows
Дело в том, что многие люди начали испытывать ошибку только после выхода определенной версии Windows. К счастью, люди, у которых были проблемы с этой сборкой, с облегчением узнали, что вскоре была выпущена новая сборка, которая сумела эффективно решить проблему. Дело в том, что вы должны установить все ожидающие обновления на свой компьютер и посмотреть, была ли проблема решена.
- Откройте PowerShell, щелкнув правой кнопкой мыши по кнопке меню «Пуск» и выбрав опцию Windows PowerShell (Admin), чтобы открыть инструмент с правами администратора. Если вы видите командную строку в этом месте, вы также можете искать ее вручную.
- В консоли Powershell введите «cmd» и подождите, пока Powershell переключится в среду, похожую на cmd.
- В консоли, похожей на «cmd», введите команду, показанную ниже, и обязательно нажмите Enter после этого:
- Пусть эта команда будет запущена не менее часа и проверьте, были ли найдены и / или установлены какие-либо обновления без проблем.
альтернатива
- Найдите «Настройки» в меню «Пуск» и щелкните первый всплывающий результат. Вы также можете нажать непосредственно на кнопку передач в нижней левой части меню «Пуск».
- Найдите обновление раздел безопасности в нижней части окна настроек и нажмите на него.
- Оставайтесь на вкладке «Центр обновления Windows» и нажмите кнопку «Проверить наличие обновлений» в разделе «Состояние обновления», чтобы проверить, доступна ли новая версия Windows, доступная в Интернете.
- Если он есть, Windows должна начать процесс загрузки автоматически.
Способ 4. Переустановка приложений Windows по умолчанию с помощью PowerShell
Этот метод несколько продвинутый, так как в нем много деталей, и его реализация может быть длительной. Однако, если вы будете тщательно следовать инструкциям, вы, вероятно, получите правильно работающую службу Магазина Windows, просто переустановив приложения Windows по умолчанию.
- Щелкните правой кнопкой мыши папку WindowsApps, расположенную в папке C: \ Program Files, выберите «Свойства» и перейдите на вкладку «Безопасность». Нажмите кнопку Дополнительно. Откроется окно «Дополнительные параметры безопасности». Здесь вам нужно сменить владельца ключа.
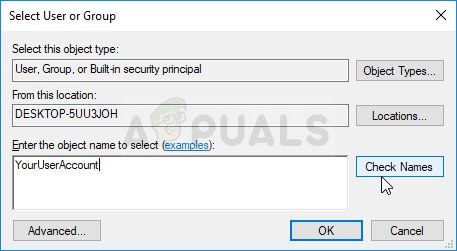
- Нажмите на ссылку «Изменить» рядом с меткой «Владелец:». Откроется окно «Выбрать пользователя или группу».
- Выберите учетную запись пользователя с помощью кнопки «Дополнительно» или просто введите свою учетную запись в поле с надписью «Введите имя объекта для выбора» и нажмите «ОК». Добавьте вашу учетную запись.
- При желании, чтобы изменить владельца всех подпапок и файлов внутри папки, установите флажок «Заменить владельца на подконтейнерах и объектах» в окне «Дополнительные параметры безопасности». Нажмите кнопку ОК, чтобы изменить владельца.
- На вкладке «Безопасность» окна «Свойства» папки WindowsApps нажмите «Изменить», чтобы изменить разрешения и выбрать свою личную учетную запись, для которой вы установили право собственности. Измените разрешения на Полный доступ и примените изменения.
Теперь, когда вы выполнили эти шаги, пришло время использовать Powershell для эффективной переустановки этих приложений. Это, вероятно, самая легкая часть этого метода, так что подумайте почти.
- Откройте PowerShell, щелкнув правой кнопкой мыши кнопку «Пуск» и выбрав опцию Windows PowerShell (Admin), чтобы открыть ее с правами администратора.
- Скопируйте и вставьте эту команду и убедитесь, что вы нажимаете Enter:
- Проверьте, была ли проблема решена.
Метод 5: Используйте новую учетную запись, чтобы исправить положение
Этот необычный трюк спас несколько пользователей от потери сознания из-за этой проблемной ошибки. Похоже, что, хотя Windows Store и wsreset, кажется, не работают с вашей учетной записью, они иногда работают с новой учетной записью, а запуск wsreset исправляет Windows Store для обоих пользователей! Это легко сделать, поэтому убедитесь, что вы не пропустите это решение!
- Откройте «Настройки», нажав на значок шестеренки, который находится чуть выше кнопки питания в меню «Пуск», или выполнив поиск в строке поиска рядом с меню «Пуск».
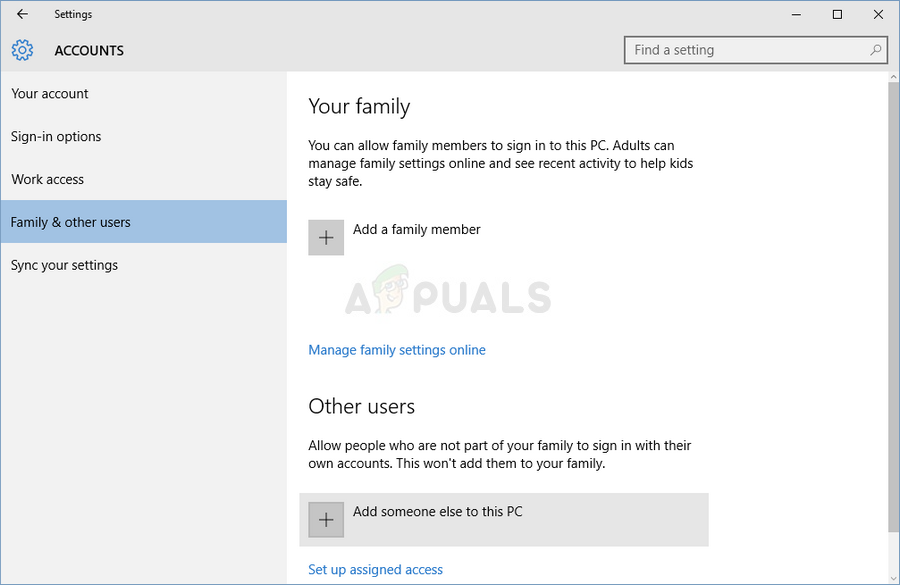
- Откройте раздел «Учетные записи» в «Настройках» и выберите опцию «Семья и другие пользователи». Выберите опцию Добавить кого-то еще на этот ПК, расположенную там, а затем нажмите на «Войти без учетной записи Microsoft», что обычно не рекомендуется, но этого достаточно для ваших текущих целей.
- Создайте локальную учетную запись и следуйте инструкциям на экране. Введите имя пользователя для этой новой учетной записи.
- Если вы хотите, чтобы эта учетная запись была защищена паролем, вы можете добавить символьный пароль, подсказку к паролю и продолжить, нажав Далее. Вы лучше без пароля в этом сценарии.

- Нажмите кнопку Готово, чтобы завершить создание новой учетной записи. Войдите через эту учетную запись, перезагрузив компьютер и попробуйте выполнить команду «wsreset», напечатав эту работу в кнопке меню «Пуск» и щелкнув первый результат. Проверьте, решена ли проблема.
Fix: ms-windows-store:purgecaches app didn’t start
ms-windows-store:purgecaches is a settings feature that purges and clears the locally stored cache for Windows Store that builds up over time.
The following error code usually appears when there is a problem with the Windows Store to which users usually respond by using the wsreset.exe utility. This is the error message that is most regularly reported by affected users: “ms-windows-store:PurgeCaches, The application didn’t start.”
However, there are other contexts where the error can appear and they are all related to errors related to Windows Store. From what we gathered, this error has increased in frequency after a certain Windows 10 update and might sometimes be caused by the upgrading process to Windows 10.
If you’re currently struggling with the same “ms-windows-store:PurgeCaches, this article will deliver a series of reliable troubleshooting guides. Below you have a collection of methods that other users in a similar situation have used to resolve the issue. To ensure the best results, please follow the methods below in order until you follow a method that enables you to either fix or circumvent the issue. Let’s get to it!
Method 1: Repairing permissions via Registry Editor
Since the error is mostly occurring because Windows is unable to reset the app cache, we can circumvent the issue with a registry workaround. Here’s a quick issue on fixing the ms-windows-store:PurgeCaches error by repairing the Packages permissions using Registry Editor:
- Press Windows key + R to open up a Run box. Next, type “regedit“, hit Enter and choose Yes at the User Account Control (UAC) prompt to open Registry Editor with Administrative privileges.
- Inside Registry Editor, use the left pane to navigate to the following location:
HKEY_CURRENT_USER \ Software \ Classes \ Local Settings \ Software \ Microsoft \ Windows \ CurrentVersion \ AppModel\ Repository \ Packages - Right-click on the Packages key and choose Permissions.
- Then, in the following window, click on the Advanced button.
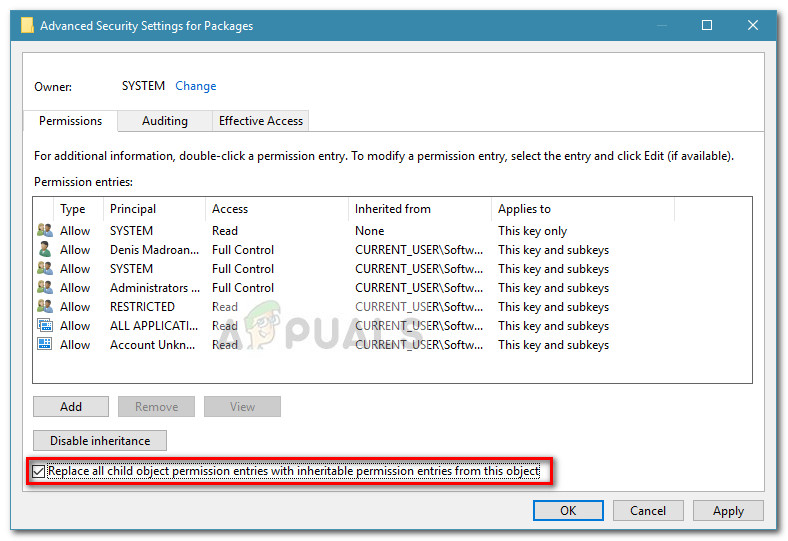
- Click on the Change button at the top of the Advanced Security Settings for Packages and make sure that the Owner is set as System. If it’s not set to System, type System in the next box, then click on Check Names and then on OK.
- Once the Owner is set to System, scroll all the way down to the bottom of the screen and check the box associated with Replace all child object permission entries with inheritable permission entries from this object.
- Next, click Apply and then Ok. Finally, close Registry Editor and reboot your machine to see if the issue is resolved at the next startup.


If you’re still encountering the same “ms-windows-store:PurgeCaches error, continue down with Method 2.
Method 2: In-Build Troubleshooting Along with a Helpful Command
This solution was suggested by a Microsoft professional and it helped plenty of people, unlike other generic responses users usually receive. This solution is quite helpful as you will first run the inbuilt Windows Apps troubleshooter which will try to identify and solve the error. After that, you will try to run a Powershell command which try to reregister your Windows Store app. Follow the instructions carefully:
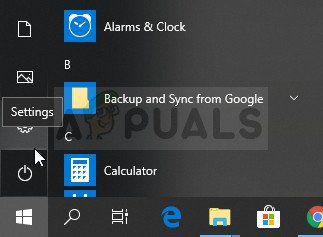
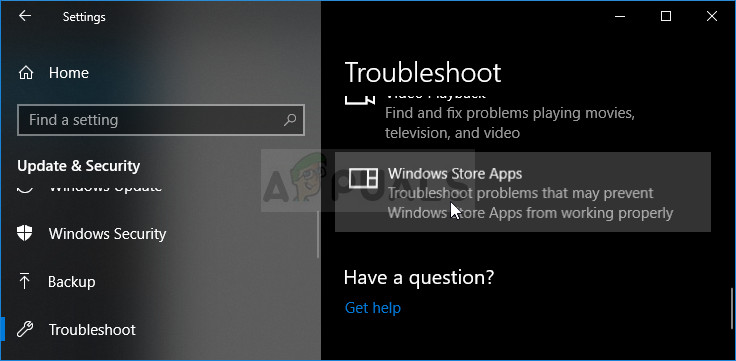
- Search for Settings in the Start menu and click on the first result which pops up. You can also click directly on the gear button at the lower left part of the Start menu.

- Locate the Update & security section at the bottom part of the Settings window and click on it.
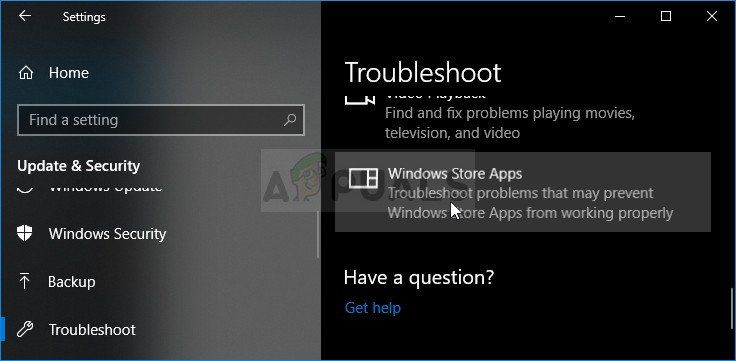
- Navigate to the Troubleshoot tab and check under the Find and Fix other problems.
- Windows Store Apps troubleshooter should be right there at the bottom so make sure you click on it and follow the instructions on the screen.
- Additionally, you can repeat the same process for the Internet Connections troubleshooter in order to check if it is your Internet connection that is causing the problems with Windows Store.
The next part of this solution consists of running this PowerShell command which will reregister the Windows Store. Make sure no Windows app updates are running in the meantime.
- Open PowerShell by right-clicking on the Start menu button and selecting the Windows PowerShell (Admin) option in order to open the tool with administrator privileges. If you see Command Prompt at that spot, you can also search for it manually.

- Copy and paste the following command and make sure you click Enter afterward.
$manifest = (Get-AppxPackage Microsoft.WindowsStore).InstallLocation + ‘\AppxManifest.xml’ ; Add-AppxPackage -DisableDevelopmentMode -Register $manifest
- Restart your computer and check to see if Windows Store issue has been resolved.
Method 3: Update Windows Completely
The thing is that many people only started to experience the error after a certain version of Windows has been released. Luckily, folks who had issues with that build were relieved to find out that a new build was soon released which managed to deal with the problem efficiently. The point is that you should install all pending updates on your computer and see if the problem has been resolved.
- Open PowerShell by right-clicking on the Start menu button and selecting the Windows PowerShell (Admin) option in order to open the tool with administrator privileges. If you see Command Prompt at that spot, you can also search for it manually.
- In the Powershell console, type in “cmd” and wait for Powershell to switch to the cmd-like environment.
- In the “cmd”-like console, type in the command displayed below and make sure you click Enter afterwards:
- Let this command run for at least an hour and check back to see if any updates were found and/or installed without issues.
Alternative
- Search for Settings in the Start menu and click on the first result which pops up. You can also click directly on the gear button at the lower left part of the Start menu.
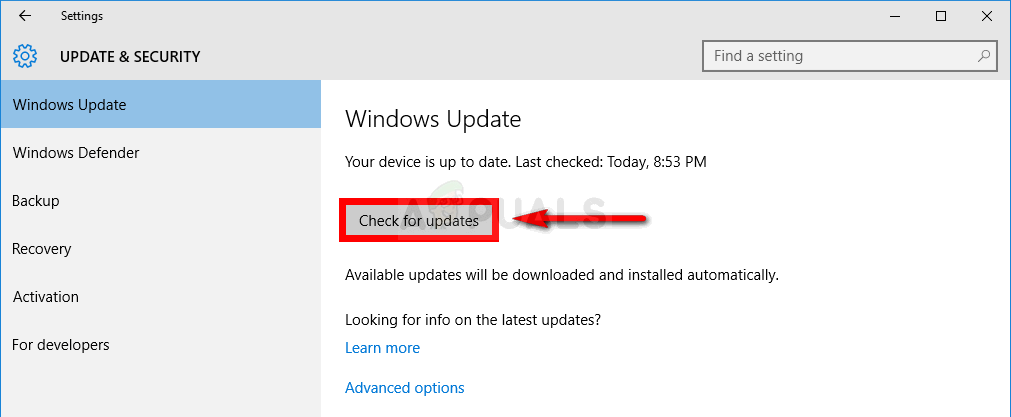
- Locate the Update & security section at the bottom part of the Settings window and click on it.
- Stay in the Windows Update tab and click on the Check for updates button under the Update status section in order to check if there is a new version of Windows available online.

- If there is one, Windows should initiate the download process automatically.
Method 4: Reinstalling Windows Default Apps Using PowerShell
This method is somewhat advanced as it involves plenty of details and its implementation can be lengthy. However, if you follow the instructions carefully, you will probably end up with a properly working Windows Store service simply by reinstalling the Windows default apps.
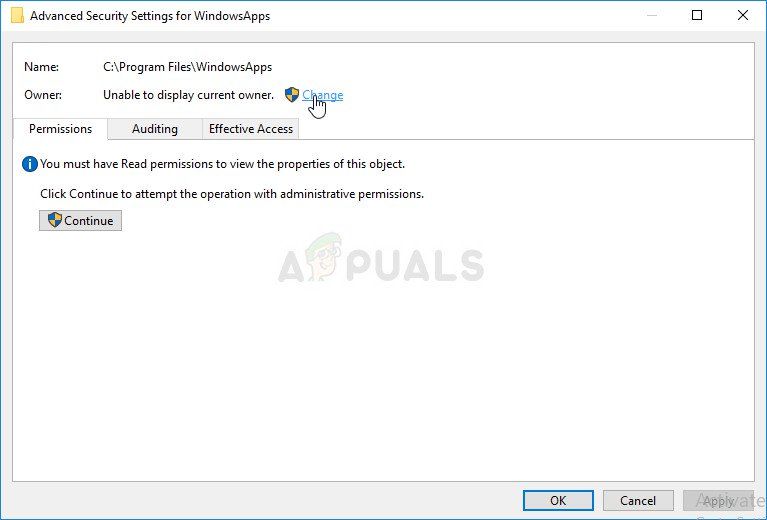
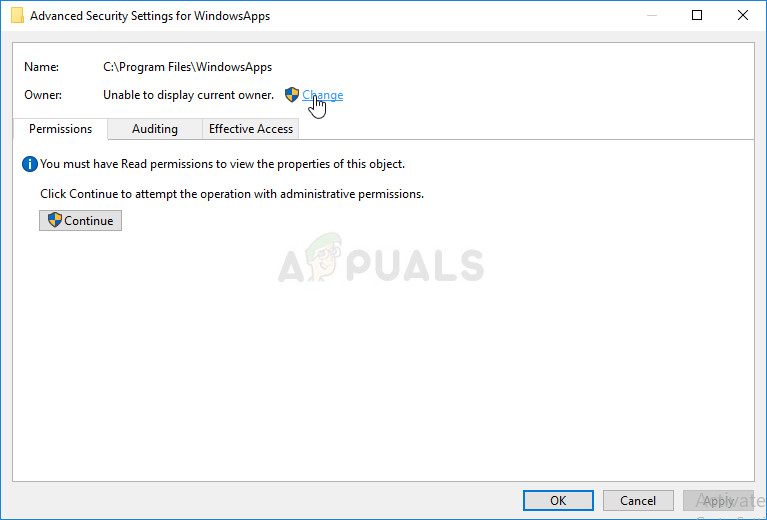
- Right-click the WindowsApps folder located in C:\Program Files, click Properties, and then click the Security tab. Click the Advanced button. The “Advanced Security Settings” window will appear. Here you need to change the Owner of the key.
- Click the Change link next to the “Owner:” label The Select User or Group window will appear.
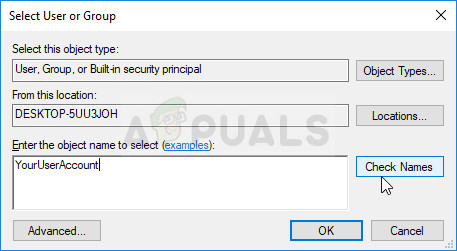
- Select the user account via the Advanced button or just type your user account in the area which says ‘Enter the object name to select’ and click OK. Add your user account.
- Optionally, to change the owner of all subfolders and files inside the folder, select the check box “Replace owner on subcontainers and objects” in the “Advanced Security Settings” window. Click OK to change the ownership.
- In the Security tab of WindowsApps folder’s Properties window, click on Edit in order to change permissions and select your personal user account you set the ownership to. Change permissions to Full Control and apply the changes.
Now that you have performed these steps, it’s time to use Powershell to effectively reinstall these apps. This is probably the easier part of this method so consider yourself almost there.
- Open PowerShell by right-clicking on the Start menu button and selecting the Windows PowerShell (Admin) option in order to open it with admin privileges.
- Copy and paste this command and make sure you click Enter:
- Check to see if the problem has been resolved.
Method 5: Use a New Account to Fix Things
This unusual trick has saved several users from losing their minds over this problematic error. It appears that, even though Windows Store and wsreset appear to be not working on your account, they sometimes do work on a new account and running wsreset fixes Windows Store for both users! This is easy to do so make sure you don’t skip this solution!
- Open Settings either by clicking on the gear icon which is located just above the power button in the Start menu or by searching for it in the search bar next to the Start menu.
- Open the Accounts section in Settings and select the Family and other users option. Choose the Add someone else to this PC option located there, and then click on the Sign in without a Microsoft account option which is usually not recommended but it’s sufficient for your current purposes.

- Create a Local account and proceed with the instructions on-screen. Enter a username for this new account.
- If you want this account to be password-protected, you can add a character password, a password hint, and proceed by clicking Next. You are better off without a password in this scenario.
- Click the Finish button in order to finish creating a new account. Login via this account by restarting your computer and try running the “wsreset” command by typing this work in the Start menu button and clicking the first result. Check to see if the problem is solved.
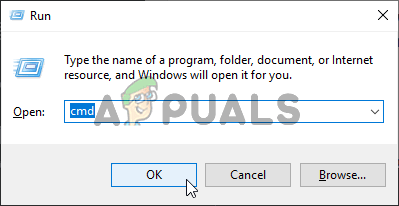
Method 6: Resetting Permissions
In some cases, certain permissions might need to be reset to on the Windows folders in order to get rid of this issue. To do that:
- Press “Windows” + “R” to open Run prompt.
- Type in “cmd” and press “Ctrl” + “Shift”+ “Enter” to provide administrative privileges. Running the Command Prompt
- Type in the following command and press “Enter” to execute it.
- Check to see if the issue persists.
 Running the Command Prompt


