Как подключить вай фай mt7601u в консоли Linux?
Подключить Wi-Fi в современном Linux дистрибутиве в графической оболочке обычно не составляет проблем, главное чтобы была поддержка «железа», а дальше мышкой клац-клац.
А вот подключить Вай-Фай в консоли Linux уже немного сложнее, но вполне возможно.

Расскажу как подключить интернет по Wi-Fi с помощью USB Wi-Fi свистка TP-Link с чипом mt7601u в Debian.
Для начала необходимо определиться с чипом вашего вай фай оборудования.
Можно попробовать сделать так:
В моем случае выдает:
Хорошо когда становится понятно, а вот, если ничего не выдает, то делаем
Листаем вывод и ищем упоминания о wi-fi модуле.
Для чипа mt7601u драйвер находится в non-free дистрибутивах Debian, чтобы их задействовать добавим в файл /etc/apt/sources.list
После этого обновим пакеты и установим нужные
Нам нужно подгрузить нужный драйвер в виде модуля, делаем это командой
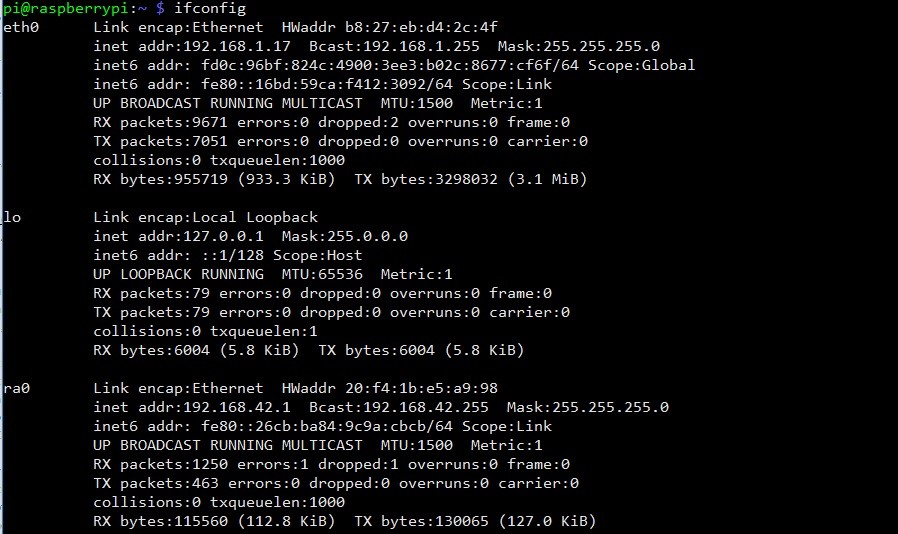
После этого, проверяем интерфейсы командой ifconfig
Должен появится наш вай фай, обычно называется wlan0
В моем случае получился
Почему-то он не хочет переименовываться в wlan0, но мне это было не принципиально, поэтому не стал тратить время, главное чтобы вай фай заработал!
Дальше мы можем просканировать сети и увидеть нашу.
Возможно вместо wlan0 вам нужно будет указать название вашего устройства в системе, в моем случае это wlx30b5c212d769
Видим нашу сеть, хорошо, если нет, то что-то не так, начинаем разбираться.
С помощью команды wpa_passphrase создаем файл с настройками для подключения к нашему wi-fi, для этого выполняем команду, в которой указываем название нашей сети и пароль к ней:
Пробуем подключить к вай фай с помощью файла настроек:
Дальше можно задать IP из нашего диапазона или использовать DHCP.
Вай фай должен успешно подключиться и работать.
После этого я сделал так — сделал скрипт и в него прописал команды для подключения вай фай после включения компьютера, хотя можно было сделать через файл /etc/network/interfaces, но мне нравится в виде скрипта.
Добавил свой скрипт в init.d, по шаблону для автозагрузки (он стартует самым последним).
Компьютер включается, скрипт подгружает нужный модуль, делает подключения с нужными настройками, получает IP по DHCP. Вай фай успешно работает!
В процессе настройки столкнулся со множеством различных вариантов проблем и решений, большинство из них не помогло, пришлось по крупицам собрать информацию, чтобы все получилось.
Надеюсь эта заметка поможет и вам, жду отзывов, спасибо за внимание!
Источник
Mt7601u ap mode linux
MT7601U Linux driver
Note: Kernel 4.2 has been released which contains a driver for mt7601u, this repository is now deprecated.
Driver support since kernel version >= 4.x is dropped and not guaranteed anymore.
This repo is forked from [imZack/mt7601] (https://github.com/imZack/mt7601) and I have added binary packages for this version.
imZack added some features for this driver:
- Add supports for Xiaomi MiniWifi USB_DEVICE(0x2717,0x4106)
- Add supports for Synology DS713+ (x86 cedarview)
Many cheap USB wifi dongles use the MediaTek MT7601U chip.


Unfortunately, there is no driver in Linux kernel source tree which can work with this chip, yet. This repository is based on the original driver released by MediaTek which was rejected from Linux kernel because of the poor code quality. The repository includes various stability and performance improvements for kernels >= 3.x and has been tested with the following kernels:
- 3.15.10-200.fc20.x86_64
- 3.16.1-301.fc21.x86_64
- 3.16.1-301.fc21.i686
- 3.17.0-0.rc2.git3.1.fc22.i686
- 3.17.0-0.rc2.git3.1.fc22.x86_64
- 3.12.26-1.20140808git4ab8abb.rpfr20.armv6hl.bcm2708
Usage for Synology DS713+
Now you have to copy os/linux/mt7601Usta.ko and RT2870STA.dat to your target machine.
The interface will be ra0.
Currently the DSM WebGUI will not be able to use the wifi dongle so far, but it works with command line.
Unofficial mt7601u driver
For kernels 3.19 and later a new mac80211 driver was written from scratch by the community. It was done because there is very little chance that this vendor driver will ever become part of official Linux kernel. If you have Linux kernel version between 3.19 and 4.2 you can download the new driver from https://github.com/kuba-moo/mt7601u. If you have Linux 4.2 or later the new driver is already part of the kernel (it’s called mt7601u). Note that from Linux 4.2 on you will have to blacklist the mt7601u driver to continue using code from this repository.
First install kernel-devel for your Linux distro:
RHEL/CentOS: # yum install kernel-devel gcc
Fedora 24/25/26: # dnf install kernel-devel gcc
Debian/Ubuntu: # apt-get install linux-headers-generic build-essential
Clone repository and type following to build driver:
If the module has loaded OK, you should see mt7601Usta listed in the output of lsmod and a new network interface ra0 should be present in the output of ip link .
If all goes well, you can permanently install the driver with make install .
In order to successfully compile this driver for Gentoo, you must compile your kernel with the appropriate wireless extensions included. One way to do that is by enabling Cisco/Aironet 34X/35X/4500/4800 PCMCIA cards wireless module. If you see errors when compiling the driver, check to see if you have the necessary wireless extensions by running zgrep -i wext /proc/config.gz . The output should look something like:
More discussion can be found here
There is a PPA repo available containing a DKMS-capable package based on this repo:
Thanks to @thopiekar
On 26 Aug, 2014 user @poma posted to the linux-wireless mailing list discussing the poor state of driver support for this chipset. Thread can be seen here:
An inital patch was released on 28 Aug, 2014 with the following comment:
A second patch was released on 31 Aug, 2014 with the following comment:
Source code: (c) Copyright 2002-2013, MediaTek Inc. (released under GPLv2)
Patch: @poma at linux-wireless mailing list
About
Linux driver for MT7601U with patch for stability and performance on recent kernel versions
Источник
Mt7601u ap mode linux
Raspberry Pi MT7601u ACCESS POINT AND STATION MODE SUPPORT
This example will teach you for using unsupported Mediatek MT7601u based wireless chipsets as Access Point mode in Linux systems. So you can use this wireless antenna in your embedded or desktop based Linux robotic projects or sharing your internet connection(as like hotspot). No hardware and programming skills required. We will not use hostapd driver. Just follow what I write.
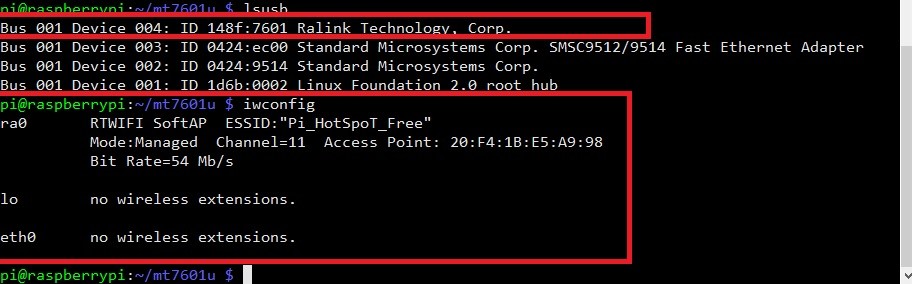
Plug your Wi-Fi antenna to your PC or Raspberry Pi and write this command to check if you have Clone MT7601.

Look this image if Ralink ID is equal with your Wi-Fi dongle then everything is fine. Your module will work. Follow instractions for your linux based operating systems.
ON UBUNTU 32-64 BIT SYSTEMS…
On Ubuntu 16.04 32-64 bit LTS systems, you can compile this driver easily. But you must be first update your system with these commands.
GETTING DRIVER ON UBUNTU 32-64 BIT SYSTEMS…
If you dont have git package then you install with this command.
GETTING SOURCE CODE FROM THIS REPOSITORY
Get this driver with git clone method from this repo. Type to terminal
COMPILING DRIVER ON UBUNTU 32-64 BIT SYSTEMS…
Driver will download after this command to your home directory. Open downloaded driver folder with
ACCESS POINT CONFIGURATION…
if you want to change your Access Point configuration, use this command for opening. If you have nano package then you can use vim,gedit or install nano package with following command (default ssid : Rpi_Hotspot_Free, password:1234567890)
Write your settings and save for configuration, press “ctrl-w” + press “y” and press enter. Compile your driver with this commands.
AFTER COMPILING SOURCE CODE…
So you if not receive any error messages and success , driver is compiled and ready for Access Point mode. Make install command will deploy your Access Point drivers (rtnet7601Uap, mt7601Uap) to kernel automatically. But old MT7601 Chipset kernel module must be remove from Linux kernel system. Only and easy way fort his, add old mt7601 kernel module to Linux blacklist. So you can this easy with these commands.
Just open your /etc/modprobe.d/blacklist file
and add drivername using following syntax:
press “ctrl-w” + press “y” and press enter for save.
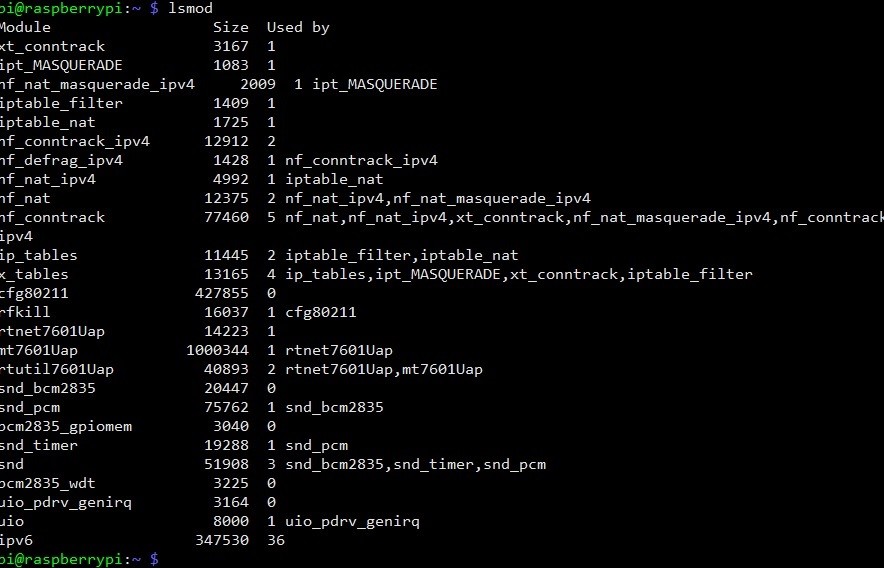
EDIT: In later versions since 12.10 (12.04?) the file is /etc/modprobe.d/blacklist.conf Reboot your system and use lsmod command to show the status of modules in the Linux Kernel. If you dont see any modüle as “mt7601u” then success.
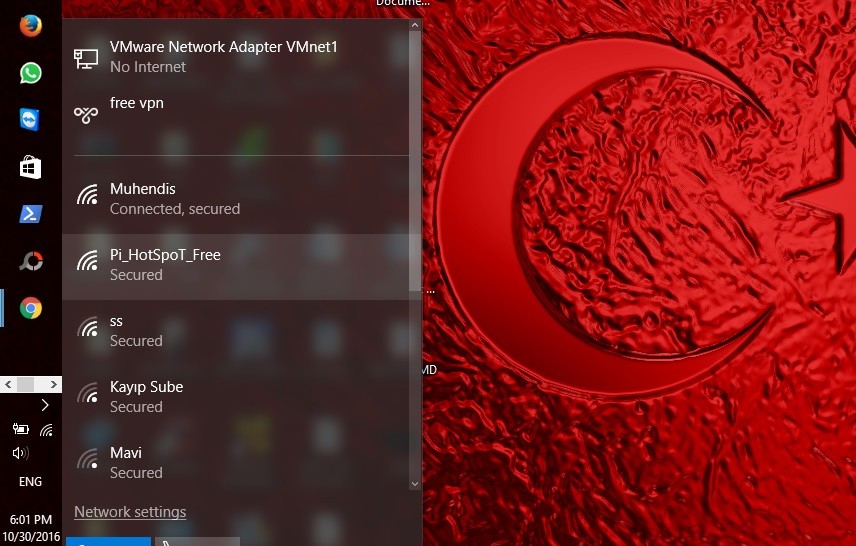
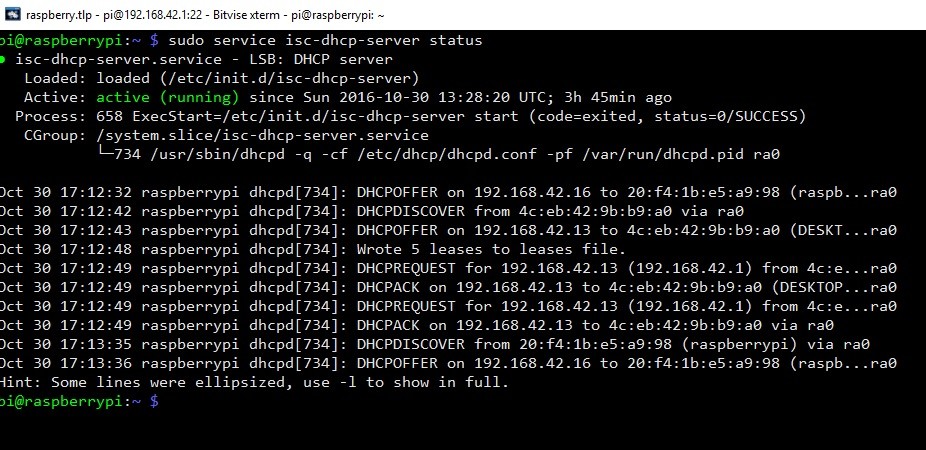
After reboot your system, Access Point is established and wait for dhcp install.
DHCP SERVER INSTALLATION
At this moment, you can connect your Access Point but you can’t obtain IP adress because DHCP server isn’t installed. Install with these commands..(You may need to sudo apt-get update if the Pi can’t seem to get to the apt-get repositories)
Next, we will edit /etc/dhcp/dhcpd.conf, a file that sets up our DHCP server — this allows wifi connections to automatically get IP addresses, DNS, etc. Run this command to edit the file
Find the lines that say
and change them to add a # in the beginning so they say
Find the lines that say # If this DHCP server is the official DHCP server for the local # network, the authoritative directive should be uncommented
Then scroll down to the bottom and add the following lines
Save the file by typing in Control-X then Y then return
and scroll down to INTERFACES=»» and update it to say INTERFACES=»ra0″
set static IP for your wifi card type and route packages for internet share type these commands to terminal
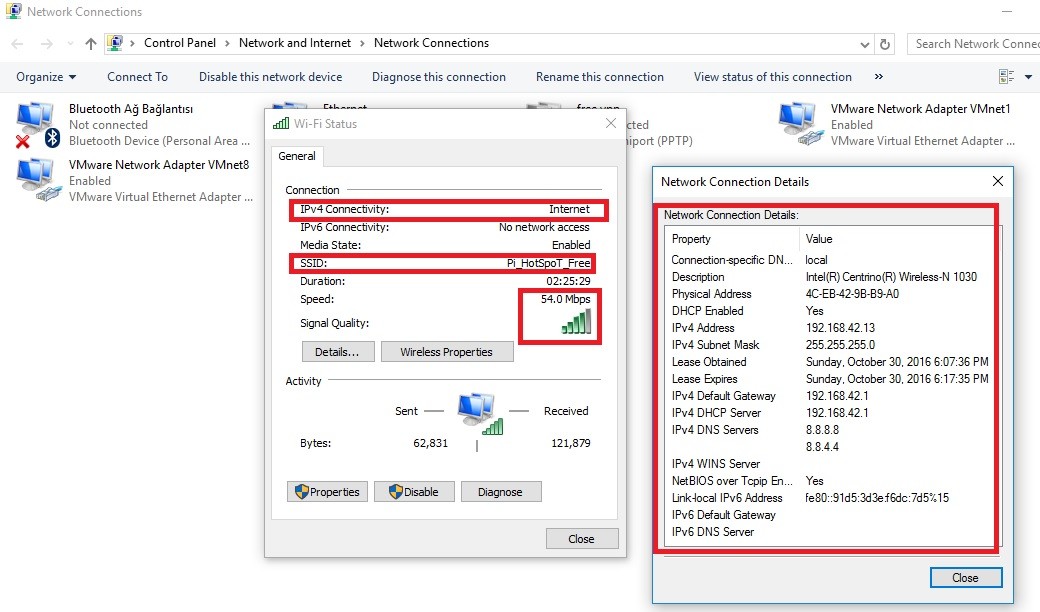
So your Access Point is ready and internet sharing will work
ON RASPBERRY PI EMBEDDED LINUX 32-64 BIT SYSTEMS…
For compiling this module, use these commands for compiling and take a coffee.
if you receive «Makefile:387: recipe for target ‘LINUX’ failed». You need to get Raspberry Pi linux headers using rpi-source.
Источник
Mt7601u ap mode linux
Raspberry Pi MT7601u ACCESS POINT AND STATION MODE SUPPORT
This example will teach you for using unsupported Mediatek MT7601u based wireless chipsets as Access Point mode in Linux systems. So you can use this wireless antenna in your embedded or desktop based Linux robotic projects or sharing your internet connection(as like hotspot). No hardware and programming skills required. We will not use hostapd driver. Just follow what I write.
Plug your Wi-Fi antenna to your PC or Raspberry Pi and write this command to check if you have Clone MT7601.
Look this image if Ralink ID is equal with your Wi-Fi dongle then everything is fine. Your module will work. Follow instractions for your linux based operating systems.
ON UBUNTU 32-64 BIT SYSTEMS…
On Ubuntu 16.04 32-64 bit LTS systems, you can compile this driver easily. But you must be first update your system with these commands.
GETTING DRIVER ON UBUNTU 32-64 BIT SYSTEMS…
If you dont have git package then you install with this command.
GETTING SOURCE CODE FROM THIS REPOSITORY
Get this driver with git clone method from this repo. Type to terminal
COMPILING DRIVER ON UBUNTU 32-64 BIT SYSTEMS…
Driver will download after this command to your home directory. Open downloaded driver folder with
ACCESS POINT CONFIGURATION…
if you want to change your Access Point configuration, use this command for opening. If you have nano package then you can use vim,gedit or install nano package with following command (default ssid : Rpi_Hotspot_Free, password:1234567890)
Write your settings and save for configuration, press “ctrl-w” + press “y” and press enter. Compile your driver with this commands.
AFTER COMPILING SOURCE CODE…
So you if not receive any error messages and success , driver is compiled and ready for Access Point mode. Make install command will deploy your Access Point drivers (rtnet7601Uap, mt7601Uap) to kernel automatically. But old MT7601 Chipset kernel module must be remove from Linux kernel system. Only and easy way fort his, add old mt7601 kernel module to Linux blacklist. So you can this easy with these commands.
Just open your /etc/modprobe.d/blacklist file
and add drivername using following syntax:
press “ctrl-w” + press “y” and press enter for save.
EDIT: In later versions since 12.10 (12.04?) the file is /etc/modprobe.d/blacklist.conf Reboot your system and use lsmod command to show the status of modules in the Linux Kernel. If you dont see any modüle as “mt7601u” then success.
After reboot your system, Access Point is established and wait for dhcp install.
DHCP SERVER INSTALLATION
At this moment, you can connect your Access Point but you can’t obtain IP adress because DHCP server isn’t installed. Install with these commands..(You may need to sudo apt-get update if the Pi can’t seem to get to the apt-get repositories)
Next, we will edit /etc/dhcp/dhcpd.conf, a file that sets up our DHCP server — this allows wifi connections to automatically get IP addresses, DNS, etc. Run this command to edit the file
Find the lines that say
and change them to add a # in the beginning so they say
Find the lines that say # If this DHCP server is the official DHCP server for the local # network, the authoritative directive should be uncommented
Then scroll down to the bottom and add the following lines
Save the file by typing in Control-X then Y then return
and scroll down to INTERFACES=»» and update it to say INTERFACES=»ra0″
set static IP for your wifi card type and route packages for internet share type these commands to terminal
So your Access Point is ready and internet sharing will work
ON RASPBERRY PI EMBEDDED LINUX 32-64 BIT SYSTEMS…
For compiling this module, use these commands for compiling and take a coffee.
if you receive «Makefile:387: recipe for target ‘LINUX’ failed». You need to get Raspberry Pi linux headers using rpi-source.
Источник


