- Desktops v2.0
- Introduction
- Using Desktops
- Screenshot
- How to Use Multiple Desktops in Windows 10
- Use Multiple Desktops in Windows 10
- Stay organized and productive with multiple desktops
- It Starts With Task View
- Why Multiple Desktops?
- Multiple Desktop Options
- How to use multiple desktops in Windows 10
- How to add a desktop in Windows 10
- How to switch between desktops
- Move windows between desktops
- Close a desktop
- Desktops v2.0
- Introduction
- Using Desktops
- Screenshot
Desktops v2.0
By Mark Russinovich
Published: October 17, 2012
 Download Desktops (61 KB)
Run now from Sysinternals Live.
Introduction
Desktops allows you to organize your applications on up to four virtual desktops. Read email on one, browse the web on the second, and do work in your productivity software on the third, without the clutter of the windows you’re not using. After you configure hotkeys for switching desktops, you can create and switch desktops either by clicking on the tray icon to open a desktop preview and switching window, or by using the hotkeys.
Using Desktops
Unlike other virtual desktop utilities that implement their desktops by showing the windows that are active on a desktop and hiding the rest, Sysinternals Desktops uses a Windows desktop object for each desktop. Application windows are bound to a desktop object when they are created, so Windows maintains the connection between windows and desktops and knows which ones to show when you switch a desktop. That making Sysinternals Desktops very lightweight and free from bugs that the other approach is prone to where their view of active windows becomes inconsistent with the visible windows.
Desktops reliance on Windows desktop objects means that it cannot provide some of the functionality of other virtual desktop utilities, however. For example, Windows doesn’t provide a way to move a window from one desktop object to another, and because a separate Explorer process must run on each desktop to provide a taskbar and start menu, most tray applications are only visible on the first desktop. Further, there is no way to delete a desktop object, so Desktops does not provide a way to close a desktop, because that would result in orphaned windows and processes. The recommended way to exit Desktops is therefore to logoff.
Screenshot
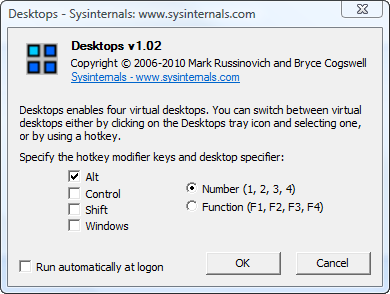
Configuration Dialog
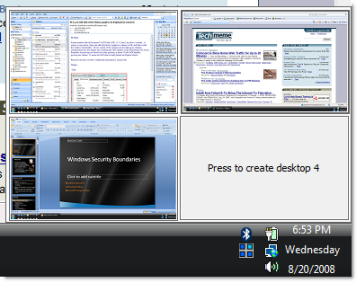
Tray Desktop Switch Window
Download Desktops (61 KB)
Run now from Sysinternals Live.
Runs on:
- Client: Windows Vista and higher.
- Server: Windows Server 2008 and higher.
—>
How to Use Multiple Desktops in Windows 10
By Melanie Pinola 25 March 2016
Multiple desktops in Windows let you separate program windows into different groups. You might have all your files related to one project open in one desktop, for example, and programs and files related to a different project in another desktop. Microsoft added virtual desktops to Windows 10 for this multi-tasking organization. Here’s how to set it up.

1. Click the Task View icon in the taskbar. It looks like two overlapping windows. Alternatively, use the Windows+Tab keyboard shortcut to go into Task View.
2. Click the New desktop button in the Task View.
Windows will create an additional virtual desktop you can switch to with the Windows+Tab keyboard shortcut.
Once your additional desktop is created, you can open new program windows in it. You can also drag a window from one desktop to another, and switch to the other desktop with the Windows+Tab keyboard shortcut.
Other shortcuts that will make using multiple virtual desktops easier:
WIN + CTRL + LEFT/RIGHT: Switch to the previous or next desktop
WIN + CTRL + D: Create a new desktop
WIN + CTRL + F4: Close the current desktop
It’s a great way to organize and group files and programs based on when and how you need to use them.
Use Multiple Desktops in Windows 10
Stay organized and productive with multiple desktops
With Windows 10, Microsoft finally brought a feature that is standard on other desktop operating systems to Windows: multiple desktops, which the company calls virtual desktops. This is admittedly a power user feature, but it can be helpful for anyone who wants an extra bit of organization.
Instructions in this article apply to Windows 10.
:max_bytes(150000):strip_icc()/MultipleDesktops-dba20a327fba4b5d8d10a3e72627d70b.jpg)
It Starts With Task View
The key starting point for multiple desktops is Windows 10’s Task View. The easiest way to access it is the icon to the right of Cortana on the taskbar — it looks like a big rectangle with a smaller rectangle on each side of it. Alternatively, you can tap the Windows key+Tab.
:max_bytes(150000):strip_icc()/Capture-2fbbaceb351a45a99c890c3eccd5460a.JPG)
Task View is a better-looking version of Alt+Tab. It shows all your open program windows at a glance, and it lets you choose between them.
The biggest difference between Task View and Alt+Tab is that Task View stays open until you dismiss it — unlike the keyboard shortcut.
When you’re in Task View, if you look at the right corner, you’ll see a button that says New desktop. Select that, and at the bottom of the Task View area, two rectangles labeled Desktop 1 and Desktop 2 appear.
:max_bytes(150000):strip_icc()/Capture-7a97dbf41fc04890bc8606b49570de97.JPG)
Select Desktop 2, and you land on a clean desktop with no programs running. Your open programs are still available on the first desktop, but now you have another one open for other purposes.
:max_bytes(150000):strip_icc()/Capture-baa2017dede4455283ff9e9f0b2a2ed3.JPG)
Why Multiple Desktops?
If you’re still scratching your head as to why you’d want more than one desktop, consider how you use your PC every day. If you’re on a laptop, switching between Microsoft Word, a browser, and a music app can be a pain. Putting each program in a different desktop makes moving between them much easier and removes the need to maximize and minimize each program as you need it.
Another way to use multiple desktops is to have all your productivity programs on one desktop, and your entertainment or game items on another, or you could put email and web browsing on one desktop and Microsoft Office on another. The possibilities are endless and depend on how you organize your programs.
You can move open windows between desktops by opening Task View and then using your mouse to drag and drop from one desktop to another.
After you have all your desktops set up, you can switch between them using Task View or by using the keyboard shortcut Windows key+Ctrl+right or left arrow key. Using the arrow keys is tricky because you have to be aware of which desktop you are on. Multiple desktops are organized on a virtual straight line with two endpoints. Once you reach the end of that line, you have to go back the way you came.
In practical terms, you move from desktop 1 to desktop 2, 3, and so on using the right arrow key. When you reach the last desktop, you go back through using the left arrow. If you find that you jump between numerous desktops out of order, it’s better to use Task View where all open desktops are consolidated in one spot.
Multiple Desktop Options
The multiple desktops feature has two key options you can adjust to your liking.
Select Start.
Choose Settings from the Start menu.
:max_bytes(150000):strip_icc()/001-use-multiple-desktops-in-windows-10-7e77e62d0b92454d878b9236128fe15c.jpg)
Select System.
:max_bytes(150000):strip_icc()/002-use-multiple-desktops-in-windows-10-ca8a345cc31f4d64839c719e07389f9d.jpg)
Select Multitasking and scroll down until you see the heading Virtual desktops.
:max_bytes(150000):strip_icc()/003-use-multiple-desktops-in-windows-10-152488c975e44925a0b8384eec660eeb.jpg)
Here are two options that are easy to understand:
- The top option lets you decide whether you want to see the icons for every single open program across the taskbar of every desktop or only on the desktop where the program is open.
- The second option is a similar setting for the previously mentioned Alt+Tab keyboard shortcut.
Multiple desktops aren’t for everybody, but if you’re having trouble keeping your programs organized in one workspace, try creating two, three, or four in Windows 10.
How to use multiple desktops in Windows 10
Windows 10’s virtual desktops feature is super helpful if you’re working on a bunch of different things.


If you’re a single-monitor user — or even if you’re not — multiple virtual desktops can be very handy. Especially if you’re now working from home for the foreseeable future due to the coronavirus pandemic and juggling different projects on the same computer. Whether you’re a longtime Windows 10 ($170 at Best Buy) user or have only recently upgraded after support for Windows 7 ended earlier this year, multiple desktops are a super useful feature.
The Task View pane in Windows 10 allows you to add an unlimited number of virtual desktops quickly and easily. You can manage the view of your virtual desktop, and move applications to different desktops, show windows on all desktops or close pages on a selected desktop.
How to add a desktop in Windows 10
Get more out of your tech
To add a virtual desktop, open up the new Task View pane by clicking the Task View button (two overlapping rectangles) on the taskbar, or by pressing the Windows Key + Tab. In the Task View pane, click New desktop to add a virtual desktop. If you have two or more desktops already open, the «Add a desktop» button will appear as a gray tile with a plus symbol. You can also quickly add a desktop without entering the Task View pane by using the keyboard shortcut Windows Key + Ctrl + D.
How to switch between desktops
To switch between virtual desktops, open the Task View pane and click on the desktop you want to switch to. You can also quickly switch desktops without going into the Task View pane by using the keyboard shortcuts Windows Key + Ctrl + Left Arrow and Windows Key + Ctrl + Right Arrow.
You can add an unlimited number of virtual desktops — we stopped at 368.
Read more from TechRepublic: 20 pro tips to make Windows 10 work the way you want (free PDF)
Move windows between desktops
To move a window from one desktop to another, you first have to open up the Task View pane and then hover over the desktop containing the window you want to move. The windows on that desktop will pop up; find the window you want to move, right-click it, and go to Move to and choose the desktop you want to move the window to. You can also drag and drop windows — grab the window you want to move and drag it into the desired desktop.
Close a desktop
To close a virtual desktop, open up the Task View pane and hover over the desktop you want to close until a small X appears in the upper right corner. Click the X to close the desktop. You can also close desktops without going into the Task View pane by using the keyboard shortcut Windows Key + Ctrl + F4 (this will close the desktop you’re currently on).
Desktops v2.0
By Mark Russinovich
Published: October 17, 2012
Download Desktops (61 KB)
Run now from Sysinternals Live.
Introduction
Desktops allows you to organize your applications on up to four virtual desktops. Read email on one, browse the web on the second, and do work in your productivity software on the third, without the clutter of the windows you’re not using. After you configure hotkeys for switching desktops, you can create and switch desktops either by clicking on the tray icon to open a desktop preview and switching window, or by using the hotkeys.
Using Desktops
Unlike other virtual desktop utilities that implement their desktops by showing the windows that are active on a desktop and hiding the rest, Sysinternals Desktops uses a Windows desktop object for each desktop. Application windows are bound to a desktop object when they are created, so Windows maintains the connection between windows and desktops and knows which ones to show when you switch a desktop. That making Sysinternals Desktops very lightweight and free from bugs that the other approach is prone to where their view of active windows becomes inconsistent with the visible windows.
Desktops reliance on Windows desktop objects means that it cannot provide some of the functionality of other virtual desktop utilities, however. For example, Windows doesn’t provide a way to move a window from one desktop object to another, and because a separate Explorer process must run on each desktop to provide a taskbar and start menu, most tray applications are only visible on the first desktop. Further, there is no way to delete a desktop object, so Desktops does not provide a way to close a desktop, because that would result in orphaned windows and processes. The recommended way to exit Desktops is therefore to logoff.
Screenshot
Configuration Dialog
Tray Desktop Switch Window
Download Desktops (61 KB)
Run now from Sysinternals Live.
Runs on:
- Client: Windows Vista and higher.
- Server: Windows Server 2008 and higher.
—>


