- Применение мультитач в Linux
- How to Enable / Configure Multi-Touch Gestures in Ubuntu 20.04 & Higher
- Touchegg Enables Touchpad Gestures include:
- Actions you can set for touchpad gesture:
- How to Install Touchegg in Ubuntu via PPA:
- Enable/Configure Multi-Touch Gestures
- Multi-touch gestures with native touchpad drivers on Linux
- Announcing syngestures, the userland multi-touch daemon
- The state of Linux multi-touch input in 2020
- Introducing Syngestures
- Related Posts
- 3 thoughts on “ Multi-touch gestures with native touchpad drivers on Linux ”
- Capacitive Multi-Touch Fusion Display (Linux)
- Setup Hardware
- Connection to the Viola Carrier Board
- Wiring
- Connection to the Iris Carrier Board
- Wiring
- Connection to the Colibri Evaluation Board
- Wiring
- Connection to the Ixora Carrier Board
- Wiring
- Connection to the Apalis Evaluation Board
- Wiring
- Software Setup
- Display Configuration
- Altering the Device Tree
- Altering the Platform Data
- Linux Kernel Driver
- Load Linux Kernel Module
- Automatically Load Linux Kernel Module
- Troubleshoot
Применение мультитач в Linux
Мне всегда нравились touch-жесты в MacOS. Особенно как можно пятью пальцами, скользящими к центру, запустить Launchpad. Выглядит красиво, не правда ли? Хочется так же на линукс? Прошу под кат.
Сегодня я расскажу вам о программе touchegg. Её пишет всего один человек по имени José Expóstio. Собрать её можно из исходников или, если Вы используете ArchLinux, скачать из пользовательского репозитория AUR(touchegg или touchegg-svn).
Всё, что делает это приложение, это запуск команд при распознавании ваших пальцев(пять пальцев она распознаёт точно, больше не проверял).
Но изначально счётом жестов занимается synclient, поэтому все пальцы считать touchegg не получится. Так что же нужно делать?
Правильно, запретить synclient обрабатывать наши пальцы:
Теперь touchegg готов работать на полную. Конфиг файл лежит соответственно в
/.config/touchegg/touchegg.conf. В конфиг файле Вам нужно указать жест и действие, которое будет выполняться при распознавании определённого жеста. Все жесты. Все действия.
Таким образом, мой конфиг имеет вид:
Единственное, что мне пришлось изменить в начальном конфиг файле это увеличение и уменьшение двумя пальцами(т.к. называемый “pinch zoom”). Но, к сожалению, и когда я приближал пальцы, и отдалял, у меня работало только увеличение. Как оказалось, это был баг, который был исправлен в svn версии touchegg. Поэтому у меня стоит версия из репозитория svn.
Теперь осталась тривиальная задача — создать скрипт, который будет запускать touchegg при вхождении в систему:
Дать ему право на запуск и добавить в автостарт.
Ну вот и всё! Всё прекрасно работает:
Источник
How to Enable / Configure Multi-Touch Gestures in Ubuntu 20.04 & Higher
This simple tutorial shows how to enable & configure the multi-touch gestures in Ubuntu 20.04, Ubuntu 21.04, Ubuntu 21.10 using touchegg.
For those running Ubuntu on laptop or PC with external touchpad, multi-finger gestures enable users with more actions to control your system.
Since Ubuntu does not offer a utility to configure multi-touch functions, touchegg is a free open-source tool to enable this feature for you. And it supports for both global gestures or gestures for Firefox, Chromium, Google Chrome only.

Touchegg Enables Touchpad Gestures include:
- Swipe up, down, left, and right with 3 fingers and/or 4 fingers.
- Pinch in / out with 2, 3, and/or 4 fingers.
- Tap with 2, 3, 4, and/or 5 fingers.
Actions you can set for touchpad gesture:
- Minimize, Maximize, Restore, Close a window.
- Tile a window.
- Toggle full-screen.
- Switch desktop.
- Show desktop.
- Execute a command.
- Specify a keyboard shortcut, e.g., to open terminal, switch workspace, toggle activities overview.
How to Install Touchegg in Ubuntu via PPA:
The software has an official PPA which so far supports for Ubuntu 20.04, Linux Mint 20, and higher.
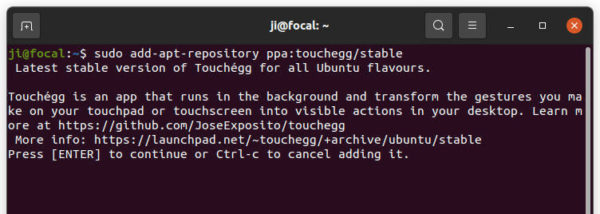
1.) Firstly open terminal from system application launcher and run command to add the PPA:
Type user password, no asterisk feedback, when it asks and hit Enter to continue.
2.) Next run command to install the touchegg service via command:
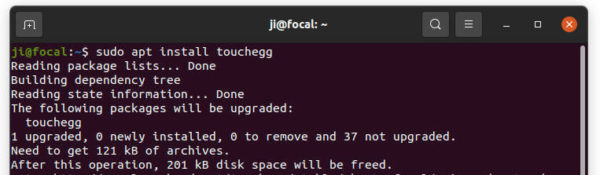
The service should run automatically once you installed it. To verify the status, run command:

It should show you ‘active (running)‘. If not, try to enable and start the service:
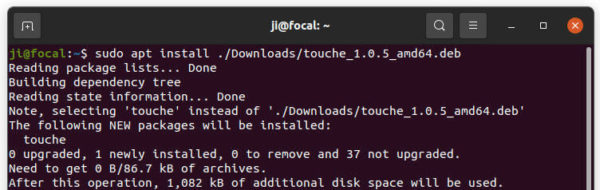
3.) A graphical configuration tool “touche” is also recommended. And you can download the .deb package from the link below:
Then either double-click to install via Software Install, or run command to install the downloaded .deb package:
Finally restart your system is required to make multi-touch work!
Enable/Configure Multi-Touch Gestures
After restarted your system, launch touche from system app launcher. When it opens, enable one or more finger gestures as you prefer. Then choose an action from the drop-down box.
To simulate a keyboard shortcut, you can type Shift_L , Control_L , Alt_L , Alt_R , Control_L+Alt_L etc in the Modifiers box. For instance, use Super_L to toggle activities overview, plus Page_Down will move to workspace below.
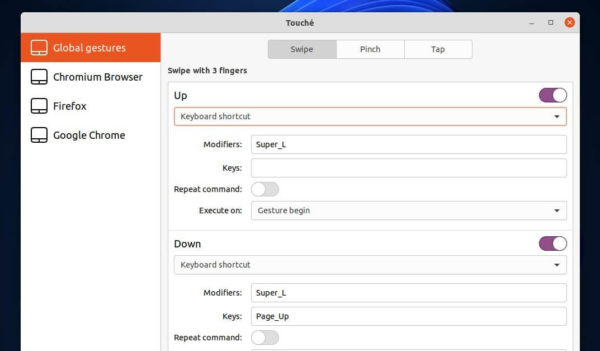
The changes in touche apply immediately. And there’s also Gnome Extension to enable multi-touch gestures on X11. For more, see touchegg on github.
Источник
Multi-touch gestures with native touchpad drivers on Linux
Announcing syngestures, the userland multi-touch daemon
Perhaps one of the biggest difficulties in setting up a Linux system for desktop/home use is the fragmentation of the ecosystem, with many different options claiming to get you from point a to somewhere in the vicinity of point b, each with their subtle differences (and at least a few “gotchas” along the way). An easy example: in 2020, you’d think there would be an easy answer to getting a trackpad/touchpad up and running with support for multi-touch gestures at least on par with the experience on Windows and macOS – after all, it’s been 12 years since Apple made multi-touch popular with 2008 MacBook Air.
The state of Linux multi-touch input in 2020
Unfortunately, it’s not so simple. First there was xf86-input-synaptics , initially written to specifically target Synaptics touchpads but later updated with support for many different devices – for the longest time this was both the best and the only way of getting Linux to recognize and support the most common trackpads. Along the way to no longer being a Synaptics-only PS/2 touchpad driver, xf86-input-synaptics started to use the evdev Linux kernel input driver, which also gave birth to the more generic input/mouse/touchpad xf86-input-evdev driver that used the same kernel abstraction, which most distributions now use because it featured some (limited) multi-touch gesture support and was viewed as the way forward. Then came Wayland with its “let’s rewrite everything” approach and brought with it libinput , as yet another replacement abstraction for all input devices. Unlike previous projects, libinput and its accompanying xf86-input-libinput X11 integration, promised native support for touchpads and multi-touch gestures, touting its superior abstraction as the reason why it could provide a better multi-touch experience where its predecessors couldn’t.
While it’s true that libinput comes with out-of-the-box gesture support, it’s unfortunately a gigantic step back in terms of the actual touchpad experience. As many people that switched from xf86-input-synaptics to xf86-input-libinput can attest (or anyone that’s tried libinput on a laptop after using Windows or macOS): it’s horrible. Regardless of how you tweak it (except perhaps if you have the exact make and model of touchpad the developers used), it feels like you’re either trying to push the cursor through mud or else chasing Blinky, Pinky, Inky and Clyde on the final level of PacMan and just can’t keep up. Instead of using the decades of work that went into the existing drivers, libinput just throws out the baby with the bathwater in the name of rewriting the stack and reinventing the wheel: the acceleration curves are extremely poor, the heuristics for determining acceleration give extremely unnatural results, and the entire experience makes one want to never try Linux on a laptop ever again.
Sidebar: if you haven’t already read it, this historical gem features Ted Selker explaining the decade of work that went into developing IBM’s Trackpoint, and the painstaking effort that it takes to create an input device (and accompanying driver/software) that is ergonomic, natural, intuitive, and user friendly. Anyone thinking of rewriting something as complex and subtle as a touchpad driver should read this before thinking they can do a better job and trying to foist their replacement on others.
Rather than risk falling into the same Wayland/libinput mistake in an attempt at creating “a newer, better alternative” (see XKCD #927) and especially given the fact that xf86-input-synaptics already does a really good job at providing a great – albeit single-touch – touchpad experience out-of-the-box, I wondered how hard it would be to simply add multi-touch gesture support on top of the synaptics input driver. My aspirations were not high: simply having two-finger forward and backward swipe navigation in Firefox would have been enough for me.
I was prepared to have to dig deep into the drivers to add support for multi-touch gestures, but it turned out not to be not very hard at all: as xf86-input-synaptics now uses libevdev under the hood, the driver-level support for reading multi-touch inputs from the trackpad itself is already fully implemented, just ignored. From there, it didn’t take long to create a proof-of-concept that would allow the xf86-input-synaptics driver to handle cursor motion, acceleration, deceleration, etc. but allow a userland program/daemon to monitor for and act upon multi-touch inputs (via the Linux multi-touch protocol).
Introducing Syngestures
syngesture is a configurable, multi-device capable, and rust-powered userland daemon that brings basic multi-touch support for one-, two-, and three-finger gestures to the venerable xf86-input-synaptics driver. It is, of course, fully open-source and released under the MIT license.
Like many other solutions, it was originally developed to scratch a personal itch, but after hearing from others with similar complaints, I decided to add some fit and polish (such as machine-wide and per-user config files and support for multiple devices with per-device configuration) that will hopefully make it more useful to the open source community at large. It was originally designed as an alternative to libinput and specifically intended for use with xf86-input-synaptics as explained above, but it should also work with xf86-input-evdev and other devices implementing the Linux Multi-Touch Protocol.
syngesture is available on GitHub and is considered ready for general use (modulo distribution-specific packages and system integrations for alternatives for manual configuration – e.g. initial device discovery – and deployment).
Related Posts
3 thoughts on “ Multi-touch gestures with native touchpad drivers on Linux ”
Great post! It is awesome to see someone working on these things. I will definitely give this a go at some point!
Do you think that a three finger drag gesture would be possible to set up with this system?
Transitioning from MacOS to Linux was a breeze for the most part and I have no regrets whatsoever. The only thing I really miss are good touchpad gestures.
@Thijs it depends on what you would want to map the three-finger drag to. But, yes, it should be possible.
There are several questions about this article that I’d like to ask.
I read the github repo and you recommend using X11. Meanwhile, now more than ever it’s starting to show that many distros are transitioning into Wayland, especially Ubuntu with its big userbase. What do you think about the adoption, since as you mentioned, Wayland releases libinput?
Источник
Capacitive Multi-Touch Fusion Display (Linux)
Attention: This is legacy content due to this product going towards EOL (End of Life). Depending on your local Toradex entity, there may be few to none of these products left for sale.
To get started with our new displays, check the Getting Started tab on their respective product pages:
Resistive Touch Display 7″ Parallel
Capacitive Touch Display 7″ Parallel
Capacitive Touch Display 10.1″ LVDS
This article shows how to configure Linux to use the Fusion 7″ and 10″ capacitive multi-touch displays. The multi-touch controller is connected using the I2C bus. Our Linux BSPs come with the fusion_F0710A (CONFIG_TOUCHSCREEN_FUSION_F0710A) driver which supports the multi-touch controller. The driver needs configuration data containing the information on how the controller is connected to the device (I2C bus and GPIO information).
The Kernel for Tegra based modules provides the platform data by default. Hence, enabling the driver is simply a matter of loading the kernel module.
On our device tree enabled Kernel (Vybrid and i.MX6 based modules), this platform data is by default disabled due to conflicting pin configurations. Hence enabling the driver on those kernels requires rebuilding the device tree.
Setup Hardware
Refer to the general product page Capacitive Multi Touch Display concerning how to hook up your carrier board to the adapter board connected to a particular multi-touch display. However, for historical reasons, the connection to the board differs slightly on Linux compared to WinCE (on Linux, both the Colibri Evaluation Board and the Iris use the same pins).
Connection to the Viola Carrier Board
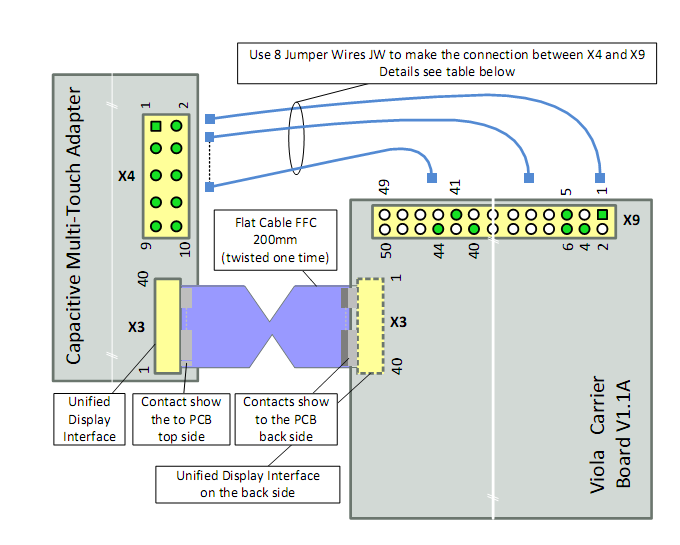
Wiring
| Adapter | Viola Carrier Board | Cable/Jumper Wire |
|---|---|---|
| X3 | X7 (on the back side) | FCC 200mm |
| X4/1 (GND) | not connected | |
| X4/2 (3V3_IN) | X9/4 (3.3V) | JW female to female |
| X4/3 (5V_IN) | X9/1 (5V) | JW female to female |
| X4/4 (GND) | X9/7 (GND) | JW female to female |
| X4/5 (DISP_ON) | not connected 1) | |
| X4/6 (TOUCH_I2C_SCL_3.3V) | X9/5 (SODIMM_196) | JW female to female |
| X4/7 (TOUCH_I2C_SDA_3.3V) | X9/6 (SODIMM_194) | JW female to female |
| X4/8 (TOUCH_INT_3.3V) | X9/42 2) (SODIMM_28) | JW female to female |
| X4/9 (TOUCH_RESET_3.3V) | X9/43 2) (SODIMM_30) | JW female to female |
| X4/10 (GND) | X9/36 (GND) | JW female to female |
1) display is on by default
2) Viola Carrier Board V1.0: X4/8 to X9/44, X4/9 to X9/41
Connection to the Iris Carrier Board
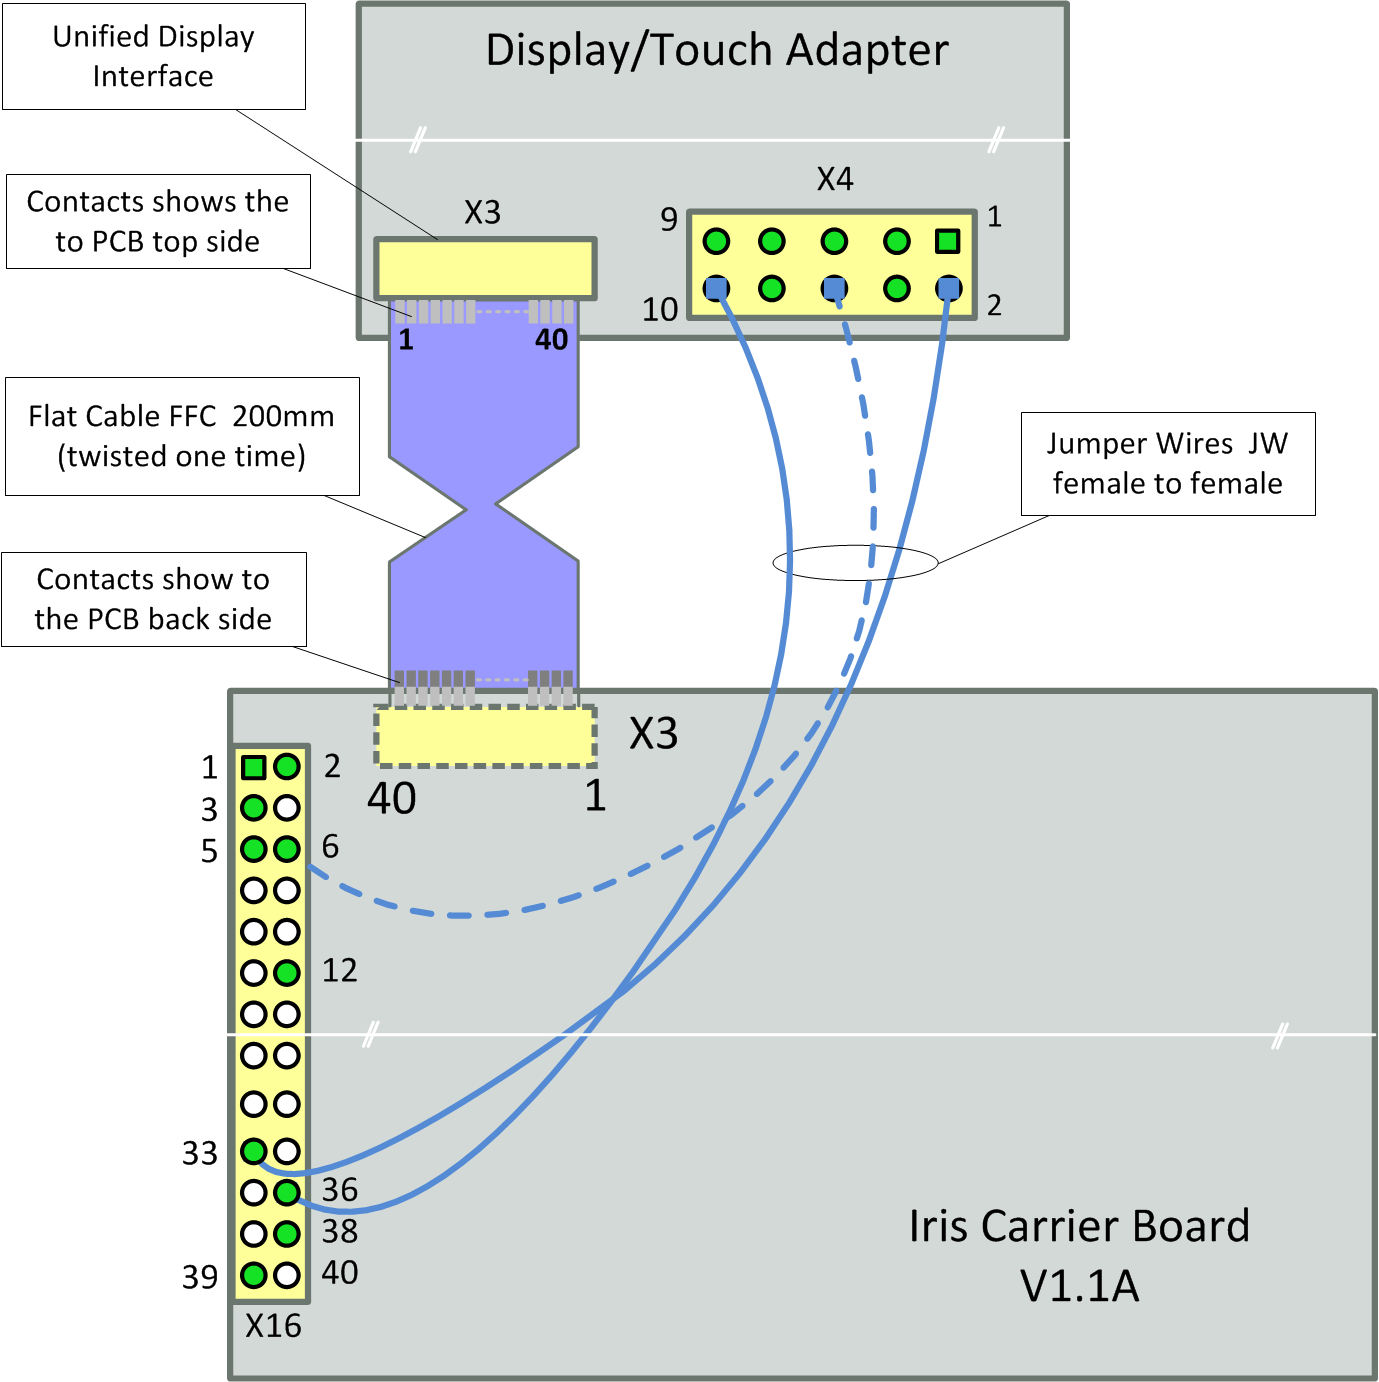
Wiring
| Adapter | Iris Carrier Board | Cable/Jumper Wire |
|---|---|---|
| X3 | X3 (on the back side) | FCC 200mm |
| X4/1 (GND) | not connected | |
| X4/2 (3V3_IN) | X16/33 (3.3V) | JW female to female |
| X4/3 (5V_IN) | X16/12 (5V) | JW female to female |
| X4/4 (GND) | X16/3 (GND) | JW female to female |
| X4/5 (DISP_ON) | not connected 1) | |
| X4/6 (TOUCH_I2C_SCL_3.3V) | X16/6 (SODIMM_196) | JW female to female |
| X4/7 (TOUCH_I2C_SDA_3.3V) | X16/5 (SODIMM_194) | JW female to female |
| X4/8 (TOUCH_INT_3.3V) | X16/38 (SODIMM_28) | JW female to female |
| X4/9 (TOUCH_RESET_3.3V) | X16/39 (SODIMM_30) | JW female to female |
| X4/10 (GND) | X16/36 (GND) | JW female to female |
1) display is on by default
Connection to the Colibri Evaluation Board
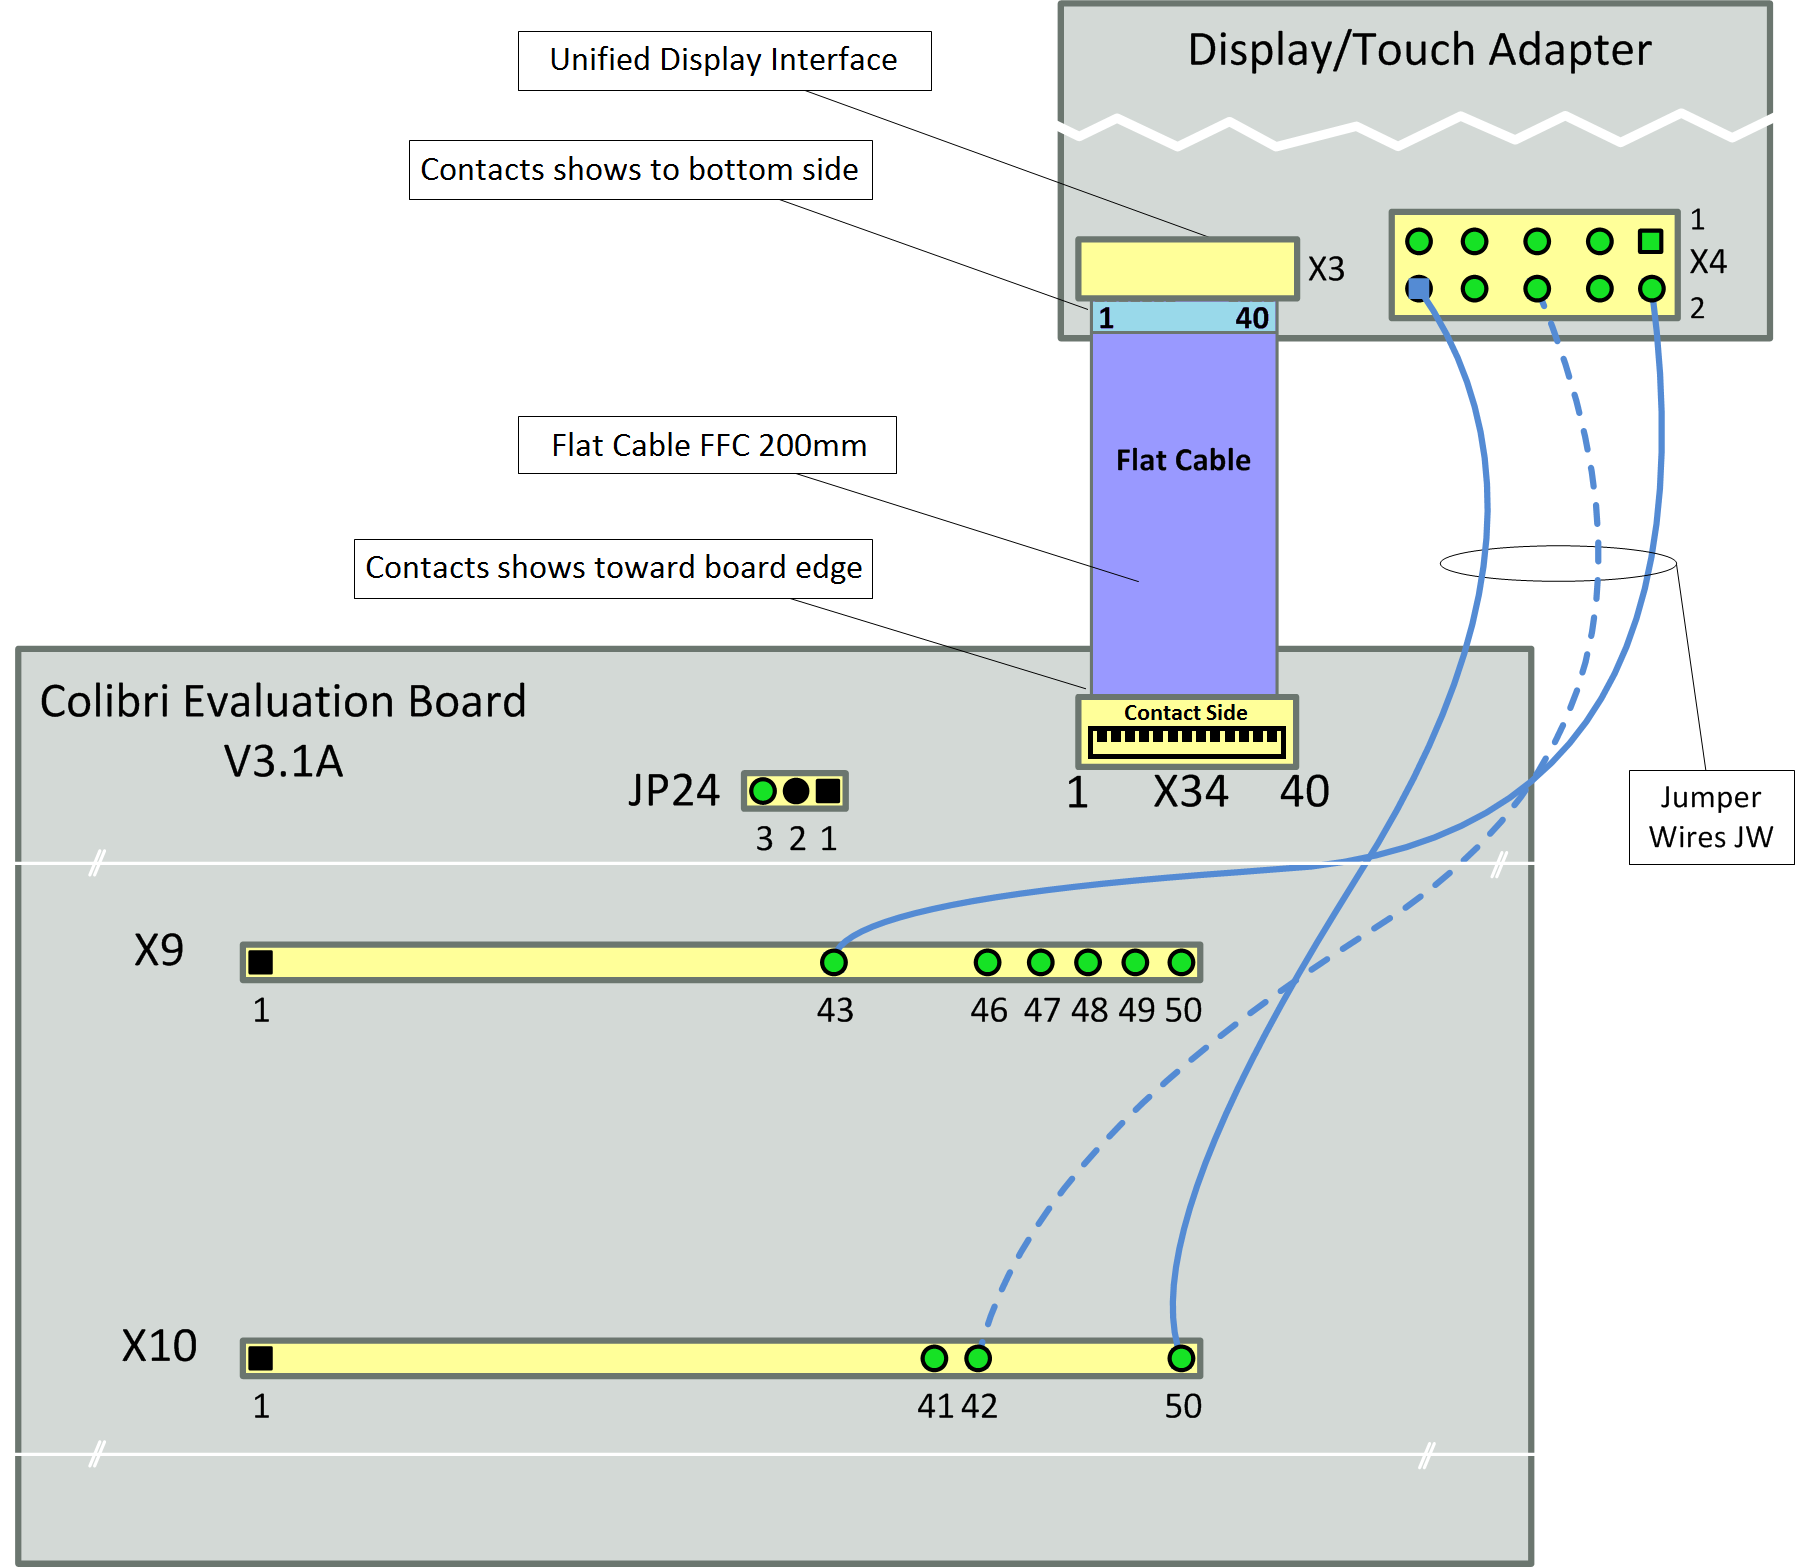
Wiring
| Adapter | Colibri Evaluation Board | Cable/Jumper Wire |
|---|---|---|
| X3 | X34 | FCC 200mm |
| X4/1 (GND) | not connected | |
| X4/2 (3V3_IN) | X9/43 (3.3V) | JW male to female |
| X4/3 (5V_IN) | JP24/3 (5V) | JW female to female |
| X4/4 (GND) | X9/49(GND) | JW male to female |
| X4/5 (DISP_ON) | not connected 1) | |
| X4/6 (TOUCH_I2C_SCL_3.3V) | X9/48(SODIMM_196) | JW male to female |
| X4/7 (TOUCH_I2C_SDA_3.3V) | X9/47(SODIMM_194) | JW male to female |
| X4/8 (TOUCH_INT_3.3V) | X10/27 (SODIMM_28) | 2x JW male to female |
| X4/9 (TOUCH_RESET_3.3V) | X10/28 (SODIMM_30) | 2x JW male to female |
| X4/10 (GND) | X10/50 (GND) | 2x JW male to female |
1) display is on by default
Connection to the Ixora Carrier Board
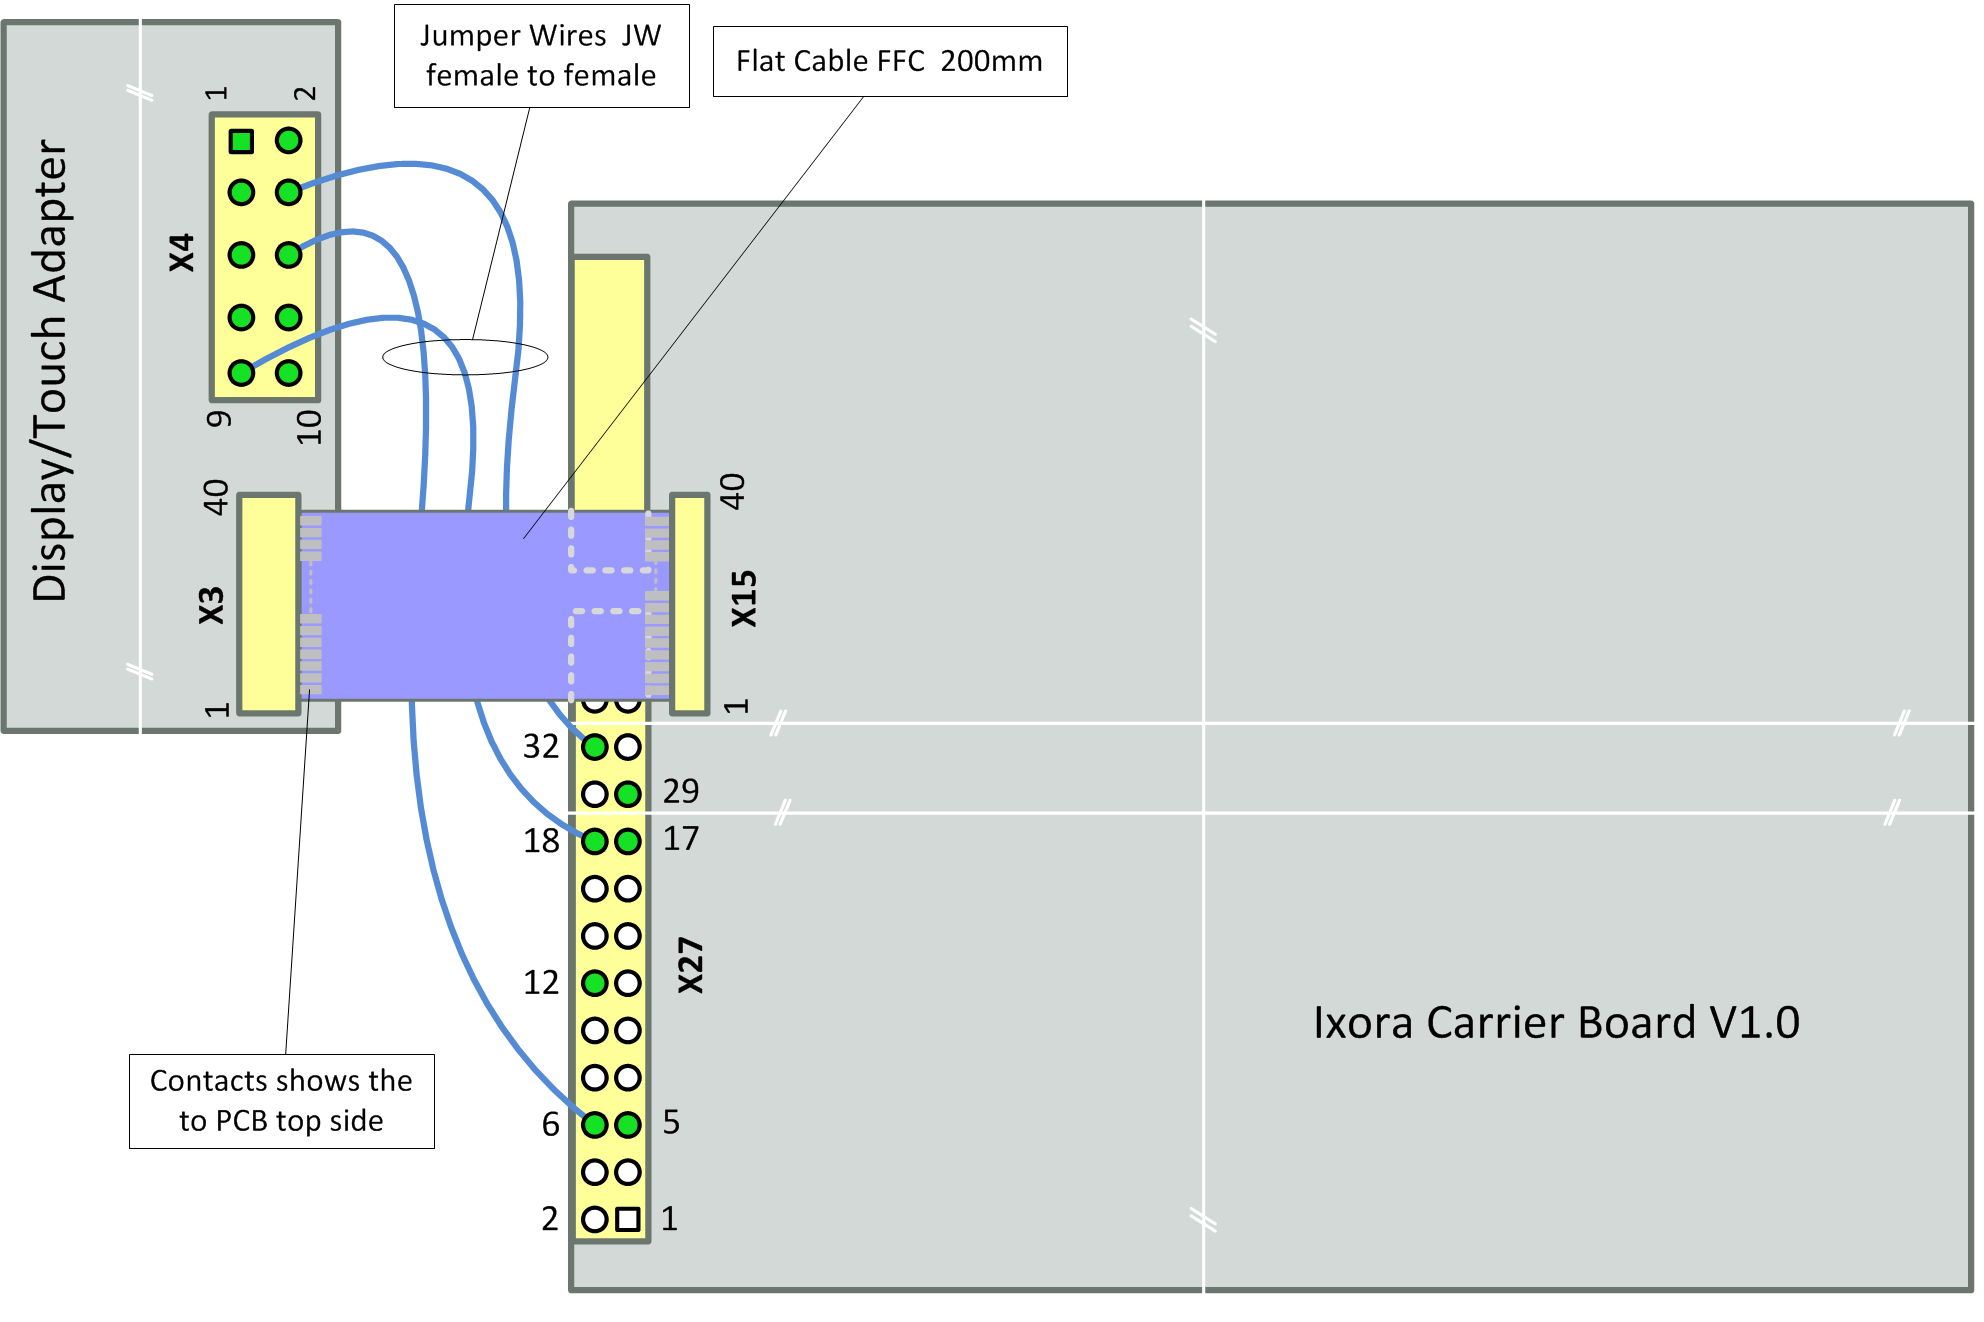
Wiring
| Adapter | Ixora Carrier Board | Cable/Jumper Wire |
|---|---|---|
| X3 | X15 | FCC 200mm |
| X4/1 (GND) | not connected | |
| X4/2 (3V3_IN) | X27/29 (3.3V) | JW female to female |
| X4/3 (5V_IN) | X27/12 (5V) | JW female to female |
| X4/4 (GND) | X27/32(GND) | JW female to female |
| X4/5 (DISP_ON) | not connected 1) | |
| X4/6 (TOUCH_I2C_SCL_3.3V) | X27/6(I2C1_SCL) | JW female to female |
| X4/7 (TOUCH_I2C_SDA_3.3V) | X27/5(I2C1_SDA) | JW female to female |
| X4/8 (TOUCH_INT_3.3V) | X27/17 (GPIO5) | JW female to female |
| X4/9 (TOUCH_RESET_3.3V) | X27/18 (GPIO6) | JW female to female |
| X4/10 (GND) | not connected |
1) display is on by default
Connection to the Apalis Evaluation Board

Wiring
| Adapter | Apalis Evaluation Board | Cable/Jumper Wire |
|---|---|---|
| X3 | X31 | FCC 200mm |
| X4/1 (GND) | not connected | |
| X4/2 (3V3_IN) | X2/16 (3.3V) | JW male to female |
| X4/3 (5V_IN) | JP14/3 (5V) | JW female to female |
| X4/4 (GND) | X2/11 (GND) | JW male to female |
| X4/5 (DISP_ON) | not connected 1) | |
| X4/6 (TOUCH_I2C_SCL_3.3V) | X8/39(I2C1_SCL/MXM3_211) | JW male to female |
| X4/7 (TOUCH_I2C_SDA_3.3V) | X8/40(I2C1_SDA/MXM3_209) | JW male to female |
| X4/8 (TOUCH_INT_3.3V) | X2/6 (GPIO5/MXM3_11) | JW male to female |
| X4/9 (TOUCH_RESET_3.3V) | X2/5 (GPIO6/MXM3_13) | JW male to female |
| X4/10 (GND) | not connected |
1) display is on by default
Software Setup
Display Configuration
To configure the display resolution, different methods are available. The Linux kernel arguments method (e.g. by using the U-Boot serial console to alter the vidargs environment variable) works on all our modules.
Some displays are able to work with various timings but others only work if correct timings are configured.
Altering the Device Tree
This step is only required for device tree enabled kernels (Vybrid, i.MX 6, i.MX7 and iMX6ULL based modules). For detailed information how to alter and rebuild the device tree, refer to the Device Tree Customization article.
On Colibri modules the multi-touch controller uses the PWM_B/PWM_C pins as pen down and reset interrupt, so the PWM functionality on these pins has to be disabled and the relevant GPIO functionality enabled and assigned to the touch driver.
On Vybrid, the pins for PWM_B/PWM_C need to be removed from the pinctrl list by overwriting the pinctrl-0 property:
(on 3.18 based kernel, the PWM pinctrl nodes look slightly different. In this case, vf-colibri.dtsi need to be altered to remove the PWM_B/PWM_C pins)
By default, the PWM frequency is 200 Hz.
The Fusion 7″ requires a frequency of 10 kHz to work reliably. The PWM pulse width can be overwritten in the backlight node of the carrier board level device tree (the period is specified in nano seconds):
The U-Boot version deployed with V2.5 Beta 1 and later executes the variable ‘fdt_fixup’ after the device tree has been loaded. This allows boot-time adjustments to be made to the device tree. Using this mechanism, the same as above may be achieved (temporarily) by defining the new ‘fdt_fixup’ variable:
Note that the enumeration of &pwm0 (the 0x34 above) may have been changed in the device tree you are using.
The following shows how one display the current setting from U-Boot. In this example the enumaration did in fact change to 0x3a, the periode is still set to the default 0x004c4b40 = 5000000 ns.
The PCAP preprocessor macro needs to be defined at the top of the device tree.
The Fusion 7″ requires a frequency of 10 kHz to work reliably. This can be specified in the backlight node of the carrier board level device tree:
There is no need to alter the device tree on Apalis i.MX6 for the Fusion 10” display. The relevant nodes are enabled by default.
The Fusion 7″ display requires a frequency of 10 kHz to work reliably. This can be specified in the backlight node of the carrier board level device tree:
On i.MX7 based devices the two PWM instances need to be disabled (which also frees the pins required by the Fusion I2C node) and the Fusion I2C multi-touch controller need to be enabled.
The Fusion 7″ requires a frequency of 10 kHz to work reliably. The frequency can be overwritten in the backlight node of the carrier board level device tree:
Also on i.MX6 ULL based devices, the two PWM instances need to be disabled (which also frees the pins required by the Fusion I2C node) and the Fusion I2C multi-touch controller needs to be enabled.
Furthermore, for the touchscreen driver to load correctly, make sure GPIO2_IO5 is available for the I2C interface by making the following change:
The Fusion 7″ requires a frequency of 10 kHz to work reliably. The frequency can be overwritten in the backlight node of the carrier board level device tree:
Altering the Platform Data
The Fusion 7″ display requires a frequency of 10 kHz to work reliably. For Apalis/Colibri T20/T30 this can be specified in the Linux kernel’s platform data. E.g. for Apalis T30:
Linux Kernel Driver
On Vybrid based modules, the driver is built-in and should register the Fusion multi-touch controller when using the altered device tree:
On all Tegra. i.MX6, i.MX7 and i.MX6 ULL based modules the driver is available as a kernel module. See the next chapter on how to load the kernel module.
Load Linux Kernel Module
The Kernel module fusion_F0710A.ko is stored at the default location:
You can use the modprobe utility to load the driver:
It is also possible to remove the driver:
Automatically Load Linux Kernel Module
To automatically load the driver upon start-up, create a configuration file located under /etc/modules-load.d/ (e.g. fusion.conf) with the module name as content:
Troubleshoot
To troubleshoot the touchscreen display one can check different things:
First take a look if the touchscreen module could configure the touch interrupt:
Now one can try to debug the touchscreen using the «evtest» application.
This program shows some informations when you touch the display.
Use the correct touchscreen interface that you would like to debug:
Another useful program is the «xinput_calibrator», you can run it to calibrate your touchscreen display.
Источник


