- Install Windows 10 on your Mac with Boot Camp Assistant
- What you need to install Windows 10 on Mac
- How to install Windows 10 on Mac
- 1. Check your Secure Boot setting
- 2. Use Boot Camp Assistant to create a Windows partition
- 3. Format the Windows (BOOTCAMP) partition
- 4. Install Windows
- 5. Use the Boot Camp installer in Windows
- How to switch between Windows and macOS
- Learn more
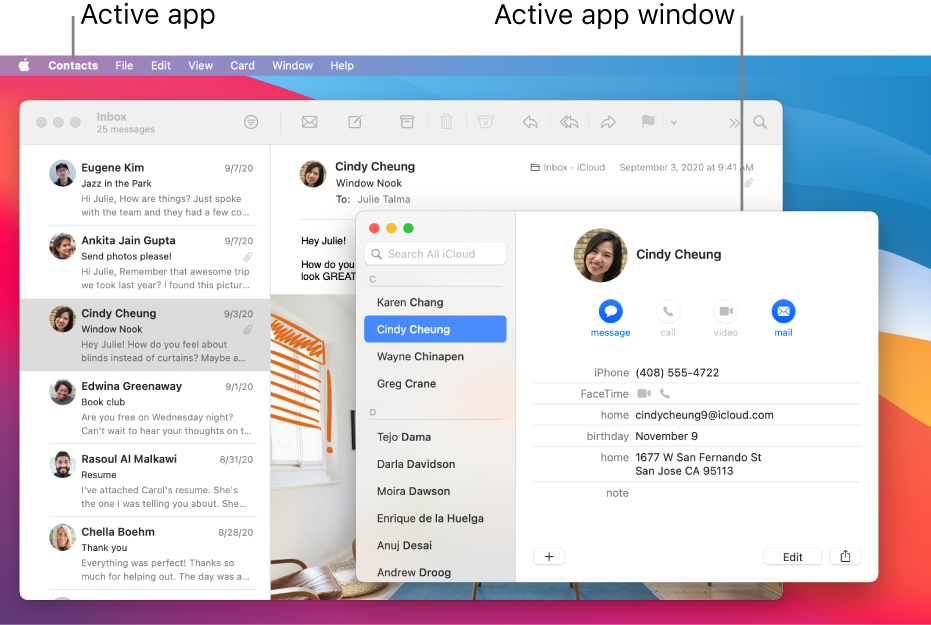
- Manage windows on Mac
- Move, align and merge windows
- Maximise or minimise windows
- Quickly switch between app windows
- Close windows
- [GUIDE] MULTI-BOOT MACOS, LINUX AND WINDOWS — 2020
- [GUIDE] The Budget Hackintosh Workstation with 9th Gen Processors | Kextcache
- Since the dawn of macOS, you guys might be thinking to own a mac which gives you smooth buttery performance without…
- macOS:
- Name: MyVolume Format: Mac OS Extended Scheme: GUID Partition map
- What the Heck is OpenCore Bootloader and What it means to Hackintosh Community? | Kextcache
- Opencore Bootloader is the new bootloader popping out of nowhere and is getting lots of love from the Hackintosh…
- [GUIDE] Install Clover Bootloader In USB or EFI Partition | Kextcache
- We need a bootloader that makes it possible to boot OS X on x86 and x86_64 PCs. There are 4 popular bootloaders to…
- WINDOWS:
- LINUX:
Install Windows 10 on your Mac with Boot Camp Assistant
With Boot Camp, you can install Microsoft Windows 10 on your Mac, then switch between macOS and Windows when restarting your Mac.
What you need to install Windows 10 on Mac
- MacBook introduced in 2015 or later
- MacBook Air introduced in 2012 or later
- MacBook Pro introduced in 2012 or later
- Mac mini introduced in 2012 or later
- iMac introduced in 2012 or later 1
- iMac Pro (all models)
- Mac Pro introduced in 2013 or later
The latest macOS updates, which can include updates to Boot Camp Assistant. You will use Boot Camp Assistant to install Windows 10.
64GB or more free storage space on your Mac startup disk:
- Your Mac can have as little as 64GB of free storage space, but at least 128GB of free storage space provides the best experience. Automatic Windows updates require that much space or more.
- If you have an iMac Pro or Mac Pro with 128GB of memory (RAM) or more, your startup disk needs at least as much free storage space as your Mac has memory. 2
An external USB flash drive with a storage capacity of 16GB or more, unless you’re using a Mac that doesn’t need a flash drive to install Windows.
A 64-bit version of Windows 10 Home or Windows 10 Pro on a disk image (ISO) or other installation media. If installing Windows on your Mac for the first time, this must be a full version of Windows, not an upgrade.
- If your copy of Windows came on a USB flash drive, or you have a Windows product key and no installation disc, download a Windows 10 disk image from Microsoft.
- If your copy of Windows came on a DVD, you might need to create a disk image of that DVD.

![]()
How to install Windows 10 on Mac
To install Windows, use Boot Camp Assistant, which is included with your Mac.
1. Check your Secure Boot setting
Learn how to check your Secure Boot setting. The default Secure Boot setting is Full Security. If you changed it to No Security, change it back to Full Security before installing Windows. After installing Windows, you can use any Secure Boot setting without affecting your ability to start up from Windows.
2. Use Boot Camp Assistant to create a Windows partition
Open Boot Camp Assistant, which is in the Utilities folder of your Applications folder. Follow the onscreen instructions.
- If you’re asked to insert a USB drive, plug your USB flash drive into your Mac. Boot Camp Assistant will use it to create a bootable USB drive for Windows installation.
- When Boot Camp Assistant asks you to set the size of the Windows partition, remember the minimum storage-space requirements in the previous section. Set a partition size that meets your needs, because you can’t change its size later.
3. Format the Windows (BOOTCAMP) partition
When Boot Camp Assistant finishes, your Mac restarts to the Windows installer. If the installer asks where to install Windows, select the BOOTCAMP partition and click Format. In most cases, the installer selects and formats the BOOTCAMP partition automatically.
4. Install Windows
Unplug any external devices that aren’t necessary during installation. Then click Next and follow the onscreen instructions to begin installing Windows.
5. Use the Boot Camp installer in Windows
After Windows installation completes, your Mac starts up in Windows and opens a ”Welcome to the Boot Camp installer” window. Follow the onscreen instructions to install Boot Camp and Windows support software (drivers). You will be asked to restart when done.
- If the Boot Camp installer never opens, open the Boot Camp installer manually and use it to complete Boot Camp installation.
- If you have an external display connected to a Thunderbolt 3 port on your Mac, the display will be blank (black, gray, or blue) for up to 2 minutes during installation.
How to switch between Windows and macOS
Restart, then press and hold the Option (or Alt) ⌥ key during startup to switch between Windows and macOS.
Learn more
If you have one of these Intel-based Mac models using OS X El Capitan or later, you don’t need a USB flash drive to install Windows:
- MacBook introduced in 2015 or later
- MacBook Air introduced in 2017 or later 3
- MacBook Pro introduced in 2015 or later 3
- iMac introduced in 2015 or later
- iMac Pro (all models)
- Mac Pro introduced in late 2013 or later
For more information about using Windows on your Mac, open Boot Camp Assistant and click the Open Boot Camp Help button.
1. If you’re using an iMac (Retina 5K, 27-inch, Late 2014) or iMac (27-inch, Late 2013) or iMac (27-inch, Late 2012) with a 3TB hard drive and macOS Mojave or later, learn about an alert you might see during installation.
2. For example, if your Mac has 128GB of memory, its startup disk must have at least 128GB of storage space available for Windows. To see how much memory your Mac has, choose Apple menu > About This Mac. To see how much storage space is available, click the Storage tab in the same window.
3. These Mac models were offered with 128GB hard drives as an option. Apple recommends 256GB or larger hard drives so that you can create a Boot Camp partition of at least 128GB.
Information about products not manufactured by Apple, or independent websites not controlled or tested by Apple, is provided without recommendation or endorsement. Apple assumes no responsibility with regard to the selection, performance, or use of third-party websites or products. Apple makes no representations regarding third-party website accuracy or reliability. Contact the vendor for additional information.
Manage windows on Mac
When you open an app or the Finder on your Mac, a window opens on the desktop. Only one app at a time is active; the name of the app (in bold) and the app menus are shown in the menu bar.
Some apps, such as Safari or Mail, let you open multiple windows or different types of windows at the same time. macOS provides several ways to manage open apps and windows.
Move, align and merge windows
On your Mac, do any of the following:
Move a window: Drag the window by its title bar to where you want it. Some windows can’t be moved.
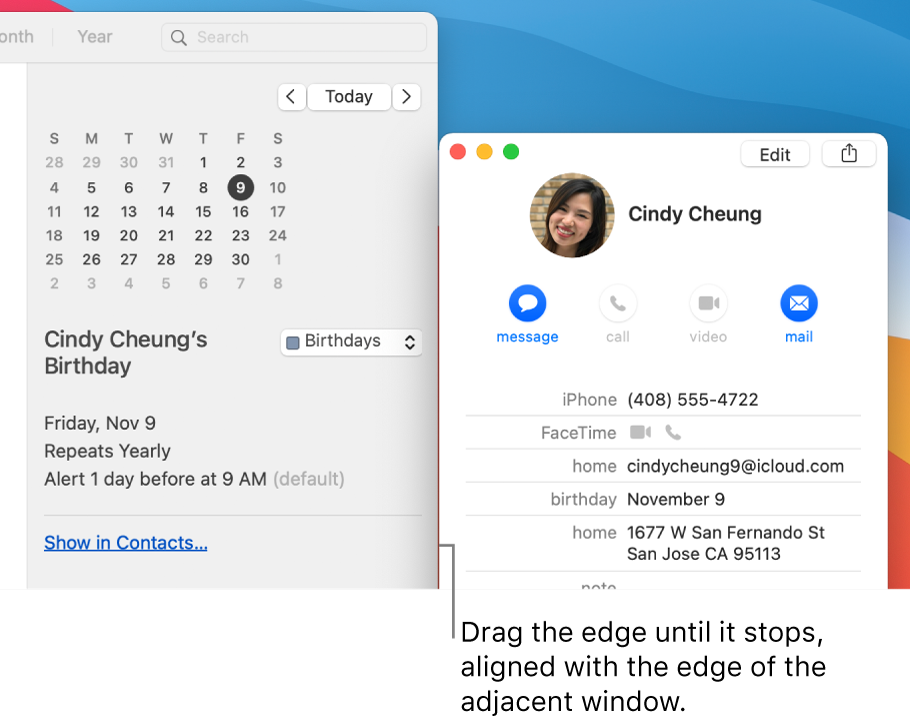
Align windows: Drag a window close to another one — as the window nears the other one, it aligns without overlapping. You can position multiple windows adjacent to each other.
To make adjacent windows the same size, drag the edge you want to resize — as it nears the edge of the adjacent window, it aligns with the edge and stops.
Merge an app’s windows into one tabbed window: In the app, choose Window > Merge All Windows.
To make a tab a separate window again, select the tab, then choose Window > Move Tab to New Window, or just drag the tab out of the window. See Use tabs in windows.
Maximise or minimise windows
On your Mac, do any of the following in a window:
Maximise a window: Press and hold the Option key while you click the green maximise button  in the top-left corner of an app window. To return to the previous window size, Option-click the button again.
You can also double-click an app’s title bar to maximise the window (as long as the option to do so is set to “zoom” in Dock & Menu Bar preferences).
Minimise a window: Click the yellow minimise button  in the top-left corner of the window or press Command-M.
You can set an option in Dock & Menu Bar preferences to have a window minimise when you double-click its title bar.
Most windows can be manually resized. Drag the window’s edge (top, bottom, or sides) or double-click an edge to expand that side of the window.
Quickly switch between app windows
On your Mac, do any of the following:
Switch to the previous app: Press Command-Tab.
Scroll through all open apps: Press and hold the Command key, press the Tab key, then press the Left or Right arrow key until you get to the app you want. Release the Command key.
If you change your mind while scrolling through the apps and don’t want to switch apps, press Esc (Escape) or the Full Stop key, then release the Command key.
Close windows
On your Mac, do any of the following:
Close a single window: In a window, click the red Close button  in the top-left corner of the window, or press Command-W.
Close all open windows for an app: Press Option-Command-W.
Closing one or all windows for an app does not close or quit the app. To do so, press Command-Q, or click the app’s name in the menu bar, then choose Quit [App]. See Quit apps.
You can hide the active app by pressing Command-H.
Use Mission Control to quickly arrange open windows and spaces in a single layer to easily spot the one you need.
[GUIDE] MULTI-BOOT MACOS, LINUX AND WINDOWS — 2020

Ayush Sahay Chaudhary
Nov 21, 2019 · 8 min read
You can’t follow this guide if you have any other bootloader like OpenCore or Chameleon.

So Hackintosh is just installed and you want to play a game or for some weird reason you wanted to use Linux for Development, For playing Games you’re probably looking for Installing Windows on Same or Separate Drive and same for Linux. This Guide is only for UEFI Systems.
If you want a 9400F beast Guide, you should Probably read,
[GUIDE] The Budget Hackintosh Workstation with 9th Gen Processors | Kextcache
Since the dawn of macOS, you guys might be thinking to own a mac which gives you smooth buttery performance without…
- If you have already installed OS on MBR you cannot follow this Guide.
- You can Follow this Guide if you have Windows or Linux Installed First, just Connect the dots.
In conclusion, there are mainly two methods to MultiBoot/DualBoot/Tri-Boot the System.
- EASY METHOD: Installing Every OS in Separate Drives.
- COMPLICATED METHOD: Installing Every OS in Same Drive.
Note: Follow t h is Guide at your Own Risk, ONLY YOU are RESPONSIBLE if you took any wrong step.
Okay, Lets Start with macOS, you can install Windows first too.
make sure that partition table is GPT else you need to format the whole drive!
macOS:
Step 1: Gather the tools,
USB Drive USB 2.0 is preferred
Working Hackintosh or Mac or macOS on VM
Step 2: Download the latest macOS Catalina.

Step 3: Quit the Installer if Opened Automatically after Download.
Step 4: Plug your USB Drive and Format the USB as mentioned,
Name: MyVolume
Format: Mac OS Extended
Scheme: GUID Partition map

Step 5: Create the Installer by running the command on Terminal,
Step 6: Now make your USB Bootable,
You can also Go OpenCore Way,
What the Heck is OpenCore Bootloader and What it means to Hackintosh Community? | Kextcache
Opencore Bootloader is the new bootloader popping out of nowhere and is getting lots of love from the Hackintosh…
Step 7: Insert the Thumb Drive to the Hack you wanted to Triboot on.
Step 8: Press the hotkey to choose boot device (F12 Key for Gigabyte MoBo)
Step 9:Choose USB
- At Clover boot screen, choose Boot Install macOS Catalina from myVolume. (If you have issues reaching the installer, you can use the spacebar on the boot screen to enter alternate boot modes such as verbose and safe mode.)
- For a new installation of macOS,
you MUST erase and format the destination drive according to the following steps before continuing. - a. In the top menu bar choose Utilities and open Disk Utility
b. Highlight your target drive for the Mojave installation in the left column.
c. Click Erase button
d. For Name: type MacintoshHD (You can rename it later)
e. For Format: choose APFS (Journaled)
f. Click Erase
g. Close Disk UtilityWhen the installer asks you where to install, choose Catalina
Upon completion, the system will automatically restart. Press the hotkey to choose boot device (F12 for Gigabyte mobo), Choose USB
At the Boot Screen, choose Boot macOS from MacintoshHD
Complete macOS installation. The system will automatically reboot.
Complete the Post-Installation and Setup the EFI Drive.
[GUIDE] Install Clover Bootloader In USB or EFI Partition | Kextcache
We need a bootloader that makes it possible to boot OS X on x86 and x86_64 PCs. There are 4 popular bootloaders to…
After Completing the Setup make Space for Windows if you want to Install on Same SSD, If you are planning to Install Windows on Separate Drive Skip to the next section.
Follow the steps below to make space for Windows Partition, make sure you don’t touch the macOS. Installer USB we’re gonna need it again.
- Open Disk Utility.
- Select your SSD and Click Partition.
- Click on (+) and adjust the slider for the new partition.
- Select the Format MS-DOS (FAT)

- Click On Apply
- Install the macOS as usual on the partition we just created.
- After successful completion Configure the EFI Partition.
- Make Sure to Make Hackintosh full working with Internal EFI.
WINDOWS:
Install Windows as usual in GPT-UEFI mode, if you don’t know how to to that follow the steps below.
1. On any Existing Windows machine go to Rufus.ie
2. make a Bootable Installation USB with GPT Format.
3. Plug the USB in and Start the Installation Process.

4. Choose the Partition which we made FAT and format it.
5. Complete the Installation.

6. Make sure you Successfully Get into the Windows Desktop.

Before Restarting make sure to check for Windows Update, if you want everything up-to-date, because Updating Windows 10 after Installing all 3 OS’s Windows EFI will mess will other Bootloaders.
LINUX:
For this Specific hack, I’ll use Manjaro KDE as it has beautiful UI and Power of Arch Linux, you can use any other Linux build duh.
Keep in Mind GRUB Bootloader is no GAME.
So Just Follow Along with the Step-by-step Screenshots Posted Below and Understand the Process. DON’T RUSH. ask for help if you stuck somewhere.
Download the Latest ISO From Manjaro Website and Rufus, make bootable USB.
Insert The USB and Select Install ManjaroLinux x64
Make Sure you Come to this Installation Screen. The version can be Different


