- Multi-touch на обычных тачпадах
- Поделитесь в соцсетях:
- two-finger-scroll
- Новые драйверы Synaptics
- Scrybe
- Настройка мультитач трекпадов в Windows 8 Setting Up Multitouch Trackpads in Windows 8
- настройки
- Жесты трекпада
- Команды пальцев
- Команды одного пальца
- Два команды Finger
- Команды с тремя и четырьмя пальцами
- Multitouch windows to any touchpad
- Synaptics Touchpad Driver для Windows
- Обзор Softonic
- Переустановите драйверы для ноутбука Touch Pad бесплатно
- Официальный драйвер для широкого набора сенсорных колодок
- Принесите свою сенсорную панель обратно в жизнь
- Touchpad Synaptics
- Contents
- Installation
- Configuration
- Frequently used options
- Configuration on the fly
- Console tools
- Graphical tools
- Xfce4/Cinnamon
- Advanced configuration
- Using xinput to determine touchpad capabilities
- Synclient
- evtest
- Circular Scrolling
- Natural scrolling
- Software toggle
- Disable touchpad while typing
- Using the driver’s automatic palm detection
- Using syndaemon
- Disable touchpad on mouse detection
- Basic desktop
- GNOME
- System with multiple X sessions
- Buttonless touchpads (aka ClickPads)
- Bottom edge correction
- Troubleshooting
- Touchpad does not work after resuming from hibernate/suspend
- xorg.conf.d/70-synaptics.conf does not seem to apply in MATE
- The touchpad is not working, Xorg.0.log shows «Query no Synaptics: 6003C8»
- Touchpad detected as «PS/2 Generic Mouse» or «Logitech PS/2 mouse»
- Laptops with touchscreen & touchpad
- Non-functional Synaptics special abilities (multi-tap, scrolling, etc.)
- No Multi-touch in some Elantech touchpads
- Cursor jump
- Touchpad device is not located at /dev/input/*
- Firefox and special touchpad events
- Firefox 17.0 and later
- Opera: horizontal scrolling issues
- Scrolling and multiple actions with Synaptics on LG laptops
- Other external mouse issues
- Touchpad synchronization issues
- Xorg.log.0 shows SynPS/2 Synaptics touchpad can not grab event device, errno=16
- Synaptics loses multitouch detection after rebooting from Windows
- Touchpad not recognized after shutdown from Arch
- Trackpoint and Clickpad
Multi-touch на обычных тачпадах
Поделитесь в соцсетях:
Тачпады Synaptics являются самыми распространенными и используются большинством компаний, выпускающих мобильные компьютеры. В данном материале пойдет речь о том, как заставить функционировать Multi-touch на устройствах ввода от этого производителя. При этом сам ноутбук не обязательно должен быть новым, все необходимые функции заработают и на лэптопах 3–4-летней давности.

Многие пользователи, познакомившиеся с технологией Multi-touch на ноутбуках Apple, были бы не прочь, чтобы и на Windows-лэптопах появилась аналогичная возможность. Multi- touch позволяет значительно упростить управление портативным ПК, поскольку распознает касание несколькими пальцами одновременно, а следовательно, в таком случае можно привязать к этим действиям различные дополнительные функции. Самая популярная из них – прокрутка страницы двумя пальцами.
two-finger-scroll
Первый способ, активирующий Multi-touch в Windows, известен уже более года. Пользователь Arkadiusz Wahlig написал маленькую утилиту, которая позволяла применять эту технологию на устройствах Synaptics. За первые несколько месяцев существования программы к ней было выпущено 5 небольших обновлений, после чего в феврале 2009 г. она, судя по всему, прекратила свое развитие, но, тем не менее, не потеряла актуальности и по сей день. Стоит отметить, что за прошедший год только с официального сайта последняя версия two-finger-scroll была загружена более 100 тыс. раз, и этот показатель продолжает расти.
После установки программы в системном трее появится новый значок, позволяющий настроить некоторые опции Multi-touch. Если на закладке Scrolling мы советуем ничего не менять, поскольку прокрутка с помощью двух пальцев работает практически идеально, то на вкладке Tapping можно настроить эмуляцию нажатия других кнопок мыши. Самый правильный вариант – добавить эмуляцию щелчка по колесику при нажатии двумя пальцами на тачпад, что значительно облегчит управление ноутбуком. Также поддерживается назначение альтернативных кнопок на касание тремя пальцами и на нажатия по схеме 1+1 и 2+1.
Если после запуска two-finger-scroll программа выдает ошибку, это значит, что необходимо установить неофициальные модифицированные драйверы, которые есть тут. При этом рекомендуем отключить прокрутку с помощью одного пальца в настройках драйвера, поскольку она может конфликтовать с two-finger-scroll.
Новые драйверы Synaptics
Еще один способ активации Multi-touch возможен при установке новых драйверов Synaptics, которые, однако, до сих пор не анонсированы официально, хотя и доступны для скачивания на сайте компании HP, причем работают на ноутбуках и от других производителей. Данный вариант практически гарантирует отсутствие проблем и несовместимости, а также предлагает ряд функций, недоступных при использовании two-finger-scroll.
После установки нового драйвера все опции Multi-touch уже по умолчанию активированы. Помимо вертикального скроллинга, здесь также работает горизонтальная прокрутка. На непродолжительное нажатие тремя пальцами можно повесить быстрый вызов любого приложения (по умолчанию это Блокнот), а росчерки трех пальцев вправо или влево интерпретируются системой как переход вперед или назад и очень удобны при перелистывании фотографий в менеджерах изображений.
В настройках прокрутки также можно включить EdgeMotion – функцию, которая продолжит скроллинг, даже когда пальцы достигли края тачпада. Опция Coasting помогает прокручивать длинные документы – скроллинг работает и после снятия пальцев с тачпада. Для остановки прокрутки необходимо прикоснуться к устройству ввода еще раз. На некоторых тачпадах также появляются опции поворота изображений с помощью двух пальцев.
Большой минус данного способа – отсутствие распознавания нажатий двумя пальцами и невозможность эмуляции клика по колесику мышки.
Scrybe
Управляющие жесты не имеют непосредственного отношения к Multi-touch, поскольку для их использования не обязательно проводить по тачпаду несколькими пальцами одновременно, однако они, так же как и Multi-touch, упрощают работу на ноутбуке.
Для применения жестов необходима утилита Scrybe, созданная в Synaptics. Скорее всего, также понадобится новый драйвер с поддержкой Multi-touch, о котором написано выше. В зависимости от ситуации во время инсталляции Scrybe и сам может установить его, либо это придется сделать самостоятельно.
Утилита позволяет с помощью горячих клавиш вызывать специальную область для рисования жестов, которые выполняют различные системные функции, а также запускают программы или открывают веб-сайты.
Для перехода в режим жестов можно быстро нажать тремя пальцами на тачпад или зажать клавиши Shift и Ctrl. В первом случае на экране появится небольшая область, на которой будет видна траектория ведения пальцем. При этом для того чтобы начать рисовать жест, не надо предварительно нажимать никаких клавиш на тачпаде, вместо этого необходимо сразу начинать вести пальцем, к чему придется привыкнуть. Чтобы убрать область с экрана до выполнения встроенных скриптов, достаточно нажать любую кнопку на клавиатуре либо нарисовать неверный символ. При использовании комбинации клавиш Shift и Ctrl рабочая область не отображается на экране до касания пальцем.
Scrybe по умолчанию настроен на открытие определенных популярных сайтов и системных приложений (видеоплеера, музыкального проигрывателя, Панели задач, редактора документов и пр.), но может настраиваться пользователем и для запуска любой другой программы или сайта. Помимо этого, поддерживаются некоторые распространенные системные функции: вырезать, скопировать, вставить, отменить, повторить, выделить все, закрыть приложение.
Настройка мультитач трекпадов в Windows 8 Setting Up Multitouch Trackpads in Windows 8
Windows 8 – первая крупная операционная система (ОС) для любого компьютера, специально разработанного для сенсорного устройства. Windows 8 в значительной степени основана на более ранней версии операционной системы Windows Mobile, с сильным использованием плиток и других дисплеев для быстрого поиска информации на устройстве. Однако, в то время как новая ОС предназначена для работы с сенсорными устройствами, ноутбуки по-прежнему требуют использования трекпадов для выполнения различных вариантов выбора. Из-за этого необходимо знать, как изменять, включать и настраивать использование трекпада на компьютере под управлением Windows 8.
Кроме того, имейте в виду, что приведенные ниже инструкции предназначены для современной мультитач-панели и не будут работать на старых трекпадах.
настройки
Для начала откройте ярлык настроек трекпада на рабочем столе Windows. После этого нажмите « Ввод» в левом углу. Это отображает информацию о клавиатуре и трекпадах. На вкладке ввода вам нужно переместить ползунок в положение «включено» или «выключено», чтобы включить и включить трекпад в компьютерной системе Windows 8. Это позволяет использовать трекпад и позволяет начать использовать его на компьютере.
Обратите внимание, что приведенные выше инструкции работают для большинства моделей трекпада, но ваш производитель может иметь другой способ настройки. Для получения дополнительной информации обратитесь к документации вашего ноутбука.
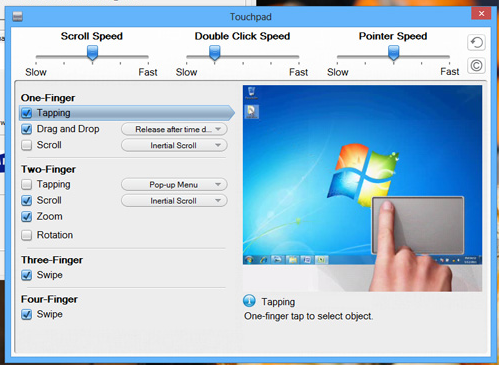
Конфигурация трекпада Windows 8.
Жесты трекпада
Вы также можете изменять жесты на трекпаде, в зависимости от того, что вы хотите, чтобы трекпад работал. В том же окне настроек, что и выше, в верхней части экрана есть три варианта: скорость прокрутки, скорость двойного клика и скорость указателя . Если вы обнаружите, что функции прокрутки сенсорной панели перемещаются слишком быстро или слишком медленно, вы можете изменить эту функцию. Вы также можете контролировать, как быстро двойные щелчки сенсорной панели, и как быстро указатель перемещается и реагирует на ваши жесты с помощью параметра Скорость указателя.
Команды пальцев
Команды одного пальца
Оттуда в левой части экрана вы можете изменить функции жестов с одним пальцем, двумя пальцами, тремя пальцами и четырьмя пальцами. С помощью жесты одним пальцем у вас есть возможность касаться, перетаскивать и прокручивать. Вы можете выбрать или отменить выбор этих параметров в зависимости от того, что вам нравится с устройством и что вам удобно. У функций перетаскивания и прокрутки есть дополнительные настройки, которые вы можете изменить, которые расположены справа от списков.
Два команды Finger
С помощью жестов с двумя пальцами вы можете задействовать, прокручивать, увеличивать и уменьшать и поворачивать. Опять же, просто отметьте, какие функции вы делаете и чего не хотите. У функций нарезания и прокрутки есть дополнительные опции, перечисленные справа от настроек, если вы хотите, чтобы у вас было больше возможностей.
Команды с тремя и четырьмя пальцами
Что касается параметров с тремя пальцами и четырьмя пальцами, для каждого из них имеется только одна функция. оба варианта с тремя и четырьмя пальцами имеют функцию салфетки, которую можно настроить вкл. и выкл., в зависимости от желаемого.
Если вы обнаружили, что эти функции в настоящее время не находятся на вашем компьютере под управлением Windows 8 (по крайней мере, не все), вам необходимо загрузить последние драйверы Elan или Synaptics в компьютерную систему. После того, как вы загрузили драйвер на свой компьютер, вам просто нужно выполнить инструкции по установке, чтобы завершить процесс установки и дождаться перезагрузки компьютера. Затем вы сможете изменить конфигурацию трекпада Windows 8 и начать использовать оборудование, как вы действительно хотите его использовать.
Multitouch windows to any touchpad

Краткое описание:
Touchpad — бесплатный полноценный wi-fi пульт для управления компьютером.
Описание:
Touchpad — бесплатный wi-fi пульт для управления компьютером.
Поддержка Multi-Touch скролинг и дополнительных клавиш ctrl, shift, alt.
Управление плеером и системным звуком windows.
——————
—————
Сервер для Windows:  TouchpadSetup13.rar ( 464,65 КБ )
Русский интерфейс: Нет
Скачать: версия: 1.3 com.thingsstuff.touchpad-1.apk ( 84 КБ )
Скачать: версия 1.3 RUS signedcom.thingsstuff.touchpad-1.apk ( 85,99 КБ )
Сообщение отредактировал zmagnatz — 27.10.14, 15:00
:rolleyes:
Хочу отметить, что это самая легкая, быстрая и «пушистая» программа в плане управления и быстроты старта.
До этого пользовался WiFi Mouse, она хоть и больше по функционалу но все как-то не так реализовано нужно много движений делать для доступа к основным функциям.
————————————-
Плюсы этого Touchpad:
Первый запуск при соединении производится мгновенно (по сравнению с WiFi Mouse)
Быстрый доступ до основных функций без лишних движений.
Минималистичный дизайн.
Дополнительно: для владельцев AMOLED экранов есть бонус в виде полностью черного фона в рабочем режиме программы, что даст существенную экономию по расходу батареи.
Сообщение отредактировал zmagnatz — 19.12.13, 15:07
Synaptics Touchpad Driver для Windows
Обзор Softonic
Переустановите драйверы для ноутбука Touch Pad бесплатно
Пакет Driver Synaptics Touchpad — это бесплатный набор драйверов для сенсорного управления. Некоторые ноутбуки имеют контроллер сенсорной панели, и иногда файлы, управляющие сенсорной панелью, повреждены или удалены. Если ваша сенсорная панель перестала работать, может случиться так, что им нужен новый драйвер, который вы получите, если вы загрузите этот файл.
Официальный драйвер для широкого набора сенсорных колодок
Многие ноутбуки используют одно и то же программное обеспечение для передачи и интерпретации сигналов от сенсорной панели к процессору. Драйвер сенсорной панели Synaptics используется во многих ноутбуках, хотя ноутбуки производятся различными компаниями. Установка этого программного обеспечения может привести к тому, что ваша сенсорная панель снова будет работать, и пошаговые инструкции по установке очень упрощают установку драйверов. Драйверы также дадут вам возможность активировать или деактивировать ваш тачпад, который обычно не является функцией, которую производители оставляют открытой для переключения.
Принесите свою сенсорную панель обратно в жизнь
Драйвер сенсорной панели Synaptics идеально подходит для людей, которые испортили или удалили своих текущих драйверов. Он также идеален для людей, которые обновляют свой ноутбук, который строит новый ноутбук или меняет свою старую сенсорную панель на новую. Установка драйвера не сложна благодаря пошаговым инструкциям по установке, которые появляются на экране при прохождении процесса установки.
Touchpad Synaptics
This article details the installation and configuration process of the Synaptics input driver for Synaptics (and ALPS) touchpads found on most notebooks.
Contents
Installation
The Synaptics driver can be installed with the package xf86-input-synaptics .
Configuration
The primary method of configuration for the touchpad is through an Xorg server configuration file. After installation of xf86-input-synaptics , a default configuration file is located at /usr/share/X11/xorg.conf.d/70-synaptics.conf . Users can copy this file to /etc/X11/xorg.conf.d/ and edit it to configure the various driver options available. Refer to the synaptics(4) manual page for a complete list of available options. Machine-specific options can be discovered using #Synclient.
Frequently used options
The following example file configures some common options, including vertical, horizontal and circular scrolling as well as tap-to-click:
TapButton1 (integer) configures which mouse-button is reported on a non-corner, one finger tap. TapButton2 (integer) configures which mouse-button is reported on a non-corner, two finger tap TapButton3 (integer) configures which mouse-button is reported on a non-corner, three finger tap RBCornerButton (integer) configures which mouse-button is reported on a right bottom corner, one finger tap (use Option «RBCornerButton» «3» to achieve Ubuntu style tap behaviour for right mouse button in lower right corner) RTCornerButton (integer) as above, but for top right corner, one finger tap. VertEdgeScroll (boolean) enables vertical scrolling while dragging across the right edge of the touch pad. HorizEdgeScroll (boolean) enables horizontal scrolling while dragging across the bottom edge of the touch pad. VertTwoFingerScroll (boolean) enables vertical scrolling using two fingers. HorizTwoFingerScroll (boolean) enables horizontal scrolling using two fingers. EmulateTwoFingerMinZ/W (integer) play with this value to set the precision of two finger scroll. FingerLow (integer) when finger pressure drops below this value, the driver counts it as a release. FingerHigh (integer) when finger pressure goes above this value, the driver counts it as a touch. MaxTapTime Determines how «crisp» a tap must be to be considered a real tap. Decrease the value to require a more crisp tap. Properly adjusting this parameter can reduce false positives when the hands hover over or lightly touch the pad. VertScrollDelta and HorizScrollDelta (integer) configures the speed of scrolling, it is a bit counter-intuitive because higher values produce greater precision and thus slower scrolling. Negative values cause natural scrolling like in macOS.
Configuration on the fly
Next to the traditional method of configuration, the Synaptics driver also supports on the fly configuration. This means that users can set certain options through a software application, these options are applied immediately without needing to restart Xorg. This is useful to test configuration options before you include them in the configuration file or a script. Note that on the fly configuration is not persistent and lasts only until the Xorg server exists.
Console tools
- Synclient — command line utility to configure and query Synaptics driver settings
https://xorg.freedesktop.org/ || xf86-input-synaptics
- xinput — general-purpose utility to configure X input devices
https://xorg.freedesktop.org/ || xorg-xinput
Graphical tools
- GPointing Device Settings — Provides graphical on the fly configuration for several pointing devices connected to the system, including your synaptics touch pad. This application replaces GSynaptics as the preferred tool for graphical touchpad configuration through the synaptics driver.
https://wiki.gnome.org/Attic/GPointingDeviceSettings || gpointing-device-settingsAUR
- kcm_touchpad — New configuration tool for KDE Plasma 5. It provides a module under input devices in System Settings. It is to be considered a replacement for synaptiks and the old kcm-touchpad module.
https://cgit.kde.org/plasma-desktop.git/tree/kcms/touchpad || plasma-desktop
Xfce4/Cinnamon
To change these settings in XFCE 4′:
- Open System Settings.
- Click Mouse and Touchpad.
- Change the settings on the Touchpad tab.
To change these settings in Cinnamon:
- Open Cinnamon System Settings.
- Click Mouse and Touchpad.
- Change the settings on the Touchpad tab.
It is possible configure the way MATE handles the touchpad:
- Run dconf-editor
- Edit the keys in the org.mate.desktop.peripherals.touchpad folder.
To prevent Mate settings daemon from overriding existing settings, do as follows:
- Run dconf-editor
- Edit org.mate.SettingsDaemon.plugins.mouse
- Uncheck the active setting.
Advanced configuration
Using xinput to determine touchpad capabilities
Depending on your model, synaptic touchpads may have or lack capabilities. We can determine which capabilities your hardware supports by using xinput .
- left, middle and right hardware buttons
- two finger detection
- three finger detection
- configurable resolution
First, find the name of your touchpad:
You can now use xinput to find your touchpad’s capabilities:
From left to right, this shows:
- 1 : device has a physical left button
- 0 : device does not have a physical middle button
- 1 : device has a physical right button
- 0 : device does not support two-finger detection
- 0 : device does not support three-finger detection
- 1 : device can configure vertical resolution
- 1 : device can configure horizontal resolution
Use xinput list-props «SynPS/2 Synaptics TouchPad» to list all device properties. See synaptics(4) for full documentation of the Synaptics properties.
Synclient
Synclient can configure every option available to the user as documented in synaptics(4) . A full list of the current user settings can be brought up:
Every listed configuration option can be controlled through synclient, for example:
- Enable palm detection: $ synclient PalmDetect=1
- Configure button events (right button event for two finger tap here): $ synclient TapButton2=3
- Disable the touchpad: $ synclient TouchpadOff=1
After you have successfully tried and tested your options through synclient, you can make these changes permanent by adding them to /etc/X11/xorg.conf.d/70-synaptics.conf .
evtest
The tool evtest can display pressure and placement on the touchpad in real-time, allowing further refinement of the default Synaptics settings. The evtest monitoring can be started with:
X denotes the touchpad’s ID. It can be found by looking at the output of cat /proc/bus/input/devices .
evtest needs exclusive access to the device which means it cannot be run together with an X server instance. You can either kill the X server or run evtest from a different virtual terminal (e.g., by pressing Ctrl+Alt+F2 ).
The tool xorg-xev can display taps, clicks, pressure, placement and other measured parameters in real-time, allowing still further refinement of the default Synaptics settings. xev can be run in X and needs no specifics. using the «-event» parameter, it is possible to restrict the types of events that are reported.
Circular Scrolling
Circular scrolling is a feature that Synaptics offers which closely resembles the behaviour of iPods. Instead of (or additional to) scrolling horizontally or vertically, you can scroll circularly. Some users find this faster and more precise. To enable circular scrolling, add the following options to the touchpad device section of /etc/X11/xorg.conf.d/70-synaptics.conf :
The option CircScrollTrigger may be one of the following values, determining which edge circular scrolling should start:
Specifying something different from zero may be useful if you want to use circular scrolling in conjunction with horizontal and/or vertical scrolling. If you do so, the type of scrolling is determined by the edge you start from.
To scroll fast, draw small circles in the center of your touchpad. To scroll slowly and more precise, draw large circles.
Natural scrolling
It is possible to enable natural scrolling through synaptics. Simply use negative values for VertScrollDelta and HorizScrollDelta like so:
Software toggle
You might want to turn the touchpad on and off with a simple button click or shortcut. This can be done by binding the following xinput-based script:
Alternatively, synclient can be used to toggle the touchpad. However, it can only turn off touch events but not physical clickpad button usage:
Disable touchpad while typing
Using the driver’s automatic palm detection
First of all you should test if it works properly for your touchpad and if the settings are accurate. Enable palm detection with
Then test the typing. You can tweak the detection by setting the minimum width for the touch to be considered a palm, for example
And you can tweak the minimum pressure required for the touch to be considered a palm, for example
Once you have found the correct settings, you can add them to your config file:
Using syndaemon
syndaemon monitors keyboard activity and disables the touchpad while typing. It has several options to control when the disabling occurs. View them with
For example, to disable tapping and scrolling for 0.5 seconds after each keypress (ignoring modifier keys like Ctrl), use
Once you have determined the options you like, you should use your login manager or xinitrc to have it run automatically when X starts. The -d option will make it start in the background as a daemon.
Disable touchpad on mouse detection
With the assistance of udev, it is possible to automatically disable the touchpad if an external mouse has been plugged in. To achieve this, use one of the following rules.
Basic desktop
This is a basic rule generally for non-«desktop environment» sessions:
If the touchpad is always deactivated at startup, even when no mouse is plugged in, try adding the following criteria between the KERNEL and ACTION parameters above:
 The factual accuracy of this article or section is disputed.
GDM usually stores the Xauthority files in /var/run/gdm in a randomly-named directory. You should find your actual path to the Xauthority file which can be done using ps ax . For some reason multiple authority files may appear for a user, so a rule like will be necessary:
Furthermore, you should validate that your udev script is running properly! You can check for the conditions using udevadm monitor -p which must be run as root.
With syndaemon running
syndaemon whether started by the user or the desktop environment can conflict with synclient and will need to be disabled. A rule like this will be needed:
touchpad-state
An AUR package touchpad-state-git AUR has been created around the udev rules above. It includes a udev rule and script:
GNOME
GNOME users can install GNOME shell extension Touchpad Indicator, change «Switch Method» to «Synclient» and enable «Automatically switch Touchpad On/Off» in its preferences.
If using Plasma, the package plasma-desktop can be used to manage the touchpad.
System with multiple X sessions
The factual accuracy of this article or section is disputed.
For an environment where multiple users are present, a slightly different approach is needed to detect the current users X environment. This script will help achieving this:
Update the TRACKPAD_NAME variable for your system configuration. Run find /sys/class/input/ -name mouse* -exec udevadm info -a <> \; | grep ‘ATTRS
Then have udev run this script when USB mices are plugged in or out, with these udev rules:
Buttonless touchpads (aka ClickPads)
Ever more laptops have a special kind of touchpad which has a single mouse button as part of the tracking plate, instead of external buttons. For example, the 2015 Dell XPS 13, HP series 4500 ProBooks, ThinkPad X220 and X1 ThinkPad series have this kind of a touchpad. By default, the whole button area is detected as a left button, so right and middle-click functions and click + drag will not work. It is possible to define two and three finger clicks as right and middle button clicks, and/or to define parts of the click pad surface as right and middle buttons. Note that although the driver registers multiple touches, it does not track individual fingers (as of version 1.7.1) which results in confusing behavior when using physical buttons of a clickpad for drag-and-drop and other gestures: you have to click with two or three fingers but then only move one of them while holding the button down with another. You can look into the xf86-input-mtrack AUR driver for better multitouch support.
Some desktop environments (KDE and GNOME at least) define sane and useful default configurations for clickpads, providing a right button at the bottom right of the pad, recognising two and three-finger clicks anywhere on the pad as right and middle clicks, and providing configuration options to define two and three-finger taps as right and middle clicks. If your desktop does not do this, or if you want more control, you can modify the touchpad section in /etc/X11/xorg.conf.d/70-synaptics.conf (or better, of your custom synaptics configuration file prefixed with a higher number). For example:
The format for the SoftButtonAreas option is (from synaptics(4) ):
The above «SoftButtonAreas» option is commonly found in documentation or synaptics packages, and it defines the right half of the bottom 18% of the touchpad as a right button. There is no middle button defined. If you want to define a middle button remember one key piece of information from the manual; edge set to 0 extends to infinity in that direction.
In the following example the right button will occupy the rightmost 40% of the button area and the middle button 20% of it in the center. The leftmost 40% remains as a left button (as does the rest of the clickpad):
You can use synclient to check the soft button areas:
If your buttons are not working, soft button areas are not changing, ensure you do not have a synaptics configuration file distributed by a package which is overriding your custom settings (ie. some AUR packages distribute configurations prefixed with very high numbers).
These settings cannot be modified on the fly with synclient , however, xinput works:
You cannot use percentages with this command, so look at /var/log/Xorg.0.log to figure out the touchpad x and y-axis ranges.
Bottom edge correction
In some cases, for example Toshiba Satellite P50, everything work out of the box except often your click are seen as mouse movement and the cursor will jump away just before registering the click. This can be easily solved running
take the BottomEdge value and subtract a the wanted height of your button, then temporary apply with
when a good value has been found make it a fixed correction with
Troubleshooting
Touchpad does not work after resuming from hibernate/suspend
Occasionally touchpads will fail to work when the computer resumes from sleep or hibernation. This can often be corrected without rebooting by
- Switching to a console and back again,
- entering sleep mode again, and resuming again, or
- locating the correct kernel module, then removing it and inserting it again.
- blacklisting kernel module psmouse may be a permanent option (when the touchpad is handled by another module, eg i2c_designware_platform)
- adding the psmouse.synaptics_intertouch=0 kernel parameter solves the issue permanently (Tested on T440s)
Now switch back to the tty that X is running on. If you chose the right module, your touchpad should be working again.
If you are using a laptop computer and your touchpad does not work after switching the laptop’s lid, you can just change your power management policy: when closing the lid, ‘shutdown the screen’ instead of ‘suspend'(or ‘hibernate’). This is useful for some laptops.
xorg.conf.d/70-synaptics.conf does not seem to apply in MATE
MATE will by default overwrite various options for your touchpad. This includes configurable features for which there is no graphical configuration within MATE’s system control panel. This may cause it to appear that /etc/X11/xorg.conf.d/70-synaptics.conf is not applied. Follow #MATE to prevent this behavior.
The touchpad is not working, Xorg.0.log shows «Query no Synaptics: 6003C8»
Due to the way synaptics is currently set-up, 2 instances of the synaptics module are loaded. We can recognize this situation by opening the xorg log file ( /var/log/Xorg.0.log ) and noticing this:
Notice how 2 differently named instances of the module are being loaded. In some cases, this causes the touchpad to become nonfunctional.
We can prevent this double loading by adding MatchDevicePath «/dev/input/event*» to our /etc/X11/xorg.conf.d/70-synaptics.conf file:
Restart X and check xorg logs again, the error should be gone and the touchpad should be functional.
related forum topics:
Touchpad detected as «PS/2 Generic Mouse» or «Logitech PS/2 mouse»
This can be caused by a number of issues;
Laptops with touchscreen & touchpad
There also seems to be a problem with laptops which have both a touchscreen & a touchpad, such as the Dell XPS 12 or Dell XPS 13. To fix this, you can blacklist the i2c_hid driver, this does have the side-effect of disabling the touchscreen though.
Post kernel 3.15, having the module blacklisted may cause touchpad to stop working completely. Removing the blacklist should allow this to start working with limited functionality, see FS#40921.
Non-functional Synaptics special abilities (multi-tap, scrolling, etc.)
In some cases Synaptics touchpads only work partially. Features like two-finger scrolling or two-finger middle-click do not work even if properly enabled. This is probably related to the The touchpad is not working problem mentioned above. Fix is the same, prevent double module loading.
If preventing the module from loading twice does not solve your issue, try commenting out the toggle MatchIsTouchpad (which is now included by default in the synaptics config).
If clicking with either 2 or 3 fingers is interpreted as a right-click, so you cannot get a middle click either way regardless of configuration, this bug is probably the culprit: https://bugs.freedesktop.org/show_bug.cgi?id=55365
No Multi-touch in some Elantech touchpads
Cursor jump
Some users have their cursor inexplicably jump around the screen. There currently no patch for this, but the developers are aware of the problem and are working on it.
Another posibility is that you are experiencing IRQ losses related to the i8042 controller (this device handles the keyboard and the touchpad of many laptops), so you have two possibilities here:
1. rmmod && insmod the psmouse module.
2. append i8042.nomux=1 to your kernel parameters and reboot your machine.
Touchpad device is not located at /dev/input/*
If that is the case, you can use this command to display information about your input devices:
Search for an input device which has the name «SynPS/2 Synaptics TouchPad». The «Handlers» section of the output specifies what device you need to specify.
In this case, the Handlers are mouse0 and event1 , so /dev/input/mouse0 would be used.
 This article or section needs expansion.
Firefox and special touchpad events
You can enable/disable some special events that Firefox handles upon tapping or scrolling certain parts of your touchpad by editing the settings of those actions. Type about:config in your Firefox address bar. To alter options, double-click on the line in question.
Firefox 17.0 and later
Horizontal scrolling will now by default scroll through pages and not through your history. To reenable Mac-style forward/backward with two-finger swiping, edit:
You may encounter accidental forwards/backwards while scrolling vertically. To change Firefox’s sensitivity to horizontal swipes, edit:
The optimum value will depend on your touchpad and how you use it, try starting with 10 . A negative value will reverse the swipe directions.
Opera: horizontal scrolling issues
Same as above. To fix it, go to Tools > Preferences > Advanced > Shortcuts. Select «Opera Standard» mouse setup and click «Edit». In «Application» section:
The factual accuracy of this article or section is disputed.
- assign key «Button 6» to command «Scroll left»
- assign key «Button 7» to command «Scroll right»
Scrolling and multiple actions with Synaptics on LG laptops
These problems seem to be occurring on several models of LG laptops. Symptoms include: when pressing Mouse Button 1, Synaptics interprets it as ScrollUP and a regular button 1 click; same goes for button 2.
The scrolling issue can be resolved by entering in xorg.conf :
Apparently, when trying to compile this against the latest version of Synaptics it fails. The solution to this is using the GIT repository for Synaptics [4].
To build the package after downloading the tarball and unpacking it, execute:
Other external mouse issues
First, make sure your section describing the external mouse contains this line (or that the line looks like this):
If the «Device» line is different, change it to the above and try to restart X. If this does not solve your problem, make your touchpad is the CorePointer in the «Server Layout» section:
and make your external device «SendCoreEvents»:
finally add this to your external device’s section:
If all of the above does not work for you, please check relevant bug trackers for possible bugs, or go through the forums to see if anyone has found a better solution.
Touchpad synchronization issues
 This article or section is out of date.
Sometimes the cursor may freeze for several seconds or start acting on its own for no apparent reason. This behavior is accompanied by records in /var/log/messages.log
This problem has no general solution, but there are several possible workarounds.
- If you use CPU frequency scaling, avoid using the «ondemand» governor and use the «performance» governor when possible, as the touchpad may lose sync when the CPU frequency changes.
- Avoid using an ACPI battery monitor.
- Attempt to load psmouse with «proto=imps» option. To do that, add this line to your /etc/modprobe.d/modprobe.conf :
- Try another desktop environment. Some users report that this problem only occurs when using XFCE or GNOME, for whatever reason
Xorg.log.0 shows SynPS/2 Synaptics touchpad can not grab event device, errno=16
If you are using Xorg 7.4, you may get a warning like this from /var/log/Xorg.0.log , thais is because the driver will grab the event device for exclusive use when using the Linux 2.6 event protocol. When it fails, X will return this error message.
Grabbing the event device means that no other user space or kernel space program sees the touchpad events. This is desirable if the X config file includes /dev/input/mice as an input device, but is undesirable if you want to monitor the device from user space.
If you want to control it, add or modify the «GrabEventDevice» option in you touchpad section in /etc/X11/xorg.conf.d/70-synaptics.conf :
This will come into effect when X is restarted, though you can also change it by using synclient. When changing this parameter with the synclient program, the change will not take effect until the Synaptics driver is disabled and re-enabled. This can be achieved by switching to a text console and then switching back to X.
Synaptics loses multitouch detection after rebooting from Windows
Many drivers include a firmware that is loaded into flash memory when the computer boots. This firmware is not necessarily cleared upon shutdown, and is not always compatible with Linux drivers. The only way to clear the flash memory is to shutdown completely rather than using reboot. It is generally considered best practice to never use reboot when switching between operating systems.
Touchpad not recognized after shutdown from Arch
Certain touchpads (elantech in particular) will fail to be recognized as a device of any sort after a standard shutdown from Arch linux. There are multiple possible solutions to this problem:
- Boot into a Windows partition/install disk and shutdown from there.
- Wait approximately 1 minute before turning on the computer after shutdown.
- As discussed in https://bugzilla.kernel.org/show_bug.cgi?id=81331#c186 a patch has been merged into the stable kernel that provides a fix for Elantech touchpads. Gigabyte P34, P35v2 and X3 models are supported by default, for others (especially rebranded Gigabyte laptops, like XMG’s) i8042.kbdreset=1 can be set as kernel parameter.
Trackpoint and Clickpad
Newer Thinkpads do not have physical buttons for their Trackpoint anymore and instead use the upper area of the Clickpad for buttons (Left, Middle, Right). Apart from the ergonomic viewpoint this works quite well with current Xorg. Unfortunately mouse wheel emulation using the middle button is not supported yet. Install xf86-input-evdev-trackpoint AUR from the AUR for a patched and properly configured version if you intend to use the Trackpoint.


