- How To Use MySql On Mac
- 1. Install MySql Database Server On Mac.
- 2. Start, Stop, Configure MySql Server.
- 3. Manage MySQL Database With MySQL Workbench.
- 4. Create MySQL User and Assign Privileges To The User.
- 5. Create Example User Account Table.
- How to Start & Stop MySQL Manually in OS X El Capitan & Yosemite
- Starting, Stopping, Restarting MySQL on Mac OS X
- Start MySQL
- Stop MySQL
- Restart MySQL
- Start, Stop, Restart MySQL from Mac OS Preference Panel
- How to Install MySQL on Mac & Configure MySQL in Terminal
- Download MySQL Server
- Install MySQL on Mac
- Configure MySQL in Mac for Terminal App
- Important MySQL Commands
- Access Root via Mac Terminal & Create Database
- Summary
- Как установить MySQL на Mac OS?
- Подготовка
- Как установить MySQL на Mac OS?
- Как пользоваться?
- Запуск
- Перезапуск
- Устанавливаем пароль на root
- Удаленный доступ к серверу
- Как удалить MySQL на Mac OS?
- Mysql commands mac os
How To Use MySql On Mac
MySql is a very popular relational SQL database server software. It is widely used in huge of websites as a database server. This article will tell you how to install the MySql database server and GUI client tool on macOS to make MySql database management easy. It will also tell you how to start, stop, restart and connect to the MySQL database server in the command line.
1. Install MySql Database Server On Mac.
- Download MySql Server community version for macOS.
- Click the downloaded dmg file to open the MySql server installer package.
- Click the Next button in the wizard dialog until go to the Change Install Location… dialog, then click the Install button to install it.
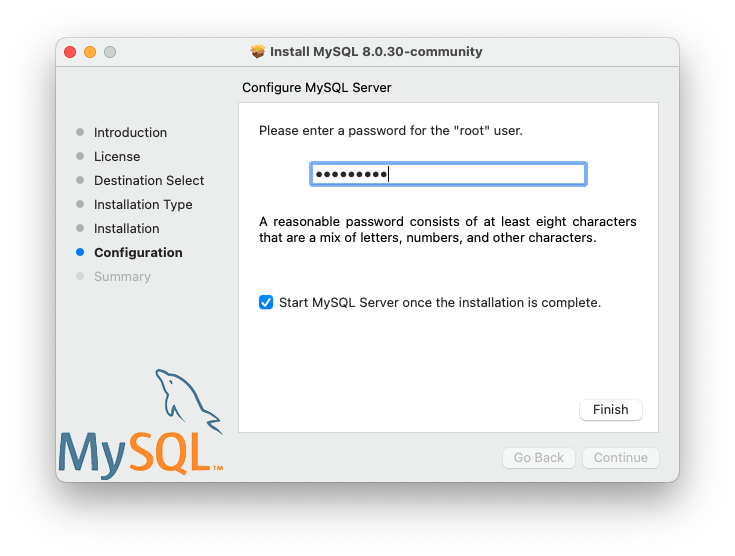
- After installation, it will display Configure MySQL Server dialog, input the root user’s password. And click the Finish button to complete the MySql server installation.
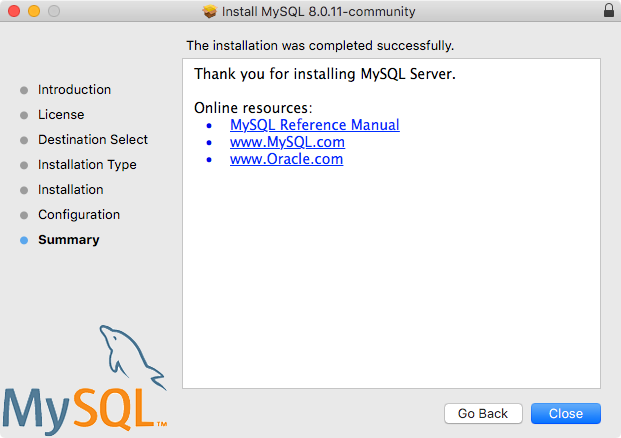
- Now MySql server has been installed successfully.
2. Start, Stop, Configure MySql Server.
- Open macOS System Preferences.
- Click the MySQL icon to open the MySQL configuration dialog. Then you can start, stop and configure the MySQL server in it.
3. Manage MySQL Database With MySQL Workbench.
- Download MySQL Workbench community version.
- Click the downloaded dmg file to install it.
- Open MySQL workbench application.
- Connect to the local MySQL database server.
- Click the Create a new schema in the connected server button to create a database.
- Input MySQL Schema name (database name) and select database character set and collation ( usually use utf8 and utf8_bin). Click Apply button to create the database.
- Right-click the Tables item under dev2qa database then clicks Create Table… menu item to create a table.
- Input table name at top text box. Then click table row to add one column, input column name, select datatype, and other column options(Primary Key, Not Null, Unique, Auto Increment, Binary, etc).
- Right-click user_account table, click Select Rows – Limit 1000 menu item to open edit table data dialog in the right panel to insert data into the table.
4. Create MySQL User and Assign Privileges To The User.
- Click Users and Privileges menu item in the left MySQL workbench panel.
- Click Add Account button at the bottom of the right panel.
- Input user name and password in the new panel.
- Click Administrative Roles tab to select related roles and assign them to the newly created MySQL user.
- Click Schema Privileges tab to assign MySQL database (schema) privileges to the user by click Add Entry… button. You can select all databases, or special databases either by matching string pattern or exactly string match.
- Then select desired Object Rights, DDL Rights, or Other Rights checkboxes at the bottom, then click Apply button to apply the selected privileges to the created user.
5. Create Example User Account Table.
In our MySQL JDBC examples, we always use a table user_account, so we should create this table use MySQL workbench. Below is the table DDL SQL code, you can also run it to create this table.
To execute the below DDL code, just click Create a new SQL tab for executing queries button ( ) at MySQL workbench toolbar top left corner to open a SQL command execute window, and then copy below code into it. Then click execute button(the first lightning icon ) at the top toolbar of the SQL window to execute the code.
Источник
How to Start & Stop MySQL Manually in OS X El Capitan & Yosemite
 Many developers require MySQL on their Macs, but if you’ve tried to install MySQL in OS X El Capitan and Yosemite, you likely noticed that you’ll get an “installation failed” error during the process. That error sounds worse than it is, because you can avoid it entirely by choosing not to install the startup item included in the MySQL bundle, or, you can just ignore the installation error and start MySQL yourself when you need it. Either way, MySQL actually installs fine, it’s just the bundled startup item that does not function. As you probably guessed, that means you’ll need to start and stop MySQL yourself.
Yes a preference panel gets installed that allows for a GUI approach, but many users prefer to use the command line for this purpose since many of us work in the Terminal anyway, and it has the added possibility of being automated.
Starting, Stopping, Restarting MySQL on Mac OS X
Hre are the three basic commands to start, stop, and restart MySQL in Mac OS X, including OS X El Capitan and OS X Yosemite. Be sure to enter the command onto a single line, sudo obviously requires an administrator password to be entered.
Start MySQL
sudo /usr/local/mysql/support-files/mysql.server start
Stop MySQL
sudo /usr/local/mysql/support-files/mysql.server stop
Restart MySQL
sudo /usr/local/mysql/support-files/mysql.server restart
Of course, these can be combined with starting and stopping Apache server if your intention is to setup a local web development environment.
You can download the latest version of MySQL for Mac OS X here. Future versions of the MySQL installer will undoubtedly fix this for OS X but in the meantime if you get the installation error, either customize the installer and avoid the startup item, or ignore the error and start and stop mysql yourself when it’s needed.
Those interested can also follow a workaround posted to StackOverflow here to automatically load MySQL on boot in OS X El Capitan or Yosemite.
Start, Stop, Restart MySQL from Mac OS Preference Panel
Of course, you can also start and stop the MySQL server from the bundled preference panel. To do that, simply go to the Apple menu and open System Preferences. Choose the “MySQL” preference panel, then click on the “Start MySQL Server” button to start MySQL Server on Mac. If the server is already started, the button will change to “Stop MySQL Server”. If you want to restart the server, simply click to turn it off, wait a minute or so, then turn it back on again. This will be the easy approach for many Mac users, though you’ll have to fiddle with the pref panel as necessary, and if you go that route you’ll want to uncheck the auto-start option because it’s going to fail.
I’m partial to the command line approach for the time being, but use whatever is most appropriate for your situation.
By the way, these mySQL server management methods continue to work in MacOS Sierra as well.
Источник
How to Install MySQL on Mac & Configure MySQL in Terminal
Mac OS doesn’t come along with the pre-configured version of MySQL, but this step by step guide will make the task easy for you. By the end of this tutorial, you will be able to set up the MySQL server on your Mac system for local development purposes.
Download MySQL Server
Before we start installing MySQL server on mac, we first download the latest version of MySQL from its official site.
Visit https://dev.mysql.com/downloads/mysql and choose the MySQL version that you want to download.
On this page, you will see list of operating systems under the “Select Operating System” dropdown choose the macOS from the list. Then, click on the download button for the MySQL .dmg file. You can download the other MySQL instances as per your operating system requirement.

Install MySQL on Mac
You have to click on the MySQL file to install the MySQL on Mac system. You might get the warning “macOS cannot verify that this app is free from malware”.
To get rid from this issue got to System Preferences > Security & Privacy and click on the “Open Anyway” button. This will allow you to install the MySQL version in your system.
Once the MySQL installation is completed, go to System Preferences and click on the MySQL icon that you can see on the bottom left position.

Here you can see the MySQL is already running and other configurations of MySQL. You can even stop the server by clicking on “stop MySQL server”. Well this is not the only way to start the server, we can even manually start the MySQL server via command line.

Configure MySQL in Mac for Terminal App
To start the MySQL via terminal app, you need to use the following command.
But this command will display the following error on your terminal screen.
“command not found: mysql.server”
To fix this issue, we have to define the MySQL path in the paths file. The easiest way to open the file is to type the following command in the terminal and provide the password.
Include one per line given below paths in the /etc/paths file.

Next, type the command to start the MySQL server.
Here is the output we get when MySQL is started correctly.
We used `sudo` with mysql.server start otherwise it will throw permission errors.
Important MySQL Commands
Here are the important commands that are often used while working with MySQL.
Run the following command to stop mysql server:
Type the below command to restart the MySQL server that is already running:
To verify the current status of MySQL server:
Access Root via Mac Terminal & Create Database
Now, we have reached to essential step of our tutorial. We are all set with the server configurations, now we have to access the MySQL root. When you run the following command it will ask for the password. So you have to type the password that you defined when installing the MySQL initially.
Now we will use the mysql query to create a new database.
You can verify the newly created MySQL database.
Use the newly created “positrondb” db by using the below command.
Create a table in the MySQL database => ‘positrondb’.
Verify the table in the database.
Summary
We have completed the MySQL tutorial, and In this tutorial, we learned how to install MySQL community server on Mac OS, How to access root user in the MySQL server, Create Database and Table.
I hope you liked this tutorial, dont forget to share it with others.
Источник
Как установить MySQL на Mac OS?
MySQL установить на компьютер с MacOS очень просто. Это сделать также просто как установить на Linux. Для установки нам понадобится пакетный менеджер brew и 5-10 минут свободного времени.
Подготовка
Как Вы уже поняли для установки MySQL на Mac OS нам понадобится brew, в котором есть все из мира Linux. Если у Вас его еще нет на Mac`е, то установить можно командой:
Многие разрабы считают, что такие вещи захламляют Mac и им нет места на их компьютере. И что предпочтительно устанавливать MysSQL через докер. Но brew очень бережно относится к вашей операционной системе и при выполнении команды на удаления, он полностью удалить MySQL из ОС.
Как установить MySQL на Mac OS?
Для установки нужно выполнить команду:
Если Вам по какой-то причине нужно установить определенную версию, то в конце указываем mysql@нужная_версия . Примерно вот так — brew install mysql@5.7
Чтобы Ваш мак «научился» работать с алиасом – mysql, нужно создать линк. Это нужно чтобы в консоли было удобно управлять через команду mysql. Для этого выполним:
Если был установлен MySQL 5.7, то команда будет такой: brew link —force mysql@5.7
Если хотите, чтобы MySQL запускался всегда при включении компа, то вот команда для этого:
Эта команда не зависит от версией установленного MySQL.
Вот и все! Сервер баз данных MySQL установлен на ваш Mac OS.
Как пользоваться?
Запуск
Если Вы не сделали автоматическую загрузку сервиса MySQL, то запустить его вручную можно вот так:
Перезапуск
Устанавливаем пароль на root
По умолчанию на root в MySQL не установлен пароль. Исправить просто! Выполняем по очереди команды:
Не забываем, что:
- password — это ваш пароль,
- localhost — это означает, что подключиться к серверу можно будет только с локальной машины. Если нужен доступ извне, то меняем это на знак % или 192.168.0.0, если для безопасности нужно ограничить подключение только из локальной сети.
Удаленный доступ к серверу
Файл конфигурации MySQL на MacOS находится по адресу /usr/local/etc/my.ini. По умлчанию доступ к серверу ограничен только локальной машиной, где он установлен. Чтобы снять это ограничение, нужно в файле конфигурации внести изменения:
Как удалить MySQL на Mac OS?
С пакетным менеджером brew также легко удалять пакеты, как их устанавливать.
Для удаления Mysql на Mac OS воспользуйтесь командой:
Источник
Mysql commands mac os
The package is located inside a disk image ( .dmg ) file that you first need to mount by double-clicking its icon in the Finder. It should then mount the image and display its contents.
Before proceeding with the installation, be sure to stop all running MySQL server instances by using either the MySQL Manager Application (on macOS Server), the preference pane, or mysqladmin shutdown on the command line.
To install MySQL using the package installer:
Download the disk image ( .dmg ) file (the community version is available here) that contains the MySQL package installer. Double-click the file to mount the disk image and see its contents.
Double-click the MySQL installer package from the disk. It is named according to the version of MySQL you have downloaded. For example, for MySQL server 8.0.26 it might be named mysql-8.0.26-macos- 10.13-x86_64 .pkg .
The initial wizard introduction screen references the MySQL server version to install. Click Continue to begin the installation.
The MySQL community edition shows a copy of the relevant GNU General Public License. Click Continue and then Agree to continue.
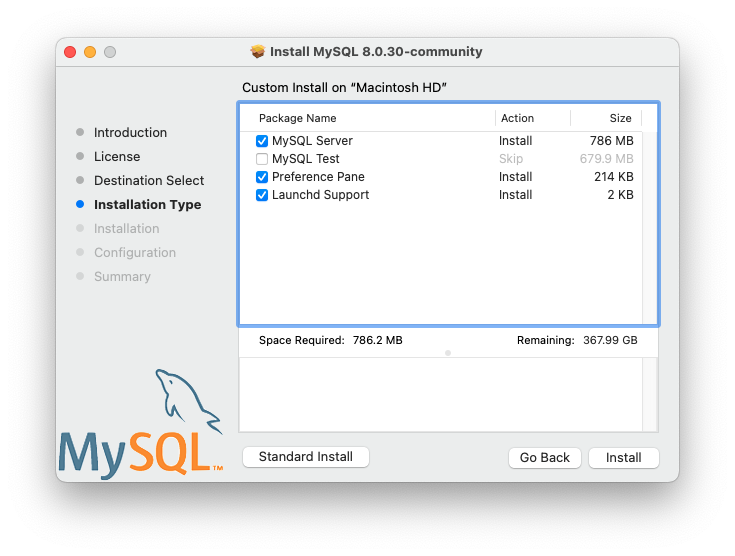
From the Installation Type page you can either click Install to execute the installation wizard using all defaults, click Customize to alter which components to install (MySQL server, MySQL Test, Preference Pane, Launchd Support — all but MySQL Test are enabled by default).
Although the Change Install Location option is visible, the installation location cannot be changed.
Figure 2.13 MySQL Package Installer Wizard: Installation Type
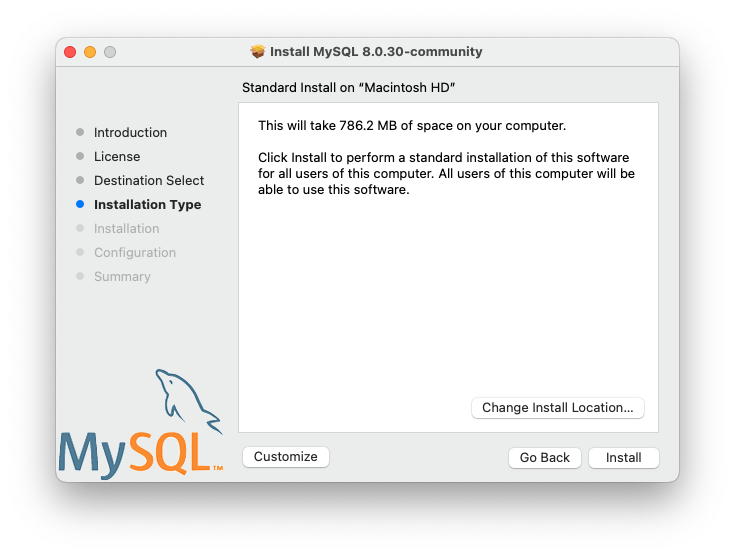
Figure 2.14 MySQL Package Installer Wizard: Customize
Click Install to install MySQL Server. The installation process ends here if upgrading a current MySQL Server installation, otherwise follow the wizard’s additional configuration steps for your new MySQL Server installation.
After a successful new MySQL Server installation, complete the configuration steps by choosing the default encryption type for passwords, define the root password, and also enable (or disable) MySQL server at startup.
The default MySQL 8.0 password mechanism is caching_sha2_password (Strong), and this step allows you to change it to mysql_native_password (Legacy).
Figure 2.15 MySQL Package Installer Wizard: Choose a Password Encryption Type
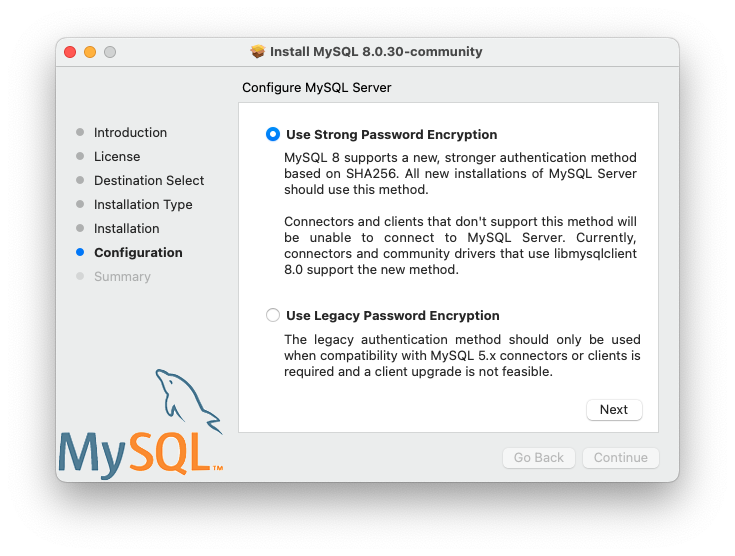
Choosing the legacy password mechanism alters the generated launchd file to set —default_authentication_plugin=mysql_native_password under ProgramArguments . Choosing strong password encryption does not set —default_authentication_plugin because the default MySQL Server value is used, which is caching_sha2_password .
Define a password for the root user, and also toggle whether MySQL Server should start after the configuration step is complete.
Figure 2.16 MySQL Package Installer Wizard: Define Root Password
Summary is the final step and references a successful and complete MySQL Server installation. Close the wizard.
Figure 2.17 MySQL Package Installer Wizard: Summary
MySQL server is now installed. If you chose to not start MySQL, then use either launchctl from the command line or start MySQL by clicking «Start» using the MySQL preference pane. For additional information, see Section 2.4.3, “Installing and Using the MySQL Launch Daemon”, and Section 2.4.4, “Installing and Using the MySQL Preference Pane”. Use the MySQL Preference Pane or launchd to configure MySQL to automatically start at bootup.
When installing using the package installer, the files are installed into a directory within /usr/local matching the name of the installation version and platform. For example, the installer file mysql-8.0.26- macos10.15-x86_64.dmg installs MySQL into /usr/local/mysql-8.0.26-macos10.15-x86_64/ with a symlink to /usr/local/mysql . The following table shows the layout of this MySQL installation directory.
The macOS installation process does not create nor install a sample my.cnf MySQL configuration file.
Table 2.7 MySQL Installation Layout on macOS
Источник


