- Как правильно установить MYSQL на Mac OSX
- Как установить MySQL на Mac OS?
- Подготовка
- Как установить MySQL на Mac OS?
- Как пользоваться?
- Запуск
- Перезапуск
- Устанавливаем пароль на root
- Удаленный доступ к серверу
- Как удалить MySQL на Mac OS?
- Установка сервера MySQL и phpMyAdmin на Mac OS X
- Конфигурация сервера MySQL
- Тестирование соединения с MySQL
- Установка и настройка phpMyAdmin
- Установка модуля mcrypt
- Комментарии (18):
- Александр
- makegood
- makegood
- ayrat
- Denis
- Александр
- makegood
- Александр
- Сергей
- Сергей
- makegood
- Serge
- Максим
- Install Apache, MySQL, PHP on macOS 11 Big Sur and earlier macOS
- Get your Local Web Development Environment Up & Running on macOS Big Sur 11 and Catalina 10.15
- Setting Stuff Up
- Apache/WebSharing
- Document Root
- System Level Web Root
- User Level Root
- Override .htaccess and allow URL Rewrites
- MySQL
- Add Mysql to your path
- Change the MySQL root password
- Starting MySQL
- Fix the 2002 MySQL Socket error
- phpMyAdmin
- Permissions
Как правильно установить MYSQL на Mac OSX
В предыдущей заметке я рассказывал как удалть Mysql с вашей системы, в этой же заметке давайте поговорим о том как правильно его установить. Давайте начнём с простого и согласимся что в век пакетных менеджеров устанавливать что либо в ручную это как минимум нелепо.
Так вот для усановки дополнительных пакетов в Mac Os существует прекрасный менеджер компонентов Homebrew его то мы и будет использовать. Если у вас по каким то причинам ещё не установлен данный чудесный инструмент, немедленно его установите следующей командой:
Ну а теперь вы можете одной лишь командой установить вообще всё что угодно в вашу Mac Os в том числе и MySql. Вот так вот просто и быстро:
Так как сейчас актуальная версия сейчас 8.x, а мне пока что больше по душе 5.7, если вы с числе таких-же ратроградов, вам поможет вот такая команда:
Всё наш sql сервер установлен и готов рватся в бой. Давайте теперь немного сконфигурируем его:
Для конфигурации запустите сервер:
Зададим пароль пользователю root
Если на этом этапе у вас возникнет проблема с тем что терминал не знает команды MySQL выполните линковку с версией 5.7 или той, которую вы выбрали в качестве фаворита
Для запуска последующего запуска сервера Mysql
Для администрирования баз данных в OSX я предпочитаю использовать программу Sequel Pro вместо пресловутого PhpMyadmin возможно вам будет интересно попробовать что то новое для себя =) Кстати программа бесплатная и чертовски удобная. Позволяет подключатся по SSH к вашим удалённым серверам ну и с локальным справляется просто отлично!
Источник
Как установить MySQL на Mac OS?
MySQL установить на компьютер с MacOS очень просто. Это сделать также просто как установить на Linux. Для установки нам понадобится пакетный менеджер brew и 5-10 минут свободного времени.
Подготовка
Как Вы уже поняли для установки MySQL на Mac OS нам понадобится brew, в котором есть все из мира Linux. Если у Вас его еще нет на Mac`е, то установить можно командой:
Многие разрабы считают, что такие вещи захламляют Mac и им нет места на их компьютере. И что предпочтительно устанавливать MysSQL через докер. Но brew очень бережно относится к вашей операционной системе и при выполнении команды на удаления, он полностью удалить MySQL из ОС.
Как установить MySQL на Mac OS?
Для установки нужно выполнить команду:
Если Вам по какой-то причине нужно установить определенную версию, то в конце указываем mysql@нужная_версия . Примерно вот так — brew install mysql@5.7
Чтобы Ваш мак «научился» работать с алиасом – mysql, нужно создать линк. Это нужно чтобы в консоли было удобно управлять через команду mysql. Для этого выполним:
Если был установлен MySQL 5.7, то команда будет такой: brew link —force mysql@5.7
Если хотите, чтобы MySQL запускался всегда при включении компа, то вот команда для этого:
Эта команда не зависит от версией установленного MySQL.
Вот и все! Сервер баз данных MySQL установлен на ваш Mac OS.
Как пользоваться?
Запуск
Если Вы не сделали автоматическую загрузку сервиса MySQL, то запустить его вручную можно вот так:
Перезапуск
Устанавливаем пароль на root
По умолчанию на root в MySQL не установлен пароль. Исправить просто! Выполняем по очереди команды:
Не забываем, что:
- password — это ваш пароль,
- localhost — это означает, что подключиться к серверу можно будет только с локальной машины. Если нужен доступ извне, то меняем это на знак % или 192.168.0.0, если для безопасности нужно ограничить подключение только из локальной сети.
Удаленный доступ к серверу
Файл конфигурации MySQL на MacOS находится по адресу /usr/local/etc/my.ini. По умлчанию доступ к серверу ограничен только локальной машиной, где он установлен. Чтобы снять это ограничение, нужно в файле конфигурации внести изменения:
Как удалить MySQL на Mac OS?
С пакетным менеджером brew также легко удалять пакеты, как их устанавливать.
Для удаления Mysql на Mac OS воспользуйтесь командой:
Источник
Установка сервера MySQL и phpMyAdmin на Mac OS X
Есть множество способов установки MySQL на Mac OS X, я предпочел стандартную установку из дистрибутива, при любом из способов инсталирования MySQL может возникнуть ряд вопросов, на которые следует обратить внимание. Дополнительно рассмотрим установку веб-интерфейса phpMyAdmin для администрирования баз данных MySQL и модуля mcrypt.
Системные требования: Mac OS X 10.6.6 и MySQL 5.5.8. В MySQL версии ниже 5.5 не работает панель настроек (MySQL.prefPane).
Скачать MySQL для Mac OS X можно на официальном сайте. Переходим на страницу загрузки, в меню слева переходим по ссылке MySQL Community Server и в выпадающем списке выбираем платформу Mac OS X. Ищем версию совместимую с операционной системой и скачиваем. Монтируем образ и последовательно устанавливаем основной пакет MySQL, MySQLStartupItem.pkg (автозагрузка) и MySQL.prefPane (панель настроек позволяет запускать/останавливать сервер и добавить его в автозагрузку). Установка тривиальна, достаточно принять условия лицензионного соглашения и следовать инструкциям.
В начале необходимо переименовать папку, в которую установлен MySQL. Она находится в скрытой директории /usr/local/mysql-5.5.8-osx10.6-x86_64 , если в системе уже был установлен MySQL, старую папку необходимо удалить или переименовать:
sudo mv /usr/local/mysql-5.5.8-osx10.6-x86_64 /usr/local/mysql
Для запуска и остановки сервера MySQL можно воспользоваться командами:
sudo /Library/StartupItems/MySQLCOM/MySQLCOM start
sudo /Library/StartupItems/MySQLCOM/MySQLCOM stop
Если сейчас попытаться запустить сервер MySQL, то он вернет ошибку:
ERROR 2002 (HY000): Can’t connect to local MySQL server through socket ‘/tmp/mysql.sock’ (2)
Конфигурация сервера MySQL
Создадим файл конфигурации MySQL /etc/my.cnf (не создается автоматически):
sudo touch /etc/my.cnf
sudo nano /etc/my.cnf
и добавим в него следующие строки:
Файл mysql.sock будет храниться папке /tmp , он создается автоматически при запуске сервера MySQL, поэтому необходимо дать пользователю _mysql права на чтение и запись в папку /tmp :
sudo chown _mysql:staff /tmp
Для запуска сервера MySQL необходимо перейти в Системные настройки > MySQL > Start MySQL Server или через командную строку, как упоминалось выше.
Для удобства работы с MySQL через командную строку добавим путь /usr/local/mysql/bin/ в переменную окружения PATH. В командной строке выполняем следующие инструкции:
Сохраняем и перезапускаем терминал. Теперь можно пользоваться командами mysqladmin (администрирование) и mysql (работа с базами данных).
Для проверки работоспособности сервера введем в командной строчке mysql , если все инструкции выполнены верно, мы увидим приглашение MySQL:
Настройка сервера закончена. Если требуется более тонкая конфигурация можно воспользоваться файлами настроек, которые находятся в папке /usr/local/mysql/support-files .
Возможно после перезапуска системы будет выводиться следующее предупреждение: 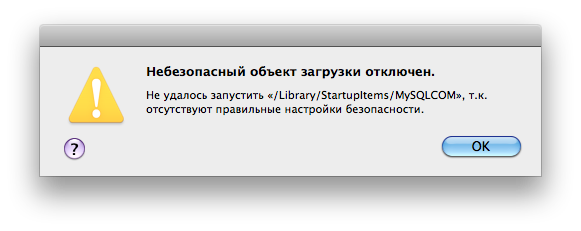
Предупреждение показывается, если в настройках указана автозагрузка сервера при старте системы, проверить можно следующим образом:
sudo nano /etc/hostconfig
Ищем строку со значением MYSQLCOM=-YES- и меняем ее на MYSQLCOM=-NO- , если автозагрузка не требуется (то же самое можно сделать через панель настроек).
Если автозагрузка сервера MySQL нужна и скрыть предупреждение, нужно ввести в следующую команду:
sudo chown -R root:wheel /Library/StartupItems/MySQLCOM
С более подробной установкой можно ознакомиться в файле ReadMe.txt, который находится на установочном образе диска MySQL.
Сделаем так, чтобы пользователь root мог соединиться с сервером, только указав пароль:
mysqladmin -u root password ‘ваш_пароль’
Тестирование соединения с MySQL
Если в системе уже подключен PHP и сконфигурирован Apache, можно протестировать совместную работу с MySQL, но для начала может потребоваться внести небольшие изменения в конфигурацию PHP и указать путь к файлу mysql.sock в параметре mysql.default_socket . Сделать это можно с помощью символьной ссылки, переходим к командной строке и вводим следующую команду:
sudo mkdir /var/mysql
sudo ln -s /tmp/mysql.sock /var/mysql/mysql.sock
Простой PHP-скрипт для тестирования соединения с MySQL:
Установка и настройка phpMyAdmin
Для удобного администрирования баз данных MySQL установим веб-интерфейс phpMyAdmin.
Предварительно необходимо настроить веб-сервер Apache и PHP (см. Настройка веб-сервера Apache и PHP на Mac OS X).
Переходим на официальный сайт phpMyAdmin и скачиваем последнюю стабильную версию. Распаковываем архив и переименовываем папку в phpMyAdmin. Переместим в директорию с нашими сайтами, например /Users/andrey/Sites/phpMyAdmin/ .
В корневом каталоге phpMyAdmin создадим файл конфигурации config.inc.php и поместим в него следующие строки:
Теперь можно перейти в веб-интерфейс phpMyAdmin ( http://localhost/phpMyAdmin/ ). Для корректной работы phpMyAdmin потребуется установить модуль mcrypt, иначе вы увидите следующее предупреждение:
Cannot load mcrypt extension. Please check your PHP configuration.
Установка модуля mcrypt
Примечание: для установки модуля mcrypt потребуется наличие установленного Xcode.
Находясь в домашнем каталоге создадим временный каталог temp (будьте внимательнее с названием и расположением каталогов) и перейдем в него:
Скачиваем и распаковываем библиотеку libmcrypt:
curl -O http://surfnet.dl.sourceforge.net/project/mcrypt/Libmcrypt/2.5.8/libmcrypt-2.5.8.tar.gz
tar xzf libmcrypt-2.5.8.tar.gz
Переходим в папку libmcrypt-2.5.8:
Выполняем следующие команды:
MACOSX_DEPLOYMENT_TARGET=10.6 CFLAGS=» -arch x86_64 -g -Os -pipe -no-cpp-precomp» CCFLAGS=» -arch x86_64 -g -Os -pipe» CXXFLAGS=» -arch x86_64 -g -Os -pipe» LDFLAGS=» -arch x86_64 -bind_at_load» ./configure —disable-dependency-tracking
make
sudo make install
Возвращаемся в папку temp:
Теперь скачаем PHP из исходников, распакуем и сконфигурируем PHP, переходим к командной строке и выполняем следующие инструкции:
curl -O http://www.opensource.apple.com/source/apache_mod_php/apache_mod_php-53.3.1/php-5.3.3.tar.bz2
tar xjf php-5.3.3.tar.bz2
MACOSX_DEPLOYMENT_TARGET=10.6 CFLAGS=» -arch x86_64 -g -Os -pipe -no-cpp-precomp» CCFLAGS=» -arch x86_64 -g -Os -pipe» CXXFLAGS=» -arch x86_64 -g -Os -pipe» LDFLAGS=»-arch x86_64 -bind_at_load» ./configure
make
sudo make install
Теперь необходимо перейти в файл конфигурации PHP и сообщить ему о новом модуле:
sudo nano /etc/php.ini
Перезапускаем веб-сервер Apache.
Файл mcrypt автоматически установился в каталог /usr/lib/php/extensions/no-debug-non-zts-20090626/mcrypt.so .
Комментарии (18):
Александр
Попытался сделать так как Вы написали в этом посте и хотел бы добавить маленькое упущение на котором сам споткнулся:
>> и добавим в него следующие строку:
>>
>> basedir=/usr/local/mysql
Перед «basedir=/usr/local/mysql» строкой выше нужно добавить [mysqld] если такой директивы нет. Иначе эта переменная не переопределится.
makegood
Согласен, там можно еще и другие директивы добавить, но я потом пробовал удалять все лишнее и MySQL по прежнему работал, на чистой машине еще не успел протестировать.
Сделал все как Вы написали, mcrypt так и не заработал. Может сможете подсказать в чем может быть подвох?
И phpMyAdmin не принимает русские символы, выводит знаки вопроса (. ).. хотя меню по русски..
Может ли это быть изза не рабочего mcrypt?
makegood
Max, mcrypt по приведенному руководству должен ставиться, на работу phpMyAdmin он не влияет, попробуйте Sequel Pro, он намного удобнее чем phpMyAdmin.
Спасибо, попробую… но все же хотелось бы разобраться с phpmyadmin, как его заставить работать с русскими символами?
Поставил Sequel Pro, понравилась програмка, но в стандартной кодировке опять вопросы вместо русских символов, поменял кодировку на utf8-unicode, в Sequel Pro стало нормально, а когда вытягиваю в браузер, то опять знаки вопроса…((
Все, разобрался, спс.
Статейка кстати отличная
ayrat
Спасибо, отличная статья — долго мучался с установкой mcrypt, пока не нашел вашу статью, а после прочитал про Sequel Pro и выходит зря ставил mcrypt )))
ненад за меня отвечать плз )))
для чего нужен mcrypt? и что такое Sequel Pro?
Denis
Сделал всё по инструкции, только сервер не запускается и пишет ошибку «Bad CPU type in executable». Как быть? Может я не ту версию сервера скачал?
Устанавливал версию 5.5.
Александр
«Монтируем образ и последовательно устанавливаем основной пакет MySQL, MySQLStartupItem.pkg (автозагрузка) и MySQL.prefPane (пане»
Подскажите малограмотному откуда взять эти пакеты. После скачивания получил архив, развернул, получил директорий с массой встроенных…….
если можно поподробнее…
makegood
Александр
Спасибо большое! Скачал, установил.
Сергей
ребята, так как с кодировкой разобраться. уже великое множество перебробовал, и все равно когда базу данных из phpmyadmin к сайту подключаю все символы вопросами отображаются. подскажите оптимальную кодировку !?
Сергей
makegood
Serge
Не могу избавиться от
ERROR 2002 (HY000): Can’t connect to local MySQL server through socket ‘/tmp/mysql.sock’ (2)
после перезагрузки.
уже и переустанавливал, и по 6 раз проходил все с самого начала — ни в какую не запускается mysql
Может, у кого-то была такая же проблема?
Максим
Самая годная статья которую нашел. Ничего лишнего нет.
Источник
Install Apache, MySQL, PHP on macOS 11 Big Sur and earlier macOS
Get your Local Web Development Environment Up & Running on macOS Big Sur 11 and Catalina 10.15

With Apples’ new macOS Big Sur 11 available for download, here is how to get the AMP stack up and running on the new macOS. This tutorial will go through the process of getting Apache, MySQL, PHP (or otherwise known as the ‘AMP’ stack) and phpMyAdmin running on the new mac OS Big Sur.
This guide will also work on macOS Catalina and Mojave.
This tutorial sets up the AMP stack in more of a traditional way using the loaded Apache and PHP and downloading MySQL and phpMyAdmin.
Setting Stuff Up
Apache/WebSharing
Web serving is built into Big Sur with Apache app, it is installed ready to be fired up.
This needs to be done in the Terminal which is found in the OS filing system at /Applications/Utilities/Terminal
For those not familiar with the Terminal, it really isn’t as intimidating as you may think, once launched you are faced with a command prompt waiting for your commands — just type/paste in a command and hit enter, some commands give you no response — it just means the command is done, other commands give you feedback.
Using the prefix of sudo is required for commands that have their applications protected in specific folders — when using sudo you will need to confirm with your admin password or iCloud password if set up that way. let’s get to it .
to start Apache web sharing
To find the Apache version
The Apache version that comes in macOS Big Sur is Apache/2.4.46
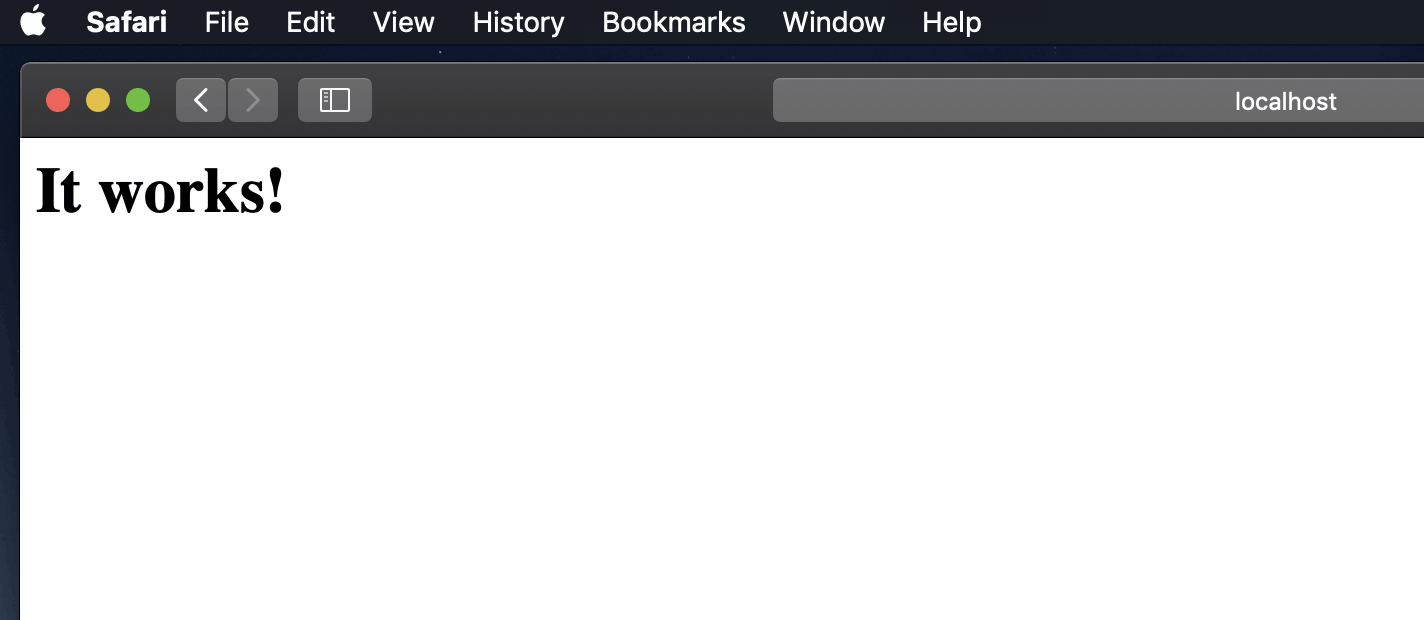
After starting Apache — test to see if the webserver is working in the browser — http://localhost — you should see the «It Works!» text.
If you don’t get the localhost test, you can try troubleshooting Apache to see if there is anything wrong in its config file by running
This will give you an indication of what might be wrong.
Document Root
Document root is the location where the files are shared from the file system and is similar to the traditional names of ‘public_html‘ and ‘htdocs‘, macOS has historically had 2 web roots one at a system level and one at a user level — you can set both up or just run with one, the user level one allows multiple accounts to have their own web root whilst the system one is global for all users. It seems there is less effort from Apple in continuing with the user level one but it still can be set up with a couple of extra tweaks in configuration files. It is easier to use the user level one as you don’t have to keep on authenticating as an admin user.
System Level Web Root
— the default system document root is still found at —
http://localhost/
The files are shared in the filing system at —
User Level Root
The other web root directory which is missing by default is the ‘
/Sites’ folder in the User account. This takes a bit longer to set up but some users are very accustomed to using it.
You need to make a «Sites» folder at the root level of your account and then it will work. Once you make the Sites folder you will notice that it has a unique icon which is a throwback from a few versions older. Make that folder before you set up the user configuration file described next.
You have to make a few additional tweaks to get the
/Sites folder back up and running.

Add a “username.conf” filed under:
If you don’t already have one (very likely), then create one named by the short username of the account with the suffix .conf, its location and permissions/ownership is best tackled by using the Terminal, the text editor ‘nano‘ would be the best tool to deal with this.
If you would rather edit config files in a text editor as an app I would suggest text editor like the free BBEdit which allows you to open hidden system files.
Launch Terminal, (Applications/Utilities), and follow the commands below, first one gets you to the right spot, 2nd one opens the text editor on the command line (swap ‘username‘ with your account’s shortname, if you don’t know your account shortname type ‘whoami‘ the Terminal prompt):
Then add the content below swapping in your ‘username’ in the code below, there is a slightly different user directive for Big Sur and Catalina, make sure ‘Require host localhost’ is used:
Permissions on the file should be:
If not, you need to change it.
Open the main httpd.conf and allow some modules:
And make sure these modules are uncommented (the first 2 should already be on a clean install):
While you have this file open also to get php running, uncomment the below . (Mentioned also in the PHP part of the article).
And also uncomment this configuration file also in httpd.conf — which allows user home directories.
Save all your changes (Control + O in nano)
Then open another Apache config file and uncomment another file:
Save all your changes (Control + O in nano)
Restart Apache for the new file to be read:
Then this user level document root will be viewable at:
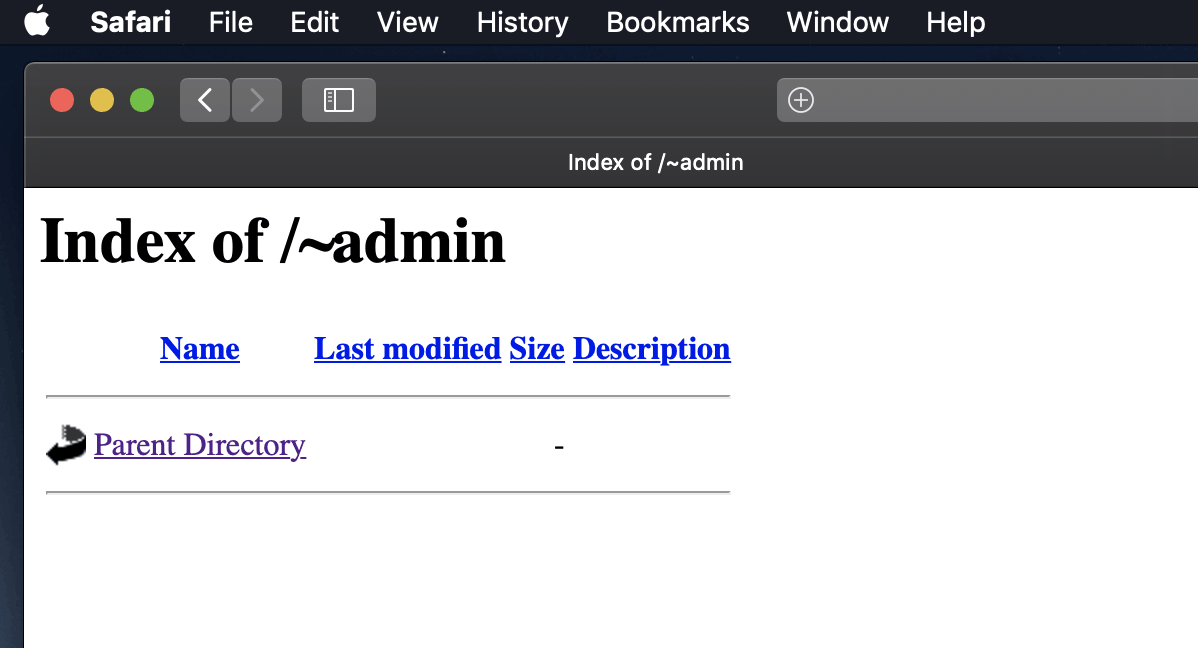
You should only see a directory tree like structure if the folder is empty.
Override .htaccess and allow URL Rewrites
If you are going to use the web serving document root at /Library/WebServer/Documents it is a good idea to allow any .htaccess files used to override the default settings — this can be accomplished by editing the httpd.conf file at line 217 and setting the AllowOverride to All and then restart Apache. This is already taken care of at the Sites level webroot by following the previous step.
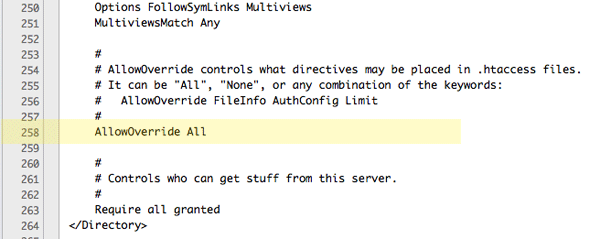
Also while here allow URL rewrites so your permalinks look clean, not ugly.
Uncomment in httpd.conf — should be uncommented on a clean install.
PHP 7.3.24 is loaded in this version of macOS Big Sur and needs to be turned on by uncommenting a line in the httpd.conf file.
Use «control» + «w» to search within nano and search for ‘php’ this will land you on the right line then uncomment the line (remove the #):
Write out and Save using the nano shortcut keys at the bottom ‘control o’ and ‘control x’
Reload Apache to kick in
To see and test PHP, create a file name it «phpinfo.php» and file it in your document root with the contents below, then view it in a browser.
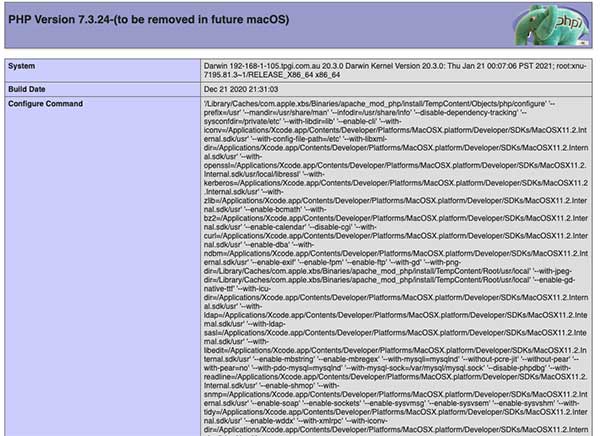
Here you will see that Apple are not intending on bundling PHP in the macOS in the future, perhaps with the next incarnation of the OS, but for now it’s working albeit not version 7.4. However you can use a Homebrew PHP solution that allows for any PHP version to be used.
MySQL
MySQL doesn’t come pre-loaded with macOS Big Sur and needs to be dowloaded from the MySQL site.
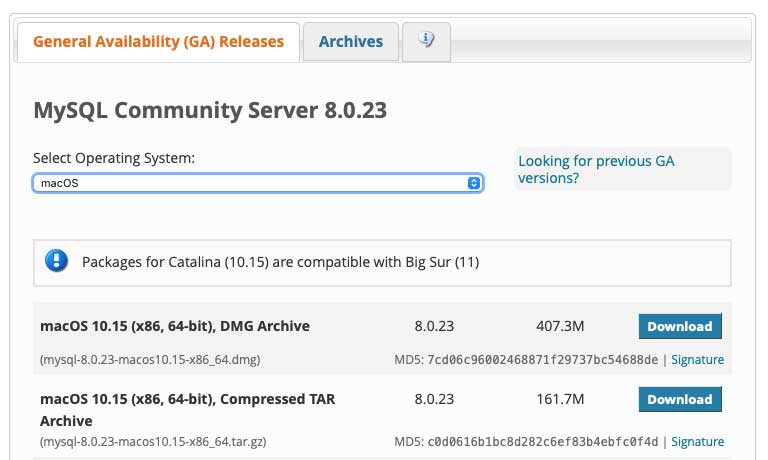
The latest version of MySQL 8.0.23 does work with the latest release of macOS.
Use the macOS 10.15 (x86, 64-bit), DMG Archive version (works on macOS Big Sur).
If you are upgrading from a previous macOS and have an older MySQL version you do not have to update it.
Also if you have a clean install and want the earlier MySQL version 5.7, you can still get this from the MySQL site — from the ‘Looking for previous GA versions’ link. (MySQL 8 is relatively new and not in many production set ups)
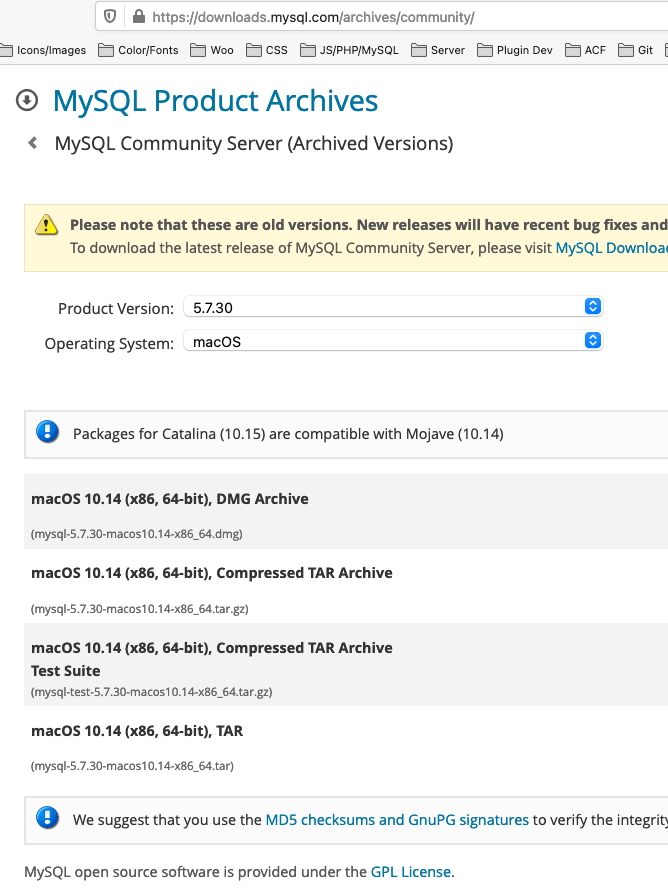
One thing with MySQL upgrades, always take a data dump of your database in case things go south and before you upgrade to macOS Catalina make sure your MySQL Server is not running.
When downloading you don’t have to sign up, look for » No thanks, just start mydownload — go straight to the download.
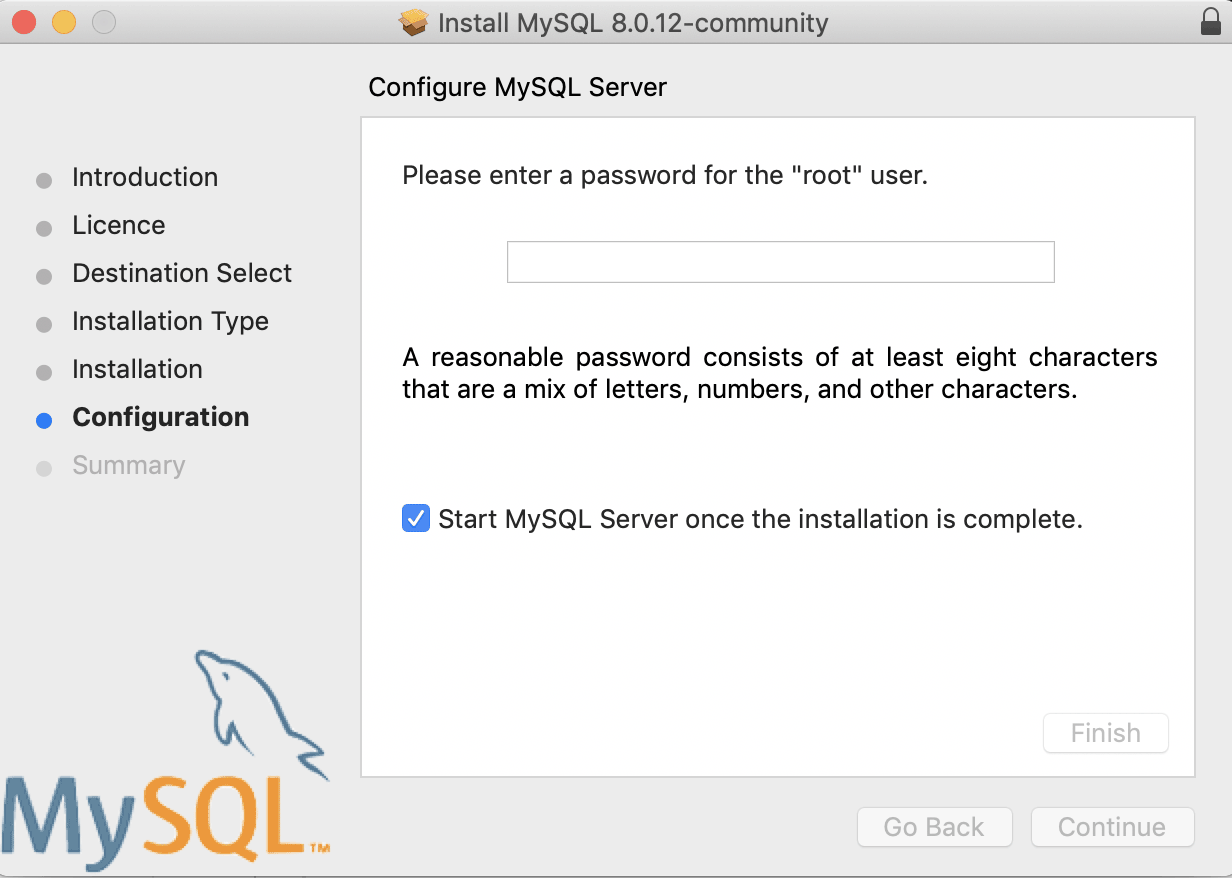
Once downloaded open the .dmg and run the installer.
During the MySQL process you are prompted to choose between strong and legacy password encryptions, since version 8 is entirely new, some software like phpMyAdmin can’t connect with the newer encryptions — so if you are going to use a GUI wrapper like phpMyadmin I suggest you stick to legacy.

Then add a password for the MySQL root user.
Add Mysql to your path
After installation, in order to use MySQL commands without typing the full path to the commands you need to add the mysql directory to your shell path, (optional step) this is done in your Zsh shell profile “.zshrc” file in your home directory (previous shells were bash), if you don’t have that file just create it using vi or nano:
The first command brings you to your home directory and opens the .zsh file or creates a new one if it doesn’t exist, then add in the line above which adds the MySQL binary path to commands that you can run. Exit the file with type “control + x” and when prompted to save the change by typing “y”. The last thing to do here is to reload the shell for the above to work straight away.
Change the MySQL root password
(This section is left in for reference — in previous macOS MySQL packages the password set during the installation process would fail — hence the info below. This newer version, however, seems to work).
Note that this is not the same as the root or admin password of macOS — this is a unique password for the MySQL root user.
Start it in safe mode:
This will be an ongoing command until the process is finished so open another shell/terminal window, and log in without a password as root:
Change the lowercase ‘MyNewPass’ to what you want — and keep the single quotes.
Starting MySQL
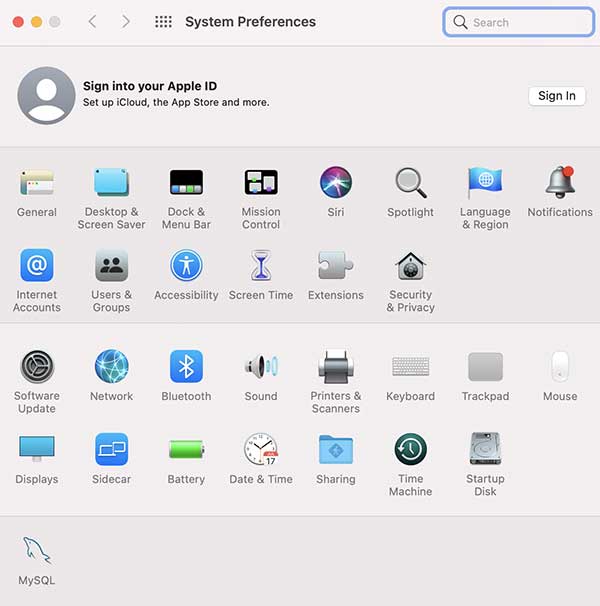
You can then start the MySQL server from the System Preferences adds to the last row or via the command line.
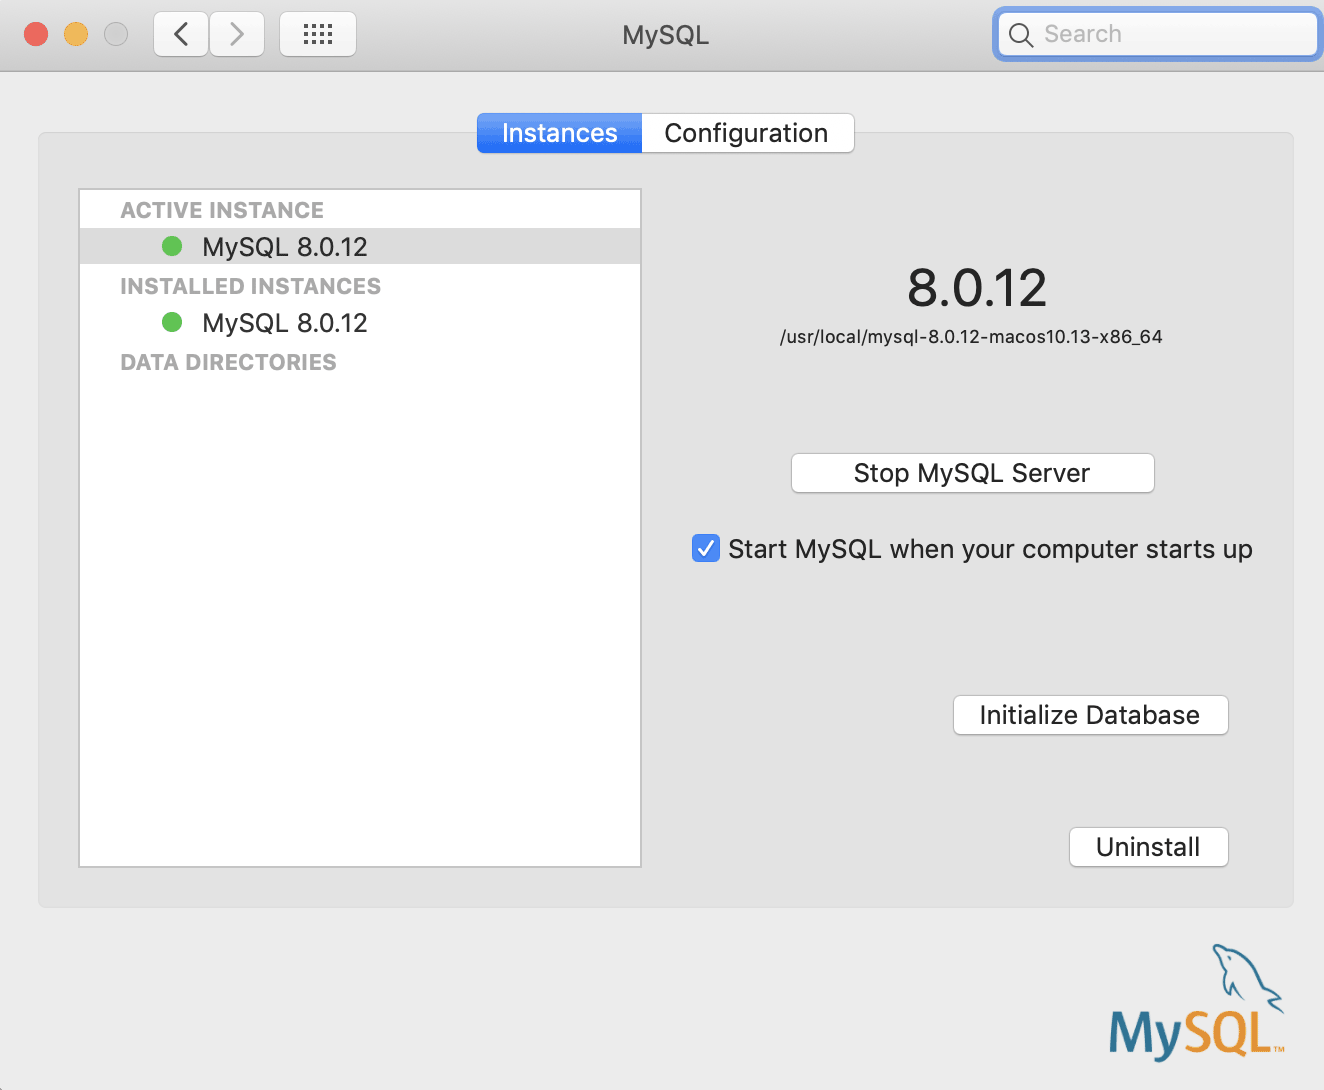
The new MySQL system preference also has the uninstall feature — useful if you’ve installed it with a security encryption that’s not working for you and want to try the other one. You can also see the paths to the config and data sources of MySQL in the configuration tab.
Or to Command line start MySQL.
To find the MySQL version from the terminal, type at the prompt:
This also puts you into a shell interactive dialogue with MySQL, type \q to exit.
Fix the 2002 MySQL Socket error
Fix the looming 2002 socket error — which is linking where MySQL places the socket and where macOS thinks it should be, MySQL puts it in /tmp and macOS looks for it in /var/mysql the socket is a type of file that allows MySQL client/server communication.
phpMyAdmin
First fix the 2002 socket error if you haven’t done so from the MySQL section-
Download phpMyAdmin, the zip English package will suit a lot of users, then unzip it and move the folder with its contents into the document root level renaming folder to ‘phpmyadmin’.
Make the config folder
Change the permissions
Run the set up in the browser
username/phpmyadmin/setup/ or http://localhost/phpmyadmin/setup/
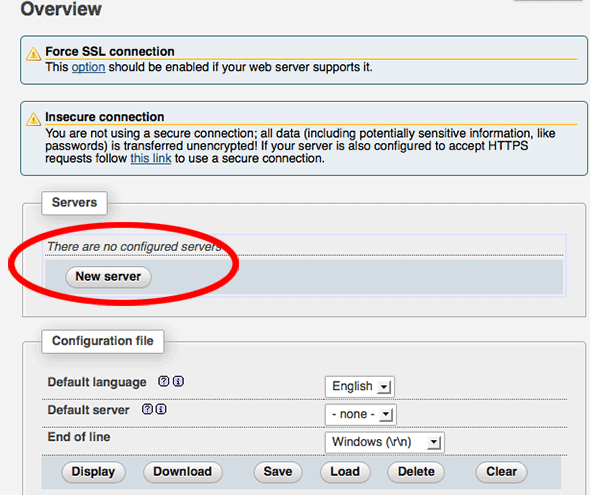
You need to create a new localhost mysql server connection, click new server.
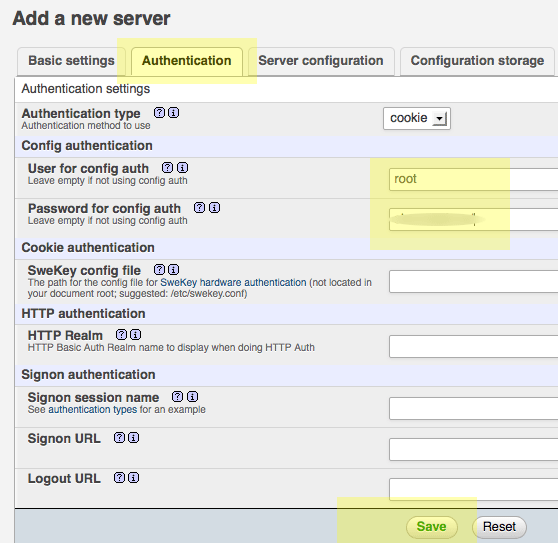
Switch to the Authentication tab and set the local MySQL root user and the password.
Add in the username “root” (maybe already populated, add in the password that you set up earlier for the MySQL root user set up, click on save and you are returned to the previous screen.
(This is not the macOS Admin or root password — it is the MySQL root user)
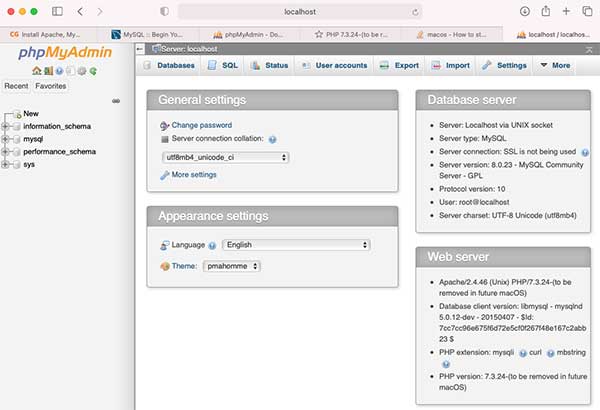
Now going to http://localhost/
username/phpmyadmin/ will now allow you to interact with your MySQL databases.
Permissions
To run a website with no permission issues it is best to set the web root and its contents to be writeable by all since it’s a local development it shouldn’t be a security issue.
Let’s say that you have a site in the User Sites folder at the following location
/Sites/testsite you would set it to be writeable like so:
If you are concerned about security then instead of making it world writeable you can set the owner to be Apache _www but when working on files you would have to authenticate more as admin you are «not» the owner, you would do this like so:
This will set the contents recursively to be owned by the Apache user.
If you had the website stored at the System level Document root at say /Library/WebServer/Documents/testsite then it would have to be the latter:
Another more straightforward way to do this if you have a one user workstation is to change the Apache web user from _www to your account.
That’s it! You now have the native AMP stack running on top of macOS Big Sur or Catalina.
If you are a WordPress user and want a smooth lean local development environment — also worth checking out is Laravel Valet which runs on top of macOS — check out my Valet WordPress Guide on macOS.
Источник


