- Mysql jdbc driver mac os
- Step 1. Verify the driver installation.
- Step 2. Set up the data source.
- Set Up Data Source Using Database Explorer
- Set Up Data Source Using Command Line
- Step 3. Connect using the Database Explorer app or the command line.
- Connect to MySQL Using Database Explorer App
- Connect to MySQL Using JDBC Driver and Command Line
- Документация
- MySQL JDBC для macOS
- Шаг 1. Проверьте установку драйвера.
- Шаг 2. Настройте источник данных.
- Настройте источник данных Используя Database Explorer
- Настройте источник данных Используя командную строку
- Шаг 3. Подключение с помощью приложения Database Explorer или командной строки.
- Соединитесь с MySQL Using Database Explorer App
- Соединитесь с MySQL Using JDBC Driver и Command Line
- Mysql jdbc driver mac os
- Step 1. Verify the driver installation.
- Step 2. Add the JDBC driver to the MATLAB static Java class path.
- Step 3. Set up the data source using Database Explorer.
- Step 4. Connect using Database Explorer or the command line.
- Connect to MySQL using Database Explorer.
- Connect to MySQL using the JDBC connection command line.
Mysql jdbc driver mac os
This tutorial shows how to set up a data source and connect to a MySQL ® database using the Database Explorer app or the command line. This tutorial uses the MySQL Connector/J 5.1.46 driver to connect to a MySQL Version 5.5.16 database.
Step 1. Verify the driver installation.
If the JDBC driver for MySQL is not installed on your computer, find the link on the Driver Installation page to install the driver. Follow the instructions to download and install this driver on your computer.
Step 2. Set up the data source.
You set up a data source using the Database Explorer app or the command line.
Set Up Data Source Using Database Explorer
Open the Database Explorer app by clicking the Apps tab on the MATLAB ® Toolstrip. Then, on the right of the Apps section, click the Show more arrow to open the apps gallery. Under Database Connectivity and Reporting, click Database Explorer. Alternatively, enter databaseExplorer at the command line.
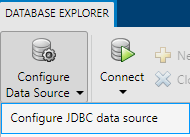
In the Data Source section, select Configure Data Source > Configure JDBC data source.

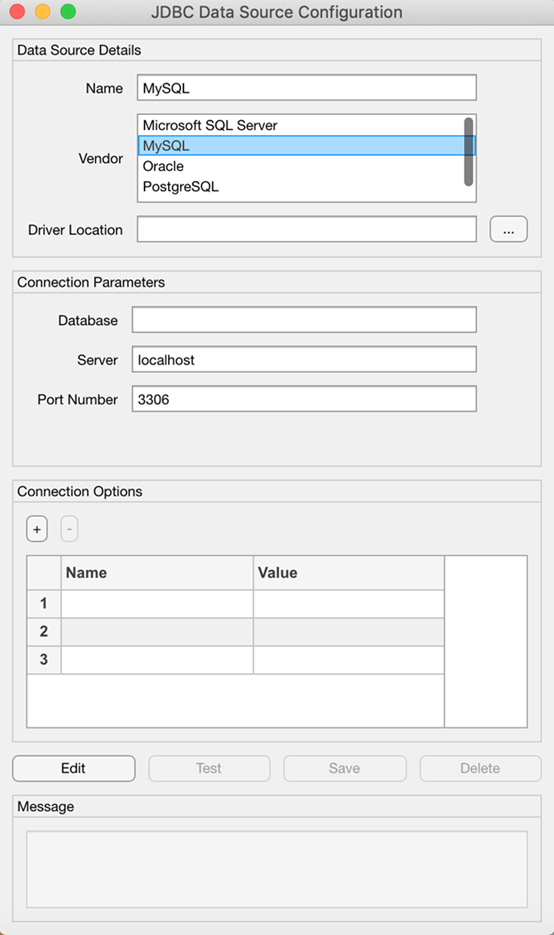
The JDBC Data Source Configuration dialog box opens.
In the Name box, enter a name for your data source. (This example uses a data source named MySQL .) You use this name to establish a connection to your database.
From the Vendor list, select MySQL .

In the Driver Location box, enter the full path to the JDBC driver file.
In the Database box, enter the name of your database. In the Server box, enter the name of your database server. Consult your database administrator for the name of your database server. In the Port Number box, enter the port number.
Under Connection Options, in the Name column, enter the name of an additional driver-specific option. Then, in the Value column, enter the value of the driver-specific option. Click the plus sign + to specify additional driver-specific options.
Click Test. The Test Connection dialog box opens. Enter the user name and password for your database, or leave these boxes blank if your database does not require them. Click Test.
If your connection succeeds, the Database Explorer dialog box displays a message indicating the connection is successful. Otherwise, it displays an error message.
Click Save. The JDBC Data Source Configuration dialog box displays a message indicating the data source is saved successfully. Close this dialog box.
Set Up Data Source Using Command Line
Create a JDBC data source for a MySQL database.
Set the JDBC connection options. For example, this code assumes that you are connecting to a JDBC data source named MySQL , full path of the JDBC driver file /home/user/DB_Drivers/mysql-connector-java-5.1.17-bin.jar , database name toystore_doc , database server dbtb01 , and port number 3306 .
Test the database connection by specifying the user name username and password pwd , or leave these arguments blank if your database does not require them.
Save the JDBC data source.
After you complete the data source setup, connect to the MySQL database using the Database Explorer app or the JDBC driver and command line.
Step 3. Connect using the Database Explorer app or the command line.
Connect to MySQL Using Database Explorer App
On the Database Explorer tab, in the Connections section, click Connect and select the data source for the connection.
In the connection dialog box, enter a user name and password, or leave these boxes blank if your database does not require them. Click Connect.
The Catalog and Schema dialog box opens.
In the Catalog list, select the catalog. Click OK.
The app connects to the database and displays its tables in the Data Browser pane. A data source tab appears to the right of the pane. The title of the data source tab is the data source name that you defined during the setup. The data source tab contains empty SQL Query and Data Preview panes.
Select tables in the Data Browser pane to query the database.
Close the data source tab to close the SQL query. In the Connections section, close the database connection by clicking Close Connection.
Note
If multiple connections are open, close the database connection of your choice by selecting the corresponding data source from the Close Connection list.
Connect to MySQL Using JDBC Driver and Command Line
Connect to a MySQL database using the configured JDBC data source, user name username , and password pwd .
Источник
Документация
MySQL JDBC для macOS
Этот пример показывает, как настроить источник данных и подключение к MySQL ® база данных с помощью приложения Database Explorer или командной строки. Этот пример использует драйвер MySQL Connector/J 5.1.46, чтобы соединиться с базой данных MySQL Version 5.5.16.
Шаг 1. Проверьте установку драйвера.
Если драйвер JDBC для MySQL не установлен на вашем компьютере, найдите, что ссылка на странице Driver Installation устанавливает драйвер. Следуйте инструкциям, чтобы загрузить и установить этот драйвер на вашем компьютере.
Шаг 2. Настройте источник данных.
Вы настраиваете источник данных с помощью приложения Database Explorer или командной строки.
Настройте источник данных Используя Database Explorer
Откройте приложение Database Explorer путем нажатия на вкладку Apps на MATLAB ® Панель инструментов. Затем справа от раздела Apps кликните по стреле Show more, чтобы открыть галерею Apps. Под Database Connectivity and Reporting нажмите Database Explorer. В качестве альтернативы введите databaseExplorer в командной строке.
В разделе Data Source выберите Configure Data Source> Configure JDBC data source.
Диалоговое окно JDBC Data Source Configuration открывается.
В поле Name введите имя для своего источника данных. (Этот пример использует источник данных под названием MySQL .) Вы используете это имя, чтобы установить связь с вашей базой данных.
Из списка Vendor выберите MySQL .
В поле Driver Location введите полный путь в файл драйвера JDBC.
В поле Database введите имя своей базы данных. В поле Server введите имя своего сервера базы данных. Консультируйтесь со своим администратором базы данных для имени вашего сервера базы данных. В поле Port Number введите номер порта.
Под Connection Options, в столбце Name, вводят имя дополнительной специфичной для драйвера опции. Затем в столбце Value введите значение специфичной для драйвера опции. Кликните по знаку «плюс» +, чтобы задать дополнительные специфичные для драйвера опции.
Нажмите Test. Диалоговое окно Test Connection открывается. Введите имя пользователя и пароль для своей базы данных или оставьте эти поля, незаполненные, если ваша база данных не требует их. Нажмите Test.
Если ваша связь успешно выполняется, диалоговое окно Database Explorer отображается сообщение, указывающее, что связь успешна. В противном случае это отображает сообщение об ошибке.
Нажмите Save. Диалоговое окно JDBC Data Source Configuration отображается сообщение, указывающее, что источник данных сохранен успешно. Закройте это диалоговое окно.
Настройте источник данных Используя командную строку
Создайте источник данных JDBC для базы данных MySQL.
Установите опции связи JDBC. Например, этот код принимает, что вы соединяетесь с источником данных JDBC под названием MySQL , полный путь файла драйвера JDBC /home/user/DB_Drivers/mysql-connector-java-5.1.17-bin.jar , имя базы данных toystore_doc , сервер базы данных dbtb01 , и номер порта 3306 .
Протестируйте соединение с базой данных путем определения имени пользователя username и пароль pwd , или оставьте эти аргументы, незаполненные, если ваша база данных не требует их.
Сохраните источник данных JDBC.
После того, как вы завершаете настройку источника данных, соединяетесь с базой данных MySQL с помощью приложения Database Explorer или драйвера JDBC и командной строки.
Шаг 3. Подключение с помощью приложения Database Explorer или командной строки.
Соединитесь с MySQL Using Database Explorer App
На вкладке Database Explorer, в разделе Connections, нажимают Connect и выбирают источник данных для связи.
В диалоговом окне связи введите имя пользователя и пароль или оставьте эти поля, незаполненные, если ваша база данных не требует их. Нажмите Connect.
Диалоговое окно Catalog и Schema открывается.
В списке Catalog выберите каталог. Нажмите OK.
Приложение соединяет с базой данных и отображениями свои таблицы в панели Data Browser. Вкладка источника данных появляется справа от панели. Заголовок вкладки источника данных является именем источника данных, которое вы задали во время настройки. Вкладка источника данных содержит пустой SQL Query и панели Data Preview.
Выберите таблицы в панели Data Browser, чтобы запросить базу данных.
Закройте вкладку источника данных, чтобы закрыть SQL-запрос. В разделе Connections закройте соединение с базой данных путем нажатия на Close Connection.
Примечание
Если многочисленные связи открыты, закрывают соединение с базой данных по вашему выбору путем выбора соответствующего источника данных из списка Close Connection.
Соединитесь с MySQL Using JDBC Driver и Command Line
Соединитесь с базой данных MySQL с помощью сконфигурированного источника данных JDBC, имя пользователя username , и пароль pwd .
Источник
Mysql jdbc driver mac os
This tutorial shows how to set up a data source and connect to your MySQL ® database. This tutorial uses the MySQL Connector/J 5.1.17 driver to connect to the MySQL Version 5.5.16 database.
Step 1. Verify the driver installation.
If the JDBC driver for MySQL is not installed on your computer, then find the link on the Driver Installation page to install the driver. Follow the instructions to download and install this driver on your computer.
Step 2. Add the JDBC driver to the MATLAB static Java class path.
Run the prefdir command in the MATLAB ® Command Window. The output is a file path to a folder on your computer.
Close MATLAB if it is running.
Navigate to the folder and create a file called javaclasspath.txt in the folder.
Open javaclasspath.txt and insert the path to the database driver JAR file. The entry should include the full path to the driver including the driver file name, for example, /home/user/DB_Drivers/mysql-connector-java-5.1.17-bin.jar. Save and close the javaclasspath.txt file.
Alternatively, you can use javaaddpath to add your JDBC driver to the dynamic Java ® class path. For details about static and dynamic class paths, see Bringing Java Classes into MATLAB Workspace.
Step 3. Set up the data source using Database Explorer.
This step is required only for connecting to Database Explorer. If you want to use the command line to connect to your database, see Connect to MySQL using the JDBC connection command line.
Open Database Explorer by clicking the Apps tab on the MATLAB Toolstrip. Then, select Database Explorer from the Database Connectivity and Reporting section in the apps gallery. Alternatively, enter dexplore at the command line. If no data sources are set up, a message box opens. Click OK to close it. Otherwise, the Connect to a Data Source dialog box opens. Click Cancel to close this dialog box.
Click the Database Explorer tab and then select New > JDBC.

The Create a New JDBC data source dialog box opens.

Select MYSQL from the Vendor list. After selecting the vendor, if you did not add the JDBC driver file path to the Java class path, this dialog box displays this warning at the bottom. Address this warning by following the steps as described in Step 2.

Enter the database server name in the Server Name field, port number in the Port Number field, user name in the Username field, password in the Password field, and database name in the Database field.
Click Test to test the connection. Database Explorer displays Connection Successful! if your connection succeeded.
Enter a data source name in the Data Source Name field in the Create a New JDBC data source dialog box. Use a new data source name that does not appear in the existing list of data source names. Click Save. The new JDBC data source appears in the list of data sources in the Connect to a Data Source dialog box.
If this is the first time you are creating a data source using Database Explorer, the New file to store JDBC connection parameters dialog box opens. Use this dialog box to create a MAT-file that saves your specified data source information for future Database Explorer sessions. This MAT-file name is stored in setdbprefs('JDBCDataSourceFile') and is valid for all MATLAB sessions.
Navigate to the folder where you want to put the MAT-file, specify a name for it that includes a .mat extension, and click Save.
With the data source setup completed, you can connect to the MySQL database using Database Explorer or the command line with the JDBC connection.
Step 4. Connect using Database Explorer or the command line.
Connect to MySQL using Database Explorer.
After setting up the data source, connect to your database by selecting the data source name for the MySQL database from the Data Sources list. Enter a user name and password. Click Connect.

Database Explorer connects to your database and displays its contents in a tab named with the data source name.

Close the connection using Database Explorer by hovering over the Close button (  ) next to the MySQL data source name on the database tab. The Close button turns into a red circle (
  ). Click it to close the database connection. If you want to close Database Explorer and all database connections, click the Close button (
  ) in the top-left corner.
If Database Explorer is docked, click the Close button (  ) to close all database connections and Database Explorer.

Connect to MySQL using the JDBC connection command line.
When using the command line, you do not have to set up a data source with Database Explorer. You can use the command line to pass all the required parameters for connection.
Use the Vendor name-value pair argument of database to specify a connection to a MySQL database. For example, the following code assumes you are connecting to a database named dbname on a database server named sname with user name username and password pwd.
Close the database connection conn.
Источник


