- How To Use MySql On Mac
- 1. Install MySql Database Server On Mac.
- 2. Start, Stop, Configure MySql Server.
- 3. Manage MySQL Database With MySQL Workbench.
- 4. Create MySQL User and Assign Privileges To The User.
- 5. Create Example User Account Table.
- How to Install MySQL on Mac & Configure MySQL in Terminal
- Download MySQL Server
- Install MySQL on Mac
- Configure MySQL in Mac for Terminal App
- Important MySQL Commands
- Access Root via Mac Terminal & Create Database
- Summary
- Mysql server start mac os
- Как установить MySQL сервер на Mac OS X
- How to Start & Stop MySQL Manually in OS X El Capitan & Yosemite
- Starting, Stopping, Restarting MySQL on Mac OS X
- Start MySQL
- Stop MySQL
- Restart MySQL
- Start, Stop, Restart MySQL from Mac OS Preference Panel
How To Use MySql On Mac
MySql is a very popular relational SQL database server software. It is widely used in huge of websites as a database server. This article will tell you how to install the MySql database server and GUI client tool on macOS to make MySql database management easy. It will also tell you how to start, stop, restart and connect to the MySQL database server in the command line.
1. Install MySql Database Server On Mac.
- Download MySql Server community version for macOS.
- Click the downloaded dmg file to open the MySql server installer package.
- Click the Next button in the wizard dialog until go to the Change Install Location… dialog, then click the Install button to install it.
- After installation, it will display Configure MySQL Server dialog, input the root user’s password. And click the Finish button to complete the MySql server installation.
- Now MySql server has been installed successfully.
2. Start, Stop, Configure MySql Server.
- Open macOS System Preferences.
- Click the MySQL icon to open the MySQL configuration dialog. Then you can start, stop and configure the MySQL server in it.
3. Manage MySQL Database With MySQL Workbench.
- Download MySQL Workbench community version.
- Click the downloaded dmg file to install it.
- Open MySQL workbench application.
- Connect to the local MySQL database server.
- Click the Create a new schema in the connected server button to create a database.
- Input MySQL Schema name (database name) and select database character set and collation ( usually use utf8 and utf8_bin). Click Apply button to create the database.
- Right-click the Tables item under dev2qa database then clicks Create Table… menu item to create a table.
- Input table name at top text box. Then click table row to add one column, input column name, select datatype, and other column options(Primary Key, Not Null, Unique, Auto Increment, Binary, etc).
- Right-click user_account table, click Select Rows – Limit 1000 menu item to open edit table data dialog in the right panel to insert data into the table.
4. Create MySQL User and Assign Privileges To The User.
- Click Users and Privileges menu item in the left MySQL workbench panel.
- Click Add Account button at the bottom of the right panel.
- Input user name and password in the new panel.
- Click Administrative Roles tab to select related roles and assign them to the newly created MySQL user.
- Click Schema Privileges tab to assign MySQL database (schema) privileges to the user by click Add Entry… button. You can select all databases, or special databases either by matching string pattern or exactly string match.
- Then select desired Object Rights, DDL Rights, or Other Rights checkboxes at the bottom, then click Apply button to apply the selected privileges to the created user.
5. Create Example User Account Table.
In our MySQL JDBC examples, we always use a table user_account, so we should create this table use MySQL workbench. Below is the table DDL SQL code, you can also run it to create this table.
To execute the below DDL code, just click Create a new SQL tab for executing queries button ( ) at MySQL workbench toolbar top left corner to open a SQL command execute window, and then copy below code into it. Then click execute button(the first lightning icon ) at the top toolbar of the SQL window to execute the code.
Источник
How to Install MySQL on Mac & Configure MySQL in Terminal
Mac OS doesn’t come along with the pre-configured version of MySQL, but this step by step guide will make the task easy for you. By the end of this tutorial, you will be able to set up the MySQL server on your Mac system for local development purposes.
Download MySQL Server
Before we start installing MySQL server on mac, we first download the latest version of MySQL from its official site.
Visit https://dev.mysql.com/downloads/mysql and choose the MySQL version that you want to download.
On this page, you will see list of operating systems under the “Select Operating System” dropdown choose the macOS from the list. Then, click on the download button for the MySQL .dmg file. You can download the other MySQL instances as per your operating system requirement.

Install MySQL on Mac
You have to click on the MySQL file to install the MySQL on Mac system. You might get the warning “macOS cannot verify that this app is free from malware”.
To get rid from this issue got to System Preferences > Security & Privacy and click on the “Open Anyway” button. This will allow you to install the MySQL version in your system.
Once the MySQL installation is completed, go to System Preferences and click on the MySQL icon that you can see on the bottom left position.

Here you can see the MySQL is already running and other configurations of MySQL. You can even stop the server by clicking on “stop MySQL server”. Well this is not the only way to start the server, we can even manually start the MySQL server via command line.

Configure MySQL in Mac for Terminal App
To start the MySQL via terminal app, you need to use the following command.
But this command will display the following error on your terminal screen.
“command not found: mysql.server”
To fix this issue, we have to define the MySQL path in the paths file. The easiest way to open the file is to type the following command in the terminal and provide the password.
Include one per line given below paths in the /etc/paths file.

Next, type the command to start the MySQL server.
Here is the output we get when MySQL is started correctly.
We used `sudo` with mysql.server start otherwise it will throw permission errors.
Important MySQL Commands
Here are the important commands that are often used while working with MySQL.
Run the following command to stop mysql server:
Type the below command to restart the MySQL server that is already running:
To verify the current status of MySQL server:
Access Root via Mac Terminal & Create Database
Now, we have reached to essential step of our tutorial. We are all set with the server configurations, now we have to access the MySQL root. When you run the following command it will ask for the password. So you have to type the password that you defined when installing the MySQL initially.
Now we will use the mysql query to create a new database.
You can verify the newly created MySQL database.
Use the newly created “positrondb” db by using the below command.
Create a table in the MySQL database => ‘positrondb’.
Verify the table in the database.
Summary
We have completed the MySQL tutorial, and In this tutorial, we learned how to install MySQL community server on Mac OS, How to access root user in the MySQL server, Create Database and Table.
I hope you liked this tutorial, dont forget to share it with others.
Источник
Mysql server start mac os
Как установить MySQL сервер на Mac OS X
Mac OS X имеет отличный дизайн и большинство задач легко выполняются. К сожалению, если вы хотите установить MySQL сервер на ваш Mac, то это не всегда легко, как все остальное.
Подождите, вы действительно нуждаетесь в MySQL сервере?
В большинстве случаев нет. Если это единственный компьютер на котором вы будете сохранять информацию о ваших продажах, вы планируете делать только несколько операций каждый день или подключаться к другим компьютерам с помощью IncoCloud, тогда вы в нем не нуждаетесь. В таких случаях вы можете использовать более простой вариант — SQLite.
Но, если в вашем офисе, магазине или заведении есть более одного компьютера, которые подключены между собой, например, в одном объекте — один или несколько Фронт-офисов, один или несколько Бэк-офисов, вы ожидаете, выполнять много операций каждый день, то в этом случае вам необходим MySQL сервер, который бы справлялся с большими нагрузками.
Важный! IncoPOS для macOS теперь может загружать, устанавливать и настраивать сервер MySQL для вас, когда он запускается в первый раз. Вы можете скачать его здесь.
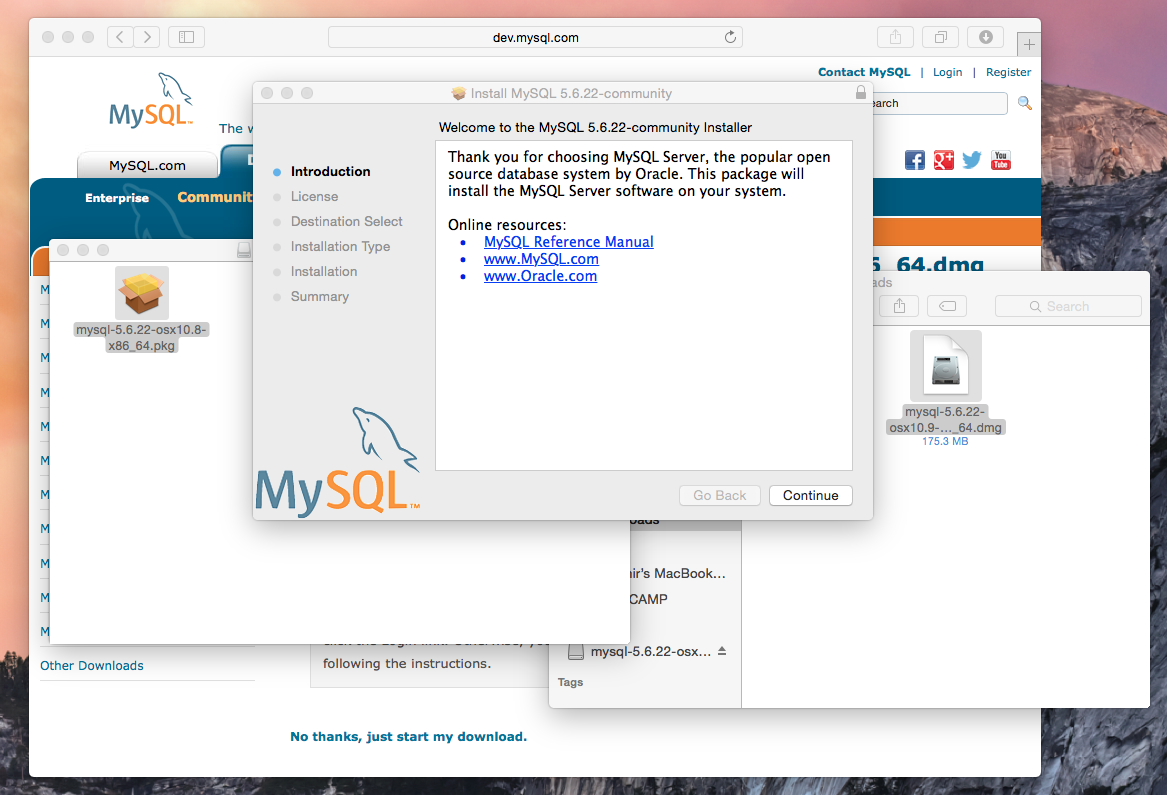
Первым шагом является установка MySQL сервера. На сайте MySQL выберите версию, которая отвечает версии вашей операционной системы Mac. Выберите версию в виде DMG архива. После установки DMG файла, нажмите на него для его открытия. После этого откройте инсталлятор, который к нему прилагается, и следуйте шагам по установке.
Предупреждение! Поскольку Oracle изменила программу установки MySQL и параметры по умолчанию сервера MySQL в более новых версиях, следующие шаги могут не работать. Эти шаги были протестированы с сервером MySQL версии 5.5.48 для Mac OS 10.9 (который должен работать на более новых версиях тоже). Если по какой-то причине установщик больше не доступен на веб-сайте MySQL вы можете загрузить его отсюда.
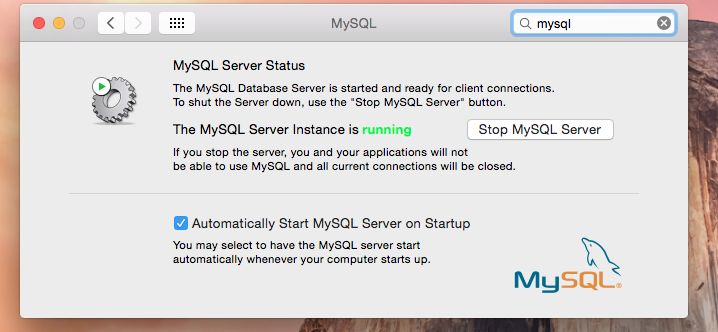
После завершения установки, откройте „System Preferences“ и вы увидите иконку MySQL. Нажмите на нее для открытия „preferences“ для MySQL сервера. После этого нажмите на клавишу „Start MySQL server“ для начала его работы. Убедитесь в том, что вы отметили поле „Automatically Start MySQL Server on Startup“, для того, чтобы вам снова не пришлось повторять этот шаг.
Сейчас следует более сложная часть. По умолчанию MySQL сервер устанавливается без пароля и не ограничивает доступ к информации в нем. Оставлять MySQL без пароля не очень хорошая идея, т.к. ваша информация является важной и мы бы не хотели, чтобы у всего мира был доступ к ней.

Чтобы это изменить, вам необходимо открыть „Spotlight“ и найти „Terminal“. Запустите „Terminal“, напишите эти команды и нажмите после каждой „Enter“:
cd /usr/local/mysql
Это изменит текущую директорию тех, в которых установлен MySQL сервер
sudo bin/mysql_secure_installation.
Данная команда запросит пароль вашего компьютера. Пока вы его вводите, не будут появляться никакие символы, что является совсем нормальным, и вас это не должно беспокоить. После окончания нажмите клавишу „Enter“. Это запустит скрипт, который вам задаст несколько вопросов и после перенастроит MySQL.
Set root password? [Y/n]
Выберите Y и нажмите Enter. После этого введите пароль для MySQL и нажмите Enter. Введите пароль снова и нажмите Enter. Это будет пароль, который IncoPOS потребует, в случае, когда вы подключитесь к MySQL серверу.
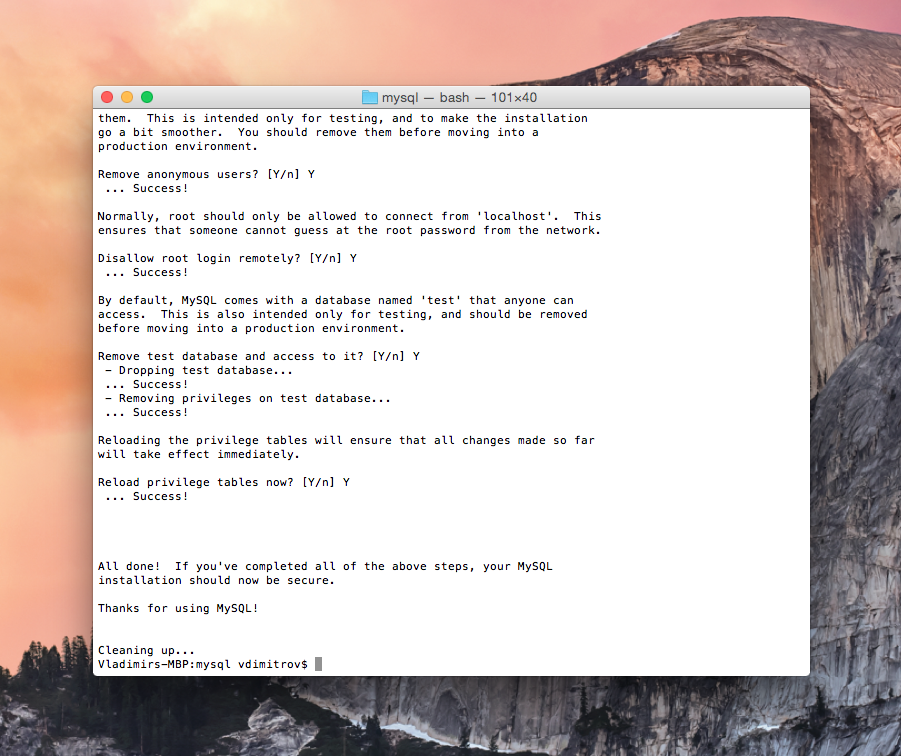
Remove anonymous users? [Y/n]
Выберите Y и нажмите Enter. Вы не хотели бы, чтобы кто-то другой кроме вас, кому вы сказали пароль, имел доступ к вашей информации.
Disallow root login remotely? [Y/n]
Здесь вам необходимо решить. Если у вас есть более одного компьютера, который будет иметь доступ к данной базе данных, то ответ должен быть „n“. Если данная информация будет доступна с этого компьютера, тогда нажмите „Y“. В любом случае это можно изменить позже, используя теже инструкции.
Remove test database and access to it? [Y/n]
Выберите Y и нажмите Enter. Вам не нужна данная тестовая база данных, так что ее удаление будет совсем безопасным.
Reload privilege tables now? [Y/n]
Выберите Y и нажмите Enter. Это выполнит изменения, которые вы сделали сразу же действительными .
Это все! У вас уже есть установленный и надежный MySQL на вашем Mac.
Источник
How to Start & Stop MySQL Manually in OS X El Capitan & Yosemite
 Many developers require MySQL on their Macs, but if you’ve tried to install MySQL in OS X El Capitan and Yosemite, you likely noticed that you’ll get an “installation failed” error during the process. That error sounds worse than it is, because you can avoid it entirely by choosing not to install the startup item included in the MySQL bundle, or, you can just ignore the installation error and start MySQL yourself when you need it. Either way, MySQL actually installs fine, it’s just the bundled startup item that does not function. As you probably guessed, that means you’ll need to start and stop MySQL yourself.
Yes a preference panel gets installed that allows for a GUI approach, but many users prefer to use the command line for this purpose since many of us work in the Terminal anyway, and it has the added possibility of being automated.
Starting, Stopping, Restarting MySQL on Mac OS X
Hre are the three basic commands to start, stop, and restart MySQL in Mac OS X, including OS X El Capitan and OS X Yosemite. Be sure to enter the command onto a single line, sudo obviously requires an administrator password to be entered.
Start MySQL
sudo /usr/local/mysql/support-files/mysql.server start
Stop MySQL
sudo /usr/local/mysql/support-files/mysql.server stop
Restart MySQL
sudo /usr/local/mysql/support-files/mysql.server restart
Of course, these can be combined with starting and stopping Apache server if your intention is to setup a local web development environment.
You can download the latest version of MySQL for Mac OS X here. Future versions of the MySQL installer will undoubtedly fix this for OS X but in the meantime if you get the installation error, either customize the installer and avoid the startup item, or ignore the error and start and stop mysql yourself when it’s needed.
Those interested can also follow a workaround posted to StackOverflow here to automatically load MySQL on boot in OS X El Capitan or Yosemite.
Start, Stop, Restart MySQL from Mac OS Preference Panel
Of course, you can also start and stop the MySQL server from the bundled preference panel. To do that, simply go to the Apple menu and open System Preferences. Choose the “MySQL” preference panel, then click on the “Start MySQL Server” button to start MySQL Server on Mac. If the server is already started, the button will change to “Stop MySQL Server”. If you want to restart the server, simply click to turn it off, wait a minute or so, then turn it back on again. This will be the easy approach for many Mac users, though you’ll have to fiddle with the pref panel as necessary, and if you go that route you’ll want to uncheck the auto-start option because it’s going to fail.
I’m partial to the command line approach for the time being, but use whatever is most appropriate for your situation.
By the way, these mySQL server management methods continue to work in MacOS Sierra as well.
Источник


