How do I install command line MySQL client on mac?
I want to install the MySQL client for the command line, not a GUI. I have searched over the web but only found instructions on installing the MySQL server.
15 Answers 15
/.bash_profile and then run source
/.bash_profile or load a new instance of terminal.
If you have already installed MySQL from the disk image (dmg) from http://dev.mysql.com/downloads/), open a terminal, run:
then, reload .bash_profile by running following command:
You can now use mysql to connect to any mysql server:
This strictly installs a command line client, without the other overhead:
Install Homebrew (if you don’t have it):
Then, install mysql-client :
Then, add the mysql-client binary directory to your PATH:
Finally, reload your bash profile:
Then you should be able to run mysql in a terminal, if not try opening a new terminal
/.zshrc if using default zsh (default in recent macOS)
Mysql has a client-only set of utilities:
Mac OSX version available.

There is now a mysql-client formula.
brew install mysql-client
For installing mysql-shell with homebrew, run
you can then launch the mysql shell with
if you want to enter SQL mode directly, run
Open the «MySQL Workbench» DMG file and
Eject the DMG disk
If you installed from the DMG on a mac, it created a mysql client but did not put it in your user path.
Add this to your .bash_profile :
This will let you run mysql from anywhere as you.
Installation command from brew:
Look at what you can do:
Run query from mysqlsh client installed:
As stated by the earlier answer you can get both mysql server and client libs by running
brew install mysql .
There is also client only installation. To install only client libraries run
brew install mysql-connector-c
In order to run these commands, you need homebrew package manager in your mac. You can install it by running
/usr/bin/ruby -e «$(curl -fsSL https://raw.githubusercontent.com/Homebrew/install/master/install)»

Using MacPorts you can install the client with:
You also need to select the installed version as your mysql
The server is only installed if you append -server to the package name (e.g. mysql57-server )
The easiest way would be to install mysql server or workbench, copy the mysql client somewhere, update your path settings and then delete whatever you installed to get the executable in the first place.
The mysql client is available in macOS ports. If you don’t have this excellent third party package manager already installed, it is available from here: https://www.macports.org/
Once you have installed macports, open a terminal and make sure everything is up to date:
There are multiple different versions of MySQL and mariadb (community fork of MySQL) available in the ports repos. List available versions using the following command:
I recommend choosing mariadb over mysql as it is, mostly, a drop in replacement (https://mariadb.com/kb/en/mariadb-vs-mysql-compatibility/) and has excellent community support.
If applicable, choose which version of mariadb you want (a list of versions of mariadb is available here: https://downloads.mariadb.org/mariadb/+releases/). If you’re not bothered, install the default version:
Mariadb (including the mysql-compatible command line client) is now available on your system. On my system, the CLI client resides in the following location:
It’s obviously a bit inconvenient to type out the full path, /opt/local/bin/mysql each time you want to use the client. Ports has already thought of this problem. To view available versions of mysql on your system, run:
Choose one from the list. For example, to use mariadb as the default mysql client:
Now open a fresh terminal window and you should be able to start the mariadb mysql CLI client:
Источник
Как установить MySQL на Mac OS?
MySQL установить на компьютер с MacOS очень просто. Это сделать также просто как установить на Linux. Для установки нам понадобится пакетный менеджер brew и 5-10 минут свободного времени.
Подготовка
Как Вы уже поняли для установки MySQL на Mac OS нам понадобится brew, в котором есть все из мира Linux. Если у Вас его еще нет на Mac`е, то установить можно командой:
Многие разрабы считают, что такие вещи захламляют Mac и им нет места на их компьютере. И что предпочтительно устанавливать MysSQL через докер. Но brew очень бережно относится к вашей операционной системе и при выполнении команды на удаления, он полностью удалить MySQL из ОС.
Как установить MySQL на Mac OS?
Для установки нужно выполнить команду:
Если Вам по какой-то причине нужно установить определенную версию, то в конце указываем mysql@нужная_версия . Примерно вот так — brew install mysql@5.7
Чтобы Ваш мак «научился» работать с алиасом – mysql, нужно создать линк. Это нужно чтобы в консоли было удобно управлять через команду mysql. Для этого выполним:
Если был установлен MySQL 5.7, то команда будет такой: brew link —force mysql@5.7
Если хотите, чтобы MySQL запускался всегда при включении компа, то вот команда для этого:
Эта команда не зависит от версией установленного MySQL.
Вот и все! Сервер баз данных MySQL установлен на ваш Mac OS.
Как пользоваться?
Запуск
Если Вы не сделали автоматическую загрузку сервиса MySQL, то запустить его вручную можно вот так:
Перезапуск
Устанавливаем пароль на root
По умолчанию на root в MySQL не установлен пароль. Исправить просто! Выполняем по очереди команды:
Не забываем, что:
- password — это ваш пароль,
- localhost — это означает, что подключиться к серверу можно будет только с локальной машины. Если нужен доступ извне, то меняем это на знак % или 192.168.0.0, если для безопасности нужно ограничить подключение только из локальной сети.
Удаленный доступ к серверу
Файл конфигурации MySQL на MacOS находится по адресу /usr/local/etc/my.ini. По умлчанию доступ к серверу ограничен только локальной машиной, где он установлен. Чтобы снять это ограничение, нужно в файле конфигурации внести изменения:
Как удалить MySQL на Mac OS?
С пакетным менеджером brew также легко удалять пакеты, как их устанавливать.
Для удаления Mysql на Mac OS воспользуйтесь командой:
Источник
Установка MySQL на MacOS X
Начиная с MySQL 4.0.11, вы можете поставить MySQL на Mac OS X 10.2 («Jaguar») используя родной формат пакетов PKG вместо бинарного tar-архива. Обратите внимание, что более старые версии Mac OS X (скажем, 10.1.x) не поддерживаются этим пакетом.
Пакет находится внутри файла образа диска ( .dmg ), который вам сначала следует смонтировать двойным щелчком мышки на его иконке в Finder. Образ должен быть смонтирован и вы увидите его содержимое.
Внимание : Перед тем как продолжить инсталляцию, убедитесь, что другие сервера MySQL не работают на этом компьютере!
Пожалуйста, остановите все запущенные копии MySQL перед тем, как продолжать. Для этого используйте или приложение MySQL Manager (на Mac OS X Server) или с помощью mysqladmin shutdown в командной строке.
Для того чтобы поставить MySQL PKG, дважды щелкните мышкой на иконке пакета. Это действие запустит инсталлятор пакетов Mac OS, который и проведет вас через процесс установки MySQL.
Пакет поставит себя в /usr/local/mysql- и также поставит символическую ссылку /usr/local/mysql , указывающую на новое месторасположение. Если каталог с именем /usr/local/mysql уже существует, он будет вначале переименован в /usr/local/mysql.bak . Кроме того, будут установлены таблицы привилегий MySQL путем выполнения mysql_install_db после инсталляции.
Схема инсталляции похожа на ту, которая используется в бинарной поставке: все исполняемые файлы MySQL будут расположены по пути /usr/local/mysql/bin , сокет будет расположен в /etc/mysql.sock . Схемы установки.
Необходимо чтобы существовал пользователь с именем mysql (который должен существовать по умолчанию в каждой поставке Mac OS X 10.2 и выше).
Если вы используете Mac OS X Server, у вас уже есть работающая копия MySQL:
Mac OS X Server 10.2-10.2.2 идет с MySQL 3.23.51 в поставке
Mac OS X Server 10.2.3 и 10.2.4 поставляется с MySQL 3.23.53
Этот раздел руководства покрывает вопросы инсталляции только официального пакета PKG для Mac OS X. Сначала прочитайте руководство Apple по установке MySQL, пожалуйста (запустите приложение «Help View», выберите «Mac OS X Server», сделайте поиск слова «MySQL» и прочитайте раздел под названием «Installing MySQL»).
Учтите, что преинсталлированные пакеты MySQL на Mac OS X Server запускаются с помощью команды safe_mysqld вместо mysqld_safe !
Если вы ранее использовали пакеты MySQL Марка Лиянажа (Marc Liyanage) с сайта http://www.entropy.ch, вы можете просто следовать инструкциям по обновлению пакетов используя схему расположения, как указано на его страничках.
Если вы обновляете MySQL с версии, собранной Марком или с предустановленной версии из поставки Mac OS X Server, на официальную сборку от MySQL — вам следует также преобразовать существующие таблицы привилегий MySQL. .
После инсталляции вы можете запустить MySQL выполняя следующие команды в терминальном окне. Обратите внимание, что вам нужны привилегии администратора для выполнения этой задачи.
Теперь вы сможете подключиться к серверу MySQL, скажем, запустив /usr/local/mysql/bin/mysql .
Для того, чтобы MySQL автоматически запускался при загрузке, вы можете взять MySQL StartupItem Марка по этому адресу:
Мы планируем в ближайшее время добавить StartupItem в официальный пакет MySQL в ближайшее время.
Заметьте, что инсталляция нового пакета MySQL не удаляет каталог более старой инсталляции. К сожалению, инсталлятор в Mac OS X еще не предоставляет нужной функциональности для того, чтобы корректно обновить существующие в системе пакеты.
После того, как вы скопировали файлы данных MySQL с предыдущего месторасположения, и успешно запустили новую версию, вы можете удалить старую инсталляцию. Кроме того, вы можете удалить старые каталоги Package Receipt, расположенные здесь: /Library/Receipts/mysql- .pkg .
Источник
Mysql shell mac os
The package is located inside a disk image ( .dmg ) file that you first need to mount by double-clicking its icon in the Finder. It should then mount the image and display its contents.
Before proceeding with the installation, be sure to stop all running MySQL server instances by using either the MySQL Manager Application (on macOS Server), the preference pane, or mysqladmin shutdown on the command line.
To install MySQL using the package installer:
Download the disk image ( .dmg ) file (the community version is available here) that contains the MySQL package installer. Double-click the file to mount the disk image and see its contents.
Double-click the MySQL installer package from the disk. It is named according to the version of MySQL you have downloaded. For example, for MySQL server 8.0.26 it might be named mysql-8.0.26-macos- 10.13-x86_64 .pkg .
The initial wizard introduction screen references the MySQL server version to install. Click Continue to begin the installation.
The MySQL community edition shows a copy of the relevant GNU General Public License. Click Continue and then Agree to continue.
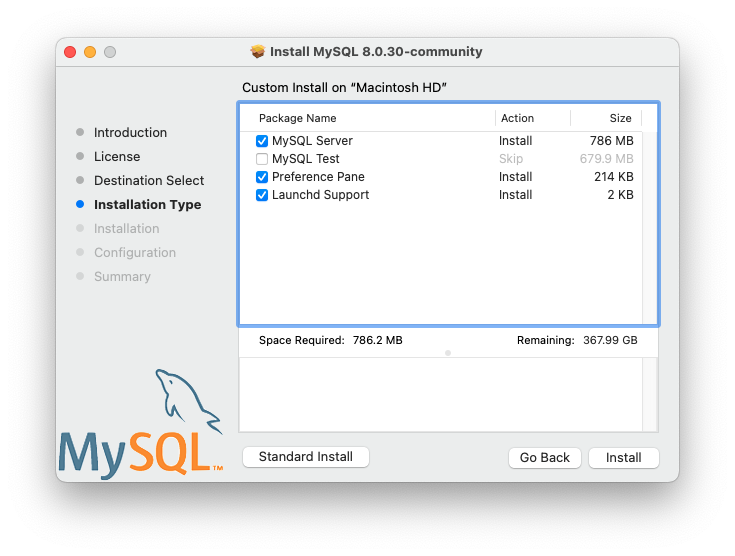
From the Installation Type page you can either click Install to execute the installation wizard using all defaults, click Customize to alter which components to install (MySQL server, MySQL Test, Preference Pane, Launchd Support — all but MySQL Test are enabled by default).
Although the Change Install Location option is visible, the installation location cannot be changed.
Figure 2.13 MySQL Package Installer Wizard: Installation Type
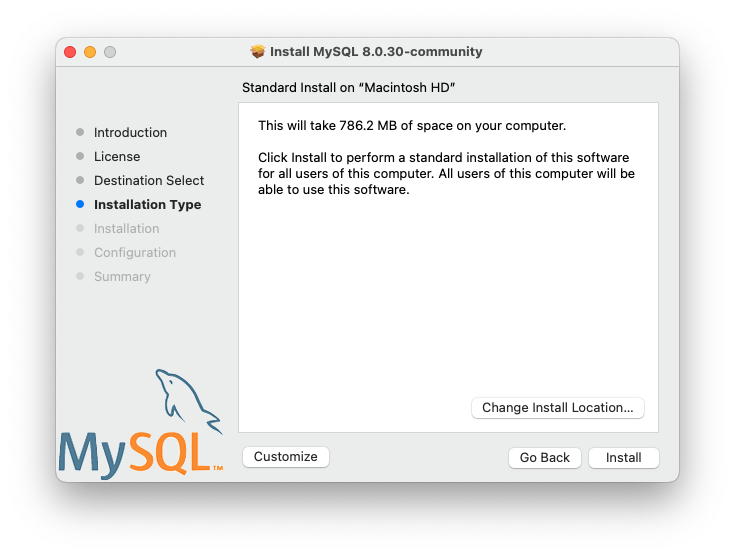
Figure 2.14 MySQL Package Installer Wizard: Customize
Click Install to install MySQL Server. The installation process ends here if upgrading a current MySQL Server installation, otherwise follow the wizard’s additional configuration steps for your new MySQL Server installation.
After a successful new MySQL Server installation, complete the configuration steps by choosing the default encryption type for passwords, define the root password, and also enable (or disable) MySQL server at startup.
The default MySQL 8.0 password mechanism is caching_sha2_password (Strong), and this step allows you to change it to mysql_native_password (Legacy).
Figure 2.15 MySQL Package Installer Wizard: Choose a Password Encryption Type
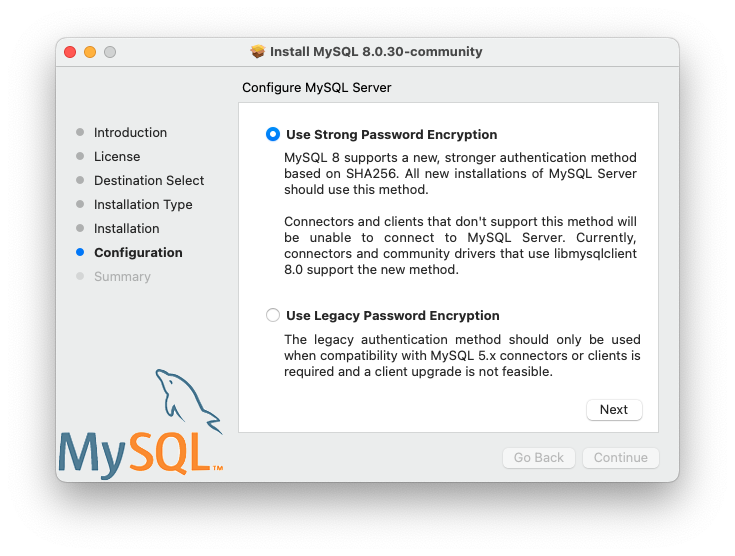
Choosing the legacy password mechanism alters the generated launchd file to set —default_authentication_plugin=mysql_native_password under ProgramArguments . Choosing strong password encryption does not set —default_authentication_plugin because the default MySQL Server value is used, which is caching_sha2_password .
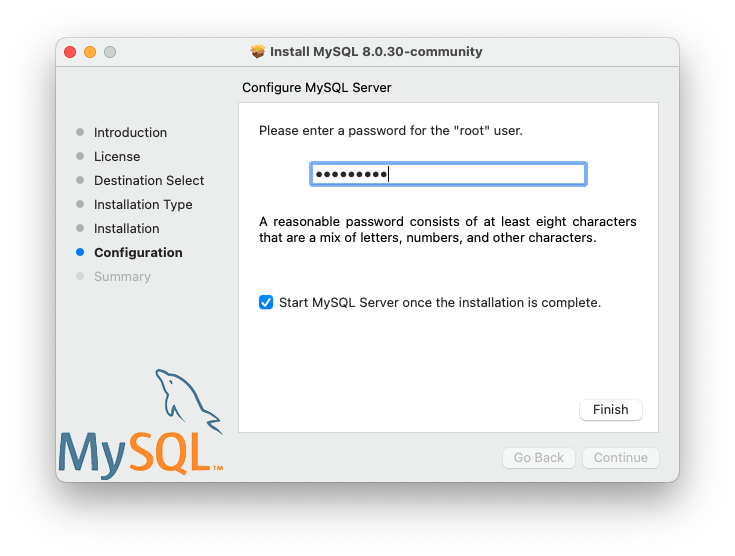
Define a password for the root user, and also toggle whether MySQL Server should start after the configuration step is complete.
Figure 2.16 MySQL Package Installer Wizard: Define Root Password
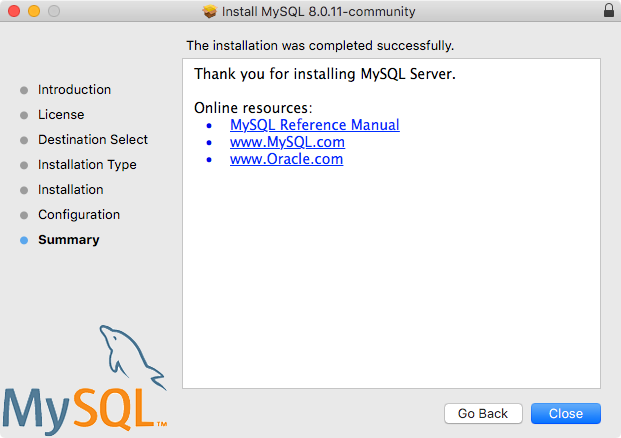
Summary is the final step and references a successful and complete MySQL Server installation. Close the wizard.
Figure 2.17 MySQL Package Installer Wizard: Summary
MySQL server is now installed. If you chose to not start MySQL, then use either launchctl from the command line or start MySQL by clicking «Start» using the MySQL preference pane. For additional information, see Section 2.4.3, “Installing and Using the MySQL Launch Daemon”, and Section 2.4.4, “Installing and Using the MySQL Preference Pane”. Use the MySQL Preference Pane or launchd to configure MySQL to automatically start at bootup.
When installing using the package installer, the files are installed into a directory within /usr/local matching the name of the installation version and platform. For example, the installer file mysql-8.0.26- macos10.15-x86_64.dmg installs MySQL into /usr/local/mysql-8.0.26-macos10.15-x86_64/ with a symlink to /usr/local/mysql . The following table shows the layout of this MySQL installation directory.
The macOS installation process does not create nor install a sample my.cnf MySQL configuration file.
Table 2.7 MySQL Installation Layout on macOS
Источник


