- Как проверить версию MySQL
- Из командной строки
- Из оболочки MySQL
- Использование PHP
- Выводы
- Как проверить версию MySQL в Ubuntu Linux
- Проверить версию сервера MySQL
- Использование phpMyAdmin
- Использование PHP
- Заключение
- Как узнать версию MySQL
- Через командную строку
- Использование MySQL Shell
- MySQL select version и как узнать версию MySQL
- Смена версии сервера баз данных на Debian
- How to Check and Upgrade Your MySQL Version Easily
- Why Keep MySQL Up to Date?
- Which Version of MySQL is the Best?
- How to Check MySQL Version
- Check MySQL Version with MyKinsta
- Use the Command Line
- Check MySQL Version with phpMyAdmin
- Through WordPress Dashboard
- How to Upgrade MySQL Version
- Sign Up For the Newsletter
- Want to know how we increased our traffic over 1000%?
- Upgrade MySQL Using cPanel
- Upgrade MySQL in Linux/Ubuntu
- Upgrade MySQL on macOS
- Upgrade MySQL in Windows
- Summary
Как проверить версию MySQL
MySQL (и его заменитель MariaDB) — самая популярная система управления реляционными базами данных с открытым исходным кодом. Между версиями MySQL есть некоторые важные различия, поэтому в некоторых ситуациях может быть важно знать, какая версия работает на вашем сервере.
Например, если вы устанавливаете приложение, для которого требуется определенная версия MySQL, перед началом установки вам необходимо выяснить версию вашего сервера MySQL.
В этой статье мы покажем вам, как проверить версию сервера MySQL или MariaDB, установленную в вашей системе.
Из командной строки
Если у вас есть SSH-доступ к серверу, есть несколько различных команд, которые могут помочь вам определить версию вашего MySQL.
Бинарный файл сервера MySQL называется mysqld . Чтобы получить версию сервера, запустите двоичный файл с помощью параметра —version или -V :
Команда выведет информацию о версии MySQL и завершит работу. В этом примере версия сервера MySQL — 5.7.27 :
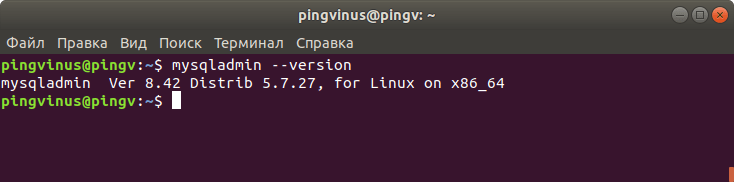
mysqladmin — это клиентская утилита, которая используется для выполнения административных операций на серверах MySQL. Его также можно использовать для запроса версии MySQL:
Результат будет немного отличаться от предыдущей команды:
Из оболочки MySQL
Утилита командного клиента, такая как mysql , также может использоваться для определения версии сервера MySQL.
Чтобы подключиться к серверу MySQL, просто введите mysql :
После подключения к оболочке MySQL версия будет напечатана на экране:
Чтобы получить информацию о версии MySQL и других компонентах, запросите переменные version :
Есть также некоторые другие операторы и команды, которые могут показать вам версию сервера. Оператор SELECT VERSION() отобразит только версию MySQL.
Команда STATUS показывает версию MySQL, а также информацию о статусе сервера:
Использование PHP
Если вы используете виртуальный хостинг и у вас нет доступа к командной строке или к клиенту MySQL, например PhpMyAdmin, вы можете определить версию сервера MySQL с помощью PHP.
В корневой каталог документов веб-сайта загрузите следующий файл PHP с помощью клиента FTP или SFTP . Убедитесь, что вы изменили my_user и my_password на реальную учетную запись пользователя MySQL :
Откройте файл в браузере, и версия сервера MySQL отобразится на вашем экране:
Выводы
Определение версии сервера MySQL — относительно простая задача. В этом руководстве мы показали несколько различных вариантов того, как найти версию MySQL, работающую в вашей системе.
Не стесняйтесь оставлять комментарии, если у вас есть вопросы.
Источник
Как проверить версию MySQL в Ubuntu Linux

Это краткое руководство показывает студентам и новым пользователям, как проверять версии MySQL/MariaDB в Ubuntu Linux.
Как узнать, какие версии MySQL или сервера базы данных MariaDB у вас установлены? Как узнать? Какую команду вы используете?
Ответ на все ваши вопросы подробно описан ниже.
В настоящее время, куда бы вы ни посмотрели, вы найдете сервер базы данных MariaDB, который используется во многих проектах с открытым исходным кодом. Несколько лет назад этого не было.
Тогда MySQL был, вероятно, единственным сервером баз данных, который использовался в большинстве проектов с открытым исходным кодом. Однако после изменений лицензирования, внесенных Oracle, новая материнская компания создала альтернативу MySQL под названием MariaDB.
MariaDB — это прямая замена MySQL. Это означает, что во многих случаях вы можете просто удалить MySQL и установить MariaDB, и все готово. Обычно нет необходимости конвертировать какие-либо файлы данных.
Какую бы базу данных вы ни использовали, приведенные ниже команды должны работать для определения версии MySQL или MariaDB.
Чтобы начать проверку версий базы данных MySQL или MariaDB, выполните следующие действия.
Проверить версию сервера MySQL
MySQL и MariaDB поставляются со встроенным инструментом, который позволяет вам проверять версии сервера. Просто запустите приведенные ниже команды с аргументом -d, чтобы отобразить текущую версию сервера.
Выполнение приведенной выше команды покажет, какая версия работает на сервере.
Если вы запустите приведенные ниже команды, она также должна отобразить версию сервера.
Вывод команды выше.
MySQL и MariaDB поставляются с клиентским инструментом, который также должен помочь вам найти версию сервера. Из командной строки вызовите клиентский инструмент, выполнив следующую команду:
Это позволит вам войти в систему и отобразить сведения о сервере, включая номер версии.
Сервер MariaDB выдаст следующее сообщение:
Или запустите запрос STATUS, чтобы отобразить сведения о сервере, включая номер версии.
Это должно отобразить вывод ниже:
Этих методов немного, которые помогут вам определить серверную версию MySQL или MariaDB из консоли командной строки.
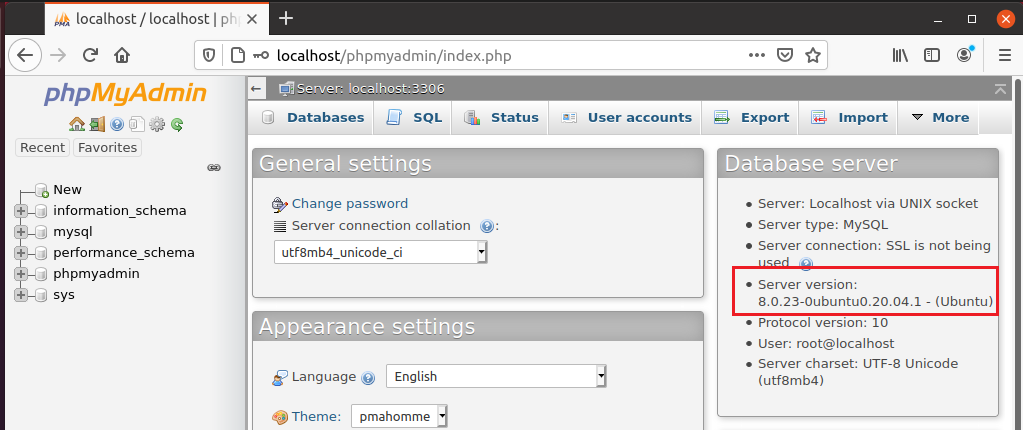
Использование phpMyAdmin
Если у вас установлен phpMyAdmin, вы также сможете увидеть версию сервера на портале. Войдите в систему и просмотрите сведения о сервере на панели управления.
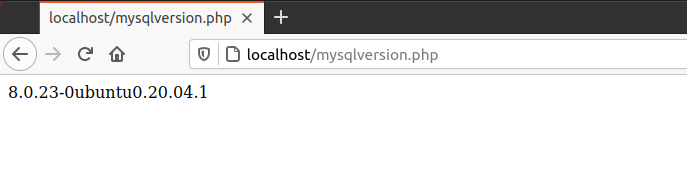
Использование PHP
Если вы можете загрузить файл в корневой каталог Интернета, просто создайте локальный файл с именем mysqlversion.php . Затем скопируйте и вставьте приведенный ниже код в файл и загрузите его в корневую папку вашего сервера.
Это отобразит версию вашего сервера.
 Могут быть другие способы просмотреть номер версии вашего сервера базы данных в Ubuntu Linux. Однако несколько вышеперечисленных методов должны помочь вам начать работу.
Заключение
В этом посте показано, как узнать номер версии сервера базы данных MySQL или MariaDB в Ubuntu Linux. Если вы обнаружите какую-либо ошибку выше, пожалуйста, используйте форму комментария ниже, чтобы сообщить.
Источник
Как узнать версию MySQL
При работе над проектами или с серверами, использующими MySQL, иногда требуется узнать текущую установленную версию MySQL. Например, это нужно при установке модулей, для которых требуется определенная версия MySQL.
Рассмотрим, как узнать версию MySQL, которая установлена в системе.
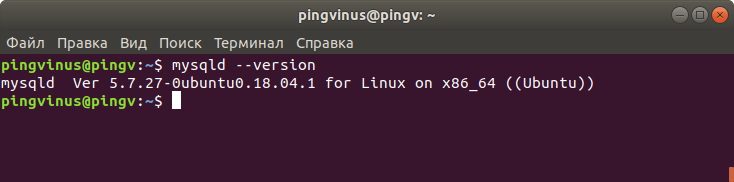
Через командную строку
Сервер MySQL представлен в системе программой mysqld. Чтобы узнать версию MySQL используем опцию —version команды mysqld . Выполняем команду:
В результате выполнения команды будет выведена версия MySQL сервера. В нашем примере используется версия 5.7.27, работающая в Ubuntu 18.04.
Еще один способ — это использование команды mysqladmin . mysqladmin — это утилита для администрирования MySQL сервера. Выполняем команду:
Результат выполнения команды:
Использование MySQL Shell
Выполним вход в MySQL Shell, для этого используем команду mysql
Если возникает ошибка доступа ( ERROR 1045 (28000): Access denied for user ’pingvinus’@’localhost’ using password: NO ) , то может потребоваться использование sudo:
Как только вы вошли в MySQL Shell, отображается приветственная информация, в которой показывается используемая версия MySQL.
Источник
MySQL select version и как узнать версию MySQL
Узнать версию можно несколькими способами. Самый простой не требует знать пароль пользователя сервера баз данных. Достаточно зайти по SSH и выполнить mysql —version
mysql Ver 14.14 Distrib 5.5.55, for debian-linux-gnu (x86_64) using readline 6.3
Чтобы использовать способ, приведенный в заголовке, нужно направить SQL запрос, для этого — авторизоваться в консоли (можно делать это и скриптом).
Enter password:
Welcome to the MySQL monitor. Commands end with ; or \g.
Your MySQL connection id is 41
Server version: 5.5.55-0ubuntu0.14.04.1 (Ubuntu)
Copyright (c) 2000, 2017, Oracle and/or its affiliates. All rights reserved.
Oracle is a registered trademark of Oracle Corporation and/or its
affiliates. Other names may be trademarks of their respective
owners.
Type ‘help;’ or ‘\h’ for help. Type ‘\c’ to clear the current input statement.
Необходимая информация имеется в выводе, который появляется после успешной авторизации. В данном случае используется MySQL Server версии 5.5.55-0.
Также оказавшись в консоли сервера баз данных можно запросить версию следующим образом:
+————————-+
| version() |
+————————-+
| 5.5.55-0ubuntu0.14.04.1 |
+————————-+
1 row in set (0.00 sec)
Во всех рассмотренных случаях получена одинаково полная информация.
Читайте цикл статей, описывающих основы работы с MySQL (вводный материал цикла).
Если скрипты сайта, работающие с базой, написаны под определенную версию ПО на сервере и используется не она, версию как и сам пакет можно сменить. Делается это в Debian довольно просто, ниже приведен алгоритм.
Смена версии сервера баз данных на Debian
1) с использованием утилиты mysqldump создается дамп всех таблиц (в том числе служебных)
2) пакет удаляется apt-get remove mysql-server* && apt-get purge mysql-server*, также нужно удалить /var/lib/mysql и /etc/mysql предварительно сделав копию
3) в /etc/apt/source.list добавляется репозиторий, приведенный на официальном сайте (например, для MariaDB 10 на Debian 8), информация обновляется apt-get update
3) также через apt-get ставится новый пакет после чего загружаются дампы баз
Копии всегда нужно иметь на случай непредвиденных ситуаций. Для разных версий используются разные директивы в конфигурационных файлах и может потребоваться ручная их правка.
Читайте про запрос SELECT, при помощи него была выведена версия пакета, именно выборка является самой частой операцией.
Источник
How to Check and Upgrade Your MySQL Version Easily

Your database more than likely runs on MySQL or its fully open-source fork MariaDB. These popular database management software power 90% of websites, so your server host has probably installed either of them for you.
But not all hosts will continue to keep it up to date, so it’s often up to you to check your MySQL version and keep it upgraded. Outdated software on your server is never good and can also be harmful.
Let’s learn how to check if your MySQL version is up to date, and upgrade it if it isn’t.
Why Keep MySQL Up to Date?
Manual server maintenance is not a fun task, especially if you’re not very familiar with your webserver’s inner workings. As long as your server and database are working fine, it may be tempting to ignore an outdated piece of software. But there are quite a few reasons why this is a bad idea.
It’s never good to have outdated software on your server. Even the tiniest hole in your security could be a vector for attackers to slip through and take over.
They may even be able to mess with your database. All sorts of important info are stored there, such as your WordPress posts and all other kinds of sensitive bits. You don’t want anyone unwanted to be able to modify that.
Besides that, a new version means new features and general improvements for what’s already there. Even if these extra features don’t affect you, more recent MySQL versions are more secure, better optimized, and faster.

What’s new in MySQL 8.0.
And with every update of MySQL comes a whole slew of bug fixes, patching up errors that could be an annoyance at best or cause you serious trouble at worst.
When it comes to any software on your website, it’s almost always best to keep it at the latest version.
Which Version of MySQL is the Best?
Many servers these days are still running on MySQL 5.7 (the latest version before the jump to 8.0), even though a newer and better version exists. Why is this? And which is best, MySQL 5.7 or 8.0?
Most people don’t upgrade because either they don’t know about the latest MySQL version, or they don’t want to take the time to update it. In addition, 5.7 has not been deprecated and will not be until 2023.

Support EOL for macOS v10.14
But while MySQL 5.7 is still supported, making the switch to the latest version is definitely worth your time. It’s faster and more secure — changes can be observed instantly upon activating it. And for developers who can make use of the new functions, the benefits are more numerous than can be quickly listed.
There are some upgrade considerations and backward incompatibilities you’ll need to know about, but for a majority of sites, they won’t cause issues.
It’s almost always best to keep up with the latest stable version of MySQL. Even minor updates are worth the trouble, though the new built-in auto-updater will likely handle those for you. As for major updates, it’s worth it unless crucial parts of your server are incompatible.
While WordPress supports MySQL versions all the way back to 5.6, 8.0 works perfectly with it. And as 5.6 is no longer supported and is susceptible to bugs and security risks, you should at least update to 5.7.
How to Check MySQL Version
It’s crucial to keep MySQL up to date, but you need to know its version before upgrading. Chances are, you’re already using the latest version and don’t need to do anything at all. There are several ways to check; these are just a handful of the easiest ones.
Check MySQL Version with MyKinsta
Accessing your database and checking your MySQL version with MyKinsta is very easy. There are several ways to do so, as detailed above, but the easiest two are using phpMyAdmin or connecting with the command line.
You can find phpMyAdmin after logging into MyKinsta. Just go to Sites > Info, and under the Database access section, click Open phpMyAdmin. The credentials you need to log in are right there.
You can also connect with the command line with SSH. With Kinsta, we set up everything for you to allow SSH access. Just find your credentials in Sites > Info in the SFTP/SSH section. Then follow the steps below to log in and put in the proper commands.
Use the Command Line
The easiest way to obtain your MySQL version is with a simple code submitted through the command line. It takes mere seconds and answers your question instantly. Getting at your server’s command line shouldn’t be too difficult unless you’re using minimal hosting.
There are a variety of ways to access your server’s command line. For example, your web host may provide a way to submit commands through their back end, such as with cPanel. Or you may be able to use the built-in Terminal or Command Prompt to connect to your server. Tools like PuTTY also exist to help you log in and are usually required for Windows users to connect with SSH.
Either way, you’ll need some SSH login credentials. You can usually find them in your web hosting dashboard, or you can email them and ask for help.
Once you know how you’re going to connect to your server’s command line, follow these steps.
Step 1: Launch the Terminal (Linux, macOS) or Command Prompt/PuTTY (Windows) on your computer. In cPanel, you can find it under Advanced > Terminal.
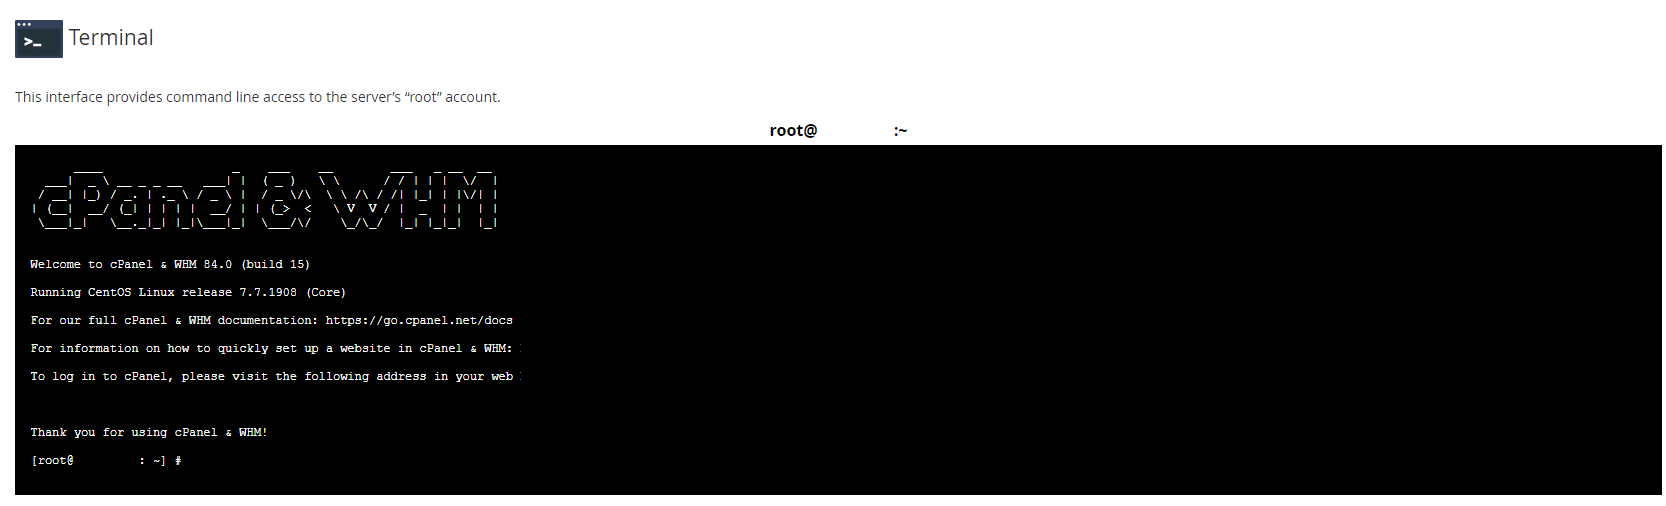
cPanel Terminal view
Step 2: Provide your SSH credentials to connect and log in to the server.
Step 3: Input the following command:
If you have the MySQL Shell installed, you can also use the simple command “mysql” to show your version information.
Either way, the version number should be output on the screen.
Check MySQL Version with phpMyAdmin
There’s another straightforward way to check your MySQL version, and that’s with phpMyAdmin. This software is also ubiquitous and present on most servers, so you have a good shot at finding your MySQL version.
Find your phpMyAdmin credentials by checking your web hosting dashboard. There may even be a direct link to log in there. Email your host if you can’t find them.
Log in to phpMyAdmin once you find your credentials. As soon as you’re in, you’ll see a Database server box on the right side of the screen. There, under the Software version section, is your MySQL version. Easy as that!
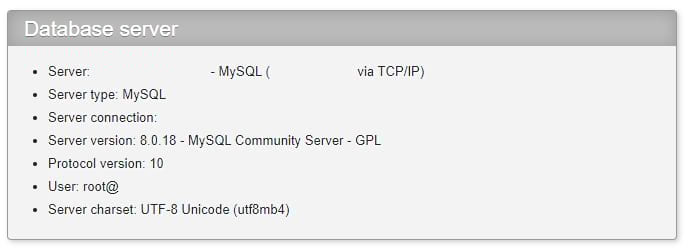
Viewing MySQL version in phpMyAdmin
Through WordPress Dashboard
A final easy way to find your MySQL version is through your site’s WordPress admin dashboard.
To do that, visit your WordPress dashboard, and go to Tools > Site Health. Under here, first, go to the Info tab, and then to the Database section below.
You can find your server’s current MySQL version listed here beside the Server version label.
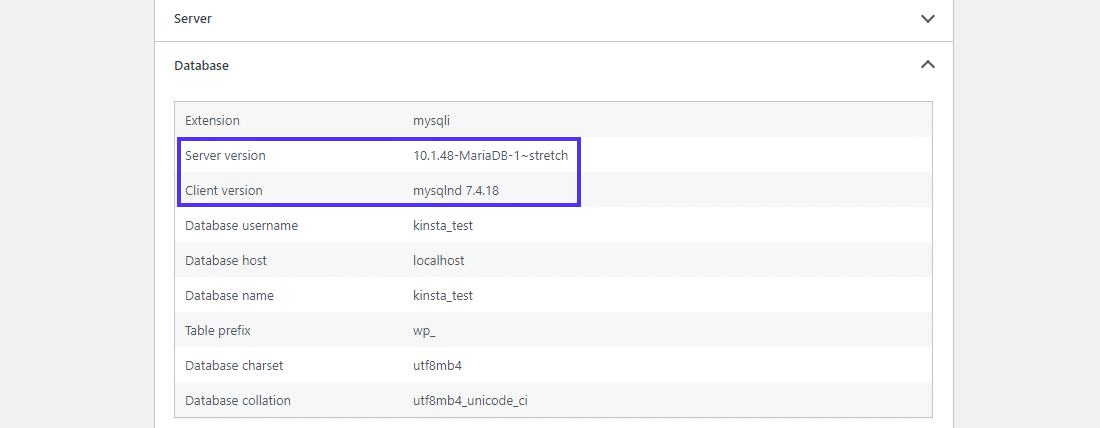
Finding the MySQL version in WordPress dashboard.
How to Upgrade MySQL Version
If you’ve determined your MySQL is out of date, you should rectify that as soon as possible. There are multiple ways to update MySQL to the latest versions; it all depends on what tools and operating systems you’re using.
Sign Up For the Newsletter
Want to know how we increased our traffic over 1000%?
Join 20,000+ others who get our weekly newsletter with insider WordPress tips!
It’s worth noting that later versions of MySQL will attempt to auto-update if the script notices that your installation is out of date. You may not need to do anything at all. If you’ve determined that MySQL is out of date and needs to be manually updated, follow these steps.
Like checking your MySQL version with the command line, you’ll need to obtain your SSH login credentials from your web host to access the terminal on your server. And, of course, you’ll need the IP address of your server.
Before updating MySQL, make sure to backup your database. For Kinsta users, it’s elementary to do in MyKinsta: log in and go to Sites > Backups. You’ll find a downloadable zip file there.
This backup contains both your database (an SQL file) and your entire site, so you’ll be extra safe if something goes wrong.
Upgrade MySQL Using cPanel
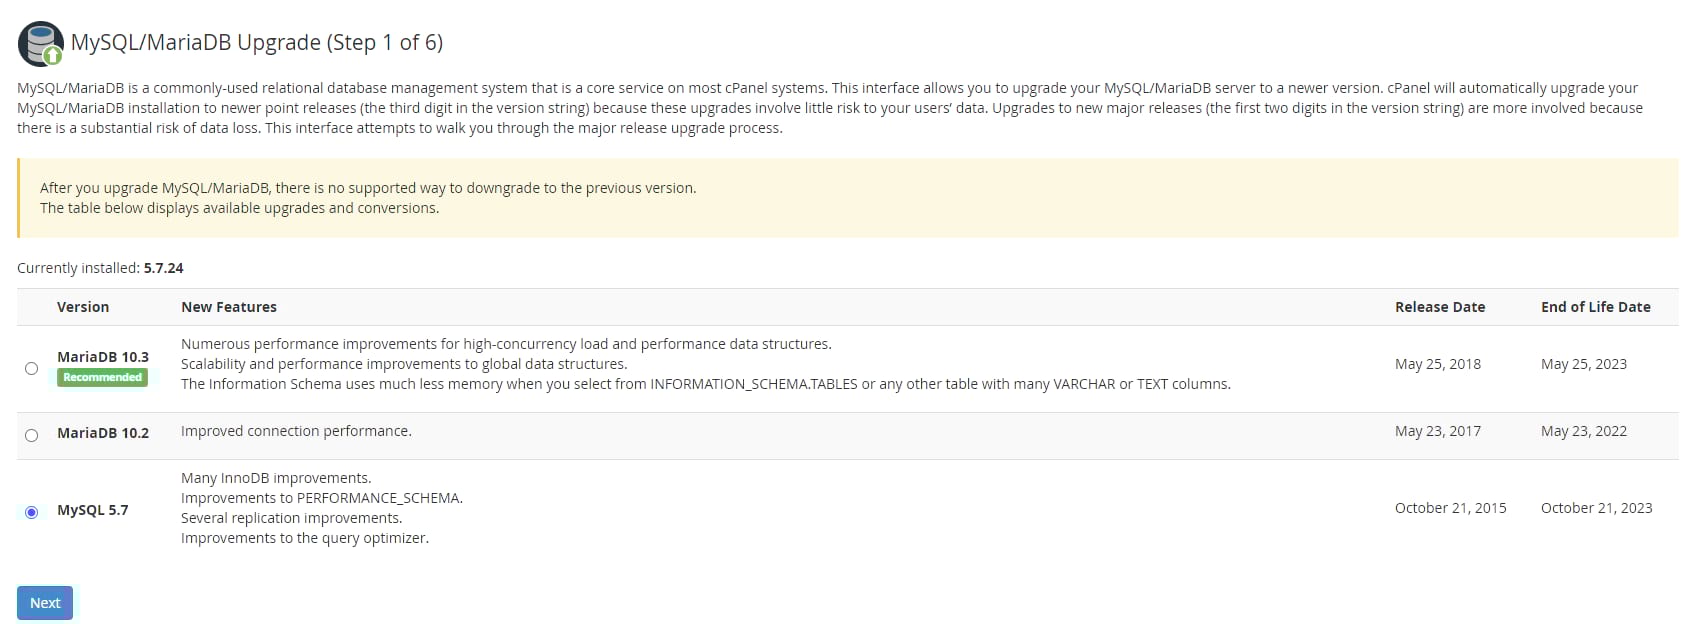
If your host offers cPanel, it’s probably the easiest way to do an upgrade since you can use the interface provided. But since cPanel defaults to MySQL 5.7 by default, you may want to do an upgrade.
As cPanel doesn’t allow you to downgrade, you should back up your database before proceeding.
Most cPanel installations come with Web Host Manager, WHM, which gives you deeper root access.
Step 1: Log in to WHM by visiting either “example-site.com:2087” or “example-site.com/whm.” You can also ask your web host how to access WHM.
Step 2: Navigate to Software > MySQL Upgrade or type “MySQL” into the search bar. You may also find it under SQL Services > MySQL/MariaDB Upgrade.
Step 3: Select the version of MySQL you want to upgrade to and click Next. Now follow the upgrade steps, and it’ll take care of everything for you.
Web Host Manager cPanel MySQL update
This method is by far the simplest way to do a MySQL upgrade, but if your host doesn’t offer cPanel or WHM, you may need to do it manually.
Upgrade MySQL in Linux/Ubuntu
There are a variety of Linux distributions, but Ubuntu is by far the most common. These instructions should work for any operating system that uses the apt/apt-get function to install the software.
MySQL APT Repository
Linux can easily SSH connect without any additional software requirements. So, you can get right into your server.
Need a hosting solution that gives you a competitive edge? Kinsta’s got you covered with incredible speed, state-of-the-art security, and auto-scaling. Check out our plans
Step 1: Launch the Terminal. Obtain your SSH credentials and use the ssh command to log in.
Step 2: You should have the MySQL apt Repository installed since MySQL is already on your server. Update your package list with the following command:
Step 3: Now upgrade MySQL.
You can also try this command if the above doesn’t work:
It’ll prompt you to choose a version; select 5.7 or 8.0. If you’re upgrading from 5.6, you should update to 5.7 first, rather than going straight to 8.0.
Upgrade MySQL on macOS
While macOS comes with its own version of MySQL, you can’t upgrade it through the usual methods. And most likely, your server is using a separate instance.
Many of these steps are very similar to updating MySQL on Linux. macOS similarly has SSH built into the operating system, so all you need to do is run the commands.
We’ll assume you’re using Homebrew as a package manager as it’s the simplest way to install and update MySQL on Mac. You shouldn’t attempt to upgrade MySQL with Homebrew if you didn’t use it to install it initially.
Using Homebrew to install MySQL on Mac
Step 1: Launch the Terminal program and log in with the ssh command.
Step 2: Run these commands using Homebrew.
This command should automatically install 8.0 and upgrade any existing versions.
Are you running into trouble? Try uninstalling the current version of MySQL first. Use these commands:
Then you can again attempt to run the update and install commands again.
Step 3: Make sure you start the MySQL server again manually:
Upgrade MySQL in Windows
Unlike Mac and Linux, Windows can’t use SSH by default. Instead, you’ll need to install a separate client, and then you can connect to your server.
Step 1: Download PuTTY and install it on your system. Launch it and input your SSH credentials to connect to the server. 3306 is the default port number. Ignore any security alerts; these are normal.
Step 2: Assuming you’re connecting to a Linux terminal, you can use the commands in the Linux/Ubuntu section above to perform the upgrade.
You can also use the MySQL installer to download MySQL onto the system directly. This process skips the SSH connection entirely.
Summary
With any software, it’s crucial to keep it up to date. And with MySQL being so integral to your website and its database, it’s even more imperative. Unfortunately, too many web admins choose to let their MySQL version fall behind, to the detriment of their website’s speed and security.
Luckily, checking your MySQL version and upgrading it is almost always a smooth process. While you should definitely back up your website and database for emergencies, you aren’t likely to experience any issues.
With just a tiny command in your web server’s terminal, your database will be well optimized and faster than ever.
Save time, costs and maximize site performance with:
- Instant help from WordPress hosting experts, 24/7.
- Cloudflare Enterprise integration.
- Global audience reach with 28 data centers worldwide.
- Optimization with our built-in Application Performance Monitoring.
All of that and much more, in one plan with no long-term contracts, assisted migrations, and a 30-day-money-back-guarantee. Check out our plans or talk to sales to find the plan that’s right for you.
Источник


