- Install and Configure the Web Application Proxy Server
- Configure CAs and certificates
- Configure certificate templates
- To configure a certificate template
- Configure web application certificates
- Install the Remote Access role
- To install the Web Application Proxy role service
- Configure Web Application Proxy
- To configure Web Application Proxy
- Настройка параметров прокси-сервера устройства и подключения к Интернету Configure device proxy and Internet connectivity settings
- Настройка прокси-сервера вручную с использованием статического прокси-сервера на основе реестра Configure the proxy server manually using a registry-based static proxy
- Настройка прокси-сервера вручную с помощью команды netsh Configure the proxy server manually using netsh command
- Включить доступ к URL-адресам службы «Защитник Майкрософт для конечных точек» на прокси-сервере Enable access to Microsoft Defender for Endpoint service URLs in the proxy server
- Агент мониторинга Майкрософт (MMA) — требования к прокси и брандмауэру для более старых версий клиента Windows или Windows Server Microsoft Monitoring Agent (MMA) — proxy and firewall requirements for older versions of Windows client or Windows Server
- Подтверждение требований к URL-адресу службы агента мониторинга Майкрософт (MMA) Confirm Microsoft Monitoring Agent (MMA) Service URL Requirements
- Проверка подключения клиента к URL-адресам службы ATP Microsoft Defender Verify client connectivity to Microsoft Defender ATP service URLs
Install and Configure the Web Application Proxy Server
Applies To: Windows Server 2012 R2
This content is relevant for the on-premises version of Web Application Proxy. To enable secure access to on-premises applications over the cloud, see the Azure AD Application Proxy content.
This topic describes how to install the Remote Access role with the Web Application Proxy role service and how to configure the Web Application Proxy server to connect to an ActiveВ Directory Federation Services (ADВ FS) server. Before beginning the deployment steps, ensure that you have completed the planning steps described in Plan the Web Application Proxy Server.
This topic includes sample Windows PowerShell cmdlets that you can use to automate some of the procedures described. For more information, see Using Cmdlets.
Configure CAs and certificates
Web Application Proxy servers require the following certificates in the certificate store on each Web Application Proxy server:
A certificate whose subject covers the federation service name. If you want to use Workplace Join, the certificate must also contain the following subject alternative names (SANs): . and enterpriseregistration. .
A wildcard certificate, a subject alternative name (SAN) certificate, several SAN certificates, or several certificates whose subjects cover each web application.
A copy of the certificate issued to external servers when using client certificate preauthentication.
Configure certificate templates
Depending on your deployment and authentication requirements, you might require additional certificate templates on your internal certification authority (CA).
To configure a certificate template
On the internal CA, create a certificate template as described in Creating Certificate Templates.
Deploy the certificate template as described in Deploying Certificate Templates.
Configure web application certificates
In an Web Application Proxy deployment you require certificates for the published web applications, and for the AD FS proxy if your deployment provides AD FS proxy functionality. For these required certificates, there are two options for the issuing CA:
Public—Supplied by a 3rd party.
A website certificate used for server authentication. If the certificate subject is not a wildcard, it must be the externally resolvable fully qualified domain name (FQDN) URL that you configure on the Web Application Proxy server for the application.
Private—The following are required, if they do not already exist:
A website certificate used for server authentication. The certificate subject should be an externally resolvable FQDN that is reachable from the Internet. The certificate can be based on the certificate template created in Configure certificate templates.
A certificate revocation list (CRL) distribution point that is reachable from a publicly resolvable FQDN.
Make sure that the website certificate used for server authentication meets the following requirements:
The common name of the certificate should match the name that you configure for the external URL of the published web application, or the federation service name.
For the Enhanced Key Usage field, use the Server Authentication object identifier (OID).
For the CRL Distribution Points field, specify a CRL distribution point that is accessible by client devices that are connected to the Internet.
The certificate must have a private key.
The certificate must be imported directly into the personal store.
Certificates can have wildcards in the name. A wildcard certificate with the subject name *.contoso.com can be used for web applications in the domain contoso.com, for example, sharepoint.contoso.com and owa.contoso.com. This wildcard certificate cannot be used for the website sharepoint.internal.contoso.com.
Certificates can be subject alternative name (SAN) certificates. For example, a SAN certificate with the names owa.contoso.com and crm.contoso.com can be used for only those two websites. It cannot be used for sharepoint.contoso.com.
For Workplace Join, a SAN certificate is required with the following SANs: . For example, adfs1.contoso.com. enterpriseregistration. For example, enterpriseregistration.contoso.com.
Install the Remote Access role
To deploy Web Application Proxy, you must install the Remote Access role with the Web Application Proxy role service on a server that will act as the Web Application Proxy server.
Repeat this procedure for all of the servers that you want to deploy as Web Application Proxy servers.
To install the Web Application Proxy role service
On the Web Application Proxy server, in the Server Manager console, in the Dashboard, click Add roles and features.
In the Add Roles and Features Wizard, click Next three times to get to the server role selection screen.
On the Select server roles dialog, select Remote Access, and then click Next.
Click Next twice.
On the Select role services dialog, select Web Application Proxy, click Add Features, and then click Next.
On the Confirm installation selections dialog, click Install.
On the Installation progress dialog, verify that the installation was successful, and then click Close.
.jpeg) Windows PowerShell equivalent commands
Windows PowerShell equivalent commands
The following Windows PowerShell cmdlet or cmdlets perform the same function as the preceding procedure. Enter each cmdlet on a single line, even though they may appear word-wrapped across several lines here because of formatting constraints.
See the instructional video for help Installing the Web Application Proxy
Configure Web Application Proxy
You must configure Web Application Proxy to connect to an AD FS server.
Repeat this procedure for all of the servers that you want to deploy as Web Application Proxy servers.
To configure Web Application Proxy
On the Web Application Proxy server, open the Remote Access Management console: On the Start screen, click the Apps arrow. On the Apps screen, typeВ RAMgmtUI.exe, and then press ENTER. If the User Account Control dialog box appears, confirm that the action it displays is what you want, and then click Yes.
In the navigation pane, click Web Application Proxy.
In the Remote Access Management console, in the middle pane, click Run the Web Application Proxy Configuration Wizard.
On the Web Application Proxy Configuration Wizard, on the Welcome dialog, click Next.
On the Federation Server dialog, do the following, and then click Next:
In the Federation service name box, enter the fully qualified domain name (FQDN) of the AD FS server; for example, fs.contoso.com.
In the User name and Password boxes, enter the credentials of a local administrator account on the AD FS servers.
On the AD FS Proxy Certificate dialog, in the list of certificates currently installed on the Web Application Proxy server, select a certificate to be used by Web Application Proxy for AD FS proxy functionality, and then click Next.
The certificate you choose here should be the one that whose subject is the Federation Service name, for example, fs.contoso.com. If you plan on using Workplace Join, this must be a SAN certificate with the SANs described in Configure CAs and certificates.
On the Confirmation dialog, review the settings. If required, you can copy the PowerShell cmdlet to automate additional installations. Click Configure.
On the Results dialog, verify that the configuration was successful, and then click Close.
Windows PowerShell equivalent commands
The following Windows PowerShell cmdlet or cmdlets perform the same function as the preceding procedure. Enter each cmdlet on a single line, even though they may appear word-wrapped across several lines here because of formatting constraints.
The following command will prompt you to enter credentials of a local administrator account on the AD FS servers.
Настройка параметров прокси-сервера устройства и подключения к Интернету Configure device proxy and Internet connectivity settings
Область применения: Applies to:
Хотите испытать Defender для конечной точки? Want to experience Defender for Endpoint? Зарегистрився для бесплатной пробной. Sign up for a free trial.
Датчик Defender для конечной точки требует от Microsoft Windows HTTP (WinHTTP) отчета о данных датчиков и связи со службой Defender для конечной точки. The Defender for Endpoint sensor requires Microsoft Windows HTTP (WinHTTP) to report sensor data and communicate with the Defender for Endpoint service.
Встроенный датчик Defender for Endpoint работает в системном контексте с помощью учетной записи LocalSystem. The embedded Defender for Endpoint sensor runs in system context using the LocalSystem account. Датчик использует службы MICROSOFT Windows HTTP (WinHTTP), чтобы включить связь с облачной службой Defender для конечной точки. The sensor uses Microsoft Windows HTTP Services (WinHTTP) to enable communication with the Defender for Endpoint cloud service.
В организациях, в которых прокси-серверы переадресации используются в качестве шлюза в Интернет, можно использовать защиту сети для изучения прокси-сервера. For organizations that use forward proxies as a gateway to the Internet, you can use network protection to investigate behind a proxy. Дополнительные сведения см. в статье Исследование событий подключения, происходящих за прокси-серверами переадресации. For more information, see Investigate connection events that occur behind forward proxies.
Параметр конфигурации WinHTTP не зависит от параметров прокси-сервера Для просмотра прокси-серверов Windows Internet (WinINet) и может открыть прокси-сервер только с помощью следующих методов обнаружения: The WinHTTP configuration setting is independent of the Windows Internet (WinINet) Internet browsing proxy settings and can only discover a proxy server by using the following discovery methods:
Методы автоматического обнаружения: Auto-discovery methods:
Прозрачный прокси Transparent proxy
Протокол автоматического обнаружения веб-прокси (WPAD) Web Proxy Auto-discovery Protocol (WPAD)
Если вы используете прозрачный прокси или WPAD в сетевой топологии, вам не нужны специальные параметры конфигурации. If you’re using Transparent proxy or WPAD in your network topology, you don’t need special configuration settings. Дополнительные сведения об исключениях URL-адресов Defender для конечной точки в прокси-сервере см. в ссылке Включить доступ к URL-адресам службы Defender для конечных точек на прокси-сервере. For more information on Defender for Endpoint URL exclusions in the proxy, see Enable access to Defender for Endpoint service URLs in the proxy server.
Конфигурация статического прокси вручную: Manual static proxy configuration:
- Конфигурация на основе реестра Registry based configuration
- WinHTTP, настроенный с помощью команды netsh, подходит только для настольных компьютеров в стабильной топологии (например: настольный компьютер в корпоративной сети за тем же прокси-сервером) WinHTTP configured using netsh command – Suitable only for desktops in a stable topology (for example: a desktop in a corporate network behind the same proxy)
Настройка прокси-сервера вручную с использованием статического прокси-сервера на основе реестра Configure the proxy server manually using a registry-based static proxy
Настройка статического прокси-сервера на основе реестра, чтобы позволить только датчику Defender для конечных точек сообщать диагностические данные и общаться с службами Defender для конечных точек, если компьютеру не разрешено подключение к Интернету. Configure a registry-based static proxy to allow only Defender for Endpoint sensor to report diagnostic data and communicate with Defender for Endpoint services if a computer is not be permitted to connect to the Internet.
- При использовании этого параметра в Windows 10 или Windows Server 2019 рекомендуется использовать следующие (или более поздние) сборки и накопительные обновления: When using this option on Windows 10 or Windows Server 2019, it is recommended to have the following (or later) build and cumulative update rollup:
Windows 10, версия 1909 — https://support.microsoft.com/kb/4601380 Windows 10, version 1909 — https://support.microsoft.com/kb/4601380 Windows 10, версия 2004 — https://support.microsoft.com/kb/4601382 Windows 10, version 2004 — https://support.microsoft.com/kb/4601382
Windows 10, версия 20H2 — https://support.microsoft.com/kb/4601382 Windows 10, version 20H2 — https://support.microsoft.com/kb/4601382 Эти обновления улучшают подключение и надежность канала CnC (Command and Control). These updates improve the connectivity and reliability of the CnC (Command and Control) channel.
Статический прокси-сервер можно настроить с помощью групповой политики (GP). The static proxy is configurable through Group Policy (GP). Групповые политики можно найти в следующих статьях: The group policy can be found under:
- Административные шаблоны > компоненты Windows > сбор данных и сборки предварительного просмотра > Настройка использования аутентификации прокси для службы подключенных пользователей и телеметрии Administrative Templates > Windows Components > Data Collection and Preview Builds > Configure Authenticated Proxy usage for the Connected User Experience and Telemetry Service
- Установите его для включения и выбора отключения использования прокси-сервера с проверкой подлинности:
 Set it to Enabled and select Disable Authenticated Proxy usage:
- Установите его для включения и выбора отключения использования прокси-сервера с проверкой подлинности:
- Административные шаблоны > компоненты Windows > сбор данных и предварительные сборки > настройка подключенных пользовательских интерфейсов и телеметрии: Administrative Templates > Windows Components > Data Collection and Preview Builds > Configure connected user experiences and telemetry:
- Это повлияет на все приложения, в том числе службы Windows, которые используют WinHTTP с прокси по умолчанию. This will affect all applications including Windows services which use WinHTTP with default proxy.
- Ноутбуки, которые меняют топологию (например, из офиса в дом), будут неисправными с сеткой. Laptops that are changing topology (for example: from office to home) will malfunction with netsh. Используйте настройку статических прокси-серверов на основе реестра. Use the registry-based static proxy configuration.
Настройка прокси-сервера: Configure the proxy:
Политика устанавливает два значения реестра: TelemetryProxyServer как REG_SZ и DisableEnterpriseAuthProxy как REG_DWORD в разделе реестра HKLM\Software\Policies\Microsoft\Windows\DataCollection . The policy sets two registry values TelemetryProxyServer as REG_SZ and DisableEnterpriseAuthProxy as REG_DWORD under the registry key HKLM\Software\Policies\Microsoft\Windows\DataCollection .
Значение реестра принимает TelemetryProxyServer следующий формат строки: The registry value TelemetryProxyServer takes the following string format:
Например, 10.0.0.6:8080 For example: 10.0.0.6:8080
Следует назначить значение реестра DisableEnterpriseAuthProxy — 1. The registry value DisableEnterpriseAuthProxy should be set to 1.
Настройка прокси-сервера вручную с помощью команды netsh Configure the proxy server manually using netsh command
Используйте команду netsh для настройки статического прокси на уровне системы. Use netsh to configure a system-wide static proxy.
Откройте командную строку с повышенными правами: Open an elevated command-line:
а. a. В меню Пуск введите cmd. Go to Start and type cmd.
б. b. Щелкните правой кнопкой мыши пункт Командная строка и выберите команду Запуск от имени администратора. Right-click Command prompt and select Run as administrator.
Введите следующую команду и нажмите клавишу ВВОД: Enter the following command and press Enter:
Например, netsh winhttp set proxy 10.0.0.6:8080 For example: netsh winhttp set proxy 10.0.0.6:8080
Чтобы сбросить прокси winhttp, введите следующую команду и нажмите кнопку Ввод To reset the winhttp proxy, enter the following command and press Enter
Включить доступ к URL-адресам службы «Защитник Майкрософт для конечных точек» на прокси-сервере Enable access to Microsoft Defender for Endpoint service URLs in the proxy server
Если прокси-сервер или брандмауэр блокирует весь трафик по умолчанию и пропускает только определенные домены, добавьте домены, перечисленные в загружаемой электронной таблице, в список разрешенных доменов. If a proxy or firewall is blocking all traffic by default and allowing only specific domains through, add the domains listed in the downloadable sheet to the allowed domains list.
В следующей загружаемой таблице перечислены службы и связанные с ними URL-адреса, к которые должна подключаться ваша сеть. The following downloadable spreadsheet lists the services and their associated URLs that your network must be able to connect to. Необходимо убедиться, что нет правил фильтрации брандмауэра или сети, которые бы отказывали в доступе к этим URL-адресам, или вам может потребоваться создать правило разрешить специально для них. You should ensure that there are no firewall or network filtering rules that would deny access to these URLs, or you may need to create an allow rule specifically for them.
Таблица списка доменов Spreadsheet of domains list Description Description Таблица определенных DNS-записей для расположения служб, географических местоположений и ОС. Spreadsheet of specific DNS records for service locations, geographic locations, and OS. Если на прокси-сервере или брандмауэре включено сканирование HTTPS (проверка SSL), исключите домены, перечисленные в приведенной выше таблице, из сканирования HTTPS. If a proxy or firewall has HTTPS scanning (SSL inspection) enabled, exclude the domains listed in the above table from HTTPS scanning.
settings-win.data.microsoft.com требуется только в том случае, если у вас есть устройства с Windows 10 с версией 1803 или более ранней версии. settings-win.data.microsoft.com is only needed if you have Windows 10 devices running version 1803 or earlier.
URL-адреса, которые включают в них v20, необходимы только в том случае, если у вас есть устройства с Windows 10 с версией 1803 или более поздней версии. URLs that include v20 in them are only needed if you have Windows 10 devices running version 1803 or later. Например, необходимо для устройства с Windows 10 с версией 1803 или более поздней версии и с бортовой версией в регион хранения us-v20.events.data.microsoft.com данных США. For example, us-v20.events.data.microsoft.com is needed for a Windows 10 device running version 1803 or later and onboarded to US Data Storage region.
Если вы используете антивирус Microsoft Defender в своей среде, см. в руб. Настройка сетевых подключений к облачной службе антивирусных программ Microsoft Defender. If you are using Microsoft Defender Antivirus in your environment, see Configure network connections to the Microsoft Defender Antivirus cloud service.
Если прокси-сервер или брандмауэр блокирует анонимный трафик, так как датчик Defender для конечной точки подключается из системного контекста, убедитесь, что анонимный трафик разрешен в указанных ранее URL-адресах. If a proxy or firewall is blocking anonymous traffic, as Defender for Endpoint sensor is connecting from system context, make sure anonymous traffic is permitted in the previously listed URLs.
Агент мониторинга Майкрософт (MMA) — требования к прокси и брандмауэру для более старых версий клиента Windows или Windows Server Microsoft Monitoring Agent (MMA) — proxy and firewall requirements for older versions of Windows client or Windows Server
В приведенной ниже информации приведены сведения о конфигурации прокси и брандмауэра, необходимые для связи с агентом Log Analytics (часто именуемой агентом мониторинга Майкрософт) для предыдущих версий Windows, таких как Windows 7 SP1, Windows 8.1, Windows Server 2008 R2, Windows Server 2012 R2 и Windows Server 2016. The information below list the proxy and firewall configuration information required to communicate with Log Analytics agent (often referred to as Microsoft Monitoring Agent) for the previous versions of Windows such as Windows 7 SP1, Windows 8.1, Windows Server 2008 R2, Windows Server 2012 R2, and Windows Server 2016.
Ресурс агента Agent Resource Порты Ports Direction Direction Обход проверки HTTPS Bypass HTTPS inspection *.ods.opinsights.azure.com *.ods.opinsights.azure.com Порт 443 Port 443 Исходящие Outbound Да Yes *.oms.opinsights.azure.com *.oms.opinsights.azure.com Порт 443 Port 443 Исходящие Outbound Да Yes *.blob.core.windows.net *.blob.core.windows.net Порт 443 Port 443 Исходящие Outbound Да Yes *.azure-automation.net *.azure-automation.net Порт 443 Port 443 Исходящие Outbound Да Yes В качестве облачного решения диапазон IP может изменяться. As a cloud-based solution, the IP range can change. Рекомендуется перейти к параметру разрешения DNS. It’s recommended you move to DNS resolving setting.
Подтверждение требований к URL-адресу службы агента мониторинга Майкрософт (MMA) Confirm Microsoft Monitoring Agent (MMA) Service URL Requirements
См. следующие инструкции по устранению требования под диктовки (*) для конкретной среды при использовании агента мониторинга Microsoft (MMA) для предыдущих версий Windows. Please see the following guidance to eliminate the wildcard (*) requirement for your specific environment when using the Microsoft Monitoring Agent (MMA) for previous versions of Windows.
На борту предыдущей операционной системы с агентом мониторинга Microsoft (MMA) в Defender for Endpoint (дополнительные сведения см. в предыдущих версиях Windows on Defender for Endpoint и onboard Windows servers). Onboard a previous operating system with the Microsoft Monitoring Agent (MMA) into Defender for Endpoint (for more information, see Onboard previous versions of Windows on Defender for Endpoint and Onboard Windows servers.
Убедитесь, что машина успешно сообщается на портале Центра безопасности Защитника Майкрософт. Ensure the machine is successfully reporting into the Microsoft Defender Security Center portal.
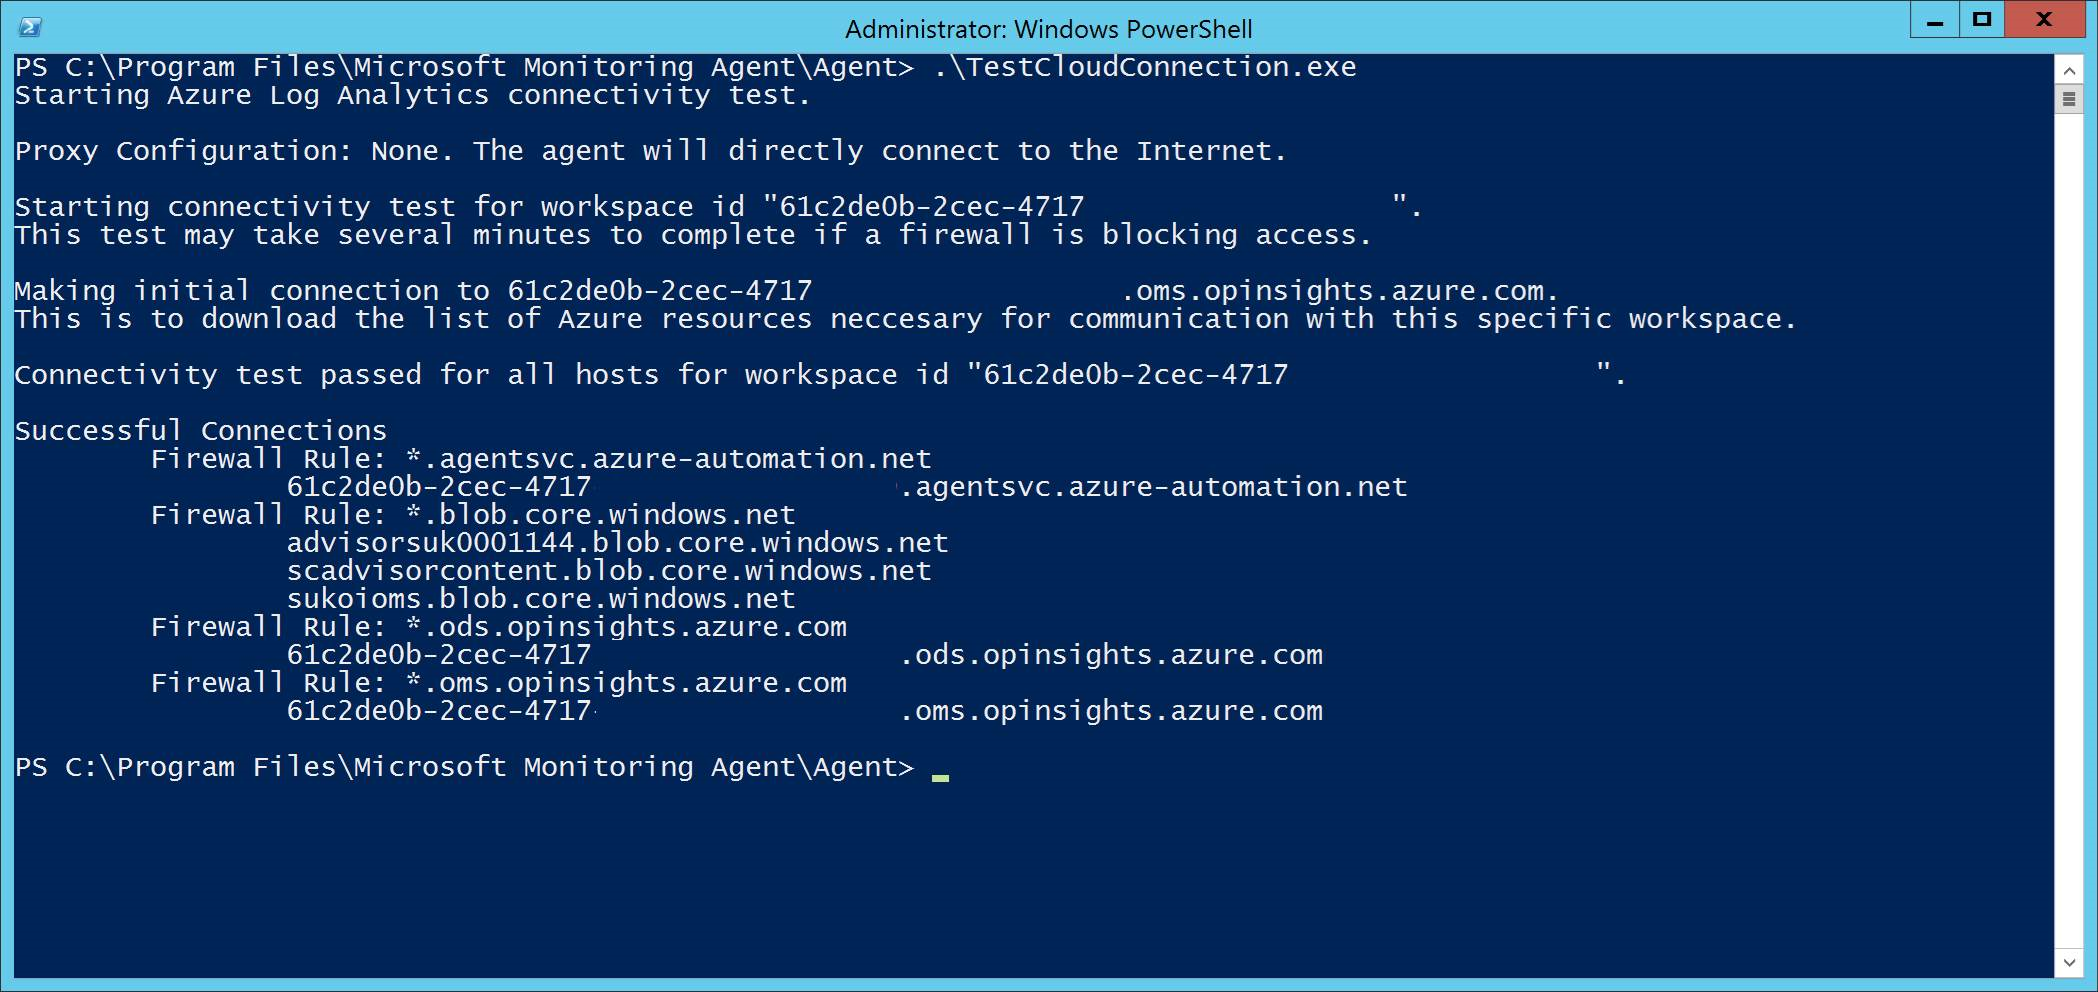
Запустите TestCloudConnection.exe из «C:\Program Files\Microsoft Monitoring Agent\Agent», чтобы проверить подключение и увидеть необходимые URL-адреса для конкретного рабочего пространства. Run the TestCloudConnection.exe tool from “C:\Program Files\Microsoft Monitoring Agent\Agent” to validate the connectivity and to see the required URLs for your specific workspace.
Проверьте список URL-адресов Microsoft Defender для конечных точек для полного списка требований к вашему региону (см. в таблице URL-адресов службы). Check the Microsoft Defender for Endpoint URLs list for the complete list of requirements for your region (please refer to the Service URLs Spreadsheet).
Конечные точки URL-адресов (*), используемые в *.ods.opinsights.azure.com, *.oms.opinsights.azure.com и *.agentsvc.azure-automation.net URL-адреса, могут быть заменены вашим конкретным ИД рабочего пространства. The wildcards (*) used in *.ods.opinsights.azure.com, *.oms.opinsights.azure.com, and *.agentsvc.azure-automation.net URL endpoints can be replaced with your specific Workspace ID. ID рабочего пространства имеет особый характер для среды и рабочего пространства и может быть найден в разделе Onboarding клиента на портале Центра безопасности Защитника Майкрософт. The Workspace ID is specific to your environment and workspace and can be found in the Onboarding section of your tenant within the Microsoft Defender Security Center portal.
Конечная точка URL blob.core.windows.net *.blob.core.windows.net может быть заменена URL-адресами, показанными в разделе «Правило брандмауэра: *.blob.core.windows.net» результатов тестирования. The *.blob.core.windows.net URL endpoint can be replaced with the URLs shown in the “Firewall Rule: *.blob.core.windows.net” section of the test results.
В случае использования в центре безопасности Azure (ASC) может использоваться несколько областей работы. In the case of onboarding via Azure Security Center (ASC), multiple workspaces maybe used. Вам потребуется выполнить процедуру TestCloudConnection.exe на бортовом компьютере из каждого рабочего пространства (чтобы определить, есть ли какие-либо изменения url-адресов *.blob.core.windows.net между рабочей областью). You will need to perform the TestCloudConnection.exe procedure above on an onboarded machine from each workspace (to determine if there are any changes to the *.blob.core.windows.net URLs between the workspaces).
Проверка подключения клиента к URL-адресам службы ATP Microsoft Defender Verify client connectivity to Microsoft Defender ATP service URLs
Убедитесь в том, что настройка прокси-сервера выполнена успешно, служба WinHTTP может обнаружить и передать данные через прокси-сервер в вашей среде, а прокси-сервер разрешает трафик на URL-адреса службы Защитника для конечных точек. Verify the proxy configuration completed successfully, that WinHTTP can discover and communicate through the proxy server in your environment, and that the proxy server allows traffic to the Defender for Endpoint service URLs.
Скачайте средство клиентского анализатора MDATP на компьютер, на котором работает датчик Defender для конечной точки. Download the MDATP Client Analyzer tool to the PC where Defender for Endpoint sensor is running on.
Извлеките содержимое MDATPClientAnalyzer.zip на устройство. Extract the contents of MDATPClientAnalyzer.zip on the device.
Откройте командную строку с повышенными правами: Open an elevated command-line:
а. a. В меню Пуск введите cmd. Go to Start and type cmd.
б. b. Щелкните правой кнопкой мыши пункт Командная строка и выберите команду Запуск от имени администратора. Right-click Command prompt and select Run as administrator.
Введите следующую команду и нажмите клавишу ВВОД: Enter the following command and press Enter:
Замените HardDrivePath на путь, по которому был загружен инструмент MDATPClientAnalyzer, например Replace HardDrivePath with the path where the MDATPClientAnalyzer tool was downloaded to, for example
ИзвлечениеMDATPClientAnalyzerResult.zip, созданного инструментом в папке, используемой в HardDrivePath. Extract the MDATPClientAnalyzerResult.zip file created by tool in the folder used in the HardDrivePath.
Откройте MDATPClientAnalyzerResult.txt и убедитесь в том, что вы выполнили действия по настройке прокси-сервера, чтобы включить обнаружение сервера и доступ к URL-адресам службы. Open MDATPClientAnalyzerResult.txt and verify that you have performed the proxy configuration steps to enable server discovery and access to the service URLs.
Средство проверяет возможность подключения URL-адресов службы Защитника для конечной точки, которые настроены для работы службы Защитника для конечной точки с клиентом. The tool checks the connectivity of Defender for Endpoint service URLs that Defender for Endpoint client is configured to interact with. Затем результаты выводятся в файл MDATPClientAnalyzerResult.txt для каждого URL-адреса, который потенциально можно использоваться для общения с Защитником для служб конечных точек. It then prints the results into the MDATPClientAnalyzerResult.txt file for each URL that can potentially be used to communicate with the Defender for Endpoint services. Пример: For example:
Если по крайней мере один из вариантов подключения возвращает состояние (200), то клиент Defender для конечной точки может правильно взаимодействовать с проверенным URL-адресом, используя этот метод подключения. If at least one of the connectivity options returns a (200) status, then the Defender for Endpoint client can communicate with the tested URL properly using this connectivity method.
Однако, если результаты проверки подключения указывают на сбой, отображается ошибка HTTP (см. Коды состояния HTTP). However, if the connectivity check results indicate a failure, an HTTP error is displayed (see HTTP Status Codes). Затем можно использовать URL-адреса в таблице, показанной в Таблице Включить доступ к URL-адресам службы Defender для конечных точек на прокси-сервере. You can then use the URLs in the table shown in Enable access to Defender for Endpoint service URLs in the proxy server. Url-адреса, которые вы будете использовать, будут зависеть от региона, выбранного во время процедуры бортовой работы. The URLs you’ll use will depend on the region selected during the onboarding procedure.
Анализатор подключений не совместим с правилом ASR — Блокировка создания процессов, исходящих от команд PSExec и WMI. The Connectivity Analyzer tool is not compatible with ASR rule Block process creations originating from PSExec and WMI commands. Необходимо временно отключить это правило, чтобы запустить средство подключения. You will need to temporarily disable this rule to run the connectivity tool.
При наборе TelemetryProxyServer в реестре или через групповую политику защитник для конечной точки отпадет на прямую, если не может получить доступ к определенному прокси-серверу. When the TelemetryProxyServer is set, in Registry or via Group Policy, Defender for Endpoint will fall back to direct if it can’t access the defined proxy.
 Set it to Enabled and select Disable Authenticated Proxy usage: