- Русские Блоги
- Простое руководство по использованию PyCharm под Mac
- Configure a virtual environment
- Create a virtual environment
- Set an existing virtual environment
- Create a virtual environment using the project requirements
- Configure a Python interpreter
- Python interpreters in PyCharm
- Setting an existing Python interpreter
- Change the Python interpreter using the Python Interpreter selector
- Change the Python interpreter in the project settings
- Modify a Python interpreter
- Creating a new Python interpreter
- Setting the default interpreter
- Managing interpreter packages
Русские Блоги
Простое руководство по использованию PyCharm под Mac
PyCharm — это Python IDE, созданная JetBrains и поддерживающая системы MacOS, Windows, Linux.
Функции PyCharm: отладка, подсветка синтаксиса, управление проектом, переход кода, интеллектуальное приглашение, автозаполнение, модульное тестирование, контроль версий .
1. Новый проект PyCharm
1. Откройте Pycharm, создайте новый проект

2. Выберите путь к проекту и версию интерпретатора.
местоположение: выберите путь, где хранится проект
Интерпретатор: выберите версию, используемую python (каталог установки python)
создать: после выбора пути и версии, нажмите кнопку создать, чтобы создать

После завершения создания, как показано ниже:

3.new файл python Создать файл python

4. Создайте файл с расширением .py
name: имя файла, который вы хотите создать
вид: необязательный тип файла

После написания кода дважды щелкните, ЗАПУСТИТЬ, успешно запустите

Маленький треугольник в правом верхнем углу может быстро бегать

При первом запуске сценария лучше всего использовать запуск RUN правой кнопкой мыши. Сочетания клавиш и другие методы не могут автоматически изменяться после обновления кода.
2. Простые настройки, обычно используемые pycharm
1. Установите кодировку по умолчанию в utf-8

2. Отрегулируйте размер шрифта

3. Вы можете указать часто используемый контент в качестве собственного шаблона
Источник
Configure a virtual environment
PyCharm makes it possible to use the virtualenv tool to create a project-specific isolated virtual environment . The main purpose of virtual environments is to manage settings and dependencies of a particular project regardless of other Python projects. virtualenv tool comes bundled with PyCharm, so the user doesn’t need to install it.
For Python 3.3+ the built-in venv module is used, instead of the third-party virtualenv utility.
Create a virtual environment
Ensure that you have downloaded and installed Python on your computer.
Do one of the following:
Click the Python Interpreter selector and choose Add Interpreter .
Press Ctrl+Alt+S to open the project Settings/Preferences and go to Project
| Python Interpreter . Then click the icon and select Add .
In the left-hand pane of the Add Python Interpreter dialog, select Virtualenv Environment . The following actions depend on whether the virtual environment existed before.

If New environment is selected:
Specify the location of the new virtual environment in the text field, or click and find location in your file system. Note that the directory where the new virtual environment should be located, must be empty!
Choose the base interpreter from the list, or click and find a Python executable in the your file system.
If PyCharm detects no Python on your machine, it provides two options: to download the latest Python versions from python.org or to specify a path to the Python executable (in case of non-standard installation). 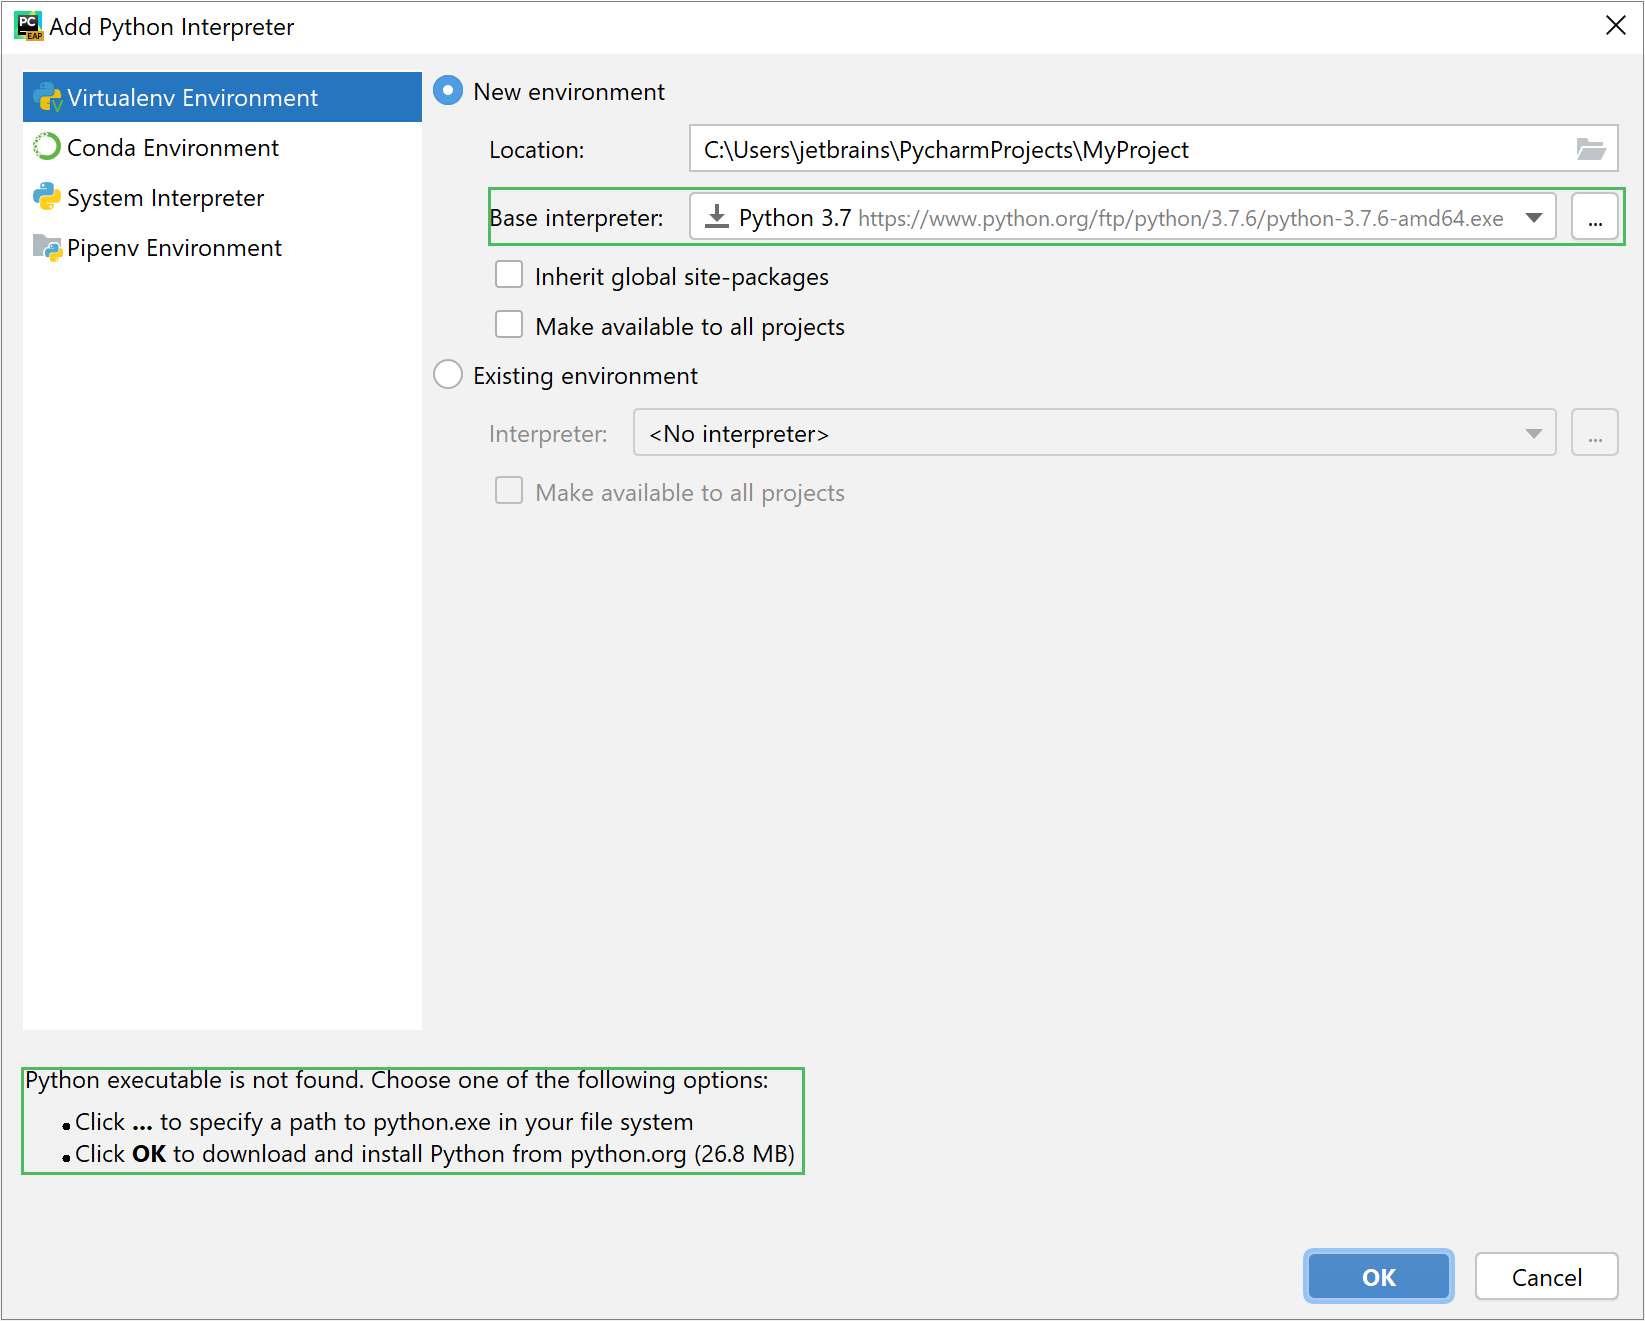
Select the Inherit global site-packages checkbox if you want that all packages installed in the global Python on your machine to be added to the virtual environment you’re going to create. This checkbox corresponds to the —system-site-packages option of the virtualenv tool.
Select the Make available to all projects checkbox if you want to reuse this environment when creating Python interpreters in PyCharm.
If Existing environment is selected:
Expand the Interpreter list and select any of the existing interpreters. Alternatively, click and specify a path to the Python executable in your file system, for example, C:\Python36\python.exe .
Select the Make available to all projects checkbox if you want to reuse this environment when creating Python interpreters in PyCharm.
Click OK to complete the task.
If PyCharm warns you about an Invalid environment , the specified Python binary cannot be found in the file system, or the Python version is not supported. Check the Python path and install a new version, if needed.
You can create as many virtual environments as required. To easily tell them from each other, use different names.
Set an existing virtual environment
- Press Ctrl+Alt+S to open the IDE settings and select Project
Expand the list of the available interpreters and click the Show All link. Alternatively, click the icon and select Show All . 
Virtual environments are marked with .
Select the target environment from the list and click OK to confirm your choice.

PyCharm can create a virtual environment for your project based on the project requirements.
Create a virtual environment using the project requirements
Open any directory with your source files that contains the requirements.txt or setup.py file: select File | Open from the main menu and choose the directory.
If no virtual environment has been created for this project, PyCharm suggests creating it: 
Keep the suggested options, or specify the environment location or base Python interpreter. Click OK to complete the task.
Once you click OK , PyCharm creates an environment and installs all the required packages. On the completion, see the notification popup: 
Note that if you ignore a suggestion to create a virtual environment, PyCharm won’t create a Python interperter for your project. So, any time when you open a .py file, you’ll see the warning with the options for configuring a project interpreter: 
This approach is particularly helpful when you want to upgrade a version of Python your environment is based on, for example, from 3.5 to 3.9. You can specify a new base interpreter and use requirements.txt to ensure all the needed packages are installed.
For any of the configured Python interpreters (but Docker-based), you can:
Once you have create a new virtual environment, you can reuse it for your other projects. Learn more how to setup an existing environment as a Python interpreter.
Источник
Configure a Python interpreter
Python interpreters in PyCharm
To work with your Python code in PyCharm, you need to configure at least one Python interpreter. You can use a system interpreter that is available with your Python installation. You can also create a Virtualenv, Pipenv, or Conda virtual environment . A virtual environment consists of a base interpreter and installed packages.
With PyCharm Professional , you can also configure interpreters to execute your Python code on remote environments: SSH, Vagrant, WSL (only for Windows), Docker, and Docker Compose

When you configure a Python interpreter , you need to specify the path to the Python executable in your system. So, before configuring a Python interpreter, you need to ensure that you’ve downloaded Python and installed it in your system and you’re aware of a path to it. You can create several Python interpreters based on the same Python executable. This is helpful when you need to create different virtual environments for developing different types of applications. For example, you can create one virtual environment based on Python 3.6 to develop Django applications and another virtual environment based on the same Python 3.6 to work with scientific libraries.
Python interpreters can be configured for a new project or for the current project (you can create a new interpreter or use one of the existing interpreters).
Setting an existing Python interpreter
At any time, you can switch your Python interpreter either using the Python Interpreter selector or in the project Settings/Preferences .
Change the Python interpreter using the Python Interpreter selector
The Python Interpreter selector is located on the status bar. It is the most convenient and quickest way to switch the Python interpreter. Just click it and select the target interpreter: 
Change the Python interpreter in the project settings
- Press Ctrl+Alt+S to open the IDE settings and select Project
Expand the list of the available interpreters and click the Show All link. Alternatively, click the icon and select Show All .
Select the target interpreter.

When PyCharm stops supporting any of the outdated Python versions, the corresponding Python interpreter is marked as unsupported.
When you change an SSH interpreter, you might need to synchronize local content with the target server. Mind a notification balloon in the lower-right corner.  You can click one of the links to perform the following actions:
Auto-upload files to the server
Synchronize files and then enable auto-uploading
Modify a Python interpreter
- Press Ctrl+Alt+S to open the IDE settings and select Project
Expand the list of the available interpreters and click the Show All link. Alternatively, click the icon and select Show All .
Select the target interpreter and click Edit . 
You can specify an alternative interpreter name for the selected interpreter. The Python interpreter name specified in the Name field, becomes visible in the list of available interpreters. Click OK to apply the changes.
For remote interpreters (that are available in PyCharm Professional ) you can modify configuration parameters.

When you modify an SSH interpreter, PyCharm shows the parameters of the corresponding Deployment configuration . It is not recommended selecting the SSH option as it doesn’t allow file synchronization and is part of the legacy implementation.
Creating a new Python interpreter
To add a new interpreter to the current project:
Do one of the following:
Click the Python Interpreter selector and choose Add Interpreter .
Press Ctrl+Alt+S to open the project Settings/Preferences and go to Project
| Python Interpreter . Then click the icon and select Add .
Choose the interpreter type to add and perform the specific settings:
Note that SSH, WSL, Vagrant, Docker, and Docker Compose are available only for the commercial version of PyCharm. WSL is Windows specific.
In the left-hand pane of the Add Python Interpreter dialog, select Virtualenv Environment . The following actions depend on whether the virtual environment existed before.
If New environment is selected:
Specify the location of the new virtual environment in the text field, or click and find location in your file system. Note that the directory where the new virtual environment should be located, must be empty!
Choose the base interpreter from the list, or click and find a Python executable in the your file system.
If PyCharm detects no Python on your machine, it provides two options: to download the latest Python versions from python.org or to specify a path to the Python executable (in case of non-standard installation).
Select the Inherit global site-packages checkbox if you want that all packages installed in the global Python on your machine to be added to the virtual environment you’re going to create. This checkbox corresponds to the —system-site-packages option of the virtualenv tool.
Select the Make available to all projects checkbox if you want to reuse this environment when creating Python interpreters in PyCharm.
If Existing environment is selected:
Expand the Interpreter list and select any of the existing interpreters. Alternatively, click and specify a path to the Python executable in your file system, for example, C:\Python36\python.exe .
Select the Make available to all projects checkbox if you want to reuse this environment when creating Python interpreters in PyCharm.
Click OK to complete the task.
If you have added the user base’s binary directory to your PATH environmental variable, you don’t need to set any additional options: the path to the pipenv executable will be autodetected.

Click OK to complete the task.
If you have not modified the PATH variable, PyCharm shows an error message: Pipenv executable is not found . Discover the proper executable path as described in the pipenv installation procedure and enter the target string in the Pipenv executable field, for example: C:\Users\jetbrains\AppData\Roaming\Python\Python37\Scripts\pipenv.exe (Windows) or /Users/jetbrains/.local/bin/pipenv (macOS).
Click OK to save the changes and complete the task.
In the left-hand pane of the Add Python Interpreter dialog, select Conda Environment . The following actions depend on whether the Conda environment existed before.
If New environment is selected:
Specify the location of the new Conda environment in the text field, or click and find location in your file system. Note that the directory where the new Conda environment should be located, must be empty!
Select the Python version from the list.
Specify the location of the Conda executable file in the text field, or click and find location in the Conda installation directory. You’re basically looking for a path that you’ve used when installing Conda on your machine.
Select the Make available to all projects checkbox if you want to reuse this environment when creating Python interpreters in PyCharm.
If Existing environment is selected:
Expand the Interpreter list and select any of the existing interpreters. Alternatively, click and specify a path to the Conda executable in your file system, for example, C:\Users\jetbrains\Anaconda3\python.exe .
Select the Make available to all projects checkbox if you want to reuse this environment when creating Python interpreters in PyCharm.
Click OK to complete the task.
In the left-hand pane of the Add Python Interpreter dialog, select System Interpreter . 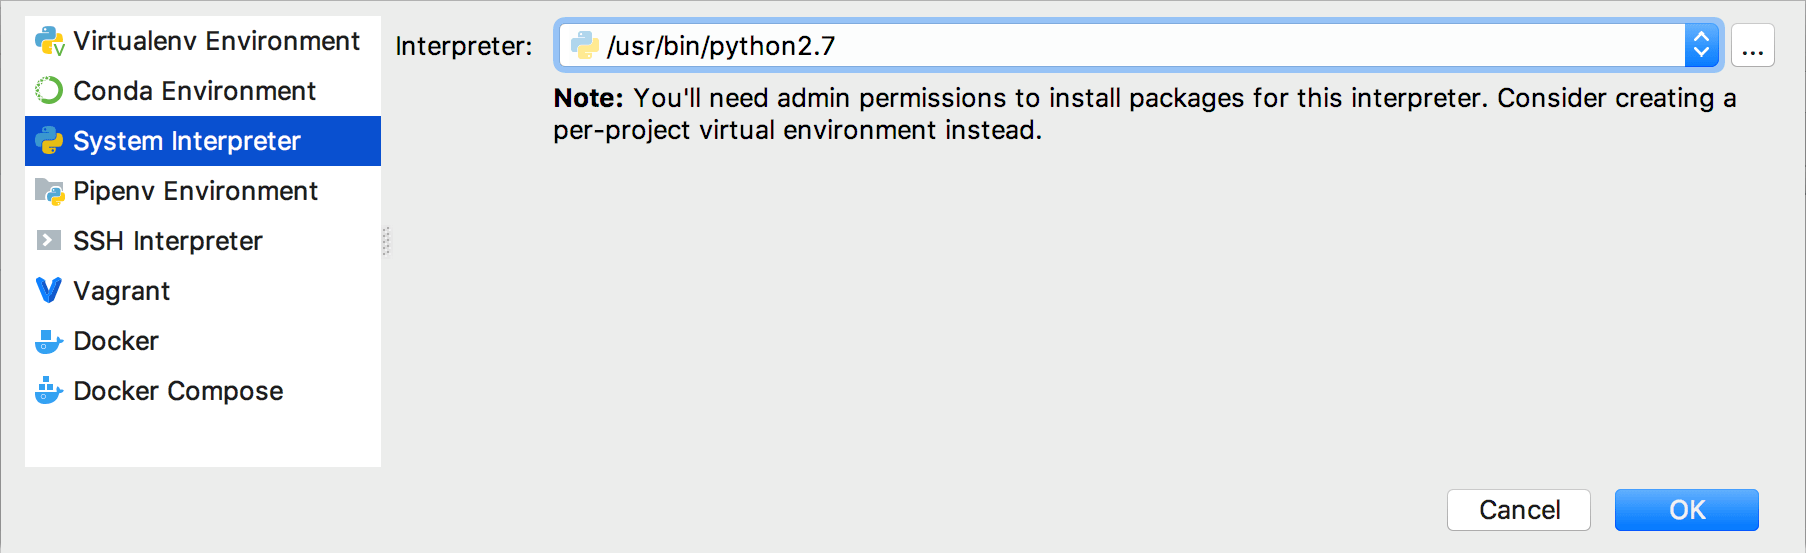
In the Interpreter field, type the fully-qualified path to the required interpreter executable, or click and in the Select Python Interpreter dialog that opens, choose the desired Python executable and click OK .
If PyCharm detects no Python on your machine, it provides two options: to download the latest Python versions from python.org or to specify a path to the Python executable (in case of non-standard installation). 
You will need admin privileges to install, remove, and upgrade packages for the system interpreter. When attempting to install an interpreter package through an intention action, you might receive the following error message:  As prompted, consider using a virtual environment for your project.
Click OK to complete the task.
In the left-hand pane of the Add Python Interpreter dialog, click SSH Interpreter .
In the right-hand pane select New server configuration , then specify server information (host, port, and username).

In the next dialog window, provide the authentication details to connect to the target server. 
Select Password or Key pair (OpenSSL or PuTTY) and enter your password or passphrase. If Key pair (OpenSSL or PuTTY) is selected, specify:
Private key file : location of the file with a private key
Passphrase : similar to a password, it serves to encrypt the private key.
The RFC 4716 format for OpenSSH keys is not supported by PyCharm. See the workaround.
Click Next to proceed with the final configuration step.
In the next dialog window, verify the path to the desired Python interpreter. You can accept default, or specify a different one. You have to configure the path mappings between your local project and the server. To do that, click next to the Sync folders field and enter the path to the local project folder and the path to the folder on the remote server.

You can also select the lowest checkbox to enable automatic upload of the local changes to the remote server.
In the left-hand pane of the Add Python Interpreter dialog, click Vagrant : 
Click the browse button next to the field Vagrant instance folder , and specify the desired Vagrant instance folder.
This results in showing the link to Vagrant host URL.
The Python interpreter path field displays the path to the desired Python executable. You can accept default, or specify a different one.
Click OK . The configured remote interpreter is added to the list.
In the left-hand pane of the dialog, click WSL .

Select the Linux distribution and specify the path to the python executable in the selected Linux distribution. Typically, you should be looking for wsl.exe but you can specify any non default WSL distro.
In the dialog that opens, select the Docker option, from the drop-down lists select the Docker server (if the server is missing, click New. ), and specify the image name: python:latest .
Python interpreter path should have the default value:

Click OK to complete the task.
In the dialog that opens, select the Docker Compose option, from the drop-down lists select the Docker server, Docker Compose service (here web ), configuration file (here docker-compose.yml ) and Python interpreter path (here python ).
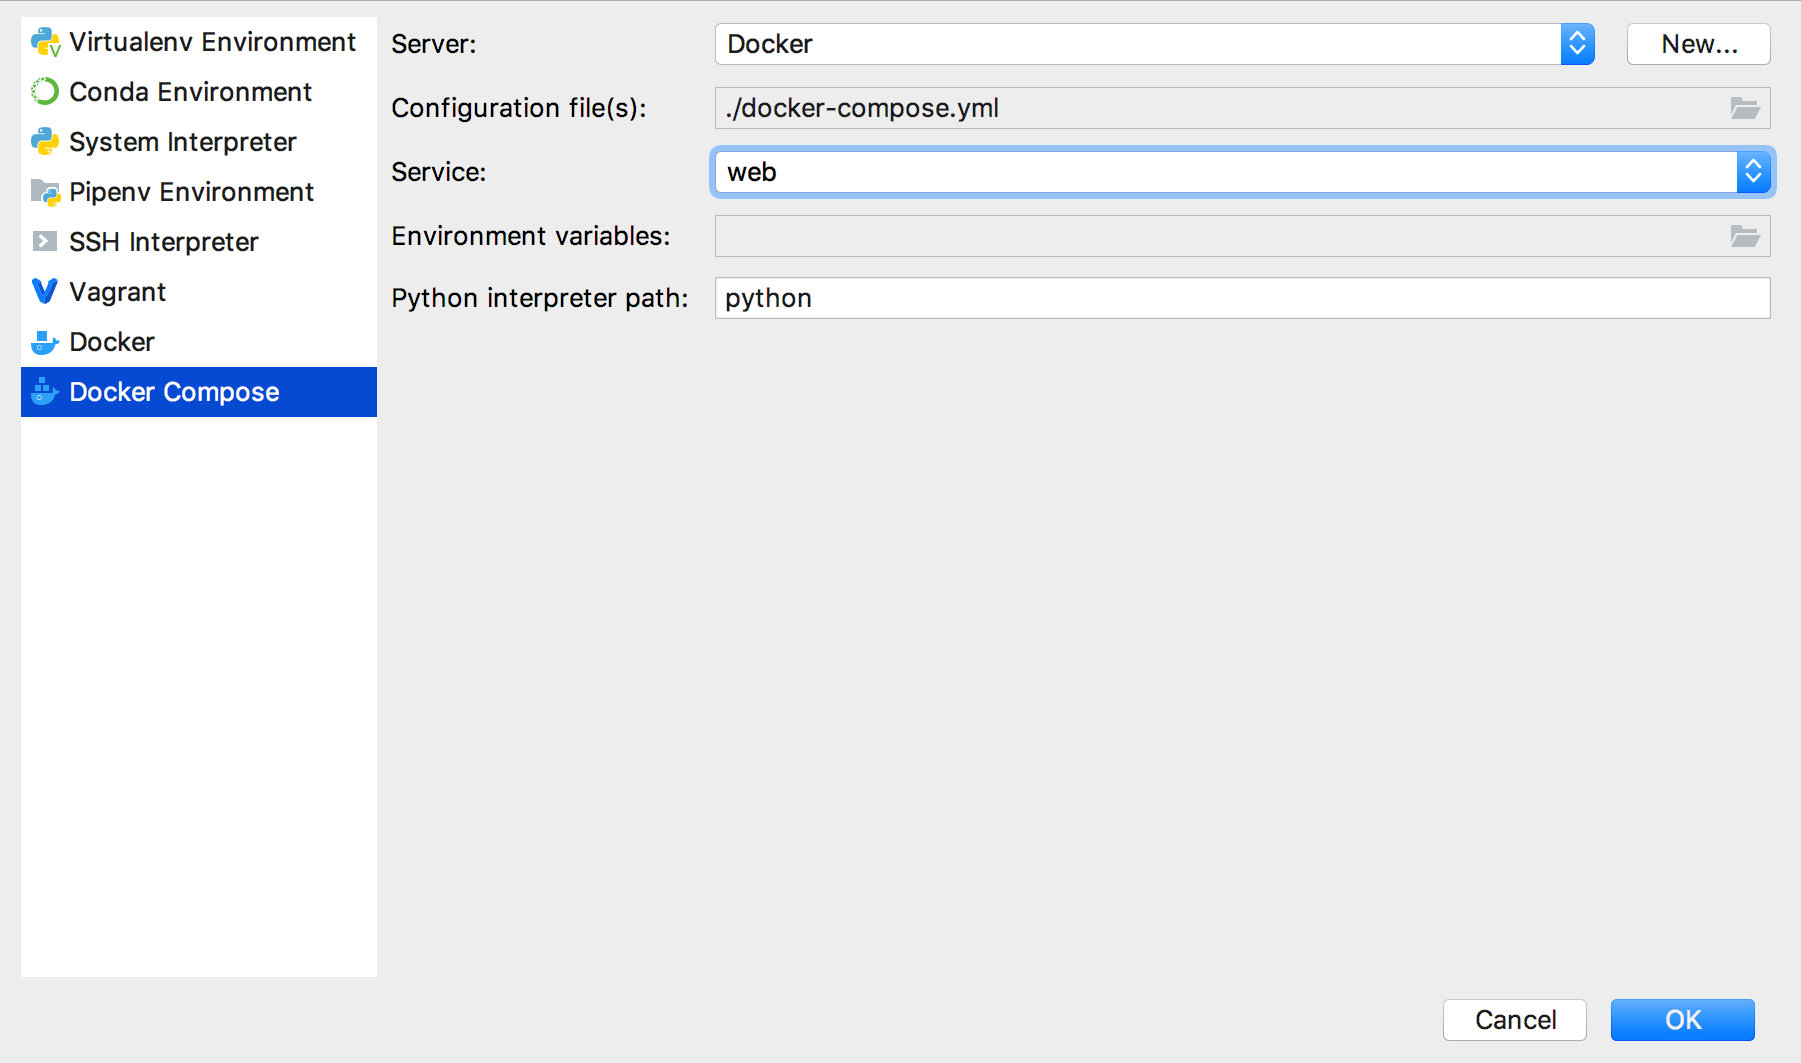
Why we’ve chosen web ? This choice is explained by the fact, that after configuring a Docker-Compose-based interpreter, we’ll be able to create regular run configurations that will alter the behavior of the container we selected. Therefore, if we want to debug the code in a container, that’s the one we should select here. All other containers in the compose file will always be started together with this one, but you won’t be able to affect their behavior from PyCharm — they’ll always behave as if you started them with the command docker-compose up from the command line.
Next, wait while PyCharm starts your Docker Compose configuration to scan and index:
Click OK to complete the task.
When a remote Python interpreter is added, at first the PyCharm helpers are copied to the remote host. PyCharm helpers are needed to run remotely the packaging tasks, debugger, tests and other PyCharm features. Next, the skeletons for binary libraries are generated and copied locally. Also all the Python library sources are collected from the Python paths on a remote host and copied locally along with the generated skeletons. Storing skeletons and all Python library sources locally is required for resolve and completion to work correctly. PyCharm checks remote helpers version on every remote run, so if you update your PyCharm version, the new helpers will be uploaded automatically and you don’t need to recreate remote interpreter. SFTP support is required for copying helpers to the server.
Setting the default interpreter
In PyCharm, you can specify an interpreter that will be automatically set for all newly created projects.
From the main menu, select File | New Projects Setup | Settings for New Projects (on Window and Linux) or File | New Projects Setup | Preferences for New Projects (on macOS).
Select Python Interpreter settings. Then either choose an existing interpreter from the Python interpreter list of click to add a new interpreter. Click OK to save the changes.
The change will become effective for all newly created projects in PyCharm.
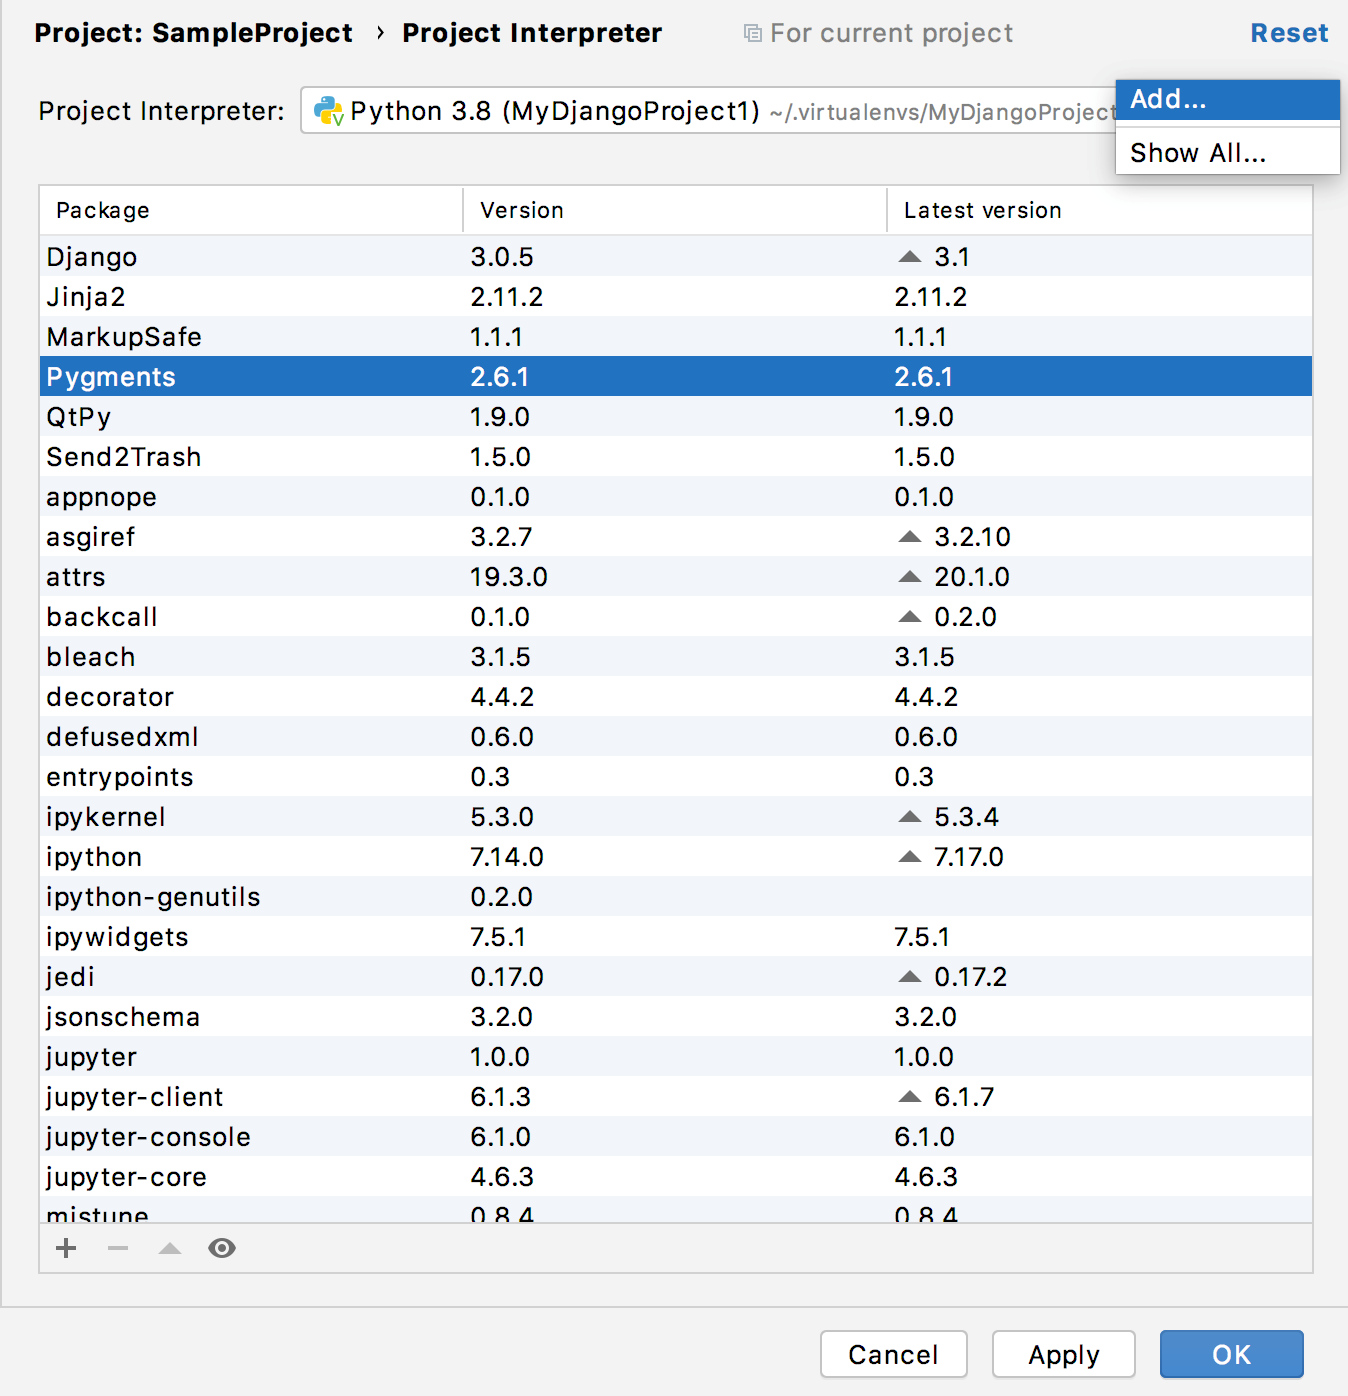
Managing interpreter packages
For each interpreter, you can install, upgrade, and delete Python packages. By default, PyCharm uses pip to manage project packages. For Conda environments you can use the Conda package manager.

PyCharm smartly tracks the status of packages and recognizes outdated versions by showing the number of the currently installed package version (column Version ), and the latest available version (column Latest version ). When a newer version of a package is detected, PyCharm marks it with the arrow sign and suggests to upgrade it.
By default, the Latest version column shows only stable versions of the packages. If you want to extend the scope of the latest available versions to any pre-release versions (such as beta or release candidate ), click Show early releases .
You can upgrade several packages at once. Hold Cmd (macOS) or Ctrl on (Unix or Windows), left-click to select several items in the list of packages, and then click Upgrade .
Источник


