- Пробрасываем USB в VirtualBox
- VirtualBox PUEL умеет:
- Процесс проброса USB
- Возможные проблемы с пробросом USB в Virtualbox на Linux
- Комментарии
- How to Enable USB in VirtualBox
- How to Install the VirtualBox Extension Pack
- Enabling USB Access to User
- Enabling USB Support in VirtualBox
- If You Appreciate What We Do Here On TecMint, You Should Consider:
- How to Access USB from VirtualBox Guest OS
- Step 1: Install Virtualbox Extension Pack
- Step 2: Add Your User to vboxusers Group
- Step 3: Enable USB Controller and Add New USB filter
- Step 4: Access USB from VirtualBox
- How to Boot VM From USB Stick
- Wrapping Up
- Virtualbox не видит USB в Ubuntu
- Ошибка Virtualbox не видит USB
- Выводы
Пробрасываем USB в VirtualBox
После прочтения статьи «Virtualbox – Виртуальная машина» открыл для себя VirtualBox с лицензией PUEL , которая для домашнего использования распространяется абсолютно бесплатно. Раньше то я знал о существовании виртуальной машины VirtualBox, но о версии PUEL услышал впервые. Немного погуглив я нашел отличия версии OSE и PUEL .
VirtualBox PUEL умеет:
- USB устройства базовой машины доступны в гостевых ОС.
- Можно подключать iSCSI устройства.
- Есть встроенный RDP -сервер.
- Можно засунуть образа жестких дисков VMDK от VMware и VHD от Microsoft Virtual PC. Будет работать даже snapshots.
Из всего этого самое нужное в домашнем использовании содержится в первом пункте – USB устройства базовой машины доступны в гостевых ОС.
Процесс проброса USB
Для того чтобы пробросить USB в Virtualbox, необходимо установить VM VirtualBox Extension Pack. Его можно найти на оф.сайте Для каждой версии Virtualbox он свой. Для домашнего использования использование Extension Pack — бесплатно.
Далее добавляем в VirtualBox. Для этого переходим в Настройки – Плагины. Кликаем на Обзор и выбираем скаченный плагин.
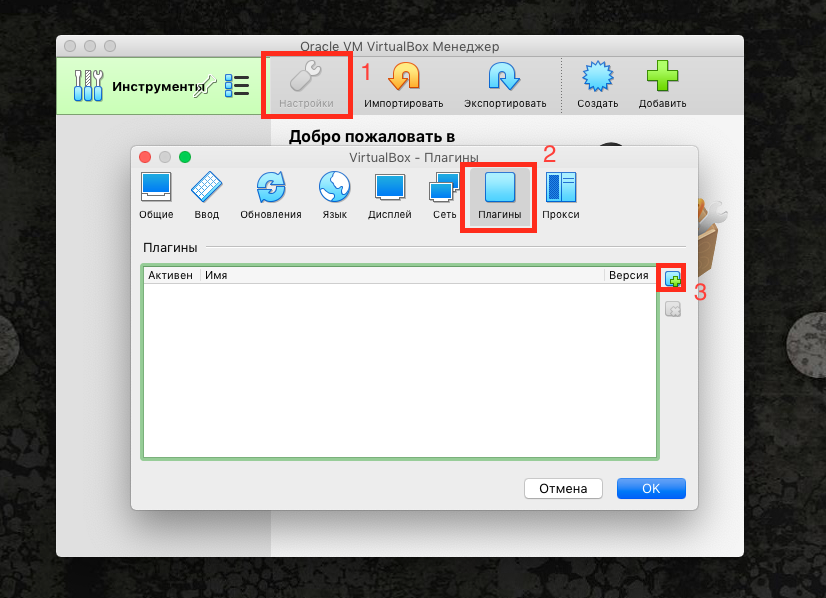
После этого у нас появится возможность пробрасывать и настраивать USB -порты в Virtualbox.
Но как было обещано, после установки PUEL версии, USB устройства на гостевой машине не запустились.
Возможные проблемы с пробросом USB в Virtualbox на Linux
Это возникает по причине ограниченности прав логина. Чтобы решить эту проблему нужно добавить пользователя в группу vboxusers:
Чтобы посмотреть логин:
Так же следует посмотреть правила udev:
Собственно и все!
Комментарии
Ну или Система-Администрирование-Пользователи и группы
далее Дополнительный параметры ну и подраздел Права пользователя и поставить галку на против Виртуализация VirtualBox
Это к слову, кто с консолью не дружит.
Источник
How to Enable USB in VirtualBox
If your data center depends on VirtualBox and your virtual machines depend on the USB device, you’ve perhaps noticed that USB doesn’t support by default unless you’ve manually enabled it.
In this article, we will explain to you how to enable USB support on Virtualbox. The current version of VirtualBox 6.0 comes with support for USB 3.0, and to take advantage of it, you need to install the latest version of VirtualBox Extension Pack.
This tutorial presumes that you already installed VirtualBox on your Linux and VirtualBox guest additions on your virtual machines. If you haven’t, you can install it using the following articles.
How to Install the VirtualBox Extension Pack
To install the latest version of Extension Pack, head over to the Virtualbox Downloads page and grab the file for All supported platforms.
1. Once you’ve downloaded, open up VirtualBox –> Click File –> Preferences in the Menu.
![]() VirtualBox Preferences
VirtualBox Preferences
2. Next, click on the Extension tab and then click the + sign.
![]() Virtualbox Extension
Virtualbox Extension
3. Select the downloaded Extension Pack and install it as shown.
![]() Install Virtualbox Extension Pack
Install Virtualbox Extension Pack
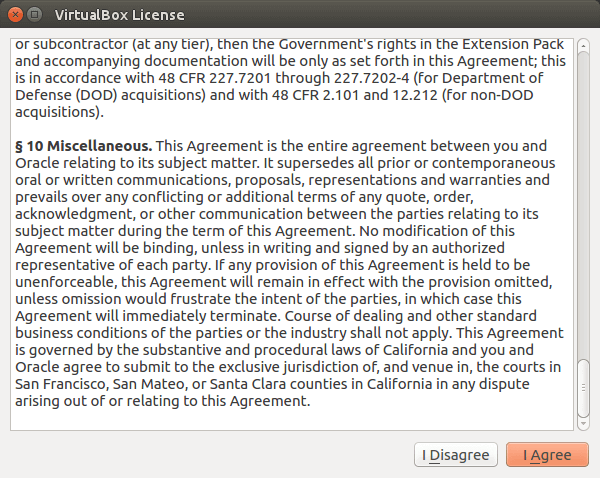
4. Scroll through the Virtualbox License and then click I Agree button to install it.
![]() Virtualbox License Agreement
Virtualbox License Agreement
5. Enter your sudo password and allow the installation to finish.
![]() Installing Virtualbox Extension Pack
Installing Virtualbox Extension Pack ![]() Installed Virtualbox Extension Pack
Installed Virtualbox Extension Pack
Enabling USB Access to User
To allow a user to access the USB subsystem, you need to add the user (running VirtualBox) to the vboxusers group using the following command.
Where USERNAME is the name of the user running the VirtualBox.
![]() Add User to vboxusers Group
Add User to vboxusers Group
Once the command runs successfully, logout and log back into the system.
Enabling USB Support in VirtualBox
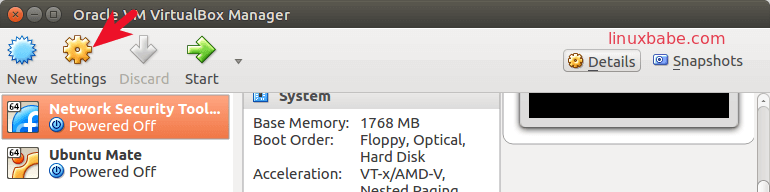
Start up VirtualBox, right-click on the virtual machine that needs access to a USB device, and click Settings.
![]() VirtualBox VM Settings
VirtualBox VM Settings
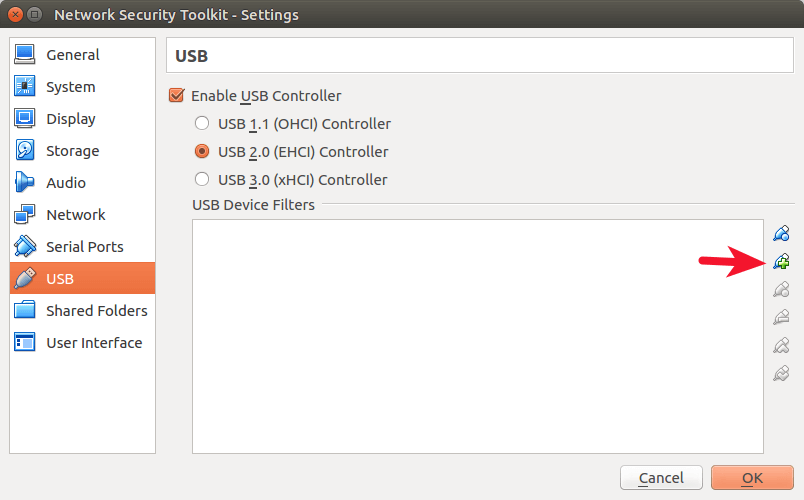
In the virtual machine’s Setting tab, click on USB to see the available USB devices. Click on the + sign to add a new device.
![]() Enable USB Support in VM
Enable USB Support in VM
Once USB device added, start up the virtual machine to have access to the data on the USB device. If you want to enable more USB devices, go back into the Settings –> USB and add the devices.
If You Appreciate What We Do Here On TecMint, You Should Consider:
TecMint is the fastest growing and most trusted community site for any kind of Linux Articles, Guides and Books on the web. Millions of people visit TecMint! to search or browse the thousands of published articles available FREELY to all.
If you like what you are reading, please consider buying us a coffee ( or 2 ) as a token of appreciation.

We are thankful for your never ending support.
Источник
How to Access USB from VirtualBox Guest OS
There are times when you need to access USB from VirtualBox. For instance, you installed Kali Linux in VirtualBox and a USB wireless network adapter is required to do penetration testing. This simple tutorial will show you how to easily access your USB thumb drive, USB hard disk, or USB wireless network adapter in your Virtualbox guest OS.
It’s assumed that you have already set up VirtualBox on your host OS.
Step 1: Install Virtualbox Extension Pack
Shut down your guest OS.
VirtualBox by default only supports USB 1.x devices. VirtualBox extension pack includes support for USB 2.0 and USB 3.0 devices, VirtualBox RDP and PXE boot for Intel cards. You must install the extension pack with the same version as your installed version of VirtualBox.
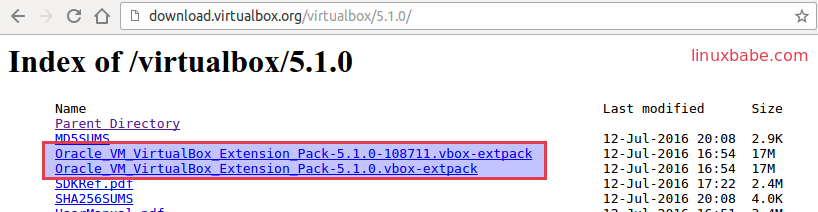
To check the version of your VirtualBox, open VirtualBox manager, then go to Help > About VirtualBox . Once you know the version number, go to http://download.virtualbox.org/virtualbox/ in your web browser to download VirtualBox extension pack which ends with .vbox-extpack extension.
Once downloaded, in VirtualBox manager go to File > Preferences > Extensions. Click the add button to add VirtualBox extensions pack from your hard disk.
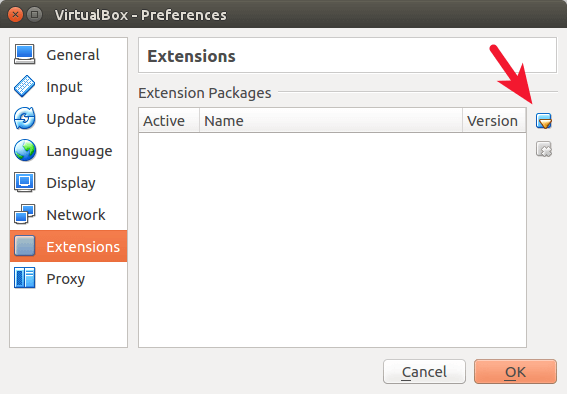
Once you choose the extension pack, click Install button to install it. You can see what functionalities it adds to your virtual machine in the description.
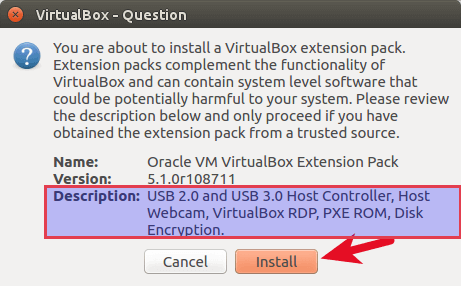
Then click Agree to accept VirtualBox license.
So now Virtualbox USB support is enhanced.
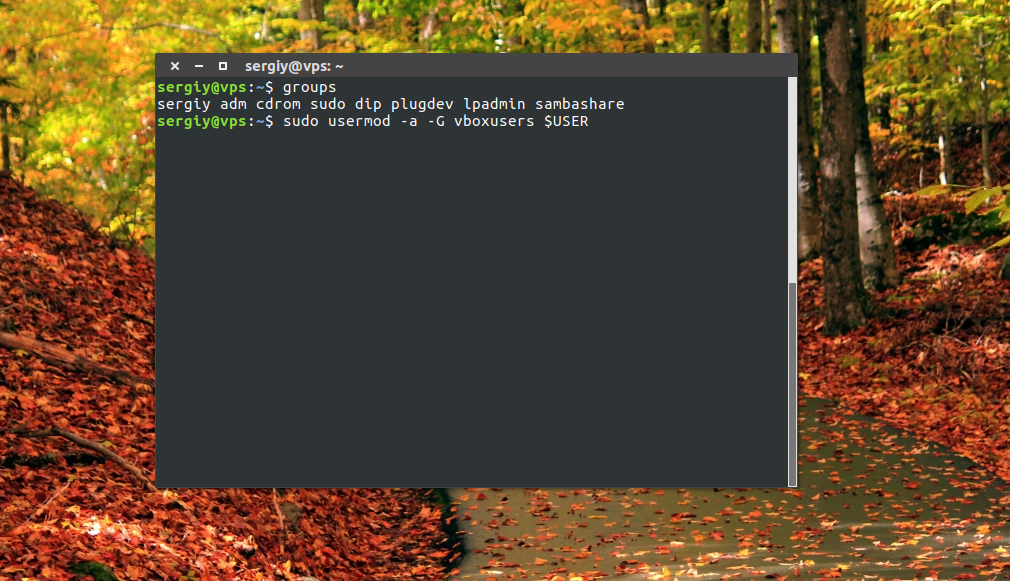
Step 2: Add Your User to vboxusers Group
In order for VirtualBox to see your USB devices, your user must be in the vboxusers group. Open up a terminal window (Ctrl+Alt+T), then run this command. Replace your-username with your real username. (I assume your host OS is a Linux distro such as Ubuntu, instead of Windows).
Now log out and log back in so the changes can take effect. To check which groups your user account belongs to, run:
Step 3: Enable USB Controller and Add New USB filter
Click settings for your virtual machine.
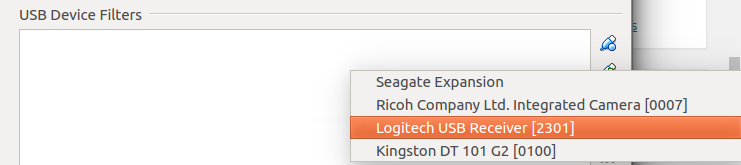
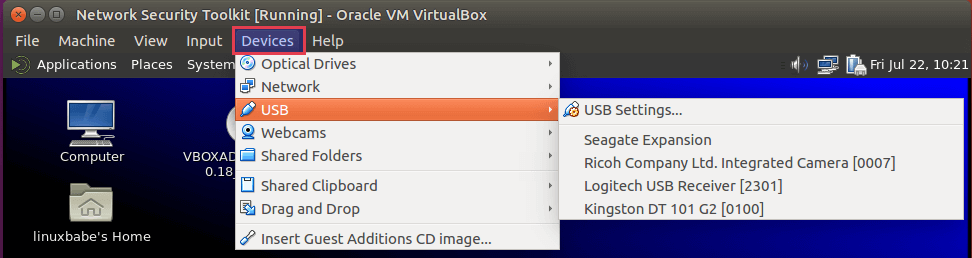
Select USB on the left pane. Then choose USB 2.0 controller or USB 3.0 controller. Note that you can only enable one type of controller. Next, insert your USB device to your host machine and click the add button to add new USB filter.
Choose your USB device and Click OK.
Step 4: Access USB from VirtualBox
Now boot up your virtual machine and you will see your USB device in the guest OS. It should be noted that your host OS won’t be able to see the USB device while it’s being used by VirtualBox.
To unmount USB device from guest OS, select devices > USB and uncheck your USB device.
To mount USB in VirtualBox again, simply select your USB drive in the list.
How to Boot VM From USB Stick
Let’s say you created a bootable USB stick and you want to boot your VirtualBox VM from the USB stick. Virtualbox allows your VM to access raw hard disk, by creating a special VMDK image. I assume your host OS is Linux.
First, find the device name of your USB stick.
Mine is /dev/sdb . Then run the following command to create a VMDK image file /tmp/usb.vmdk .
Change the ownership of this file. Replace username with your real username.
Then add your user account to the disk group, so you can access raw hard disk.
Log out and log back in for the changes to take effect. Then open Virtualbox and attach the raw disk ( /tmp/usb.vmdk ) to your VM.
Wrapping Up
Does this post helped you access USB drive in VirtualBox guest OS? Let me know in the comments section below. As always, if you found this post useful, subscribe to our free newsletter or follow us on Google+, Twitter or like our Facebook page.
Источник
Virtualbox не видит USB в Ubuntu
VirtualBox — это популярная программа для эмуляции персонального компьютера и запуска различных операционных систем. Вы можете подключать к своей виртуальной машине различные устройства, включая USB устройства, подключенные к основной системе.
Но многие пользователи сталкиваются с проблемой что VirtualBox не видит USB. Устройства подключены к системе и точно работают, а в меню подключения их просто нет. В этой статье мы рассмотрим что делать если virtualbox linux не видит usb устройства. Статья рассчитана в первую очередь на Ubuntu, но подойдет также пользователям других дистрибутивов.
Ошибка Virtualbox не видит USB
Чаще всего такая ошибка возникает потому что у пользователя, от имени которого вы запустили VirtualBox нет доступа к необходимым файлам. Это решается очень просто, вам достаточно добавить своего пользователя в группу vboxusers. Для этого выполните команду:
sudo usermod -a -G vboxusers $USER
После этого вам достаточно еще раз войти в систему чтобы все заработало. Вы можете проверить обнаруживаются ли USB устройства с помощью команды:
VBoxManage list usbhost
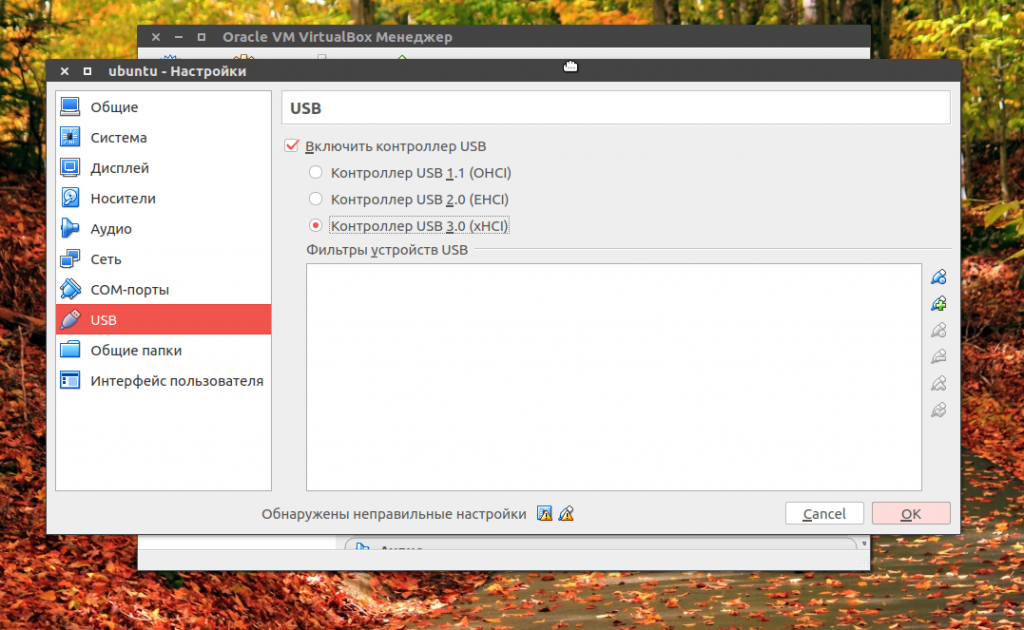
Но это помогает не всегда. Вам также нужно посмотреть включена ли поддержка USB контроллера для виртуальной машины. Для этого откройте контекстное меню для нее и выберите пункт «Настройка», затем перейдите на вкладку «USB»:
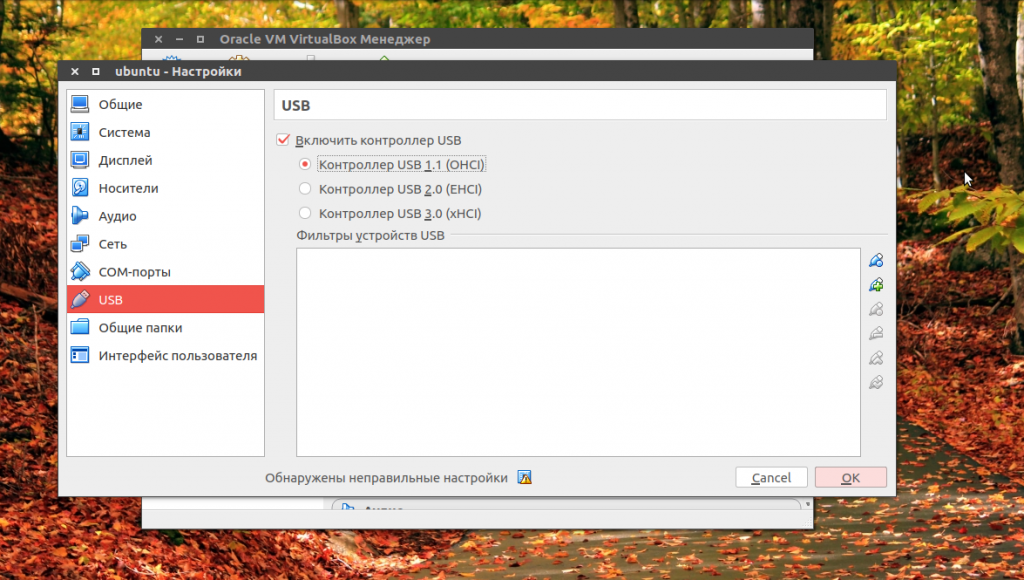
Тут должна быть установлена галочка напротив «Включить контроллер USB», а также выбран один из доступных интерфейсов. Для поддержки USB 2.0 или USB 3.0 вам необходимо установить Virtualbox Extensions Pack. Это набор проприетарных расширений, которые включают к тому же поддержку этой технологии. Скорее всего, вы уже можете подключить usb virtualbox.
Для этого скачайте файл для вашей версии Virtualbox на официальном сайте. Затем откройте меню «Файл» -> «Настройки» -> «Плагины» и подключите здесь скачанный файл:

В Ubuntu 16.04 это можно сделать проще, достаточно выполнить команду:
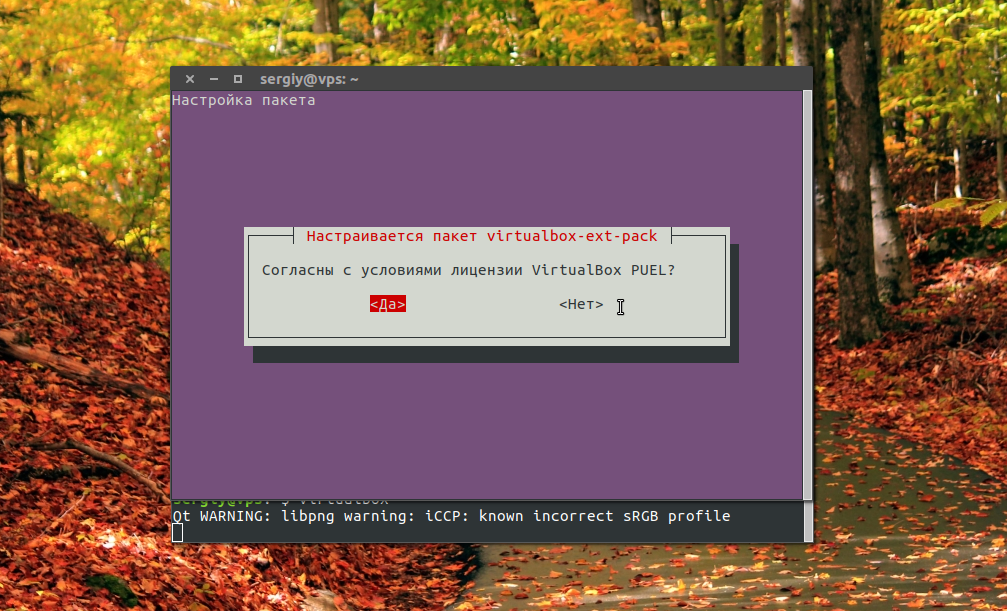
sudo apt install virtualbox-ext-pack
Готово, после этого вы можете включить поддержку USB 3.0.
В некоторых дистрибутивах, например, семейства Red Hat, не работает usb в virtualbox, потому что поддержка подключения USB отключена из соображений безопасности. В таком случае вам придется ее включить. Для этого нужно сначала раскомментировать все строки SUBSYSTEM в /etc/udev/rules.d/60-virtualbox.conf. Это можно сделать командой:
sudo printf ‘%s\n’ ‘g/^#SUBSYSTEM/s/^#//’ w | ed -s /etc/udev/rules.d/60-vboxdrv.rules
Затем скопируйте этот файл в каталог /usr/lib/udev:
sudo cp -v /etc/udev/rules.d/60-vboxdrv.rules /usr/lib/udev/
И перезагрузите наборы правил:
sudo udevadm control —reload-rules
$ sudo systemctl restart vboxdrv.service
Теперь можете опять проверить все ли еще не видит Virtualbox usb устройства или уже все работает.
Выводы
В этой статье мы рассмотрели что делать если VirtualBox не видит USB Ubuntu или других Linux дистрибутивах. В большинстве случаев проблема решается очень просто. Надеюсь, эта информация была вам полезной.
Источник


