- How To Setup Cisco VPN on Mac OS X
- Main Set Up Steps
- Optional Set Up Steps
- VPN Clients For Mac OS X FAQ
- Available Languages
- Contents
- Introduction
- General Questions
- Q. What options do I have in order to provide remote access to Mac users?
- Q. How do I uninstall Cisco VPN Client on Mac OS X?
- Q. What are the feature differences between the Cisco Remote Access VPN Client and AnyConnect VPN Client?
- IPsec VPN Questions
- Q. If I want to use IPsec, should I use the built-in Mac VPN Client or the Cisco Remote Access VPN Client?
- Q. How do I configure the Mac built-in VPN Client?
- Q. I tried to use the built-in Mac Client on Lion, but I receive a phase 2 mismatch. What should I do?
- Q. Are there any compatibility issues with the Cisco Remote Access VPN Client?
- Q. Where can I download the Cisco Remote Access VPN Client?
- Q. I tried to use Cisco VPN Client, but received Error 51. What should I do?
- Q. Does the built-in Mac VPN Client support ESP-NULL transforms?
- Установка и удаление Cisco VPN Client 3.5 и более поздних версий для Mac OS 10.1
- Параметры загрузки
- Содержание
- Введение
- Предварительные условия
- Требования
- Используемые компоненты
- Условные обозначения
- Установка VPN-клиента
- Расположение профилей пользователей
- Удаление VPN-клиента
How To Setup Cisco VPN on Mac OS X
Starting with Mac OS X 10.6, it is now possible to connect to a Cisco IPSec VPN without having to download any extra software.
Main Set Up Steps
Before you begin please have your VPN IP address, your username, password, shared secret, certificate, and/or group name ready. If you do not have this information please contact support using the options at the bottom of this page.
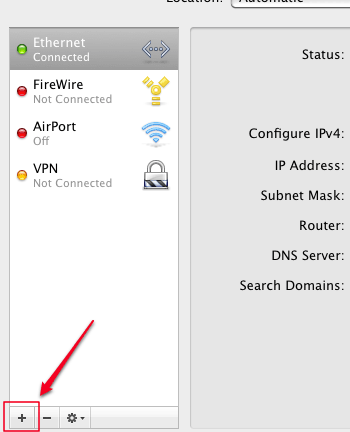
Open System Preferences and click on the Network icon:

On the Network screen, click on the + symbol in the lower left:
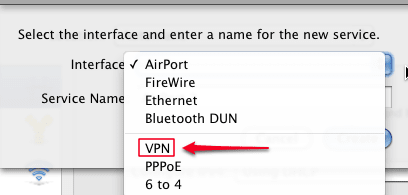
On the following screen click on the Interface drop-down menu and choose VPN:
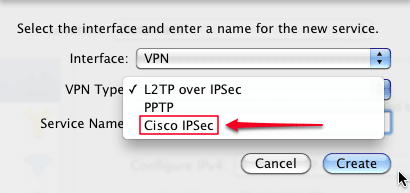
Click on the VPN Type menu and choose Cisco IPSec:
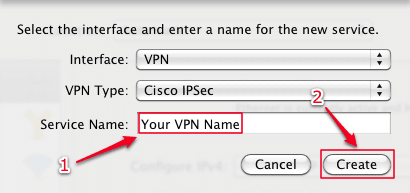
Give your new VPN connection a label in the Service Name text field (1) (this can be any name you choose) and click Create (2):
Back on the main Network screen, click on your new VPN name in the list on the left side. Enter your VPN server’s IP address, your username (Account Name), and password:
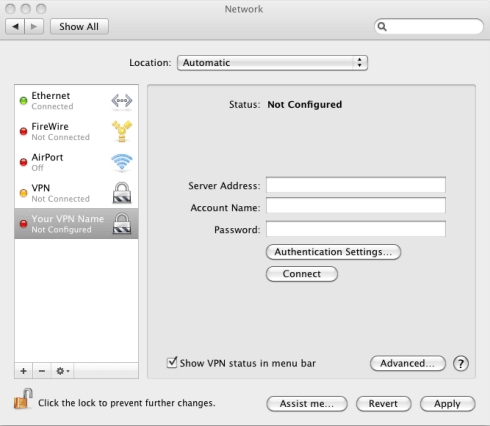
If you leave the checkbox marked Show VPN status in the menu bar checked a new menu bar icon will appear that allows you quickly turn the VPN connection on and off.
Click on the Authentication Settings button and enter the VPN’s Shared Secret, Certificate, and/or Group Name. Click OK when done:
Depending on your network and VPN configuration you may now start using your new VPN connection. If you need to add settings for DNS servers or Proxies when using the VPN please see the screenshots below for reference.
Optional Set Up Steps
The settings below can be reached by clicking the Advanced… button when viewing your VPN connection in the network list.
DNS Servers and Search Domains
Источник
VPN Clients For Mac OS X FAQ
Available Languages
Contents
Introduction
This document answers frequently asked questions about Cisco’s VPN Client solutions available on Mac OS X.
Tip: Cisco recommends that you migrate to the AnyConnect VPN Client for both Secure Sockets Layer (SSL) as well as IPsec. The built-in IPsec client on Mac OS is an Apple product, so any questions/upgrades/bug fixes and other issues on the client side need to be addressed by Apple while the Cisco Remote Access VPN client is EOS. Therefore, no fixes will be put in for this client.
General Questions
Q. What options do I have in order to provide remote access to Mac users?
There are three VPN Client solutions that can be implemented, dependent upon the Mac OS Version.
| VPN Client | Technology/Protocol | Mac OS X 10.10 Yosemite | Mac OS X 10.11 El Capitan | |||||
| Mac Built-in VPN Client | IPsec | X | X | X | X | X | X | |
| Cisco Remote Access IPsec Client | IPsec | X | X | |||||
| Cisco AnyConnect Secure Mobility Client | SSL, IKEv2/IPsec | X* | X | X** | X*** | X | X | X**** |
*Mac OS X 10.5 (Leopard) is no longer supported in AnyConnect Release 3.1. Also, PowerPC support was dropped in Release 3.0 and later.
**Mac OS X 10.7 (Lion) is supported in AnyConnect Releases 2.5.3051 and 3.0.3054 and later.
***Mac OS X 10.8 (Mountain Lion) is supported in AnyConnect Releases 3.0.08057 and 3.1 and later.
****MAC OS X 10.11 (El Capitan) is supported in Anyconnect 4.1.04011 and later. El Capitan support will not be provided in AnyConnect 3.x as new OS support ended in July 2015. Refer to End-of-Sale and End-of-Life Announcement for the Cisco AnyConnect Secure Mobility Client Version 3.x.
Q. How do I uninstall Cisco VPN Client on Mac OS X?
In order to uninstall the Cisco VPN Client, complete these steps:
- Enter these commands in order to clean out the old Cisco VPN kernel extension and reboot the system.
- If you installed the Cisco VPN for Mac version 4.9.01.0180 package, enter these commands in order to delete the misplaced files. The deletion of these files will not affect your system, since applications do not use these misplaced files in their current location.
- Enter these commands if you no longer need the old Cisco VPN Client or Shimo.
Q. What are the feature differences between the Cisco Remote Access VPN Client and AnyConnect VPN Client?
This is beyond the scope of this document, but fundamentally SSL VPN has more features than the Cisco Remote Access Software VPN Client as it is a newer technology and new features are rolled into each new release of AnyConnect. The latest AnyConnect Mobility Client, Version 3.0, includes the same feature-rich support for both SSL VPN and IKEv2.
IPsec VPN Questions
Q. If I want to use IPsec, should I use the built-in Mac VPN Client or the Cisco Remote Access VPN Client?
A. Although it is possible to use either VPN Client, the advantages of each are explained here.
Note: Cisco recommends that you use AnyConnect, which allows you to take advantage of Next Generation Encryption (NGE) ciphers and advancements in the IKEv2 protocol.
Mac VPN Client
- + The Apple built-in client ensures support as the Mac OS evolves.
- + The client is integrated into Mac OS X 10.6 and later.
- + Faster to configure as it does not require installation of another application.
- — Not built into Mac OS X 10.5.
Cisco Remote Access VPN Client
- + Supported in Mac OS X 10.5 and 10.6.
- — Requires installation of another software application on your Mac.
- — In early 2011 Mac began to ship Mac OS X 10.6 with a 64-bit kernel. This is not supported by the Cisco Remote Access VPN Client and results in Error 51 after install. Refer to Cisco IPsec VPN Client on MAC OS X generates the error «Error 51: Unable to communicate with the VPN subsystem».
Q. How do I configure the Mac built-in VPN Client?
In Mac OS X 10.6 and later:
- Choose System Preferences > Network.
- Click the lock button in order to unlock it and make changes.
- Click the plus sign
 above the unlocked lock button in order to add an interface.
 - From the Interface drop-down list, choose VPN.
- From the VPN Type drop-down list, choose Cisco IPSec.
- In the Service Name text box, type an easy to remember interface name such as ‘Corp IPsec VPN’.
- Click OK and then select this new interface.
- Click the new VPN interface in order to configure the interface.
- Server Address-VPN headend’s outside interface IP address (WAN/publicly routable IP address)
- Account Name-Username
- Account Password-User’s password
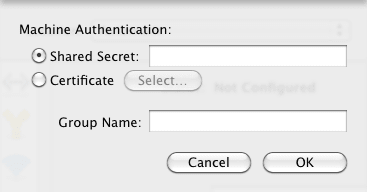
- Click Authentication Settings.
- Under Machine Authentication, click the radio button for your respective authentication mechanism (pre-shared-key or certificate authentication).
- If a pre-shared key that matches the pre-shared-key defined on the VPN headend is used, type the key into the Shared Secret dialog box.
- Enter the Group Name that matches the one defined in the EZVPN configuration on the VPN headend device (ASA ‘tunnel-group’, IOS ‘crypto ipsec client ezvpn group’).
 above the unlocked lock button in order to add an interface.
Q. I tried to use the built-in Mac Client on Lion, but I receive a phase 2 mismatch. What should I do?
If your Microsoft Windows clients work or your older Macs that use the Cisco Remote Access VPN Clients work, and only the Lion machines do not seem to be able to connect, then it is likely a phase 2 mismatch issue. You see this error message if you enable ‘debug crypto ipsec’ on the ASA. This essentially means the transform sets used probably do not support the encryption used by the Mac built-in client. For Lion, the client uses 3DES or AES. It does not support DES. In order to work around this issue, either switch the transform set to use 3DES completely or add multiple transform sets as shown here:
This issue is usually caused by running an ASA software release earlier than Release 8.4. The later ASA software comes with all transforms sets defined by default, so additional configuration is not required to make it work.
Q. Are there any compatibility issues with the Cisco Remote Access VPN Client?
Refer to the Software Release Notes first for compatibility guidelines. Note the Error 51 compatibility issue between the Cisco Remote Access VPN Client and 64-bit Mac kernel mentioned later in this document.
Q. Where can I download the Cisco Remote Access VPN Client?
- Open the Cisco Support Page.
- Click Download Software.
- Choose Products > Security > Virtual Private Networks (VPN) > Cisco VPN Clients > Cisco VPN Client.
- Choose Cisco VPN Client v4.x.
- Choose Mac OS.
Note: The VPN Client v5.x was only released for Windows PCs. The latest Mac release is v4.9.
Q. I tried to use Cisco VPN Client, but received Error 51. What should I do?
Q. Does the built-in Mac VPN Client support ESP-NULL transforms?
No, the built-in client does not support this transform set.
Источник
Установка и удаление Cisco VPN Client 3.5 и более поздних версий для Mac OS 10.1
Параметры загрузки
Содержание
Введение
В этом документе приведены пошаговые инструкции по установке и удалению клиента Cisco VPN Client версии 3.5 для компьютера Mac с операционной системой Mac OS 10.1.
Загрузить текущую версию VPN-клиента для операционной системы Mac OS можно в Центре программного обеспечения (только для зарегистрированных пользователей).
Предварительные условия
Требования
Действия, описанные в этом документе, выполняются на жестком диске под управлением операционной системы Mac OS 10.1.
Используемые компоненты
Сведения в этом документе основаны на версиях оборудования и программного обеспечения, указанных ниже.
Cisco VPN Client 3.5
Операционная система MAC OS 10.1
Примечание. Для применения этой конфигурации в системе Mac OS X 10.2 необходимо использовать клиент Cisco VPN Client версии 3.6 или выше. Кроме того, следует учесть, что клиент Cisco VPN Client версии 3.6 для Mac при использовании в операционной системе Mac OS X 10.2 не работает на интерфейсе en1 (плата Apple AirPort WiFi). Дополнительные сведения и временное решение представлены в описании идентификатора ошибки CSCdy4112 (только для зарегистрированных пользователей).
Условные обозначения
Подробные сведения об условных обозначениях см. в документе Условное обозначение технических терминов Cisco.
Установка VPN-клиента
Установка VPN-клиента требует изменения реестра Mac OS 10.1 и должна выполняться в режиме администратора (root).
Для установки VPN-клиента следуйте приведенным ниже указаниям.
Для активации пользователя-администратора и настройки пароля выполните следующие шаги:
Включите режим администратора.
Войдите в систему как обычный пользователь.
Дважды щелкните значок жесткого диска (Hard Drive).
Выберите Applications > Utilities > Netinfo Manager (Приложения > Служебные > Диспетчер сведений о сети).

В диспетчере выберите Domain > Security > Authenticate (Домен > Безопасность > Аутентификация).

Будет запрошен пароль администратора (admin). Администратор – это пользователь, создавший учетную запись администратора.
В диспетчере выберите Domain > Security > Enable Root User (Домен > Безопасность > Разрешить пользователя-администратора).

После разрешения администратора войдите в качестве пользователя-администратора.
Определите местонахождение файла TAR VPN-клиента, загруженного с web-сайта компании Cisco, и дважды щелкните по образу TAR, чтобы его распаковать.
Файлы будут помещены в папку vpnclient на вашем рабочем столе. Эта папка содержит необходимые файлы для установки и удаления VPN-клиента.
В окне терминала перейдите в папку vpnclient, указав после каталога символ «/», например cd \desktop/vpnclient, и нажмите Enter. Затем для установки VPN-клиента в выбранной папке наберите ./vpn_install.


Выберите Applications > Security > Netinfo Manager (Приложения > Безопасность > Диспетчер сведений о сети), затем войдите в раздел Domain > Security > Disable Root User (Домен > Безопасность > Отключить пользователя-администратора) для отключения администратора.

Для отмены аутентификации администратора выберите Domain (Домен) > Security (Безопасность) > Deauthenticate (Отменить аутентификацию).

Выйдите из диспетчера Netinfo Manager.
Перезапустите компьютер Mac и войдите в качестве обычного пользователя. При этом будет запущена служба VPN, установленная вместе с VPN-клиентом.
Расположение профилей пользователей
Можно изменить файл sample.pcf и сохранить его как новый файл в том же месте.
Удаление VPN-клиента
Для удаления VPN-клиента необходимо очистить записи реестра в системе Mac. Также потребуются полномочия администратора. При удалении VPN-клиента выводятся следующие сообщения:
Включите режим администратора. (Процедура совпадает с описанной в шаге 1 раздела Установка VPN-клиента.)
Выполните удаление VPN-клиента.
Отключите режим администратора и отмените для него аутентификацию. (Процедура совпадает с описанной в шагах 4 и 5 раздела Установка VPN-клиента.)
Источник


