- Native приложения. Первые шаги
- Загрузочные экраны native режима разных версий Windows:
- Что нужно знать:
- Заготовка проекта Native приложения
- Compiling Apps with .NET Native
- In This Section
- Walkthrough: Create a traditional Windows Desktop application (C++)
- Prerequisites
- Create a Windows desktop project
- To create a Windows desktop project in Visual Studio 2019
- To create a Windows desktop project in Visual Studio 2017
- To create a Windows desktop project in Visual Studio 2015
- Create the code
- To start a Windows desktop application
- To add functionality to the WinMain function
- To add functionality to the WndProc function
- Build the code
- To build this example
Native приложения. Первые шаги
Native приложения — это программы, предназначенные для выполнения на операционных системах Windows семейства NT (NT/2000/XP/2003/Vista/7), способные запускаться на раннем этапе загрузки Windows, до окна входа в систему и даже до запуска каких-либо подсистем Windows. Синий экран при загрузке Windows XP, в котором, например, происходит проверка диска и есть тот самый режим. Native приложения используют только Native API, они могут использовать только функции, экспортируемые из библиотеки ntdll.dll. Для них недоступны функции WinAPI.
Native приложения запускаются на экране, который возникает до появления окна входа в систему. Примером native приложения является приложение chkdsk, которое запускается перед входом в Windows, если предварительно была запущена проверка системного раздела на ошибки и отложена до перезагрузки. Приложение работает, выводя сообщения экран, а затем происходит обычный запуск Windows.
Преимущества использования этого режима: большая часть компонентов Windows ещё не запущена, отсутствуют многие ограничения. Этот режим, например, используется в приложениях, которые хотят что-то сделать с системным разделом Windows, но не могут, пока запущена операционная система: дефрагментаторы, конверторы файловой системы, и тому подобные утилиты.
Моя программа Native shell запускается до экрана входа в систему и предоставляет интерфейс командной строки с возможностью перемещаться по файловой системе Windows, копировать и удалять файлы, просматривать некоторую информацию об операционной системе и запускать другие процессы, способные выполняться в native-режиме, такие как autochk.exe и autoconv.exe. Доступны исходные коды программы на языке Си.
Загрузочные экраны native режима разных версий Windows:
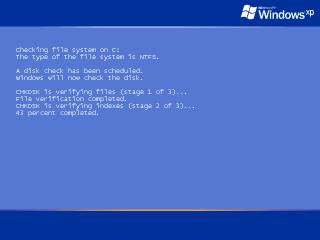 — Синий экран Windows XP. — Синий экран Windows XP. | 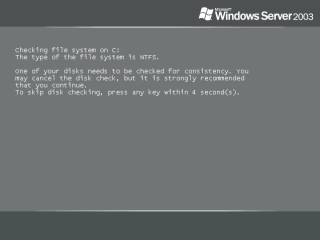 Серый экран Windows Server 2003 Серый экран Windows Server 2003 |
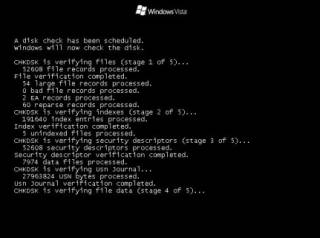 Чёрный экран Windows Vista Чёрный экран Windows Vista | 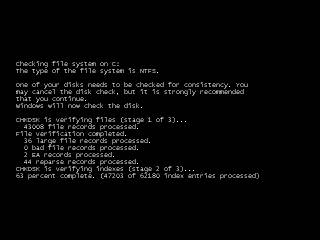 Чёрный экран Windows 7 Чёрный экран Windows 7 |
Что нужно знать:
Native приложения компилируются с помощью WDK — Windows Driver Kit (также известный, как DDK). Есть возможность делать их и в какой-то другой среде разработки, но в WDK проще всего.
Native приложения используют Native API. Оно частично документировано в MSDN для использования при написании драйверов. Но документированы не все функции. Информацию по остальным нужно брать из неофициальных источников. Например, на сайте http://undocumented.ntinternals.net/
Функции в ntdll.dll имеют префиксы Zw и Nt, а также некоторые другие. Видно, что у Zw и Nt функции дублируются названия. На самом деле это одни и те же функции. Если искать в сети пример использования какой-либо функции, стоит поискать сначала с одним префиксом, потом с другим, иначе можно что-то упустить. Почему у них разные префиксы — отдельная история, для программирования native приложений существенной роли не играет.
Для программирования нужны прототипы функций Native API, но в заголовочных файлах WDK присутствуют не все определения. Нужно использовать альтернативные заголовочные файлы, содержащие в том числе и определения недокументированных функций и типов данных. Например, можно воспользоваться заголовочными файлами Native Development Kit (NDK), которые доступны здесь.
Программировать на чистом Native API неудобно. Не обойтись без библиотеки, в которой уже реализованы некоторые рутинные действия. Существует библиотека с открытым кодом — ZenWINX, можно пользоваться ей. Ещё на страничке NDK анонсирована некая библиотека NDL, но на сайте её нет.
Чтобы native приложение запустилось при запуске Windows, надо положить его в каталог system32, а в ключ реестра HKLM\System\CurrentControlSet\Control\Session Manager\BootExecute прописать его имя файла, и аргументы, если они есть. Ключ имеет тип MULTI_SZ, может содержать несколько строк. Первой строкой там идёт Autocheck Autochk * . После неё можно прописывать свою программу. Программа, прописанная в этом ключе, имеет свойство запускаться даже в безопасном режиме Windows (safe mode), так что нужно быть осторожным. Ошибка в программе — и система не запустится. Но можно внутри приложения отслеживать факт запуска в safe mode и обрабатывать этот режим отдельно, например сделать завершение программы, если она обнаружила себя запущенной в safe mode. Кроме того, несмотря на то, что программа запускается и может выполнять какие-то действия, в этом режиме не работает вывод на консоль. Невозможно взаимодействие с пользователем. Это следует учитывать.
При необходимости, native-приложение можно запустить и не перезагружая компьютер. Для этого следует воспользоваться утилитой nrun.exe. Но загрузочный экран от этого не появится, и вам следует придумать, как ещё взаимодействовать с вашим приложением, если нужна интерактивность. В исходном коде nrun можно посмотреть, как реализован запуск native-процессов с использованием недокументированных функций Native API.
У native приложений точка входа не main и не wmain, а NtProcessStartup. В PE-заголовке EXE-файла есть специальное поле, означающее подсистему, в которой выполняется приложение. У native приложений в это поле установлено специальное значение, означающее, что EXE не требует подсистемы. У обычных приложений ставится значение, соответствующее подсистемам «Windows GUI» или «Windows console». Native приложения не запускаются в обычном режиме работы Windows. При попытке запустить программу Windows выдаёт сообщение «Приложение нельзя запустить в режиме Win32».
Вывод кириллицы на экран по-умолчанию в этом режиме не поддерживается. Есть способ обойти это ограничение, впрочем, способ сложный и пока работает только на Windows XP.
Заготовка проекта Native приложения
Я создал заготовку проекта Native приложения — набор файлов, который можно использовать в качестве базы для разработки собственного Native приложения. Заготовка содержит файл native.c , содержащий точку входа в приложение. Остальные файлы — это файлы библиотеки ZenWINX, которые модифицированы так, что используют определения функций из NDK, а не из своего файла с определениями. Это позволяет использовать как функции самой библиотеки, так и функции Native API, которые разработчики ZenWINX забыли включить в собственный заголовочный файл. Фактически, NDK — более полный каталог Native API функций, чем файл, поставляемый с ZenWINX. Компилировать заготовку нужно утилитой build из состава WinDDK (я использую версию WinDDK 1.1.6001.000). Следует подключать заголовочные файлы NDK, прописав пути к каталогу с ними.
Возможно также разрабатывать и собирать Native-приложения прямо в Visual Studio, без использования компилятора WDK. О том, как это сделать, написано в статье Сборка Native API-приложения в Visual Studio 2010.
Compiling Apps with .NET Native
.NET Native is a precompilation technology for building and deploying Windows apps that is included with Visual Studio 2015 and later versions. It automatically compiles the release version of apps that are written in managed code (C# or Visual Basic) and that target the .NET Framework and Windows 10 to native code.
Typically, apps that target the .NET Framework are compiled to intermediate language (IL). At run time, the just-in-time (JIT) compiler translates the IL to native code. In contrast, .NET Native compiles Windows apps directly to native code. For developers, this means:
Your apps feature the performance of native code. Usually, performance will be superior to code that is first compiled to IL and then compiled to native code by the JIT compiler.
You can continue to program in C# or Visual Basic.
You can continue to take advantage of the resources provided by the .NET Framework, including its class library, automatic memory management and garbage collection, and exception handling.
For users of your apps, .NET Native offers these advantages:
Faster execution times for the majority of apps and scenarios.
Faster startup times for the majority of apps and scenarios.
Low deployment and update costs.
Optimized app memory usage.
For the vast majority of apps and scenarios, .NET Native offers significantly faster startup times and superior performance when compared to an app compiled to IL or to an NGEN image. However, your results may vary. To ensure that your app has benefited from the performance enhancements of .NET Native, you should compare its performance with that of the non-.NET Native version of your app. For more information, see Performance Session Overview.
But .NET Native involves more than a compilation to native code. It transforms the way that .NET Framework apps are built and executed. In particular:
During precompilation, required portions of the .NET Framework are statically linked into your app. This allows the app to run with app-local libraries of the .NET Framework, and the compiler to perform global analysis to deliver performance wins. As a result, apps launch consistently faster even after .NET Framework updates.
The .NET Native runtime is optimized for static precompilation and in the vast majority of cases offers superior performance. At the same time, it retains the core reflection features that developers find so productive.
.NET Native uses the same back end as the C++ compiler, which is optimized for static precompilation scenarios.
.NET Native is able to bring the performance benefits of C++ to managed code developers because it uses the same or similar tools as C++ under the hood, as shown in this table.
| .NET Native | C++ | |
|---|---|---|
| Libraries | The .NET Framework + Windows Runtime | Win32 + Windows Runtime |
| Compiler | UTC optimizing compiler | UTC optimizing compiler |
| Deployed | Ready-to-run binaries | Ready-to-run binaries (ASM) |
| Runtime | MRT.dll (Minimal CLR Runtime) | CRT.dll (C Runtime) |
For Windows apps for Windows 10, you upload .NET Native Code Compilation binaries in app packages (.appx files) to the Windows Store.
In This Section
For more information about developing apps with .NET Native Code Compilation, see these topics:
.NET Native and Compilation: How .NET Native compiles your project to native code.
Walkthrough: Create a traditional Windows Desktop application (C++)
This walkthrough shows how to create a traditional Windows desktop application in Visual Studio. The example application you’ll create uses the Windows API to display «Hello, Windows desktop!» in a window. You can use the code that you develop in this walkthrough as a pattern to create other Windows desktop applications.
The Windows API (also known as the Win32 API, Windows Desktop API, and Windows Classic API) is a C-language-based framework for creating Windows applications. It has been in existence since the 1980s and has been used to create Windows applications for decades. More advanced and easier-to-program frameworks have been built on top of the Windows API. For example, MFC, ATL, the .NET frameworks. Even the most modern Windows Runtime code for UWP and Store apps written in C++/WinRT uses the Windows API underneath. For more information about the Windows API, see Windows API Index. There are many ways to create Windows applications, but the process above was the first.
For the sake of brevity, some code statements are omitted in the text. The Build the code section at the end of this document shows the complete code.
Prerequisites
A computer that runs Microsoft Windows 7 or later versions. We recommend Windows 10 for the best development experience.
A copy of Visual Studio. For information on how to download and install Visual Studio, see Install Visual Studio. When you run the installer, make sure that the Desktop development with C++ workload is checked. Don’t worry if you didn’t install this workload when you installed Visual Studio. You can run the installer again and install it now.

An understanding of the basics of using the Visual Studio IDE. If you’ve used Windows desktop apps before, you can probably keep up. For an introduction, see Visual Studio IDE feature tour.
An understanding of enough of the fundamentals of the C++ language to follow along. Don’t worry, we don’t do anything too complicated.
Create a Windows desktop project
Follow these steps to create your first Windows desktop project. As you go, you’ll enter the code for a working Windows desktop application. To see the documentation for your preferred version of Visual Studio, use the Version selector control. It’s found at the top of the table of contents on this page.
To create a Windows desktop project in Visual Studio 2019
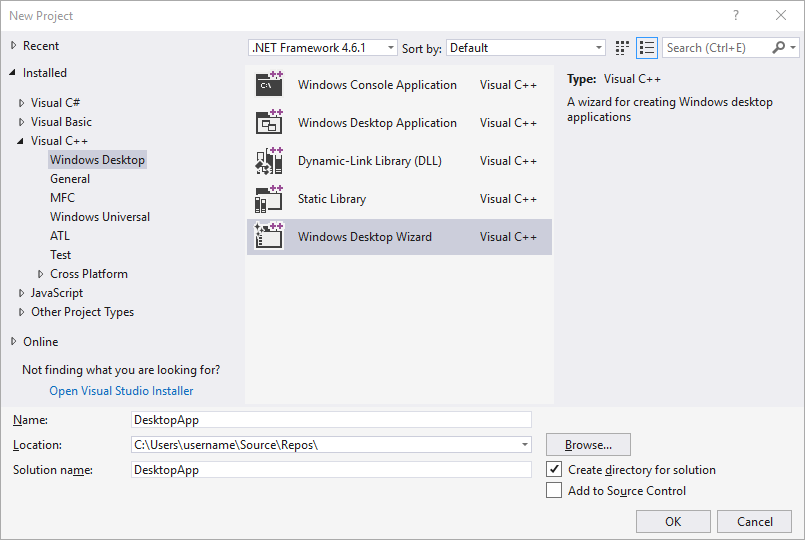
From the main menu, choose File > New > Project to open the Create a New Project dialog box.
At the top of the dialog, set Language to C++, set Platform to Windows, and set Project type to Desktop.
From the filtered list of project types, choose Windows Desktop Wizard then choose Next. In the next page, enter a name for the project, for example, DesktopApp.
Choose the Create button to create the project.
The Windows Desktop Project dialog now appears. Under Application type, select Desktop application (.exe). Under Additional options, select Empty project. Choose OK to create the project.
In Solution Explorer, right-click the DesktopApp project, choose Add, and then choose New Item.

In the Add New Item dialog box, select C++ File (.cpp). In the Name box, type a name for the file, for example, HelloWindowsDesktop.cpp. Choose Add.
 Visual C plus plus selected and the C plus plus File option highlighted.» title=»Add .cpp file to DesktopApp Project» data-linktype=»relative-path»>
Your project is now created and your source file is opened in the editor. To continue, skip ahead to Create the code.
To create a Windows desktop project in Visual Studio 2017
On the File menu, choose New and then choose Project.
In the New Project dialog box, in the left pane, expand Installed > Visual C++, then select Windows Desktop. In the middle pane, select Windows Desktop Wizard.
In the Name box, type a name for the project, for example, DesktopApp. Choose OK.
 Visual C plus plus > Windows Desktop selected, the Windows Desktop Wizard option highlighted, and DesktopApp typed in the Name text box.» title=»Name the DesktopApp project» data-linktype=»relative-path»>
In the Windows Desktop Project dialog, under Application type, select Windows application (.exe). Under Additional options, select Empty project. Make sure Precompiled Header isn’t selected. Choose OK to create the project.
In Solution Explorer, right-click the DesktopApp project, choose Add, and then choose New Item.
In the Add New Item dialog box, select C++ File (.cpp). In the Name box, type a name for the file, for example, HelloWindowsDesktop.cpp. Choose Add.
Visual C plus plus selected and the C plus plus File option highlighted.» title=»Add .cpp file to DesktopApp Project» data-linktype=»relative-path»>
Your project is now created and your source file is opened in the editor. To continue, skip ahead to Create the code.
To create a Windows desktop project in Visual Studio 2015
On the File menu, choose New and then choose Project.
In the New Project dialog box, in the left pane, expand Installed > Templates > Visual C++, and then select Win32. In the middle pane, select Win32 Project.
In the Name box, type a name for the project, for example, DesktopApp. Choose OK.
 Templates > Visual C plus plus > Win32 selected, the Win32 Project option highlighted, and DesktopApp typed in the Name text box.» title=»Name the DesktopApp project» data-linktype=»relative-path»>
On the Overview page of the Win32 Application Wizard, choose Next.

On the Application Settings page, under Application type, select Windows application. Under Additional options, uncheck Precompiled header, then select Empty project. Choose Finish to create the project.
In Solution Explorer, right-click the DesktopApp project, choose Add, and then choose New Item.

In the Add New Item dialog box, select C++ File (.cpp). In the Name box, type a name for the file, for example, HelloWindowsDesktop.cpp. Choose Add.
 Visual C plus plus selected and the C plus plus File option highlighted.» title=»Add .cpp file to DesktopApp Project» data-linktype=»relative-path»>
Your project is now created and your source file is opened in the editor.
Create the code
Next, you’ll learn how to create the code for a Windows desktop application in Visual Studio.
To start a Windows desktop application
Just as every C application and C++ application must have a main function as its starting point, every Windows desktop application must have a WinMain function. WinMain has the following syntax.
For information about the parameters and return value of this function, see WinMain entry point.
What are all those extra words, such as CALLBACK , or HINSTANCE , or _In_ ? The traditional Windows API uses typedefs and preprocessor macros extensively to abstract away some of the details of types and platform-specific code, such as calling conventions, __declspec declarations, and compiler pragmas. In Visual Studio, you can use the IntelliSense Quick Info feature to see what these typedefs and macros define. Hover your mouse over the word of interest, or select it and press Ctrl+K, Ctrl+I for a small pop-up window that contains the definition. For more information, see Using IntelliSense. Parameters and return types often use SAL Annotations to help you catch programming errors. For more information, see Using SAL Annotations to Reduce C/C++ Code Defects.
Windows desktop programs require . defines the TCHAR macro, which resolves ultimately to wchar_t if the UNICODE symbol is defined in your project, otherwise it resolves to char . If you always build with UNICODE enabled, you don’t need TCHAR and can just use wchar_t directly.
Along with the WinMain function, every Windows desktop application must also have a window-procedure function. This function is typically named WndProc , but you can name it whatever you like. WndProc has the following syntax.
In this function, you write code to handle messages that the application receives from Windows when events occur. For example, if a user chooses an OK button in your application, Windows will send a message to you and you can write code inside your WndProc function that does whatever work is appropriate. It’s called handling an event. You only handle the events that are relevant for your application.
For more information, see Window Procedures.
To add functionality to the WinMain function
In the WinMain function, you populate a structure of type WNDCLASSEX. The structure contains information about the window: the application icon, the background color of the window, the name to display in the title bar, among other things. Importantly, it contains a function pointer to your window procedure. The following example shows a typical WNDCLASSEX structure.
For information about the fields of the structure above, see WNDCLASSEX.
Register the WNDCLASSEX with Windows so that it knows about your window and how to send messages to it. Use the RegisterClassEx function and pass the window class structure as an argument. The _T macro is used because we use the TCHAR type.
Now you can create a window. Use the CreateWindow function.
This function returns an HWND , which is a handle to a window. A handle is somewhat like a pointer that Windows uses to keep track of open windows. For more information, see Windows Data Types.
At this point, the window has been created, but we still need to tell Windows to make it visible. That’s what this code does:
The displayed window doesn’t have much content because you haven’t yet implemented the WndProc function. In other words, the application isn’t yet handling the messages that Windows is now sending to it.
To handle the messages, we first add a message loop to listen for the messages that Windows sends. When the application receives a message, this loop dispatches it to your WndProc function to be handled. The message loop resembles the following code.
For more information about the structures and functions in the message loop, see MSG, GetMessage, TranslateMessage, and DispatchMessage.
At this point, the WinMain function should resemble the following code.
To add functionality to the WndProc function
To enable the WndProc function to handle the messages that the application receives, implement a switch statement.
One important message to handle is the WM_PAINT message. The application receives the WM_PAINT message when part of its displayed window must be updated. The event can occur when a user moves a window in front of your window, then moves it away again. Your application doesn’t know when these events occur. Only Windows knows, so it notifies your app with a WM_PAINT message. When the window is first displayed, all of it must be updated.
To handle a WM_PAINT message, first call BeginPaint, then handle all the logic to lay out the text, buttons, and other controls in the window, and then call EndPaint. For the application, the logic between the beginning call and the ending call displays the string «Hello, Windows desktop!» in the window. In the following code, the TextOut function is used to display the string.
HDC in the code is a handle to a device context, which is used to draw in the window’s client area. Use the BeginPaint and EndPaint functions to prepare for and complete the drawing in the client area. BeginPaint returns a handle to the display device context used for drawing in the client area; EndPaint ends the paint request and releases the device context.
An application typically handles many other messages. For example, WM_CREATE when a window is first created, and WM_DESTROY when the window is closed. The following code shows a basic but complete WndProc function.
Build the code
As promised, here’s the complete code for the working application.
To build this example
Delete any code you’ve entered in HelloWindowsDesktop.cpp in the editor. Copy this example code and then paste it into HelloWindowsDesktop.cpp:
On the Build menu, choose Build Solution. The results of the compilation should appear in the Output window in Visual Studio.

To run the application, press F5. A window that contains the text «Hello, Windows desktop!» should appear in the upper-left corner of the display.

Congratulations! You’ve completed this walkthrough and built a traditional Windows desktop application.


