- .NET Core Workers as Windows Services
- Create a worker
- Create a Worker in Visual Studio
- Create a Worker on the command line
- Run as a Windows Service
- Install the Worker
- Logging
- Future Work
- Conclusion
- .NET Core Workers as Windows Services
- Create a worker
- Create a Worker in Visual Studio
- Create a Worker on the command line
- Run as a Windows Service
- Install the Worker
- Logging
- Future Work
- .NET Core Workers как службы Windows
- Создание worker
- Создание Worker в Visual Studio
- Создание Worker в командной строке
- Запуск в виде службы Windows
- Установка Worker
- Логирование
- Дальнейшая работа
- .Net Core 2.0 Windows Service
- 10 Answers 10
.NET Core Workers as Windows Services
March 29th, 2019
In .NET Core 3.0 we are introducing a new type of application template called Worker Service. This template is intended to give you a starting point for writing long running services in .NET Core. In this walkthrough we will create a worker and run it as a Windows Service.
Create a worker
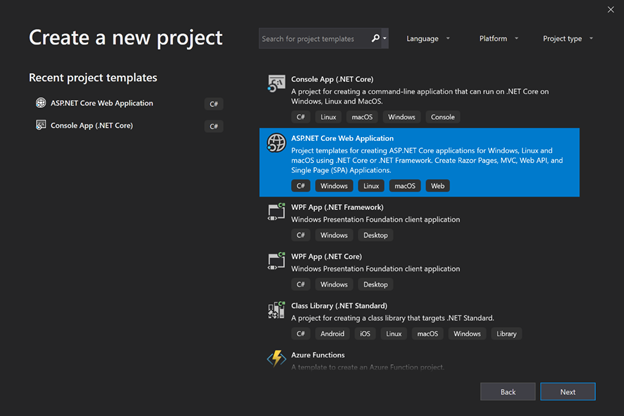
Preview Note: In our preview releases the worker template is in the same menu as the Web templates. This will change in a future release. We intend to place the Worker Service template directly inside the create new project wizard.
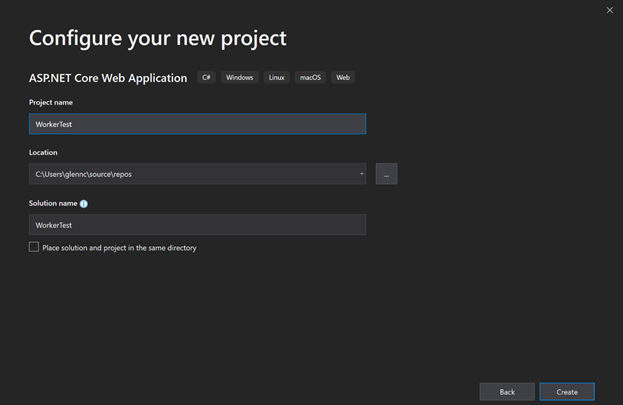
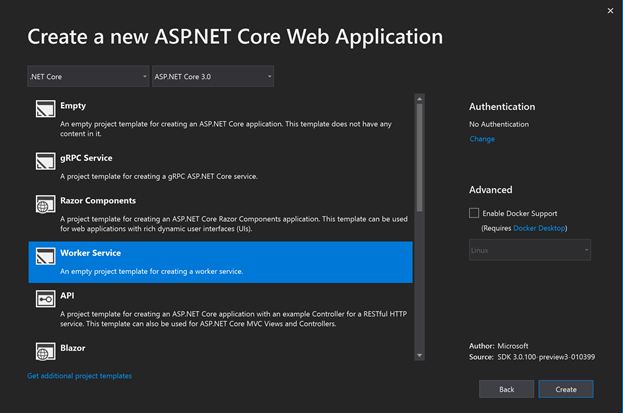
Create a Worker in Visual Studio

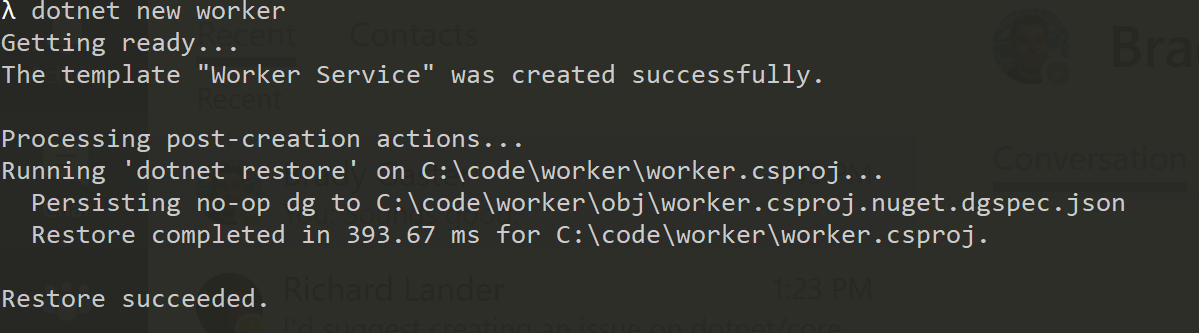
Create a Worker on the command line
Run dotnet new worker

Run as a Windows Service
In order to run as a Windows Service we need our worker to listen for start and stop signals from ServiceBase the .NET type that exposes the Windows Service systems to .NET applications. To do this we want to:
Add the Microsoft.Extensions.Hosting.WindowsServices NuGet package

Add the UseServiceBaseLifetime call to the HostBuilder in our Program.cs
This method does a couple of things. First, it checks whether or not the application is actually running as a Windows Service, if it isn’t then it noops which makes this method safe to be called when running locally or when running as a Windows Service. You don’t need to add guard clauses to it and can just run the app normally when not installed as a Windows Service.
Secondly, it configures your host to use a ServiceBaseLifetime . ServiceBaseLifetime works with ServiceBase to help control the lifetime of your app when run as a Windows Service. This overrides the default ConsoleLifetime that handles signals like CTL+C.
Install the Worker
Once we have our worker using the ServiceBaseLifetime we then need to install it:
First, lets publish the application. We will install the Windows Service in-place, meaning the exe will be locked whenever the service is running. The publish step is a nice way to make sure all the files I need to run the service are in one place and ready to be installed.
Then we can use the sc utility in an admin command prompt

Security note: This command has the service run as local system, which isn’t something you will generally want to do. Instead you should create a service account and run the windows service as that account. We will not talk about that here, but there is some documentation on the ASP.NET docs talking about it here: https://docs.microsoft.com/en-us/aspnet/core/host-and-deploy/windows-service?view=aspnetcore-2.2
Logging
The logging system has an Event Log provider that can send log message directly to the Windows Event Log. To log to the event log you can add the Microsoft.Extensions.Logging.EventLog package and then modify your Program.cs :
Future Work
In upcoming previews we plan to improve the experience of using Workers with Windows Services by:
- Rename UseWindowsServiceBaseLifetime to UseWindowsService
- Add automatic and improved integration with the Event Log when running as a Windows Service.
Conclusion
We hope you try out this new template and want you to let us know how it goes, you can file any bugs or suggestions here.
.NET Core Workers as Windows Services
In .NET Core 3.0 we are introducing a new type of application template called Worker Service. This template is intended to give you a starting point for writing long running services in .NET Core. In this walkthrough we will create a worker and run it as a Windows Service.

Create a worker
Preview Note: In our preview releases the worker template is in the same menu as the Web templates. This will change in a future release. We intend to place the Worker Service template directly inside the create new project wizard.
Create a Worker in Visual Studio


Create a Worker on the command line
Run dotnet new worker
Run as a Windows Service
In order to run as a Windows Service we need our worker to listen for start and stop signals from ServiceBase the .NET type that exposes the Windows Service systems to .NET applications. To do this we want to:
Add the Microsoft.Extensions.Hosting.WindowsServices NuGet package
Add the UseServiceBaseLifetime call to the HostBuilder in our Program.cs
This method does a couple of things. First, it checks whether or not the application is actually running as a Windows Service, if it isn’t then it noops which makes this method safe to be called when running locally or when running as a Windows Service. You don’t need to add guard clauses to it and can just run the app normally when not installed as a Windows Service.
Secondly, it configures your host to use a ServiceBaseLifetime . ServiceBaseLifetime works with ServiceBase to help control the lifetime of your app when run as a Windows Service. This overrides the default ConsoleLifetime that handles signals like CTL+C.
Install the Worker
Once we have our worker using the ServiceBaseLifetime we then need to install it:
First, lets publish the application. We will install the Windows Service in-place, meaning the exe will be locked whenever the service is running. The publish step is a nice way to make sure all the files I need to run the service are in one place and ready to be installed.
Then we can use the sc utility in an admin command prompt

Security note: This command has the service run as local system, which isn’t something you will generally want to do. Instead you should create a service account and run the windows service as that account. We will not talk about that here, but there is some documentation on the ASP.NET docs talking about it here: https://docs.microsoft.com/en-us/aspnet/core/host-and-deploy/windows-service?view=aspnetcore-2.2
Logging
The logging system has an Event Log provider that can send log message directly to the Windows Event Log. To log to the event log you can add the Microsoft.Extensions.Logging.EventLog package and then modify your Program.cs :
Future Work
In upcoming previews we plan to improve the experience of using Workers with Windows Services by:
- Rename UseWindowsServiceBaseLifetime to UseWindowsService
- Add automatic and improved integration with the Event Log when running as a Windows Service.
.NET Core Workers как службы Windows
В .NET Core 3.0 мы представляем новый тип шаблона приложения под названием Worker Service. Этот шаблон предназначен для того, чтобы дать вам отправную точку для написания долго-работающих сервисов в .NET Core. В этом пошаговом руководстве мы создадим worker и запустим его в качестве службы Windows.
Создание worker
Примечание. В наших предварительных версиях шаблон worker находится в том же меню, что и веб-шаблоны. Это изменится в будущем выпуске. Мы намерены разместить шаблон Worker Service непосредственно в мастере создания нового проекта.
Создание Worker в Visual Studio
Создание Worker в командной строке
Выполните dotnet new worker
Запуск в виде службы Windows
Чтобы запустить в качестве службы Windows, нам нужно, чтобы наш worker видел сигналы запуска и остановки от типа ServiceBase .NET, который связывает системы Windows Service с приложениями .NET. Для этого нужно:
Добавить пакет NuGet Microsoft.Extensions.Hosting.WindowsServices
Добавить вызов UseServiceBaseLifetime к HostBuilder в Program.cs
Этот метод делает несколько вещей. Во-первых, он проверяет, действительно ли приложение работает в качестве службы Windows, если это не так, то он выполняет noops, что делает этот метод безопасным для вызова при локальном запуске или в качестве службы Windows.
Во-вторых, он настраивает ваш хост на использование ServiceBaseLifetime . ServiceBaseLifetime работает с ServiceBase чтобы помочь контролировать время жизни вашего приложения при запуске в качестве службы Windows. Это переопределяет стандартный ConsoleLifetime который обрабатывает такие сигналы, как CTL + C.
Установка Worker
Как только мы получили worker использовав ServiceBaseLifetime нам нужно установить его:
Во-первых, давайте опубликуем приложение. Мы установим Службу Windows in-place, что означает, что исполняемый файл будет заблокирован при каждом запуске службы. Публикация — это хороший способ убедиться, что все файлы, необходимые для запуска службы, находятся в одном месте и готовы к установке.
Далее можно использовать sc utility в командной строке администратора
Примечание о безопасности: Эта команда запускает службу как локальную систему, которая не является тем, что нужно. Вместо этого вы должны создать service account и запустить службу Windows в качестве этой учетной записи. Мы не будем говорить об этом здесь, но здесь есть некоторая документация по ASP.NET: https://docs.microsoft.com/en-us/aspnet/core/host-and-deploy/windows-service?view=aspnetcore-2.2
Логирование
У системы логирования есть сервис «Event Log», который может отправлять сообщения логов непосредственно в журнал событий Windows. Чтобы войти в журнал событий, вы можете добавить Microsoft.Extensions.Logging.EventLog пакет, а затем изменить ваш Program.cs :
Дальнейшая работа
В следующих предварительных версиях мы планируем улучшить использование Workers с Windows Services:
- Переименуем UseWindowsServiceBaseLifetime на UseWindowsService
- Добавим автоматическую и улучшенную интеграцию с журналом событий при запуске в качестве службы Windows.
.Net Core 2.0 Windows Service
I’m trying to build a Windows Service in .Net Core 2.0 but I’ve been banging my head on the wall for a full day and no progress at all. Everything seems to be using Core 1.0/1.1 even the Microsoft documentation:
TopShelf doesn’t support 2.0 as well, for what I’ve seen.
I’ve seen some weird solutions that put all the code in a .Net Standard Class Library and then use a .Net Framework application to host the Windows Service, but this doesn’t look elegant in my eyes and I’m trying to get rid of.Net Framework altogether.
Is what I want to do even possible at the moment? Am I missing something really basic?

10 Answers 10
It is now possible to write a Windows Service in .NET Core 2.0 without third-party libraries, thanks to the release of the Windows Compatibility Pack (at the time of writing, still in prerelease). As the page itself warns:
But before you start porting, you should understand what you want to accomplish with the migration. Just porting to .NET Core because it’s a new .NET implementation isn’t a good enough reason (unless you’re a True Fan).
In particular, writing a Windows Service in .NET Core may now be possible, but you will not get cross-platform compatibility out of the box, because the assemblies for platforms other than Windows will just throw a PlatformNotSupportedException if you attempt to use service code. Working around this is possible (using RuntimeInformation.IsOSPlatform , for example), but that’s another question altogether.
Also, third-party libraries may still offer a nicer interface with regards to installing the service: as of writing, the current version of the compatibility pack ( 2.0.0-preview1-26216-02 ) does not support the System.Configuration.Install namespace, so the default approach with a ServiceProcessInstaller class and installutil will not work. More on that later.
With all that said, let’s suppose you have created a brand new Windows service ( Service1 ) from the project template (not strictly required since it contains nothing interesting, other than a class inheriting from ServiceBase ). All you need to do to make it build on .NET Core 2.0 is to edit and replace the .csproj with the new format:
And then delete properties\AssemblyInfo.cs since it’s no longer required and will conflict with version information in the project itself.
If you already have a service and it has dependencies, the conversion may be more complicated. See here.
Now you should be able to run dotnet publish and get an executable. As mentioned, you can’t use the ServiceProcessInstaller class to install the service, so you’ll have to manually
- register the event source the service uses;
- create the actual service.
This can be done with some PowerShell. From an elevated prompt in the location that contains your published executable:


