- Как подключить NFS каталог в Windows 10
- Установка клиента NFS (службы для NFS)
- Как разрешить запись в NFS каталог анонимному пользователю
- Как подключить NFS каталог в Windows 10
- Network File System overview
- Feature description
- Windows and Windows Server versions
- Practical applications
- New and changed functionality
- NFS version 4.1
- NFS infrastructure
- NFS version 3 continuous availability
- Deployment and manageability improvements
- Server Manager information
- Additional information
- Подключаем NFS шару в Windows Server 2012 R2
Как подключить NFS каталог в Windows 10
В Unix-подобных операционных системах подключить каталога NFS (Network File System) довольно просто, однако если вам понадобится использовать NFS шару в Windows, придется выполнить ряд дополнительных действий. В этой статье мы покажем, как в Windows 10 подключить NFS каталог, который находинся на UNIX системе. Все описанные инструкции будут работать в Windows 10 Pro (версия 10.0.14393 и выше).
Установка клиента NFS (службы для NFS)
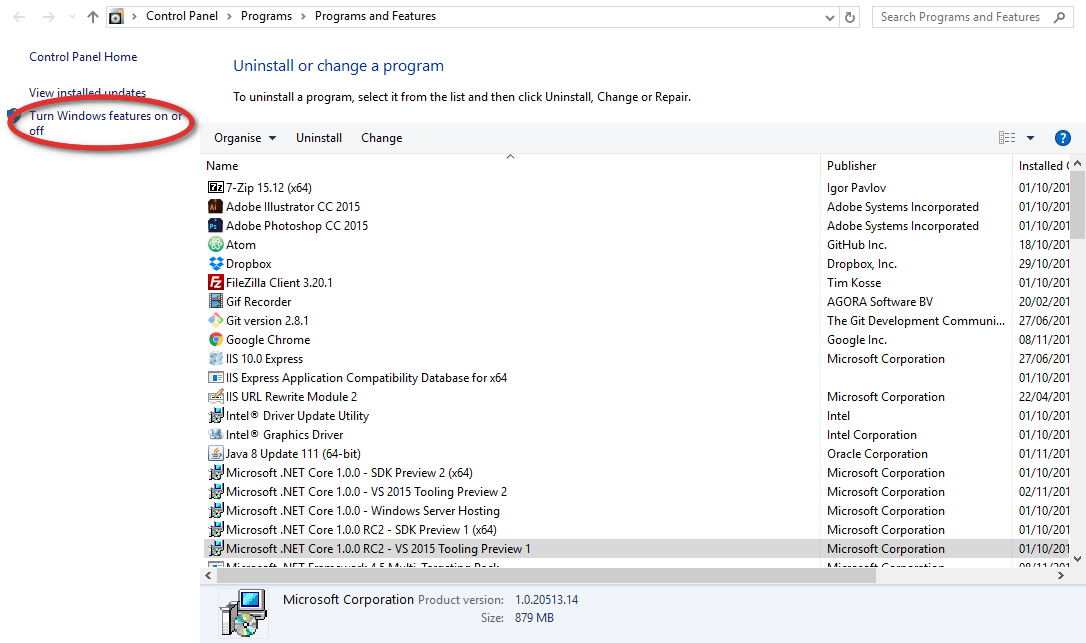
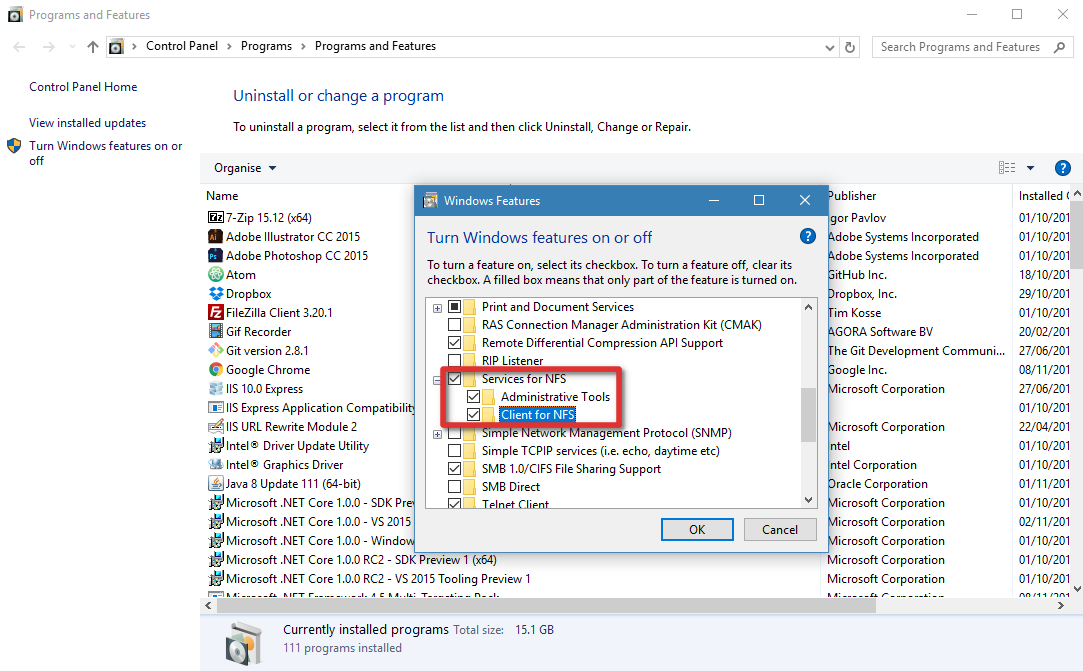
В первую очередь в Windows 10 нужно установить клиент NFS. Для установки необходимо выполнить следующие шаги:
- Откройте раздел «Programs and Features».

- Щелкните по пункту «Turn Windows features on or off».
- В появившемся списке в разделе Services for NFS включите NFS клиента (Client for NFS), а затем нажмите «ОК».
- После установки нажмите кнопку «Close» и вернитесь на рабочий стол.

Как разрешить запись в NFS каталог анонимному пользователю
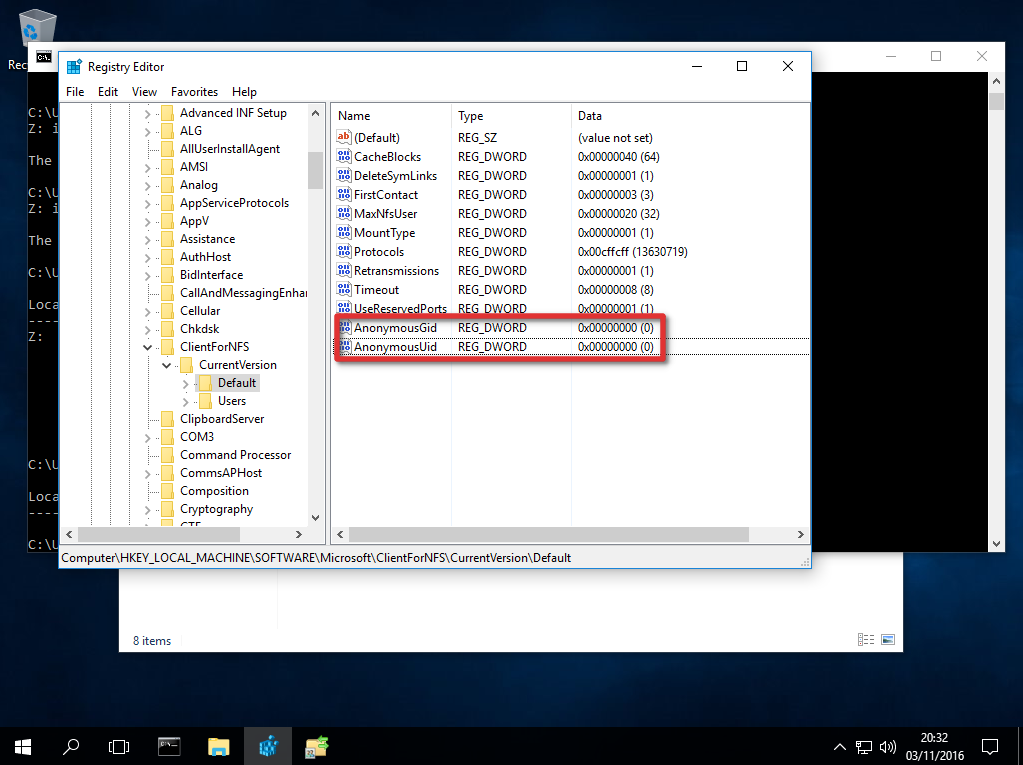
По умолчанию при подключении NFS каталога с UNIX системы, анонимному пользователю (anonymous) предоставляются права только на чтение. Чтобы предоставить анонимным пользователям право записи, необходимо изменить значения UID и GID, которые используются для монтирования NFS каталога в Windows. Пример стандартных настроек представлен на рисунке ниже.
Чтобы изменить значение полей UID и GID, нам потребуется внести изменения в реестр Windows.
- Откройте редактор реестра regedit.
- Перейдите в ветку реестра — HKEY_LOCAL_MACHINE\SOFTWARE\Microsoft\ClientForNFS\CurrentVersion\Default.
- В каталоге «Default» создайте новый параметр типа DWORD (32бит) с именем AnonymousUid и назначьте UID, назначенный на каталог в UNIX, к которому открыт доступ через NFS.
- В ветке Default создайте ещё один параметр DWORD (32-бит) с именем AnonymousGid и назначьте GID, назначенный данному каталогу в UNIX.
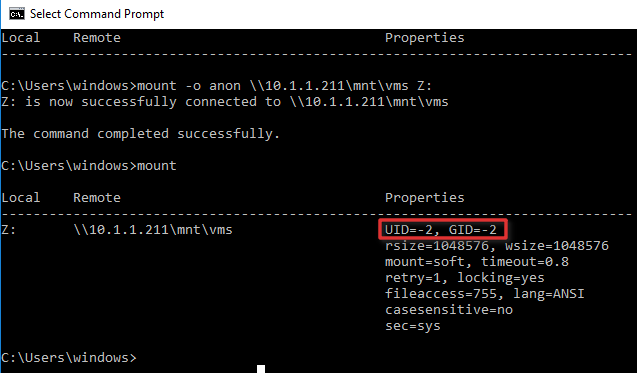
Список подключенных NFS каталогов и параметры монтирования можно вывести с помощью команды Mount без параметров.
Результат работы команды mount теперь должен выглядеть следующим образом:
Local Remote Properties
——————————————————————————-
Z: \\10.1.1.211\mnt\vms UID=0, GID=0
rsize=1078756, wsize=1078756
mount=soft, timeout=1.6
retry=1, locking=yes
fileaccess=755, lang=ANSI
casesensitive=no
sec=sys
Обратите внимание на значение полей UID и GID, которое равно 0. UID=0, GID=0 — означает, что общий ресурс монтируется под пользователем root.
Как подключить NFS каталог в Windows 10
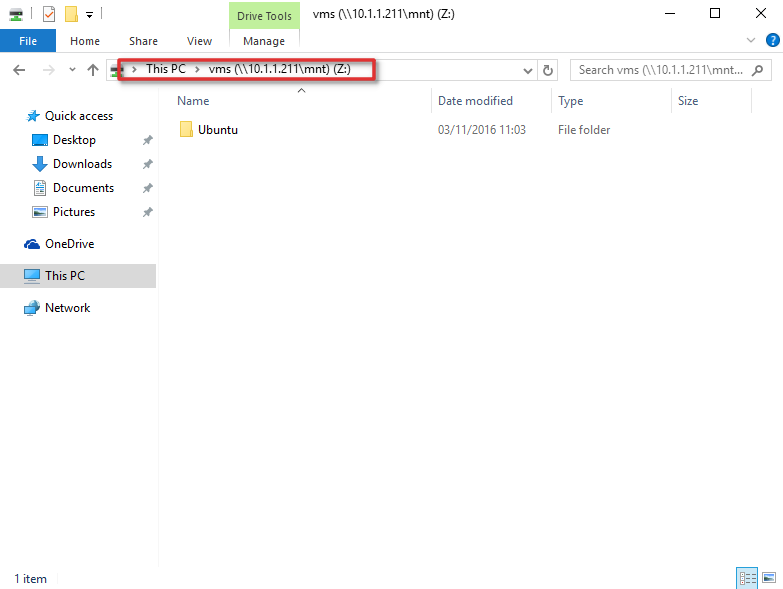
Смонтировать NFS каталог в Windows 10 можно с помощью команды mount. Например, смонтируем NFS каталог и назначим ему букву диска Z:. Предположим, что ваше NAS устройство находится в той же сети, что и ваш компьютер с установленной операционной системы Windows, а IP-адрес устройства — 10.1.1.211. С помощью следующей команды можно смонтировать общий ресурс NFS в /mnt/vms.
Mount –o anon \\10.1.1.211\mnt\vms Z:
Z: is now successfully connected to \\10.1.1.211\mnt\vms
The command completed successfully .
Теперь общий ресурс создан, и мы можем получить доступ к данным. В нашем примере сетевой ресурс (диск) обозначается буквой «Z».
На этом настройка NFS завершена и вы сможете сохранять данные на свое NAS устройство через смонтированный NFS каталог. Обратите внимание, что при в первый раз открытие этого каталога выполняется довольно долго.
Network File System overview
Applies to: Windows Server 2016, Windows Server 2012 R2, Windows Server 2012
This topic describes the Network File System role service and features included with the File and Storage Services server role in Windows Server. Network File System (NFS) provides a file sharing solution for enterprises that have heterogeneous environments that include both Windows and non-Windows computers.
Feature description
Using the NFS protocol, you can transfer files between computers running Windows and other non-Windows operating systems, such as Linux or UNIX.
NFS in Windows Server includes Server for NFS and Client for NFS. A computer running Windows Server can use Server for NFS to act as a NFS file server for other non-Windows client computers. Client for NFS allows a Windows-based computer running Windows Server to access files stored on a non-Windows NFS server.
Windows and Windows Server versions
Windows supports multiple versions ofthe NFS client and server, depending on operating system version and family.
| Operating Systems | NFS Server Versions | NFS Client Versions |
|---|---|---|
| Windows 7, Windows 8.1, Windows 10 | N/A | NFSv2, NFSv3 |
| Windows Server 2008, Windows Server 2008 R2 | NFSv2, NFSv3 | NFSv2, NFSv3 |
| Windows Server 2012, Windows Server 2012 R2, Windows Server 2016, Windows Server 2019 | NFSv2, NFSv3, NFSv4.1 | NFSv2, NFSv3 |
Practical applications
Here are some ways you can use NFS:
- Use a Windows NFS file server to provide multi-protocol access to the same file share over both SMB and NFS protocols from multi-platform clients.
- Deploy a Windows NFS file server in a predominantly non-Windows operating system environment to provide non-Windows client computers access to NFS file shares.
- Migrate applications from one operating system to another by storing the data on file shares accessible through both SMB and NFS protocols.
New and changed functionality
New and changed functionality in Network File System includes support for the NFS version 4.1 and improved deployment and manageability. For information about functionality that is new or changed in Windows Server 2012, review the following table:
| Feature/functionality | New or updated | Description |
|---|---|---|
| NFS version 4.1 | New | Increased security, performance, and interoperability compared to NFS version 3. |
| NFS infrastructure | Updated | Improves deployment and manageability, and increases security. |
| NFS version 3 continuous availability | Updated | Improves continuous availability on NFS version 3 clients. |
| Deployment and manageability improvements | Updated | Enables you to easily deploy and manage NFS with new Windows PowerShell cmdlets and a new WMI provider. |
NFS version 4.1
NFS version 4.1 implements all of the required aspects, in addition to some of the optional aspects, of RFC 5661:
- Pseudo file system, a file system that separates physical and logical namespace and is compatible with NFS version 3 and NFS version 2. An alias is provided for the exported file system, which is part of the pseudo file system.
- Compound RPCs combine relevant operations and reduce chattiness.
- Sessions and session trunking enables just one semantic and allows continuous availability and better performance while utilizing multiple networks between NFS 4.1 clients and the NFS Server.
NFS infrastructure
Improvements to the overall NFS infrastructure in Windows Server 2012 are detailed below:
- The Remote Procedure Call (RPC)/External Data Representation (XDR) transport infrastructure, powered by the WinSock network protocol, is available for both Server for NFS and Client for NFS. This replaces Transport Device Interface (TDI), offers better support, and provides better scalability and Receive Side Scaling (RSS).
- The RPC port multiplexer feature is firewall-friendly (less ports to manage) and simplifies deployment of NFS.
- Auto-tuned caches and thread pools are resource management capabilities of the new RPC/XDR infrastructure that are dynamic, automatically tuning caches and thread pools based on workload. This completely removes the guesswork involved when tuning parameters, providing optimal performance as soon as NFS is deployed.
- New Kerberos privacy implementation and authentication options with the addition of Kerberos privacy (Krb5p) support along with the existing krb5 and krb5i authentication options.
- Identity Mapping Windows PowerShell module cmdlets make it easier to manage identity mapping, configure Active Directory Lightweight Directory Services (AD LDS), and set up UNIX and Linux passwd and flat files.
- Volume mount point lets you access volumes mounted under an NFS share with NFS version 4.1.
- The Port Multiplexing feature supports the RPC port multiplexer (port 2049), which is firewall-friendly and simplifies NFS deployment.
NFS version 3 continuous availability
NFS version 3 clients can have fast and transparent planned failovers with more availability and reduced downtime. The failover process is faster for NFS version 3 clients because:
- The clustering infrastructure now allows one resource per network name instead of one resource per share, which significantly improves resources’ failover time.
- Failover paths within an NFS server are tuned for better performance.
- Wildcard registration in an NFS server is no longer required, and the failovers are more fine-tuned.
- Network Status Monitor (NSM) notifications are sent out after a failover process, and clients no longer need to wait for TCP timeouts to reconnect to the failed over server.
Note that Server for NFS supports transparent failover only when manually initiated, typically during planned maintenance. If an unplanned failover occurs, NFS clients lose their connections. Server for NFS also doesn’t have any integration with the Resume Key filter. This means that if a local app or SMB session attempts to access the same file that an NFS client is accessing immediately after a planned failover, the NFS client might lose its connections (transparent failover wouldn’t succeed).
Deployment and manageability improvements
Deploying and managing NFS has improved in the following ways:
- Over forty new Windows PowerShell cmdlets make it easier to configure and manage NFS file shares. For more information, see NFS Cmdlets in Windows PowerShell.
- Identity mapping is improved with a local flat file mapping store and new Windows PowerShell cmdlets for configuring identity mapping.
- The Server Manager graphical user interface is easier to use.
- The new WMI version 2 provider is available for easier management.
- The RPC port multiplexer (port 2049) is firewall-friendly and simplifies deployment of NFS.
Server Manager information
In Server Manager — or the newer Windows Admin Center — use the Add Roles and Features Wizard to add the Server for NFS role service (under the File and iSCSI Services role). For general information about installing features, see Install or Uninstall Roles, Role Services, or Features. Server for NFS tools include the Services for Network File System MMC snap-in to manage the Server for NFS and Client for NFS components. Using the snap-in, you can manage the Server for NFS components installed on the computer. Server for NFS also contains several Windows command-line administration tools:
- Mount mounts a remote NFS share (also known as an export) locally and maps it to a local drive letter on the Windows client computer.
- Nfsadmin manages configuration settings of the Server for NFS and Client for NFS components.
- Nfsshare configures NFS share settings for folders that are shared using Server for NFS.
- Nfsstat displays or resets statistics of calls received by Server for NFS.
- Showmount displays mounted file systems exported by Server for NFS.
- Umount removes NFS-mounted drives.
NFS in Windows Server 2012 introduces the NFS module for Windows PowerShell with several new cmdlets specifically for NFS. These cmdlets provide an easy way to automate NFS management tasks. For more information, see NFS cmdlets in Windows PowerShell.
Additional information
The following table provides additional resources for evaluating NFS.
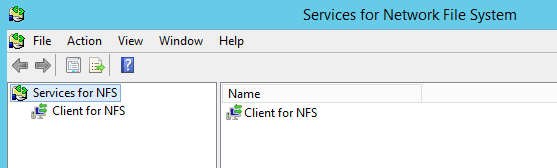
Подключаем NFS шару в Windows Server 2012 R2
Сегодня мы разберемся, как установить и настроить клиент NFS (Network File System) в Windows Server 2012 R2 / Windows 8. Итак, чтобы подключить каталог (шару) с NFS сервера в Windows Server 2012 R2 / Win 8, нужно, как и в предыдущих версиях Windows, установить отдельный компонент — клиент NFS (Client for NFS). Дополнительно, для возможности управления настройками NFS подключения, можно установить компонент служб NFS (Services for Network File System).
Клиент NFS входит в состав ОС Microsoft, начиная с Windows 7. В Windows 2012 / 8 клиент NFS получил небольшие изменения. Теперь NFS клиент поддерживает аутентификацию по протоколу Krb5p — Kerberos версии 5 (в дополнение к Krb5 и Krb5i, поддержка которых появилась еще в Windows 7), поддерживаются большие NFS пакеты – до 1024KB (в Win 7 максимальный размер пакета 32KB)
Клиент NFS можно установить через GUI или с помощью Powershell. Для установки в графическом режиме, откройте консоль Server Manager и выберите компонент (Features) под названием Client for NFS. 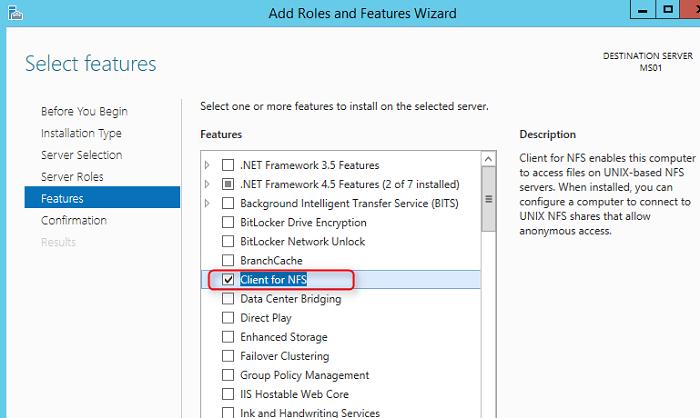
По умолчанию вместе с этим компонентом не устанавливается графическая консоль управления NFS, чтобы исправить это, установим опцию Services for Network File System Management Tools в разделе Remote Server Administration Tools -> Role Administration Tools -> File Services Tools. 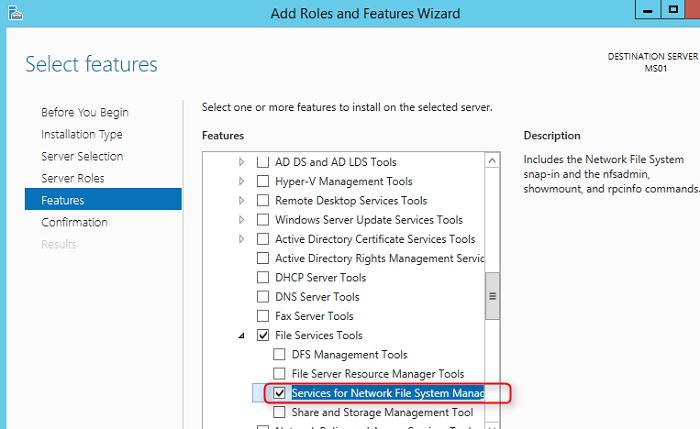
Для установки NFS-клиента в Windows 8 нужно активировать компонент Services for NFS ->Client for NFS, через установку/удаление компонентов (Turn Windows features on or off) в Панели управления (Control Panel -> Programs -> Programs and Features).
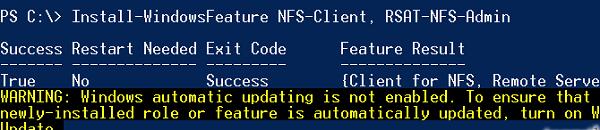
Все перечисленные выше компоненты системы можно установить всего одной командой Powershell:
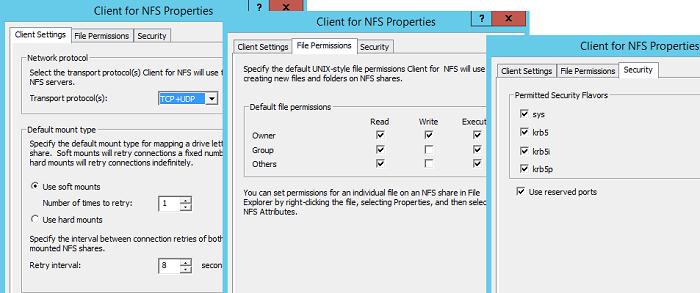
После окончания установки, запустите консоль Services for Network File System Managemen и откройте окно свойств NFS клиента (Client for NFS).
В настройках NFS клиента можно задать:
- Используемый транспортный протокол (Transport protocols) – по умолчанию TCP+UDP
- Тип монтирования NFS шар: hard или soft
- На вкладке File Permissions указываются дефолтные права для создаваемых папок и файлов на NFS шарах
- На вкладке Security указываются протоколы аутентификации, с помощью которых можно аутентифицироваться на NFS сервере
После настройки установки, администраторы смогут смонтировать NFS каталог с помощью команды mount:
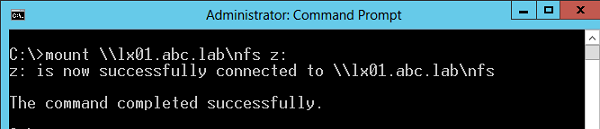
В этом примере мы смонтировали под буквой Z: каталог NFS, расположенный на сервере lx01.abc.lab.
После монтирования, подключенный таким образом каталог на NFS сервере доступен в системе как отдельный диск с буквой Z:\ .
Смонтировать NFS шару можно и с помощью Powershell:
Отключить смонтированный каталог можно так:


