- Нет task view windows 10
- Создать ярлык «Просмотр задач» в Windows 10
- Как использовать виртуальные рабочие столы в Windows 10
- Windows 10-Task View — «New Desktop» icon missing
- Replies (4)
- Инструкция по отключению кнопки представления задач в ОС Windows 10
- Что такое представление задач в Windows 10
- Инструкция по отключению отображения кнопки в панели задач
- How to use Task View features on Windows 10
- How to get started with Task View
- Using task switcher
- Accessing Task View
- Working with Task View
- Windows key + Tab vs. Alt + Tab
- Using virtual desktops
- Accessing virtual desktops
- Working with virtual desktops
- Virtual desktops settings
- Using Timeline
- Accessing Timeline
- Working with Timeline
- Customizing Timeline
- More Windows 10 resources
- Add the best VR headset to your Microsoft Flight Simulator experience
- The Dell XPS 15 is our choice for best 15-inch laptop
- Halo: MCC’s live service elements make it better, not worse
- These are the best PC sticks when you’re on the move
Нет task view windows 10
Функция управления окнами «Просмотр задач» в Windows 10 позволяет просматривать все открытые окна, чтобы вы могли быстро вернуться к определенной программе или документу. В сегодняшнем руководстве мы покажем вам, как вы можете создать ярлык Task View (Просмотр задач) в Windows 10.
В двух словах, «Просмотр задач» представляет собой переключатель задач и систему виртуальных рабочих столов. Эта возможность является одной из первых новых функций для Windows 10. Task View позволяет пользователю быстро найти открытое окно, быстро скрыть все окна и показать рабочий стол, а также управлять окнами на нескольких мониторах или виртуальных рабочих столах.
Самый простой способ получить доступ к представлению задач и нескольким рабочим столам — кликнуть новый значок рядом с поиском на панели задач.
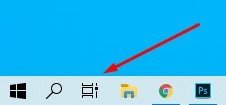
Если у вас нет кнопки «Представление задач» на панели задач, вы можете воспользоваться сочетанием клавиш, чтобы открыть данную функцию:
- Клавиша Windows + клавиша Tab.
- Alt + Tab
- Ctrl + Alt + Tab
Создать ярлык «Просмотр задач» в Windows 10
Чтобы создать ярлык на рабочем столе, для быстрого доступа к функции «Представление задач» в Windows 10, выполните следующие действия:
- Кликните правой кнопкой мыши пустую область на рабочем столе и выберите «Создать» > «Ярлык».
- В поле расположения ярлыка введите или скопируйте и вставьте следующее: %windir%\explorer.exe shell.
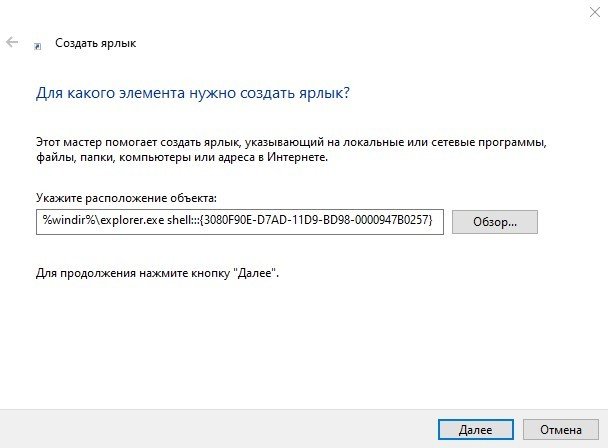
- Нажмите «Далее».
- Введите имя для ярлыка.
- Нажмите на кнопку «Готово».
- Щелкните правой кнопкой мыши созданный ярлык и выберите «Свойства».
- На вкладке «Ярлык» нажмите кнопку «Сменить значок» и укажите новый значок, если хотите.
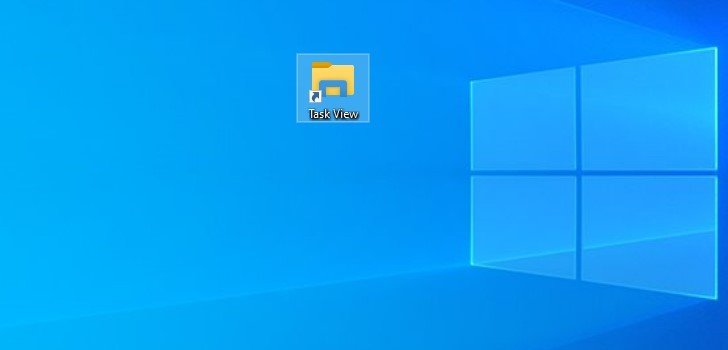
Теперь вы можете прикрепить этот ярлык к панели задач или поместить его ко всем ярлыкам для удобного использования.
Как использовать виртуальные рабочие столы в Windows 10

В данной статье показаны действия, с помощью которых можно максимально эффективно использовать виртуальные рабочие столы в операционной системе Windows 10
Виртуальные рабочие столы с выходом Windows 10 наконец стали встроенной функциональностью. Когда открыто сразу множество программ, с помощью виртуальных рабочих столов их можно удобно систематизировать.

В Windows 10 эта функция называется Представление задач (Task View) и запускается с панели задач.

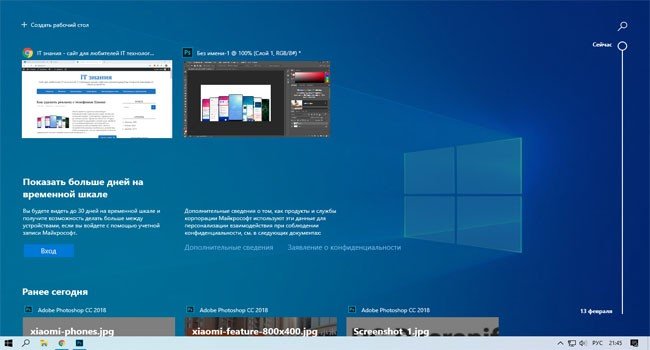
При нажатии кнопки Представление задач открывается интерфейс, показывающий все виртуальные столы с открытыми на них приложениями. Если это первый запуск или дополнительных рабочих столов нет, то в правом нижнем углу вы увидите кнопку Создать рабочий стол (Add a desktop)

После создания нескольких рабочих столов все они отображаются в панели Представление задач (Task View). На скриншоте ниже показаны пустые рабочие столы без открытых приложений.

Если на рабочих столах открыты программы, они отображаются в интерфейсе Представление задач (Task View) в виде миниатюр. При наведении курсора на один из рабочих столов миниатюры увеличиваются и отображаются над панелью Представление задач.
Чтобы перейти к окну открытой на одном из столов программы, достаточно нажать на ее миниатюре – принцип такой же, как при использовании классического переключателя приложений [Alt]+[Tab] в предыдущих версиях Windows.
Чтобы перейти на другой рабочий стол в целом, а не к окну открытой на нем программы, нужно нажать на значке этого рабочего стола в панели Представление задач

Между рабочими столами можно переключаться и с помощью клавиатуры.
При нажатии сочетания клавиш Win + Tab появляются крупные миниатюры программ, открытых на текущем рабочем столе, причем окно активной программы выделяется рамкой.
Если нажать клавишу Tab еще раз, рамка вокруг миниатюры активной программы исчезает, а фокус перемещается на панель Представление задач. С помощью клавиш-стрелок можно выделить нужный рабочий стол и перейти на него нажатием клавиши Enter↵.

Значок программы, открытой на другом рабочем столе, подчеркивается в панели задач. При нажатии на подчеркнутый значок, активным делается не только окно этой программы, но и соответствующий рабочий стол.

Программы можно перемещать между рабочими столами. Для этого нужно нажать в панели задач кнопку Представление задач, щелкнуть правой кнопкой мыши на миниатюре программы, выбрать опцию Переместить в (Move to) и указать номер рабочего стола, на который требуется переместить программу.

После этого программа появится на другом рабочем столе.

Чтобы удалить рабочий стол, нужно нажать кнопку Представление задач в панели задач, навести курсор на миниатюру рабочего стола и нажать на появившемся крестике в верхнем правом углу.
После удаления рабочего стола открытые на нем программы перемещаются на ближайший слева рабочий стол.

На сенсорных устройствах панель Представление задач можно вызвать смахиванием от левой грани экрана. Эта функция заменяет собой прежний переключатель приложений на сенсорных и не сенсорных устройствах.
Windows 10-Task View — «New Desktop» icon missing
I am trying to use the quad view expect all the tutorials I see say to click on Task View then click on the New Desktop icon. Except I do not have that icon. Currently I am only able to do dual screening and really want to use the quad view features.
Clicking and dragging the applications will not «display in quad view» no matter what I try only dual.
Replies (4)
![]()
Thank you for posting your query on Microsoft Community. We are sorry for the inconvenience caused.
I see that you are not able to see the New Desktop icon after you click the Task view icon.
Please follow the below methods and check if it helps,
Method 1: I would suggest you to uncheck and Recheck the Show task view button.
Right click on the Task bar and uncheck the Show task view button.
Recheck the Show task view button and check if it helps.
Method 2: Screen Resolution in Recommended Settings
1. Type settings and then Enter.
2. Select System and then in the right pane Display.
3. Select Advanced Display settings in the right pane.
4. Make sure that you keep the recommended settings
Method 3: Safe Mode
Try to boot the computer in Safe mode and see if the issue still persist.
Safe Mode is useful for troubleshooting problems with programs and drivers that might not start correctly or that might prevent Windows from starting correctly. Safe mode starts Windows with a limited set of files and drivers.
Please refer below link on how to boot computer in safe mode.
Note: To exit from safe mode, restart your computer and let the Windows start normally.
Reply us if you have any further queries we will be glad to assist you.
Инструкция по отключению кнопки представления задач в ОС Windows 10

С релизом каждой обновленной версии операционной системы Microsoft приносит своим пользователям большое количество новых функций, возможностей, а также исправление различных ошибок (и добавление других – куда же без этого) и неполадок. Некоторые из функций направлены на упрощение каких-либо рутинных процессов, а также ускорение работы – такую возможность дает Task View. Рассмотрим, как отключить представление задач в Windows 10 и саму функцию.
Что такое представление задач в Windows 10
Функция, которая позволяет быстро переключаться между активными приложениями, имеет название «представление задач». Например, во время серфинга в браузере можно мгновенно перейти в приложение Microsoft Word, чтобы продолжить печатать текст. Переходы осуществляются с помощью нажатия нескольких горячих клавиш.

Аналог функции был введен еще в более ранних версиях ОС, где функция была примитивнее, но со временем совершенствовалась. Для Vista появилось 3D-меню, которое отображало список запущенных приложений, а в 8.0 данное меню на сенсорных устройствах уже открывалось с помощью свайпа от края экрана.
Кроме отображения списка текущих дел (запущенных процессов: браузер, проводник и другое), опция позволяет создавать несколько рабочих столов. Это полезно, когда устройством пользуется несколько человек, и каждому необходимо поддерживать порядок, настраивать собственное рабочее место.

Управление осуществляется с помощью двух горячих клавиш: «Win + Tab». После зажатия клавиш откроется меню, а также появится возможность создать новые рабочие столы и переключаться между ними. Запущенные приложения перетаскиваются для работы к любому рабочему столу нажатием мыши. Для переключения между столами предусмотрена комбинация клавиш: «Win + Ctrl + Num 4» или «Num 6» (стрелки влево или вправо). К данной опции также относится возможность разбиения экрана на 2 части: одному приложению выделяется половина экрана, тогда как на второй половине располагается другое. Например, можно смотреть сериал и одновременно работать.

Инструкция по отключению отображения кнопки в панели задач
Как и множество других функций, Task View отключается в настройках ОС:
- Открываем раздел Параметры, далее переходим во вкладку Конфиденциальность и Журнал действий.

- Убираем галочки с единственных двух пунктов журнала.
- Выкручиваем ползунок на пункте «Показать действия от учетных записей» на состояние «Выкл.» – это позволяет очистить данные, сохраняемые системой.
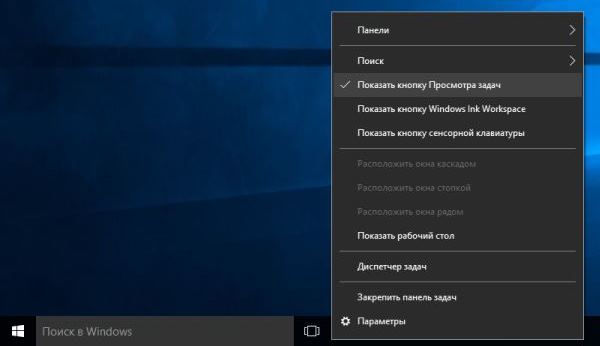
- Убираем иконку с панели – кликаем правой кнопкой мыши по панели задач, после чего убираем галочку со строки «Показать кнопку Просмотра задач».
How to use Task View features on Windows 10

Windows 10’s Task View is a system that provides an experience to work more efficiently with multiple apps. with it you can quickly jump between open applications and spread projects onto separate desktops to stay focus on a particular task.
Additionally, starting with the April 2018 Update, Task View also introduces Timeline, which works like a time machine allowing you to resume activities that you’re working in the past on the same or different PC using a Microsoft account.
In this Windows 10 guide, we’ll walk you through the steps to get started with Task View to improve your multitasking experience when working with multiple apps and projects.
How to get started with Task View
Task View was originally designed to make it easier to see and switch quickly between running applications. However, the feature has been evolving ever since it was first introduced, and now, you can also resume activities you were working in the past, as well as use virtual desktops to organize related tasks.
Here’s everything you need to know to multitask more efficiently on Windows 10’s Task View.
Using task switcher
Task View primary function is to provide an experience to quickly switch between running applications.
Accessing Task View
On Windows 10 there are at least two ways to access the experience. You can click the Task View button in the taskbar, and you can use the Windows key + Tab keyboard shortcut.
Quick Tip: If you don’t see the button, right-click the taskbar, and select the Show Task View button option.

Working with Task View
Inside Task View, your running applications will be listed in the middle of the screen, which you can click to switch to a particular app quickly.

You can also right-click an app to access its context menu to perform some common tasks, including the ability to snap the app to the left or right of the screen, move it to a different virtual desktop or show windows across desktops, and an option to quickly close the application.

Windows key + Tab vs. Alt + Tab
Since the addition of virtual desktops, there’s a slight difference between the Windows key + Tab and Alt + Tab keyboard shortcuts. While both shortcuts access a list of your running applications, the Windows key + Tab only shows the applications running on a particular desktop. It also exposes an interface that includes the controls to manage virtual desktops, and a list of all your Timeline activities.
Windows key + Tab (left), Alt + Tab (right)
On the other hand, when using the Alt + Tab keyboard shortcut, you’re accessing a list of all your running applications no matter in which virtual desktop they’re running. In addition, you can keep pressing the shortcut to cycle through apps, and when you land on a particular app, it’ll take you to that application on the desktop that’s running.
Using virtual desktops
Virtual desktops is an easy-to-use feature in Task View designed to help you organize related activities into groups.
Using this feature, you can create multiple environments that each can run different apps keeping your focus on a particular project. Typically, this feature comes in handy to keep work tasks separate from your personal tasks, or when multitasking between different activities, and you don’t have a multi-monitor setup.
Accessing virtual desktops
To access the experience, click the Task view button in the taskbar or use the Windows key + Tab keyboard shortcut.
While in Task View, virtual desktops will appear a the top of the experience.
If you’re using multiple desktops, a preview will appear for each virtual desktop, which you can hover with the mouse to get a quick pick of the apps running in a particular virtual environment.
Working with virtual desktops
On Windows 10, you can create as many desktops as you need, the only thing you need to do to start is to click the New desktop button.

You can also use the Windows key + Ctrl + D keyboard shortcut to create a new desktop even faster.
If you want to remove a desktop, simply open Task View, and click the Close (X) button in the top-right corner of the virtual desktop. (Any running application will automatically move over to your primary desktop.)
Swithching between desktops, just click the thumbnail of the virtual environment you want to use.
It’s also possible to move quickly between desktops using the Windows key + Ctrl + Left or Windows key + Ctrl + Right keyboard shortcuts.
If you need to move apps between virtual environments, right-click the app, and select Move to, and pick the desktop you want to move the app.
Alternatively, you can drag and drop a running application to the virtual desktop you want. You can even drop the app into the plus (+) button, in which case, it’ll create a new virtual desktop with the app.
Although virtual desktops is a feature to separate activities into groups, sometimes, you need a particular app to be available on all desktops.
If you need to show an app or a window on all desktops, while in Task View, right-click the app, and select one of two options:
- Show this window on all desktops.
Show windows from this app on all desktops.
Virtual desktops settings
While virtual desktops is a simple feature, using the Settings app, you can customize a few options to get the most out of the experience.
- Open Settings.
- Click on Devices.
Click on Multitasking.
Under the «Virtual desktops» section, you’ll notice two drop-down menus that allow you to decide whether the taskbar and pressing the «Alt + Tab» keyboard shortcut should include the open windows only on the virtual desktop that they’re on, or on all desktops.
Using Timeline
Timeline is a feature that leverages the Microsoft’s cloud infrastructure allowing you to pick up activities you’re working in the past within the Task View experience.
Activities can include articles you’re reading in Microsoft Edge, an Office document, or task from an app that you started on your computer, or from another device connected with the same Microsoft account, including on your Android or iOS device.
Accessing Timeline
To access Timeline, click the Task view button in the taskbar or use the Windows key + Tab keyboard shortcut.
While in Task View, Timeline will appear a the bottom of the screen.
Working with Timeline
The experience organizes your previous activities using deep-links to a specific piece of content within an app to make it easier to pick up right where you left off.
Items are group by date, and each day offers two rows of activities, but the number of items will mostly depend on the size of your screen real estate.
To resume a task, click the item from the list. If the activity you want to resume isn’t listed, you can click the See all button to access a full day of activities.
In the page, the scrollbar on the right helps you to dig through the items. Also, you can use the search button on the top-right to quickly find a particular activity using keywords.
If you need to delete activities, you can always right-click an item and select the Remove option. Or you can also select the Clear all from option to remove all the activities for a particular day.
As a result of Timeline being a feature that works across devices, in order to differentiate activities originated from another device, you’ll notice that activities will include the name of the computer that started the task.
Customizing Timeline
Using the Settings app is possible to enable, disable, and customize various aspects and functionalities of Timeline.
- Open Settings.
- Click on Privacy.
Click on Activity history.
Under the «Activity history» section, you’ll find two options:
- Let Windows collect my activities from this PC: This option is enabled by default, and you must keep it enabled for Timeline to work.
- Let Windows sync my activities from this PC to the cloud: This option is disabled by default, and you must turn it on in order to access up to 30 days of activities, and tasks from other devices. Otherwise, Windows 10 will only collect four days worth of activities.
On Task View, Timeline lists the activities from all your Microsoft accounts connected to your device. If you use multiple accounts, under Show activities from accounts section, you can decide which activities to show.
While disabling all accounts from showing activities will disable Timeline in Task View, unless you clear the Let Windows collect my activities from this PC and Let Windows sync my activities from this PC to the cloud options, Windows 10 will continue to collect and share your activities to your other devices.
You can learn even more about Timeline in this guide.
More Windows 10 resources
For more helpful articles, coverage, and answers to common questions about Windows 10, visit the following resources:
![]()
Add the best VR headset to your Microsoft Flight Simulator experience
Microsoft Flight Simulator is an impressive game on a standard 2D monitor, but have you experienced it within VR? Grab one of these headsets and take off.
![]()
The Dell XPS 15 is our choice for best 15-inch laptop
For a lot of people, a 15-inch laptop is a perfect size that offers enough screen for multitasking, and in a lot of cases, some extra performance from powerful hardware. We’ve rounded up the best of the best at this size.
![]()
Halo: MCC’s live service elements make it better, not worse
Halo: The Master Chief Collection is more popular than ever, but some fans don’t agree with the live service approach 343 Industries has taken with it. Here’s why those elements are, at the end of the day, great for the game and for Halo overall.
![]()
These are the best PC sticks when you’re on the move
Instant computer — just add a screen. That’s the general idea behind the ultra-portable PC, but it can be hard to know which one you want. Relax, we have you covered!


