How to use net user command in Windows 10,8,7

Many advanced users and administrators use Command Prompt to perform various actions. Speaking of which, today we’re going to explain how net user command works and what you can do with it on Windows 10.
What is net user command and how does it work?
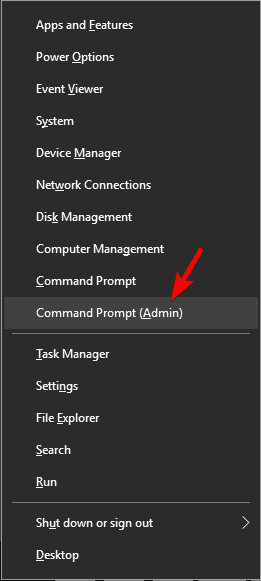
Net user command was first introduced in Windows Vista, and it has been a part of Windows ever since. The command allows you to create and modify user accounts on your PC. To use this command, you need to start Command Prompt as an administrator. The fastest way to do that is to press Windows Key + X to open Win + X menu and then choose Command Prompt (Admin) from the menu.
When you enter net user in Command Prompt, you’ll see a list of available accounts on your PC. 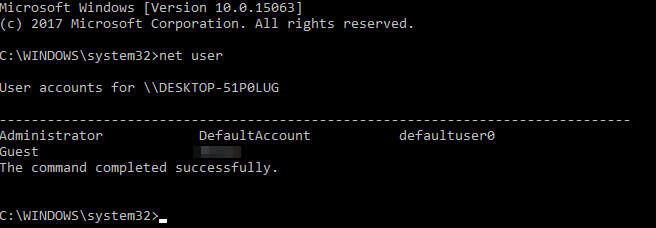
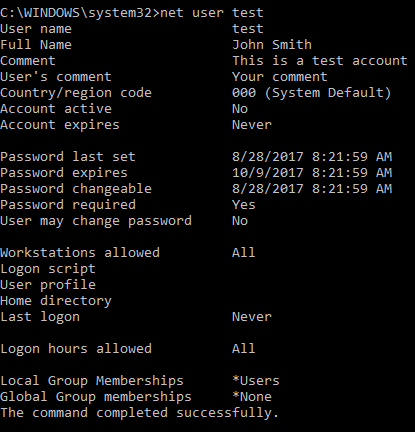
Of course, you can view detailed information regarding available user accounts on your PC. To do that, simply enter net user desired_username and press Enter. By using this command you can see the full name of the user account as well as additional information. You can see if the account is protected by a password and even the time when the password was set. In addition, you can see to which groups the selected user account belongs to.
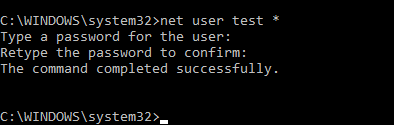
Using this command you can also set passwords for accounts on your PC. To do that, you just have to enter net user desired_username *. Now you’ll be prompted to enter the desired password and retype it to confirm the change.
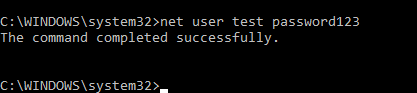
If you want to set an account password more quickly, you just need to enter net user desired_username yournewpassword
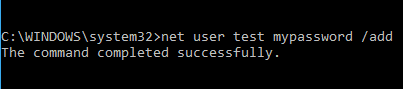
In addition to changing passwords, you can also easily add new accounts to your PC using the net user command. To do that, you just have to enter net user name_of_the_new_account /add.

If needed, you can add password to your account while creating it using the net user name_of_the_new_account mypassword /add command. Of course, you can also use the net user new_user_name * /add command to create a new user account with a password.
Using this command you can also set your account to active or inactive. Basically, if you set your account to inactive other users won’t be able to see it or access it without using net user command. To hide an account, you just have to enter net user account_name /active:no. After doing that, the selected account will become hidden and you won’t be able to access it.

Of course, you can always make account accessible by entering net user account_name /active:yes command. Net user also allows you to assign comments to user accounts. Thanks to this feature, you can add a 48-character comment to any account in order to differentiate it from others. If you’re a system administrator and you’re managing several accounts, this can be incredibly useful. To add a comment, just enter net user account_name /comment:”Comment message”.

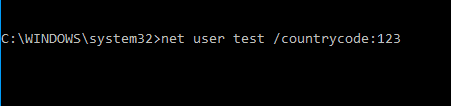
Using this command you can also set a country code for any account on your PC. This means you can change the language for Help and error messages on any user account. All users have 000 country code as default, but you can easily change it with this command. To change the country code of a specific user, enter net user user_name /countrycode:123 and press Enter. Of course, be sure to replace 123 with an actual country code.
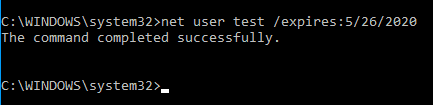
It’s also worth mentioning that you can set any account to expire by using this command. The base structure for this command is net user user_name /expires:MM/DD/YYYY, but you can also use DD/MM/YYYY format as well. It’s worth mentioning that you can use three types of values for months. You can use the full name of the month, a three letter abbreviation or just a number. As for year, you can use two-digit or four-digit values.
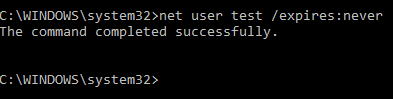
 Of course, you can also set your account to never expire by using the /expire:never parameter.
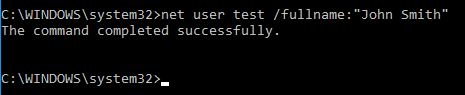
 You can also set a full name for any user on your PC. If you’re managing several users, this command will allow you to differentiate them using their real name. To assign a full name to a user, you just have to enter net user user_name /fullname:”User’s full name”.
Since many users tend to use passwords to protect their accounts, as a system administrator you can allow or prevent users from changing their account password. Thanks to this feature you’ll prevent users from changing their password without your knowledge. To prevent a specific user from changing its password you need to use net user user_name /passwordchg:no command.

If you want to allow users to change their password, you need to use net user user_name /passwordchg:yes command instead.
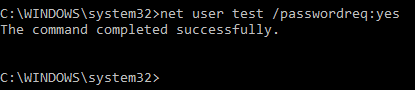
As we already mentioned, using a password is important if you want to protect your account, and with net user command you can force individual users to use a password. By doing that you’ll minimize the chance for unauthorized access. To force a user to use a password on his account, you need to use net user user_name /passwordreq:yes command. Of course, you can use net user user_name /passwordreq:no command to remove this requirement.
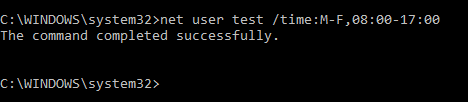
Net user command also allows you to specify the time period in which the user can use its account. This feature is especially useful if you want to set time restrictions for specific users. To restrict access for a specific user, you need to specify time frame for each day.
You can enter the full name of the day or use the abbreviation. As for the time, you can use 12-hour or 24-hour format. To set a time restriction for a user, you need to use net user user_name /time:M-F,08:00-17:00. Of course, you can use a different format so your command will look like net user user_name /time:M-F,8AM-5PM.
If needed, you can also set different time frame for different days by using net user user_name /time:M,4AM-5PM;T,1PM-3PM;W-F,8:00-17:00.

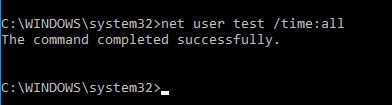
You can prevent users from permanently logging to their account on specific days simply by leaving the value blank. If you want to remove all time restrictions for a specific account, simply enter net user user_name /time:all. As you can see, this is a rather powerful command, but it only works with one hour increments and that’s its biggest flaw. Nevertheless, this command is extremely useful if you want to restrict computer usage.
Using this command you can also add a user comment for the account in order to differentiate it from others. To do that, use net user user_name /usercomment:”Your comment” command.

Net user command also allows you to set a home directory for your account by using /homedir parameter. You can also set a logon script for a user using the /scriptpath option. If needed, you can also specify profile path using /profilepath parameter.
Net user command is rather powerful and it allows you to manage user accounts on your PC. The command is relatively simple to use and we hope that our article helped you understand it a bit better.
Описание команды NET USER
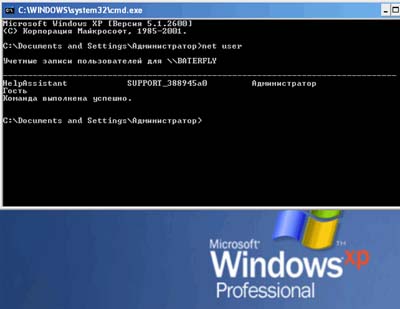
Команда NET USER предназначена для добавления, редактирования или просмотра учетных записей пользователей на компьютерах. При выполнении команды в командной строке без параметров отображается список учетных записей пользователей Windows, присутствующих на компьютере (эта команда также хорошо работает и в Windows 10). Информация об учетных записях пользователей хранится в базе данных Windows.
Синтаксис команды NET USER
net user [имя_пользователя [пароль | *] [параметры]] [/domain]
net user имя_пользователя <пароль | *>/add [параметры] [/domain]
net user имя_пользователя [/delete] [/domain], где
- имя_пользователя — Указывает имя учётной записи пользователя, которую можно добавить, удалить, отредактировать или просмотреть. Имя может иметь длину до 20 символов.
- пароль — Присваивает или изменяет пароль пользователя. Введите звездочку (*) для вывода приглашения на ввод пароля. При вводе с клавиатуры символы пароля не выводятся на экран.
- /domain — Выполняет операцию на контроллере основного для данного компьютера домена.
- параметры — Задает параметр командной строки для команды.
- net help команда — Отображение справки для указанной команды net.
- /delete — Удаление учетной записи пользователя.
Дополнительные параметы команды NET USER
- /active:
— Активирует или деактивирует учетную запись. Если учетная запись не активирована, пользователь не может получить доступ к серверу. По умолчанию учетная запись активирована. - /comment:»текст» — Позволяет добавить описание учетной записи пользователя (максимум 48 символов). Текст описания заключается в кавычки.
- /countrycode: nnn — Использует код страны, указанный для операционной системы, для реализации соответствующих языковых файлов при отображении пользовательской справки и сообщений об ошибках. Значение 0 соответствует коду страны, используемому по умолчанию.
- /expires: <дата | never>— Дата истечения срока действия учетной записи. Значение never соответствует неограниченному сроку действия. Дата указывается в формате мм/дд/гг или дд/мм/гг в зависимости от кода страны. Месяц может указываться цифрами, полностью или в сокращенном виде (тремя буквами). Год может указываться двумя ли четырьмя цифрами. Элементы даты разделяются слэшем (/) без пробелов.
- /fullname:» имя » — Полное имя пользователя (в отличии от имени учетной записи пользователя). Имя указывается в кавычках.
- /homedir: путь — Указывает путь к домашнему каталогу пользователя. Указанное место должно существовать.
- /passwordchg:
— Указывает, может ли пользователь изменять свой пароль (по умолчанию может). - /passwordreq:
— Указывает, должна ли учетная запись пользователя иметь пароль (по умолчанию должна). - /profilepath[:путь] — Указывает путь к профилю входа в систему пользователя.
- /scriptpath: путь — Путь к сценарию, используемому пользователем для входа в систему.
- /times: <время | all>— Время для входа в систему. Параметр время указывается в формате день[-день][,день[-день]],час [-час][,час [-час]], причем приращение равняется 1 часу. Название дней недели могут указываться полностью или в сокращенном виде. Часы могут указываться в 12- или 24-часовом представлении. Для 12-часового представления используются обозначения am, pm, a.m. или p.m. Значение all соответствует отсутствию ограничений на время входа в систему, а пустое значение обозначает полный запрет на вход в систему. Значения дней недели и времени разделяются запятой; несколько записей для значений дней недели и времени разделяются точкой с запятой.
- /usercomment:»текст» — Позволяет администратору добавить или изменить комментарий к учетной записи.
- /workstations: <имя_компьютера[. ] | *>— Позволяет указать до 8 компьютеров, с которых пользователь может войти в сеть. Если для параметра/workstations не указан список компьютеров или указано значение *, пользователь может войти в сеть с любого компьютера.
Примеры команды NET USER
- Для вывода списка всех пользователей данного компьютера служит команда: net user;
- Для вывода информации о пользователе «petr» служит следующая команда: net user petr;
- Для добавления учетной записи пользователя Petr с полным именем пользователя и правом на подключение с 8 до 17 часов с понедельника по пятницу используется следующая команда: net user petr /add /times:Пн-Пт,08:00-17:00/fullname:»Petr».
- Для удаления учетной записи необходимо ввести команду: net user petr /delete;
- Для отключения учетной записи необходимо ввести команду: net user petr /active:no.


