- Apache NetBeans for Mac
- Особенности NetBeans IDE for Mac
- Несложная установка
- Яблочные лайфхаки
- Редактор Sublime Text
- Установка Netbeans 7.0.1 в Mac OS X 10.7 Lion
- NetBeans IDE for Mac
- Review
- Free Download
- specifications
- A handy and user-friendly Java Integrated Development Environment (IDE) designed to help you quickly and effortlessly develop web applications
- What’s new in NetBeans IDE 8.2:
- User-oriented IDE with bundled code editing and revision control tools
- Support for multiple programming languages
- Multi-platform compatibility
- Powerful and comprehensive IDE for all purposes
- «Hello World!» for the NetBeans IDE
- A Checklist
- Creating Your First Application
- Create an IDE Project
- Add JDK 8 to the Platform List (if necessary)
- Add Code to the Generated Source File
- Compile the Source File into a .class File
- Run the Program
- Continuing the Tutorial with the NetBeans IDE
Apache NetBeans for Mac
Apache NetBeans 12.4 LATEST
Apache NetBeans for Mac 2021 full offline installer setup for Mac
A free, open-source Integrated Development Environment for software developers. You get all the tools you need to create professional desktop, enterprise, web, and mobile applications with the Java language, C/C++, and even dynamic languages such as PHP, JavaScript, Groovy, and Ruby. Apache NetBeans for Mac is easy to install and use straight out of the box and runs on many platforms including Windows, Linux, Mac OS X and Solaris.
Java Shell is a new tool included in JDK9 defined in JEP 222 to introduce REPL (read-eval-print-loop) capabilities to Java. The program provides integrated console-like UI for the Java Shell, leveraging the tool editor capabilities. The app can support the tool with the user project configuration, so the Java Shell is set up to work with project classes and libraries, providing autocompletion out of the box in the editor.
Also, the app greatly extends the capabilities of the commandline tool. Apache NetBeans for macOS can execute the shell as an agent, similar to a debugging agent, on the debugged or run application (currently only J2SE applications are supported, both Ant and Maven-based). Snippets written in JShell can be redefined and tested, even against a running code. When the prototype is ready, it can be saved to a regular Java source file and integrated with the project.
Features and Highlights
Java
JDK 8 support: tools and editor enhancements for working with Profiles, Lambdas, and Streams. Java SE Embedded support to deploy, run, debug or profile Java SE applications on an embedded device, such as Raspberry PI, directly from the Net Beans IDE. Java ME Embedded 8 support.
Java EE
New PrimeFaces code generators, to generate complete PrimeFaces skeleton CRUD applications with connection to databases. Tomcat 8.0 and TomEE support, including out-of-box JPA, JSF and JAXRS configuration and data sources. More flexibility for JPA hints, which can be disabled, enabled, and warning level changed.
Maven
New Maven graph layout switcher. Navigator shows POM goals and improved Maven performance when re-running Web applications. Improved Maven performance of «Apply Code Changes» while debugging.
JavaScript
AngularJS navigation via hyperlinking from view to controllers. Many enhancements for AngularJS in code completion between artifacts, such as code completion in the view to properties defined in controllers. Debugging of JavaScript code executed in Nashorn (JDK 8+) script engine is supported.
HTML5
Android 4.4 WebKit debugging supported for Cordova 3.3+. New Karma test runner support and New Grunt build support. Avatar.js is available in the Plugin Manager, via Tools | Plugins. After installation, you’re able to create Avatar.js projects.
PHP
Support for PHP 5.5. Enhancements for Twig, Latte, and Neon. Composer supported by New Project Wizard.
C/C++
New Breadcrumbs feature for navigation in the editor. New GDB Console to enable usage of command line GDB mode. New hints and code completions. Improved remote performance.
Platform
Enhanced flexibility in the Window System, such as split of editor via drag and drop, and a new API to customize editor tabs. New design of user interface for managing Project Groups. Files in folders can be sorted by extension.
Miscellaneous
Profiler enhancements: Profile on embedded platforms, show thread owning monitor for lock contention, and improved Threads view. Versioning enhancements: Support for Subversion 1.8 working copies, various enhancements to Git and Mercurial support. Task Schedule and other new features in Tasks window for bug tracking.
Источник
Особенности NetBeans IDE for Mac
Дата публикации: 2018-12-19

От автора: если бесплатная среда разработки с открытым кодом действительно хороша, значит, ее будут использовать владельцы техники Apple. Наверное, именно потому NetBeans for Mac так активно эксплуатируется разработчиками. Сегодня расскажем об особенностях использования этой IDE на базе «яблочной» операционной системы, а заодно и о некоторых лайфхаках, которые реализуются через эту ось.
Несложная установка
Когда говорим о специфике установки NetBeans на операционные системы Mac, то имеем дело с очень простым процессом. Взирая на всю консервативность «яблок» и их привязанность к пользовательскому опыту, можно сказать, что установка программного обеспечения кастомизированна лишь в той мере, которая необходима.

Как всегда, нужно программное обеспечение для запуска Java. Компания Apple с еще большим скептицизмом относится к Java, чем их первоначальный противник — Microsoft. Скорее всего, это вызвано конкуренцией в сфере осей для мобильных устройств (Android — Java, iOS — это Objective-C, C++ и детище Apple — Swift).
Но глубинные причины непринятия нам не выяснить в масштабах одной маленькой статьи. Поэтому лишь обозначим факт — необходима установка Java Development Kit. На самом деле, вам нужна только исполнительная среда. Но, если в планах программирование на Java, то выбор небольшой — нужна установка полного комплекта разработчика. Также для работы с платформой JavaFX нужно установить соответствующий набор разработчика.

JavaScript. Быстрый старт
Изучите основы JavaScript на практическом примере по созданию веб-приложения
Для MacOS «бобы» предоставляют чуть меньше вариантов для установки. Среди них:
Java SE. Здесь у вас полный набор инструментов для создания решений среднего бизнеса, разработки самой IDE и JavaFX;
Java EE. Решения для крупных бизнесов + все, что есть в Java SE. Здесь впридачу получаете два локальных веб-сервера;
C/C++. В пакете эти языки, а также Qt, Фортран и даже язык Ассемблера;
PHP. Все для языка, а также поддержка фреймворков Zend и Symfony.
Несмотря на доступ к выборочной установке, наибольшей популярностью пользуется вариант «Выбрать все». И это не удивительно: где еще можно получить столь универсальный продукт за низкую цену. Но, даже если вы выбрали, скажем, пакет для работы с PHP, а потом повзрослели и решили работать с языками C, то установить их поддержку не составит труда. Из самой среды можно попасть в магазин плагинов. Там же вы сможете добрать то, что потребовалось после установки. Кстати, магазин — просто привычный термин. В хранилище плагинов NetBeans не нужно платить за дополнения.
Теперь непосредственно к установке. Она очень проста, и выполнить ее не составит труда. Для начала, необходимо скачать файл установщика для вашей операционной системы. Ошибиться трудно, если речь идет о Mac OS. Скачивайте и сохраняйте. Далее открывайте исполнительный файл: аналог .exe в Windows имеет расширение .dmg. Затем начните установку пакета, который имеет расширение .mpkg. Таким образом, запустится мастер установки, где графический интерфейс лишь демонстрирует для вас процесс, а все самое сложное происходит невидимо для пользователя. Вы жмете «продолжить» почти всегда и время от времени меняете только те характеристики, которые считаете важными.
Яблочные лайфхаки
В этой IDE есть множество сокращений, которые можно использовать для оптимизации работы программиста. Вот только если в Windows они относительно интуитивны, то на компьютерах Apple нужно потратить немного времени, чтобы привыкнуть. Все дело в раскладке, которая добавляет еще одну функциональную клавишу — cmd. Так что, если пользоваться этими фишками, необходимо немного углубиться в документацию. Не стоит думать, что cmd — лишь видоизмененная Win. Хотя они похожи по расположению на клавиатуре, по функционалу cmd больше напоминает Ctrl.
В своей же документации создатели NetBeans демонстрируют несколько основных лайфхаков, которые есть в версии для Mac. Так что, не вздумайте упускать это: чем глубже изучите среду разработки, тем быстрее пойдет процесс создания ваших приложений.
JavaScript. Быстрый старт
Изучите основы JavaScript на практическом примере по созданию веб-приложения
Редактор Sublime Text
Посмотрите видео по работе с редактором Sublime Text
Источник
Установка Netbeans 7.0.1 в Mac OS X 10.7 Lion
Я совсем недавно стал обладателем MacBook Pro и пользователем Mac OS X.
Купил я этого «зверя» не забавы ради, а для того что бы работать. Ну и сразу же приступил к настройке системы: установка компиляторов, интерпретаторов, IDE, различных библиотек и расширений, а так же другого софта необходимого для разработки или упрощающего её.
После того как я обновил свою систему до «льва», благодаря вот этому посту абсолютно бесплатно, и поставил из app store, так же бесплатно, новый Xcode, установка приложений, из MacPort или DMG пакетов, пошла как по маслу. Через какое-то время дошла очередь до Netbeans 7.0.1. После установки продуктов от JetBrains, которые установились менее чем за 5 минут, с учетом закачки, Netbeans сказали, что не видят Java и отказались устанавливаться.
Решение для моего случая нашлось на официальном багтреккере:
# Необходимо выполнить две команды значение, которых скорее всего объяснять не надо
sudo mkdir -p /System/Library/Java/JavaVirtualMachines/
sudo ln -s /Library/Java/JavaVirtualMachines/1.6.0_26-b03-383.jdk /System/Library/Java/JavaVirtualMachines/1.6.0.jdk
После этого можно запускать инсталяцию и прокликав кнопочку «Next» несколько раз дожидаться появления кнопочки «Finish».
Решил опубликовать заметку про этот баг, так как Netbeans является популярным бесплатным IDE и такие проблемы могут возникнуть у других пользователей.
PS Вообще я надеюсь, что моя статья не будет ни кому полезна и у всех установка пройдет как по маслу. А Юлия Новожилова, разработчица, которой назначили задачу, в скором времени решит эту проблему и надобность в статье пропадет сама собой.
Источник
NetBeans IDE for Mac
Review
Free Download
specifications
A handy and user-friendly Java Integrated Development Environment (IDE) designed to help you quickly and effortlessly develop web applications
What’s new in NetBeans IDE 8.2:
- ECMAScript 6 and Experimental ECMAScript 7 Support
- HTML5/JavaScript Enhancements
- PHP 7 support
- Docker support
Read the full changelog
NetBeans IDE is a free and open source multi-platform integrated development environment (IDE) designed from the get-go to provide all the tools required by PHP, C and C++ developers to create well-rounded web, desktop and mobile apps using a stable and full-featured development suite.
User-oriented IDE with bundled code editing and revision control tools
Moreover, the NetBeans IDE suite comes with a user-oriented interface that features numerous modules and offers quick and easy access to source code editors and version control utilities such as Mercurial, Git and Subversion.
In addition, NetBeans IDE is capable of automatically match words and brackets, indent lines, highlight source code semantically and syntactically to make it a lot simpler to edit and manage your apps’ source code.
Support for multiple programming languages
The built-in editor offers extended support for numerous programming languages like PHP, Java, C/C++, JavaScript, XML, JSP and Javadoc. On top of that, you can effortlessly expand the editor’s support for other languages with the help of a wide selection of plug-ins.
What’s more, thanks to the NetBeans editor, you can easily design graphical user interfaces for Java ME, Java SE and Java EE applications using a visual based interface that makes it a cinch to put together a GUI by simply dragging the composing elements from the built-in component palette.
Multi-platform compatibility
As an added benefit, NetBeans IDE can be used on any operating system that comes with support for the Java runtime (i.e. Mac OS X, Windows, Linux).
NetBeans IDE also includes a feature packed static analysis toolkit that can help you to rapidly and easily identify and fix common problems in your projects.
Powerful and comprehensive IDE for all purposes
Taking it all in consideration, NetBeans IDE is the tool to go for if you need a free and cross-platform development suite, with extensible support for a vast amount of programming languages and the capability to help you build and deploy applications for a large selection of platforms.
Источник
«Hello World!» for the NetBeans IDE
It’s time to write your first application! These detailed instructions are for users of the NetBeans IDE. The NetBeans IDE runs on the Java platform, which means that you can use it with any operating system for which there is a JDK available. These operating systems include Microsoft Windows, Solaris OS, Linux, and Mac OS X.
A Checklist 

To write your first program, you’ll need:
The Java SE Development Kit (JDK 7 has been selected in this example)
The NetBeans IDE
Creating Your First Application
Your first application, HelloWorldApp , will simply display the greeting «Hello World!» To create this program, you will:
Create an IDE project
When you create an IDE project, you create an environment in which to build and run your applications. Using IDE projects eliminates configuration issues normally associated with developing on the command line. You can build or run your application by choosing a single menu item within the IDE.
Add code to the generated source file
A source file contains code, written in the Java programming language, that you and other programmers can understand. As part of creating an IDE project, a skeleton source file will be automatically generated. You will then modify the source file to add the «Hello World!» message.
Compile the source file into a .class file
The IDE invokes the Java programming language compiler (javac) , which takes your source file and translates its text into instructions that the Java virtual machine can understand. The instructions contained within this file are known as bytecodes.
Run the program
The IDE invokes the Java application launcher tool ( java ), which uses the Java virtual machine to run your application.
Create an IDE Project
To create an IDE project:
Launch the NetBeans IDE.
On Microsoft Windows systems, you can use the NetBeans IDE item in the Start menu.
On Solaris OS and Linux systems, you execute the IDE launcher script by navigating to the IDE’s bin directory and typing ./netbeans.
On Mac OS X systems, click the NetBeans IDE application icon.
In the NetBeans IDE, choose File | New Project. .
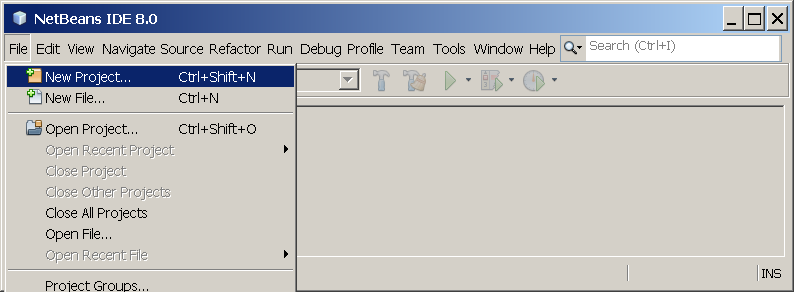
NetBeans IDE with the File | New Project menu item selected.
In the New Project wizard, expand the Java category and select Java Application as shown in the following figure:
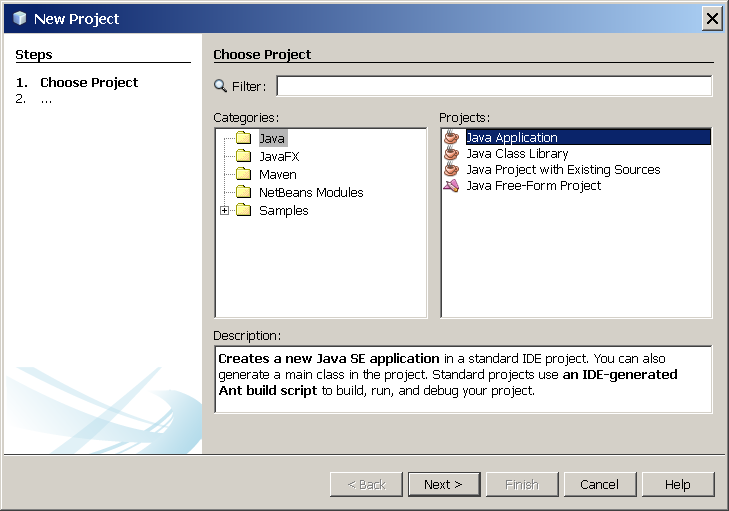
NetBeans IDE, New Project wizard, Choose Project page.
In the Name and Location page of the wizard, do the following (as shown in the figure below):
In the Project Name field, type Hello World App .
In the Create Main Class field, type helloworldapp.HelloWorldApp .
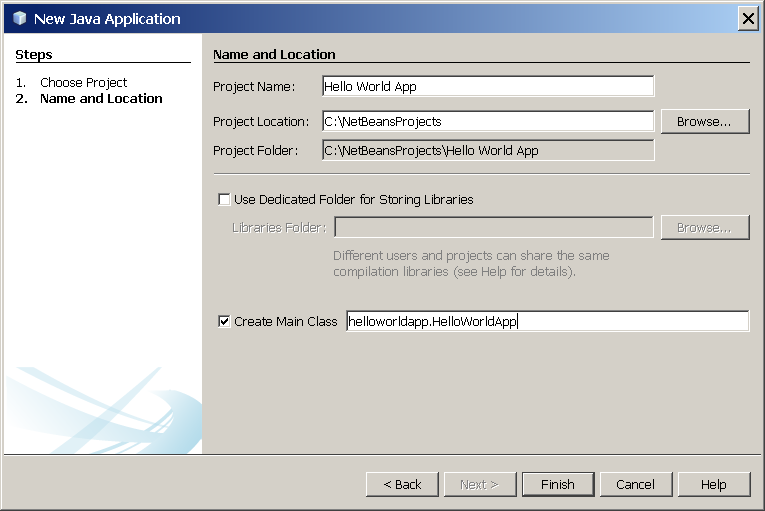
NetBeans IDE, New Project wizard, Name and Location page.
The project is created and opened in the IDE. You should see the following components:
The Projects window, which contains a tree view of the components of the project, including source files, libraries that your code depends on, and so on.
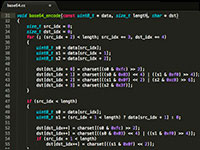
The Source Editor window with a file called HelloWorldApp.java open.
The Navigator window, which you can use to quickly navigate between elements within the selected class.
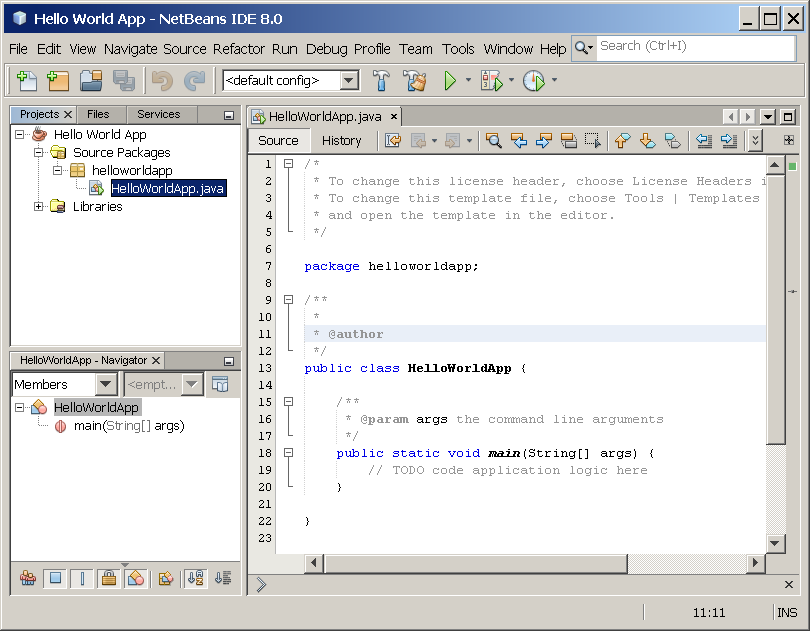
NetBeans IDE with the HelloWorldApp project open.
Add JDK 8 to the Platform List (if necessary)
It may be necessary to add JDK 8 to the IDE’s list of available platforms. To do this, choose Tools | Java Platforms as shown in the following figure:
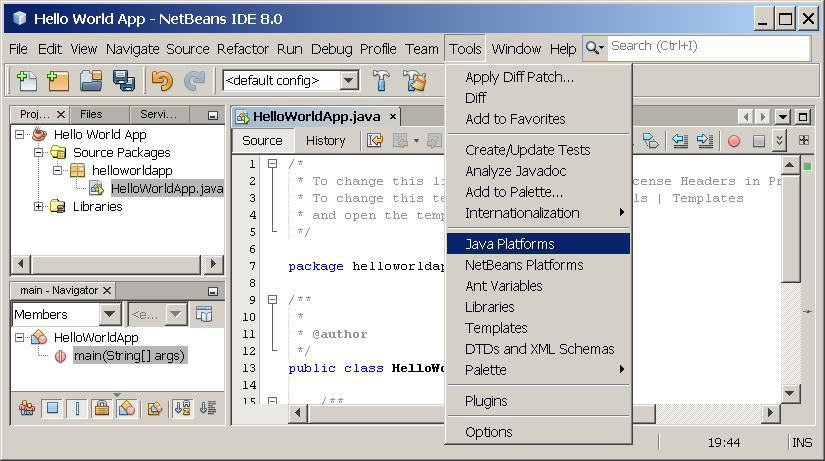
Selecting the Java Platform Manager from the Tools Menu
If you don’t see JDK 8 (which might appear as 1.8 or 1.8.0) in the list of installed platforms, click Add Platform, navigate to your JDK 8 install directory, and click Finish. You should now see this newly added platform:

The Java Platform Manager
To set this JDK as the default for all projects, you can run the IDE with the —jdkhome switch on the command line, or by entering the path to the JDK in the netbeans_j2sdkhome property of your INSTALLATION_DIRECTORY/etc/netbeans.conf file.
To specify this JDK for the current project only, select Hello World App in the Projects pane, choose File | Project Properties (Hello World App), click Libraries, then select JDK 1.8 in the Java Platform pulldown menu. You should see a screen similar to the following:
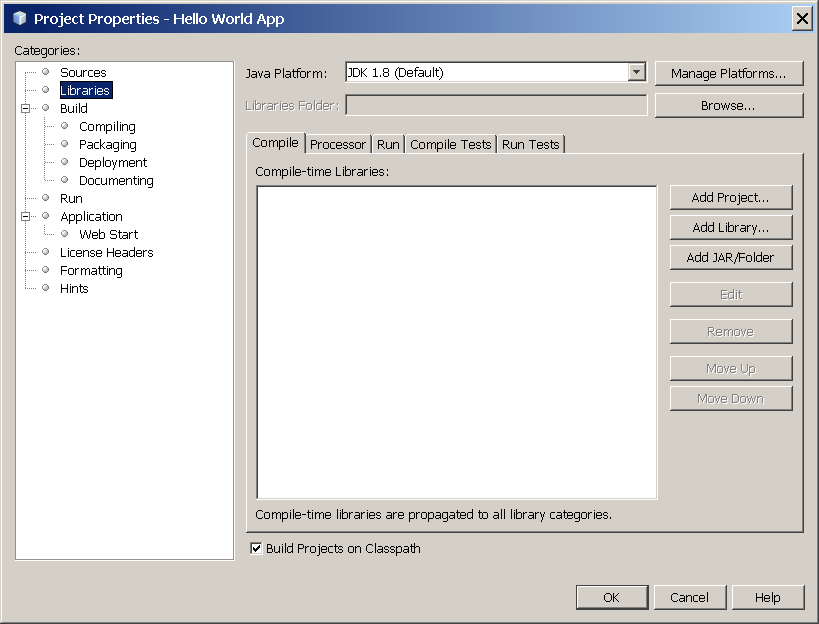
The IDE is now configured for JDK 8.
Add Code to the Generated Source File
When you created this project, you left the Create Main Class checkcbox selected in the New Project wizard. The IDE has therefore created a skeleton class for you. You can add the «Hello World!» message to the skeleton code by replacing the line:
Optionally, you can replace these four lines of generated code:
with these lines:
These four lines are a code comment and do not affect how the program runs. Later sections of this tutorial explain the use and format of code comments.
Be Careful When You Type 

Note: Type all code, commands, and file names exactly as shown. Both the compiler ( javac ) and launcher ( java ) are case-sensitive, so you must capitalize consistently.
HelloWorldApp is not the same as helloworldapp .
Save your changes by choosing File | Save.
The file should look something like the following:
Compile the Source File into a .class File
To compile your source file, choose Run | Build Project (Hello World App) from the IDE’s main menu.
The Output window opens and displays output similar to what you see in the following figure:
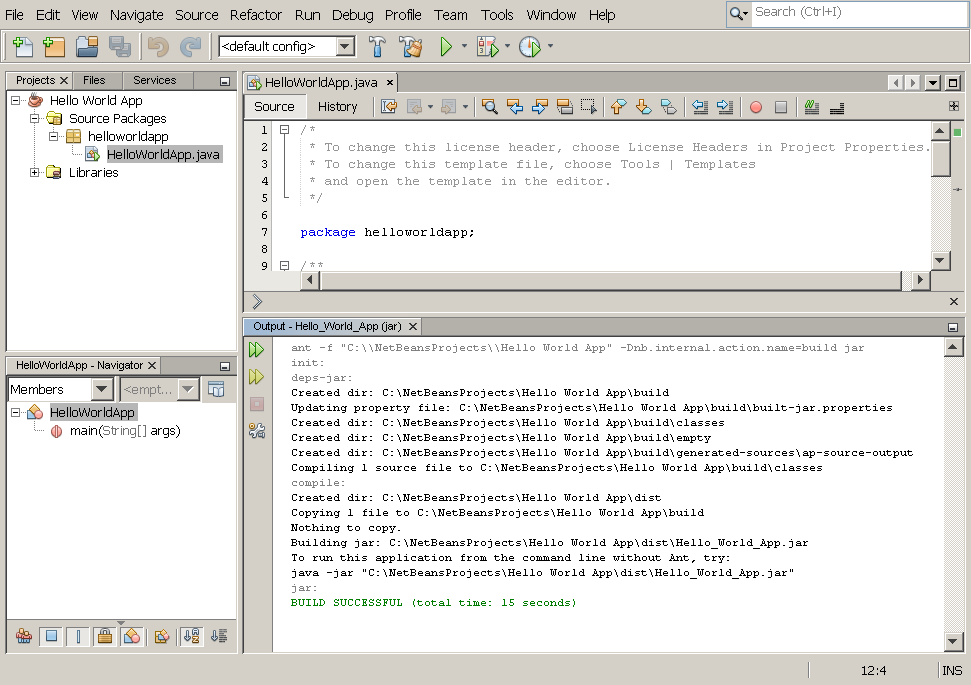
Output window showing results of building the HelloWorld project.
If the build output concludes with the statement BUILD SUCCESSFUL , congratulations! You have successfully compiled your program!
If the build output concludes with the statement BUILD FAILED , you probably have a syntax error in your code. Errors are reported in the Output window as hyperlinked text. You double-click such a hyperlink to navigate to the source of an error. You can then fix the error and once again choose Run | Build Project.
When you build the project, the bytecode file HelloWorldApp.class is generated. You can see where the new file is generated by opening the Files window and expanding the Hello World App/build/classes/helloworldapp node as shown in the following figure.

Files window, showing the generated .class file.
Now that you have built the project, you can run your program.
Run the Program
From the IDE’s menu bar, choose Run | Run Main Project.
The next figure shows what you should now see.
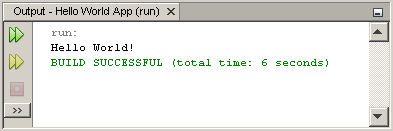
The program prints «Hello World!» to the Output window (along with other output from the build script).
Congratulations! Your program works!
Continuing the Tutorial with the NetBeans IDE
The next few pages of the tutorial will explain the code in this simple application. After that, the lessons go deeper into core language features and provide many more examples. Although the rest of the tutorial does not give specific instructions about using the NetBeans IDE, you can easily use the IDE to write and run the sample code. The following are some tips on using the IDE and explanations of some IDE behavior that you are likely to see:
Once you have created a project in the IDE, you can add files to the project using the New File wizard. Choose File | New File, and then select a template in the wizard, such as the Empty Java File template.
You can compile and run an individual file (as opposed to a whole project) using the IDE’s Compile File (F9) and Run File (Shift-F6) commands. If you use the Run Main Project command, the IDE will run the file that the IDE associates as the main class of the main project. Therefore, if you create an additional class in your HelloWorldApp project and then try to run that file with the Run Main Project command, the IDE will run the HelloWorldApp file instead.
You might want to create separate IDE projects for sample applications that include more than one source file.
As you are typing in the IDE, a code completion box might periodically appear. You can either ignore the code completion box and keep typing, or you can select one of the suggested expressions. If you would prefer not to have the code completion box automatically appear, you can turn off the feature. Choose Tools | Options | Editor, click the Code Completion tab and clear the Auto Popup Completion Window check box.
If you want to rename the node for a source file in the Projects window, choose Refactor from IDE’s main menu. The IDE prompts you with the Rename dialog box to lead you through the options of renaming the class and the updating of code that refers to that class. Make the changes and click Refactor to apply the changes. This sequence of clicks might seem unnecessary if you have just a single class in your project, but it is very useful when your changes affect other parts of your code in larger projects.
For a more thorough guide to the features of the NetBeans IDE, see the NetBeans Documentation page.
Источник


