Mikrotik Netinstall инструкция
Программа MikrоTik Netinstall — это спасательный круг для владельцев загубленных роутеров. Если после неумелых действий ваш маршрутизатор Микротик превратился в «кирпич», не спешите выбрасывать его на помойку, воспользуйтесь восстановлением прошивки с помощью утилиты Netinstall. Ниже я опишу подробную инструкцию как это сделать.
Нужно разобраться с MikroTik, но не определились с чего начать? В курсе «Настройка оборудования MikroTik» все по порядку. Подойдет и для начала работы с этим оборудованием, и для того, чтобы систематизировать знания. Это видеокурс из 162 уроков и 45 лабораторных работ, построен на официальной программе MTCNA. Проходить можно, когда удобно и пересматривать по необходимости – материалы курса выдаются бессрочно. Также есть 30 дней на личные консультации с автором. На пробу выдают 25 уроков бесплатно, заказать их можно на странице курса.
Подготовка программы
- На время прошивки роутера лучше отключить брандмауэр и антивирус
- Назначьте сетевой карте своего компьютера ip 192.168.88.2
- Скачайте Netinstall c официального сайте организации https://mikrotik.com/download. И распакуйте скаченный архив к себе на компьютер.
- Cкачайте прошивку для роутера, скачать прошивку можно также с официального сайта по выше указанной ссылке, и поместите его в ту же папку в которую был распакован архив netinstall
т.е в папке у вас должно лежать минимум три файла как показано на рисунке.

Восстановление RouterBoard
1.Вашим следующим шагом будет подключении сетевого кабеля в первый порт маршрутизатора (за исключением некоторых моделей). Роутер должен быть выключенным.
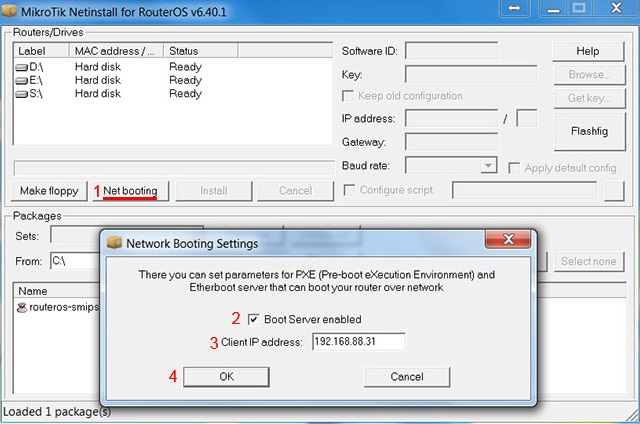
2. Запустите Netinstall, в рабочем столе компьютера откроется программа, и в её нижнем окошке высветится прошивка роутера, Нажмите кнопку «Net booting». Включите Boot server(Отметьте галочкой), в поле Client IP address введите адрес из той же сети что и компьютер, но отличный от него, например 192.168.88.31.
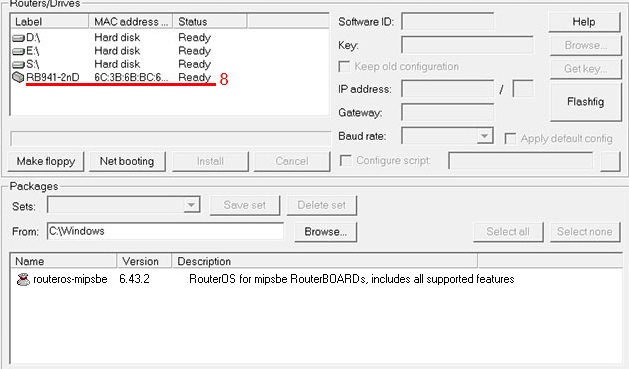
3. Зажмите любым удобным способом reset, а потом включите устройство и секунд через 15 примерно reset отпустить. Эти действия нужны для того, чтобы программа обнаружила маршрутизатор. После сигнала (пищание) устройство появится в окне Netinstall.
Идём дальше. Отмечаем какие должны быть настройки после восстановления:
- Для собственного скрипта, то есть внесения личных настроек – configure script;
- Настройки по умолчанию – apply default configuration;
- Для восстановления уже установленных настроек – keep old configuration.
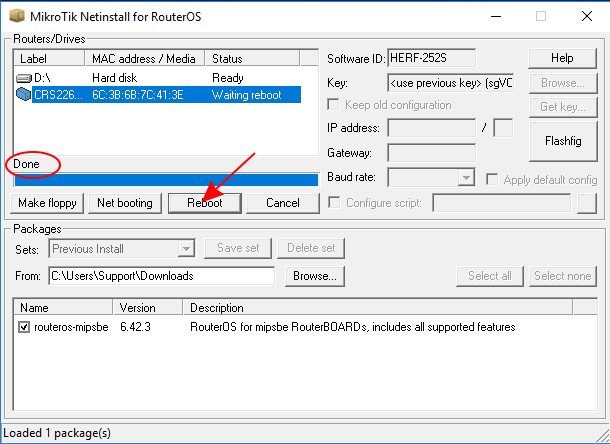
Не забудьте отметить сам роутер в верхней части окошка и прошивку в нижней! Нажимаем кнопку Install. Если все конфигурации внесены успешно ранее высвечивавшийся Install трансформируется в Reboot. Статус роутера «waiting reboot» после перезагрузки будет «ОК». Завершите настройку нажатием на «installation finished successfully».
Язык оригинал в приложении – английский. Ниже в таблице представлено значение опций.
| Название опции на английском языке | Что выполняет |
| Routers, drivers | Здесь отображаются обнаруженные маршрутизаторы Mikrotik |
| Make floppy | Создает загрузочную дискету |
| Net Booting | Включает загрузку РХЕ сеть |
| Install/Cancel | Начало/Отмена установки |
| Soft ID | Id выбранного маршрутизатора, используется для приобретения ключа |
| Key/Browse | Сюда вводится купленный ключ |
| Get Key | получить ключ из аккаунта на микро тик |
| Flashfig | Запуск Flushing подробнее можно прочитать здесь https://wiki.mikrotik.com/wiki/Manual:Flashfig |
| IP address/Netmask | Ip адрес и маска с которыми будет настроен перепрошитый роутер |
| Gatewey | Шлюз для предварительной настройки |
| Baud rate | Скорость передачи данных для com порта роутера для предварительной настройки |
Настройка с COM-портом
Активировать загрузку по сети вместо нажатия на reset можно также через COM порт. Для этого нужно перезагрузить RouterBOARD, подключенный к компьютеру через СОМ-порт. Пока будет идти перезапуск, на мониторе в режиме наблюдения появится консоль serial, на которой появится строка «press any key within 2 seconds to enterset up». У вас будет всего пару секунд что бы попасть в биос. Для этого нажмите любую клавишу на клавиатуре. В консоли появится следующее меню
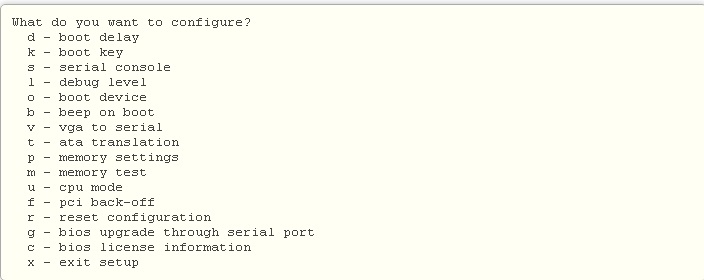
Нажимаем клавишу «о» (в английской раскладке),
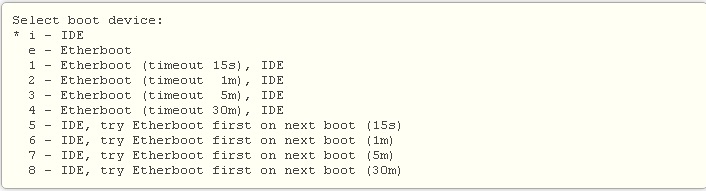
Для активации загрузки через сеть нажмите «е» после этого будет возврат в начальное меню, нажмите клавишу с буквой «х» (все та английская раскладка) для выхода. Итак, RouterBOARD начнет загрузку по сети. Далее на мониторе компьютера будет высвечиваться информация о попытке RouterBOARD загрузится через NetInstall. Программа запросит IP адрес. Нужно ввести именно статический адрес, например, 10.1.1.10/24, и можно приступить к самой настройке маршрутизатора. В интерфейсе на мониторе отобразиться МАС-адресс устройства. Он будет расположен в списке Routers/Drivers в окошке NetInstall. Далее кликните на Browse подождите пока появится окно со списком папок и выберите с npk –файлами, которые вы желаете установить на роутере, отмечайте их галочками. Подтвердите выбор- кликнув «ок». Пойдёт процесс загрузки, а после завершения кликните в появившемся окошке «install» -так вы активируете установку RoetrOS c помощью программы NetInstall. Если активации не произойдёт, перезапустите NetInstall, ничего заново вводить и трогать не нужно. После завершения загрузки нажмите на клавиатуре клавишу enter, или же в окошке программы кликните на Reboot. Перезагрузите маршрутизатор. Все, устройство готово к использованию.
Обучающий курс по настройке MikroTik
Нужно разобраться с MikroTik, но не определились с чего начать? В курсе «Настройка оборудования MikroTik» все по порядку. Подойдет и для начала работы с этим оборудованием, и для того, чтобы систематизировать знания. Это видеокурс из 162 уроков и 45 лабораторных работ, построен на официальной программе MTCNA. Проходить можно, когда удобно и пересматривать по необходимости – материалы курса выдаются бессрочно. Также есть 30 дней на личные консультации с автором. На пробу выдают 25 уроков бесплатно, заказать их можно на странице курса.
Если вы нашли ошибку, пожалуйста, выделите фрагмент текста и нажмите Ctrl+Enter.
Netinstall
Netinstall is a tool for installing and reinstalling MikroTik devices running RouterOS. Always try using Netinstall if you suspect that your device is not working properly. The tool is available for Windows (with a graphical interface) and for Linux (as a command line tool).
In short, the Netinstall procedure goes like this: Connect your PC directly to the boot port (Usually Ether1, the port labeled BOOT or as otherwise indicated in the product manual) of the device you will be reinstalling. Turn on the device while holding the reset button until it shows up in the Netinstall tool.
Careful. Netinstall re-formats the system’s drive, all configuration and saved files will be lost. Netinstall does not erase the RouterOS license key, nor does it reset RouterBOOT related settings, for example, CPU frequency is not changed after reinstalling the device.
Instructions for Windows
- Download Netinstall from the downloads page. If you are not sure which version you need, then you can always select the version that is marked as Current (stable);
Download the RouterOS Main package from the downloads page;
You must choose a RouterOS version. You can always select the version that is marked as Current . You must also select the architecture (ARM, MIPS, SMIPS, TILE, etc. ), but if you are not sure, then you can download the RouterOS package for ALL architectures, Netinstall will choose the right architecture for you.
Disconnect your computer from WiFi, Ethernet, LTE, or any other type of connection! Netinstall will only work on one active interface on your computer, it is highly recommended that you disconnect any other network interfaces in order to be sure that Netinstall will select the right network interface.
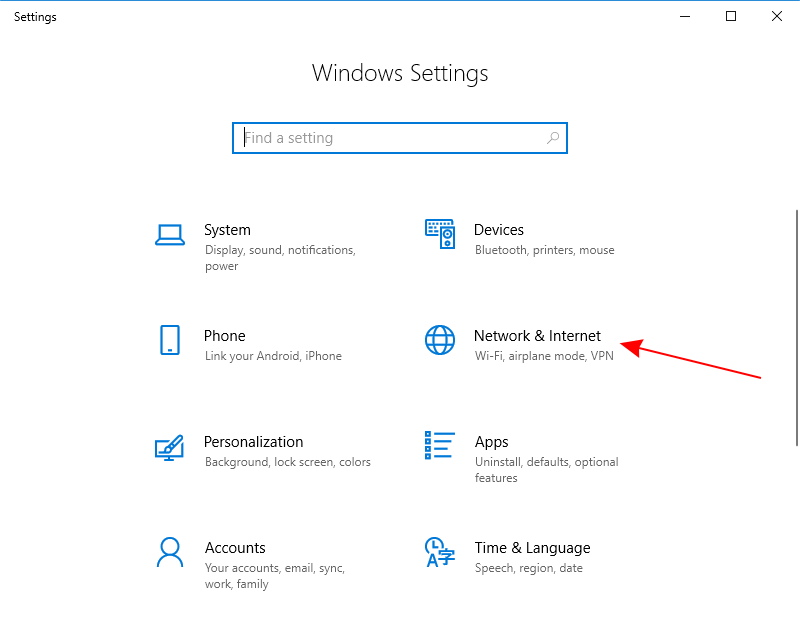
Configure a static IP address for your Ethernet interface, open Start, and select Settings :

Netinstall can run also on a local network, in such case you could skip setting a static IP address, but it is highly recommended that you set a static IP address if you are not familiar with Netinstall.
- Open Network & Internet and select Change adapter options

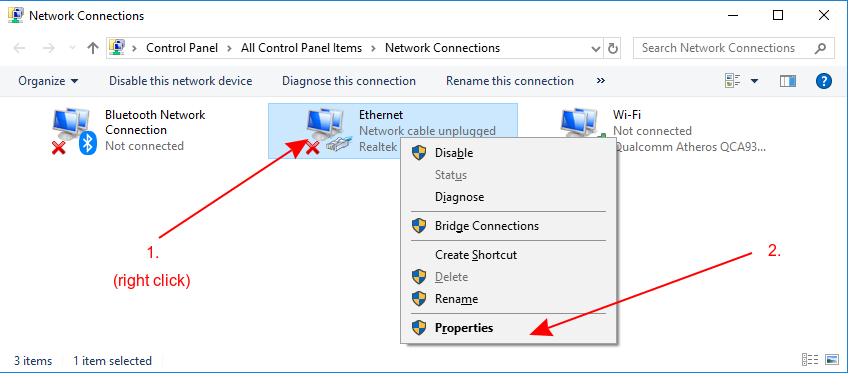
- Right-click on your Ethernet interface and select Properties
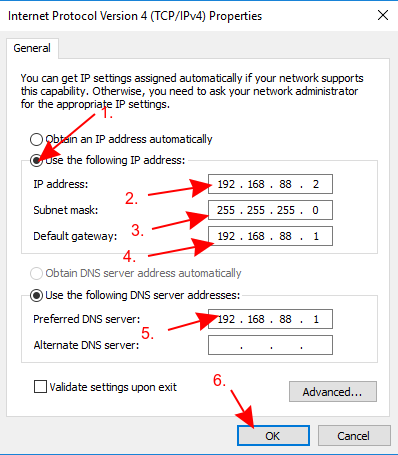
- Select Internet Protocol Version 4 (TCP/IPv4) and click Properties

- Check Use the following IP address and fill out the fields as shown in the image below
If you have a working router, then you can use it and skip the setting up a static IP part of this tutorial, but it requires you to know your LAN address since you will need to specify an unused IP address in your network for the network boot server. For this reason it is recommended to apply a static IP address and follow this guide precisely, if you are not sure how to get these parameters out of your network.
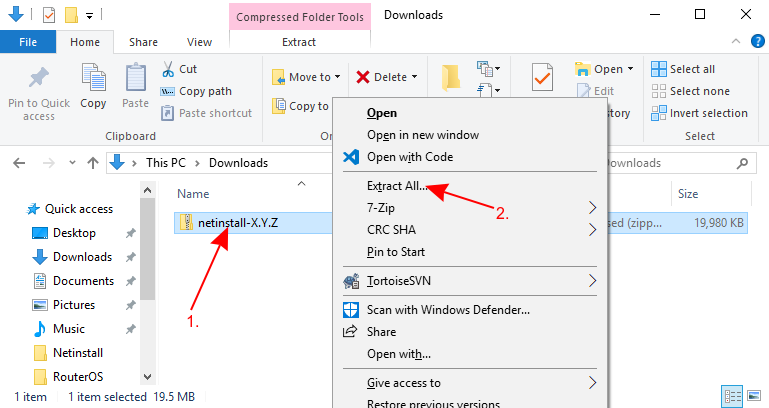
- Open your Downloads folder (or wherever you saved the downloaded files) and extract the Netinstall .zip file to a convenient place

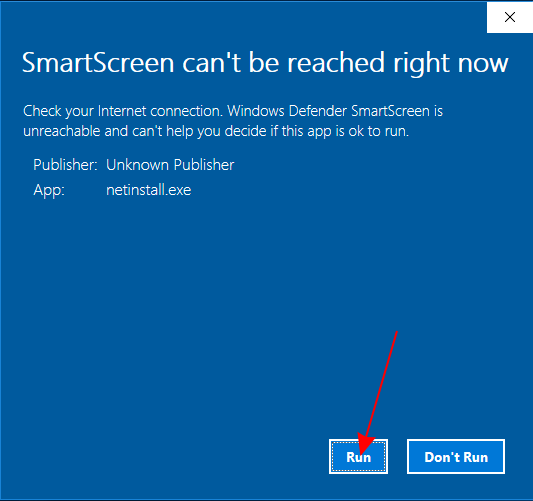
Run Netinstall.exe. If you followed the guide precisely, then you should not have any Internet connection on your computer, Windows 10 wants to verify all apps that it runs, but will not be able to do it since lack of the Internet connection, for this reason, a warning might pop up, you should click Run.
Netinstall requires administrator rights, there should be a window asking for permissions to run Netinstall, you must accept these permissions in order for Netinstall to work properly.
- Allow access for Netinstall in Public networks and configure Net booting settings and fill out the required fields as shown in the image below


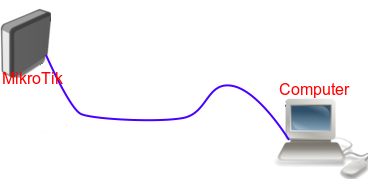
- Connect your device to your computer using an ethernet cable directly (without any other devices in-between), plug the Ethernet cable into your device’s Etherboot port.
- MikroTik devices are able to use Netinstall from their first port (Ether1), or from the port marked with «BOOT«.
Some computers have a network interface (especially USB Ethernet adapters) that tend to create an extra link flap, which is enough for Netinstall to fail to detect a device that is in Etherboot mode. In such a case you can use a switch between your device and your computer or a router in bridge mode to prevent this issue.
- Power up your device and put it into e therboot mode
There are multiple ways how to put your device into Etherboot mode. Make sure you read the Etherboot manual before trying to put the device into this mode. Methods vary between different MikroTik devices.
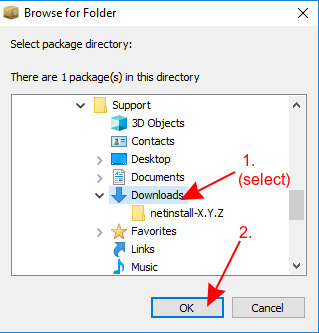
- Wait for the device to show up in Netinstall, select it and press Browse. Navigate to your Downloads folder (or wherever you saved your RouterOS packages) and press OK
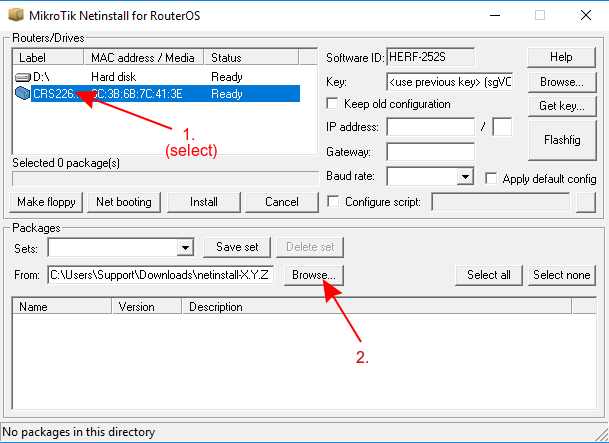
- Select your desired RouterOS version and press Install. Wait for the installation to finish and press «Reboot» (Devices without serial console have to be rebooted manually)
If you downloaded RouterOS packages for multiple architectures, then Netinstall will only show the appropriate architecture packages for your device after you have selected it. All unsupported packages will not show up in this window after you have selected a device.

If the installation does not start (progress bar is not moving or no status is shown), then you can try closing the Netinstall application and opening it up again or try to put the device into Etherboot mode again. If you are still unable to get Netinstall working, then you should try using it on a different computer since there might be an operating system’s issue that is preventing Netinstall from working properly.
- You are done! Remove the device from power, remove the Ethernet cable, place the device back in your network and your device should be running properly now!
After using Netinstall the device will be reset to defaults (unless you specified not to apply default configuration). Some devices are not accessible through ether1 port with the default configuration for security reasons. Read more about Default configuration .
When using the Configure script option, it is suggested to introduce a delay before configuration execution.
Instructions for Linux
The Linux version is a command line tool, which offers nearly the same parameters as the Windows counterpart.
Download the tool from our download page (links not literal):
The available parameters are as follows:
| Parameter | Meaning |
|---|---|
| -r | resets the configuration upon reinstallation procedure, optional |
| -k keyfile | provides the device with a license key (key file in .KEY format), optional |
| -s userscript | preconfigures the device with the provided configuration (text file in .RSC format), optional |
| uses a specific IP address that the Netinstall server will assign to the device, mandatory | |
| PACKAGE | specify a list of RouterOS.NPK format packages that Netinstall will try to install on the device, mandatory |
Etherboot
Etherboot mode is a special state for a MikroTik device that allows you to reinstall your device using Netinstall . There are several ways to put your device into Etherboot mode depending on the device you are using.
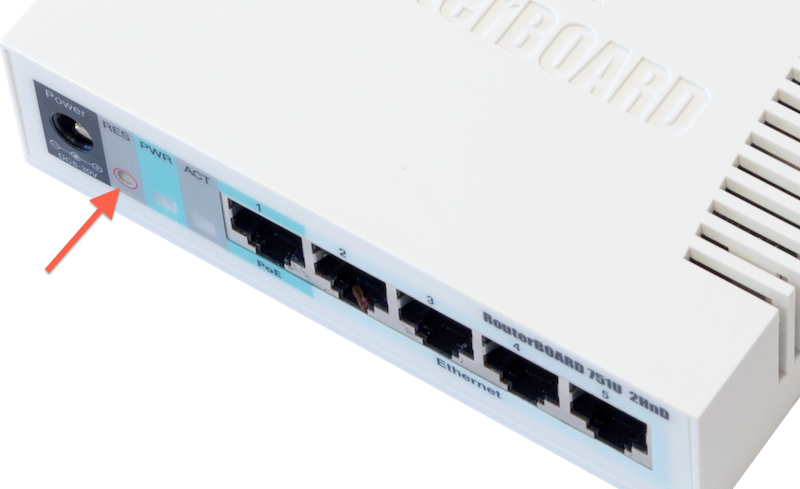
Reset button
The Reset can be found on all MikroTik devices, this button can be used to put the device into Etherboot mode. An easy way to put a device into Etherboot mode using the Reset button is by powering off the device, hold the Reset button, power on the device while holding the Reset button and keep holding it until the device shows up in your Netinstalll window.
If you have set up a Protected bootloader , then the reset button’s behavior is changed. Make sure you remember the settings you used to set up the Protected bootloader, otherwise you will not be able to use Eterboot mode and will not be able to reset your device.
RouterOS
If your device is able to boot up and you are able to log in, then you can easily put the device into Etherboot mode. To do so, just connect to your device and execute the following command:
After that either reboot the device or do a power cycle on the device. Next time the device will boot up, then it will first try going into Etherboot mode. Note that after the first boot up, the device will not try going into Etherboot mode and will boot directly of NAND or of the storage type the device is using.
Serial console
Some devices come with a serial console that can be used to put the device into Etherboot mode. To do so, make sure you configure your computer’s serial console. The required parameters for all MikroTik devices (except for RouterBOARD 230 series) are as following:
For RouterBOARD 230 series devices the parameters are as following:
Make sure you are using a proper null modem cable, you can find the proper pinout here. When the device is booting up, keep pressing CTRL+E on your keyboard until the device shows that it is trying bootp protocol:
At this point your device is in Etherboot mode, now the device should show up in your Netinstall window.


