- Find your computer’s name and network address on Mac
- Find your computer’s name
- Find your computer’s local hostname
- Find your computer’s network address
- Connect to the internet with your Mac
- Connect to a Wi-Fi network
- Connect using Personal Hotspot
- Connect using Ethernet
- Используйте сетевую утилиту в Mac OS X 2021
- Mac OS X Welcome Videos
- Поместите сетевую утилиту в LaunchPad или Dock
- Запустите сетевую утилиту с помощью Spotlight
- Откройте сетевую утилиту из системной информации
- Create a computer-to-computer network on Mac
- Create an ad hoc network
- Connect to an ad hoc network
- Enable legacy networks
- How to use network locations on your Mac
- How to add or remove a network location
- How to switch between network locations
- How to change the network service order
- How to prevent a network service from being used
Find your computer’s name and network address on Mac
If other people want to locate your Mac on the network, they need to know your computer’s name or network address. Your Mac has several identifiers that people may look for on the network: computer name, local hostname (or local network name) and network address.
Find your computer’s name
If you’re sharing your computer’s screen or files, other users on your network can find your Mac by looking for its computer name.
On your Mac, choose Apple menu

> System Preferences, then click Sharing.
The computer name for your Mac appears at the top of Sharing preferences.
Find your computer’s local hostname
Your computer’s local hostname, or local network name, is displayed on your local network so others on the network can connect to your Mac. It also identifies your Mac to Bonjour-compatible services.
On your Mac, choose Apple menu
> System Preferences, then click Sharing.
Your computer’s local hostname is displayed beneath the computer’s name at the top of Sharing preferences.
The local network name is your computer’s name with .local added, and any spaces are replaced with hyphens (-). For example, if your computer’s name is My Computer, your local network name is My-Computer.local. Local network names aren’t case sensitive, so my-computer.local is the same as My-Computer.local.
Find your computer’s network address
If you’re sharing your computer’s screen, allowing remote logins or management, or sharing files, other users may need to know your computer’s network address instead of its name to access these services.
On your Mac, choose Apple menu
> System Preferences, then click Sharing.
In the list on the left, select a service that is On.
The network address for the service is displayed on the right. For example:
If you select Screen Sharing, the network address looks similar to vnc://10.212.167.33 or vnc://name.example.com.
if you select File Sharing, the network address looks similar to smb://10.212.167.33 or smb://name.example.com.
If you select Remote Login, the network address looks similar to username@10.212.167.33 or username@name.example.com.
If you select Remote Management, the network address looks similar to 10.212.167.33 or name.example.com.
Your computer’s network address is provided by the Domain Name System (DNS) server your computer uses. If you don’t use a DNS service, the network address is derived from your computer name.
Источник
Connect to the internet with your Mac
Learn how to use Wi-Fi, Personal Hotspot, and Ethernet to connect to the internet.
Connect to a Wi-Fi network
Click the Wi-Fi icon in the menu bar, then choose a network from the menu. Before you can join the network, you might be asked to enter the network’s password or agree to terms and conditions.
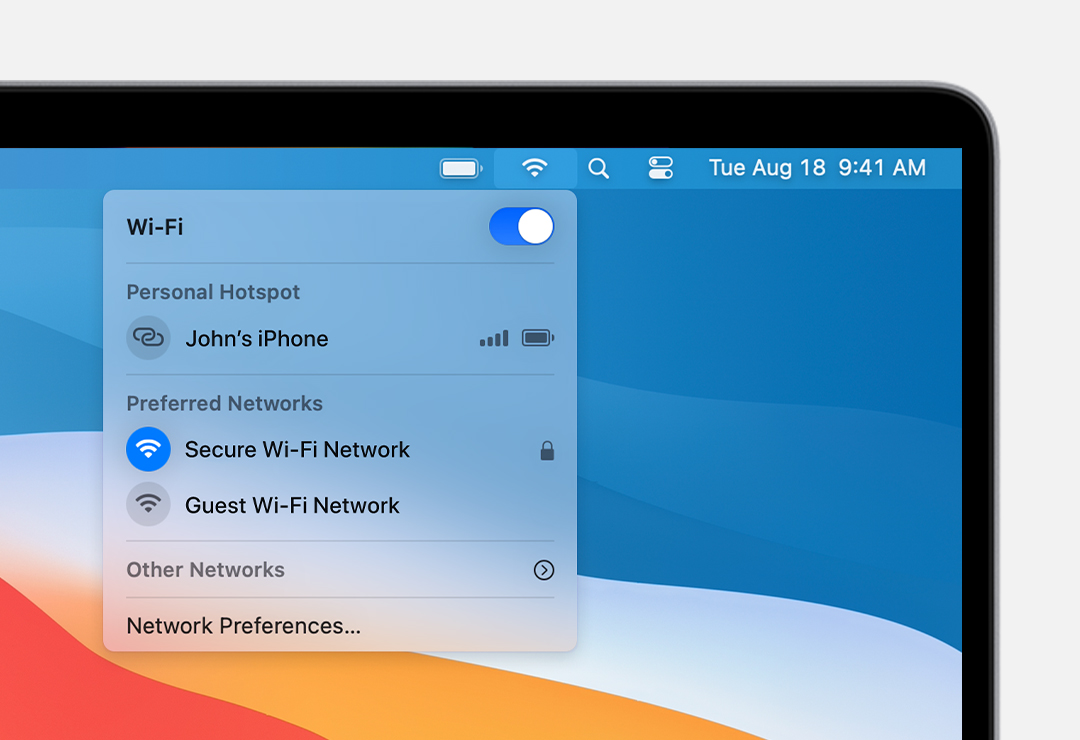
- If you don’t see the Wi-Fi icon icon in the menu bar, choose Apple menu > System Preferences, then click Network. Select Wi-Fi in the sidebar, then select ”Show Wi-Fi status in menu bar.”
- Lean what to do if your Mac doesn’t connect to the internet after joining the Wi-Fi network.
- To connect to a Wi-Fi network that you know is hidden, choose Other Networks (or Join Other Network) from the Wi-Fi menu , then choose Other. Enter the requested network name, security, and password information.
Connect using Personal Hotspot
With most carrier plans, you can share the cellular data connection of your iPhone or iPad (Wi-Fi + Cellular) with your Mac. Learn how to set up Personal Hotspot.
Connect using Ethernet
To use a wired connection to the internet, connect an Ethernet cable between your router or modem and the Ethernet port on your Mac. Some Mac models require an Ethernet adapter, such as the Belkin USB-C to Gigabit Ethernet Adapter or the Apple Thunderbolt to Gigabit Ethernet Adapter.
Information about products not manufactured by Apple, or independent websites not controlled or tested by Apple, is provided without recommendation or endorsement. Apple assumes no responsibility with regard to the selection, performance, or use of third-party websites or products. Apple makes no representations regarding third-party website accuracy or reliability. Contact the vendor for additional information.
Источник
Используйте сетевую утилиту в Mac OS X 2021
Mac OS X Welcome Videos

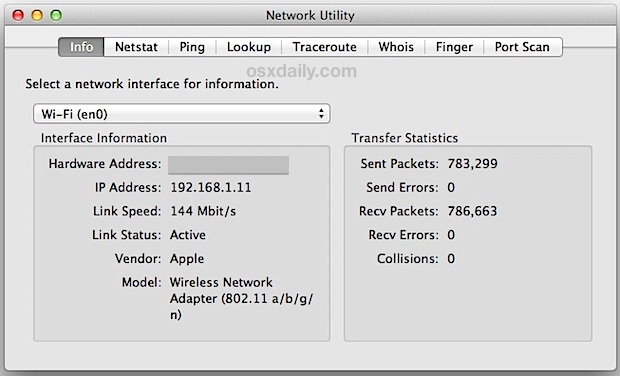
Network Utility — отличный инструмент, который был на Mac с самой первой версии OS X. Он предоставляет множество полезных сетевых инструментов и деталей, вкладка «Информация» содержит общую сетевую информацию для каждого уровня интерфейса, показывающую IP-адрес, MAC-адрес, скорость соединения и статистика передачи отправленных / полученных данных, и вы также будете иметь легкий графический интерфейс для доступа к другим инструментам командной строки, таким как netstat, ping, nslookup, трассировка маршрута, whois, finger и сканер портов.
Долгое время находясь в / Applications / Utilities /, Apple посчитала целесообразным переместить приложение Network Utility из своего давнего дома в новое место в системной папке, что затрудняет доступ к нему, если вы просматриваете файловую систему. Не волнуйтесь, все еще есть очень простые способы доступа к Network Utility от Mavericks и Yosemite, и это то, что мы рассмотрим.
Поместите сетевую утилиту в LaunchPad или Dock
Приложение Network Utility теперь находится по следующему пути, скрытому в системных папках OS X:
Вы можете перейти непосредственно к этой папке, нажав Ctrl + Shift + G, чтобы вызвать «Go To», а затем ввести путь.
Теперь, удерживая нажатой клавишу «Command» + «Option», перетащите приложение «Network Utility» в папку «Приложения», LaunchPad или Dock, чтобы создать псевдоним для быстрого доступа (пока вы находитесь там, вы можете отправить «Wireless Diagnostics» в LaunchPad. или Dock тоже, он получил фейслифтинг и остается отличной утилитой Wi-Fi, сканером, спотыкателем и приложением для оптимизации сигналов).
Запустите сетевую утилиту с помощью Spotlight
Если вы не хотите, чтобы псевдонимы сидели в папке «Приложения», и не хотите, чтобы приложение постоянно находилось в вашей док-станции, тогда самый простой способ запустить Network Utility напрямую — через Spotlight. Нажмите Ctrl + пробел, затем начните вводить «Network Utility» и нажмите «Return», когда приложение будет возвращено в результатах поиска.

Это мой предпочтительный метод, но я большой поклонник использования Spotlight в качестве средства запуска приложений в целом.
Откройте сетевую утилиту из системной информации
Приложение System Information, которое чаще всего можно найти в меню Apple> «Об этом Mac»> «Дополнительная информация», также может использоваться для запуска Network Utility:
- Запустите Системную информацию и откройте меню «Окно», чтобы найти «Сетевую утилиту».

Это запускает непосредственно в Network Utility, но, поскольку вам нужно открыть другое приложение, это, вероятно, не самый быстрый метод по сравнению с Spotlight, размещение его в Dock или использование псевдонима.
Спасибо @thegraphicmac за вдохновение. У вас есть идеи или советы, которые вы хотели бы, чтобы мы изучили? Дайте нам знать в Twitter, Facebook, Google+ или по электронной почте!
Источник
Create a computer-to-computer network on Mac
If you want to set up a temporary, ad hoc Wi-Fi connection between your Mac and another device, you can create your own network using the Wi-Fi menu.
Create an ad hoc network
Click the Wi-Fi status icon  in the menu bar, then choose Create Network.
Enter a name and choose a channel for your network.
When you create a computer-to-computer network, the Wi-Fi menu icon changes to show a computer  . The new network is available in the Device section of the Wi-Fi menu.
Connect to an ad hoc network
After you create an ad hoc network, you can connect to it from another Mac.
Click the Wi-Fi status icon in the menu bar, then select the ad hoc network.
Enable legacy networks
On your Mac, choose Apple menu

> System Preferences, then click Network.
In the service list on the left, select Wi-Fi, then click Advanced.
Select the “Show legacy networks and options” checkbox.
Источник
How to use network locations on your Mac
Use the Location feature of Network preferences to quickly switch between different sets of network settings.
The ability to switch between different sets of network settings (locations) can be useful in circumstances such as these:
- You use the same type of network (such as Ethernet) at work and at home, but the settings you use at work don’t allow your Mac to automatically connect to the same type of network at home.
- Your Mac connects to more than one type of network service (such as both Wi-Fi and Ethernet) at work and at home, but at work you want your Mac to try connecting to the Ethernet network first, and at home you want your Mac to try connecting to the Wi-Fi network first. In other words, you want to set a different service order for each location.
- Your Mac isn’t connecting to your network and you want to quickly reset your network settings for testing purposes, without losing your current network settings.

How to add or remove a network location
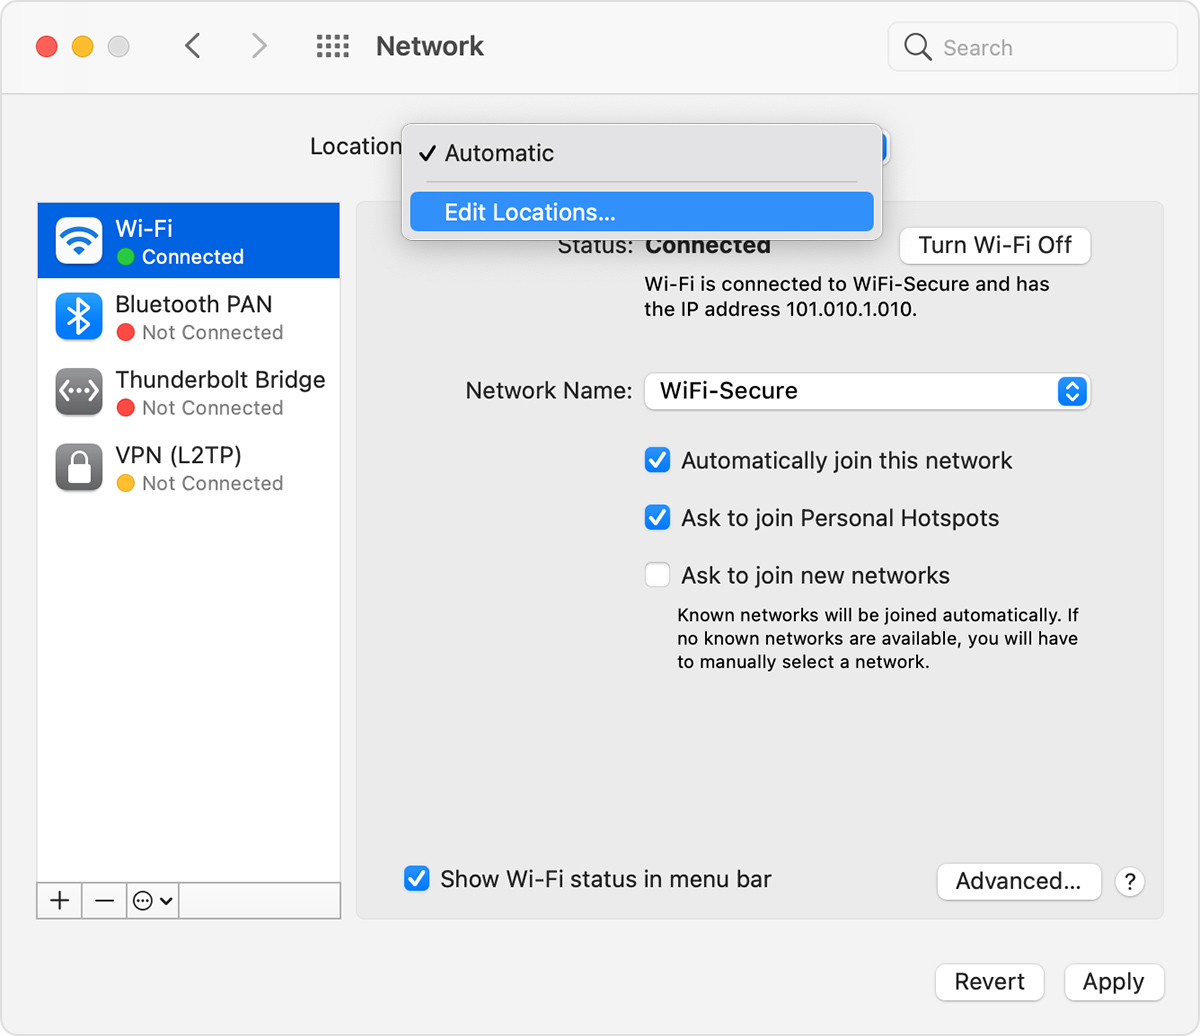
- Choose Apple menu > System Preferences, then click Network.
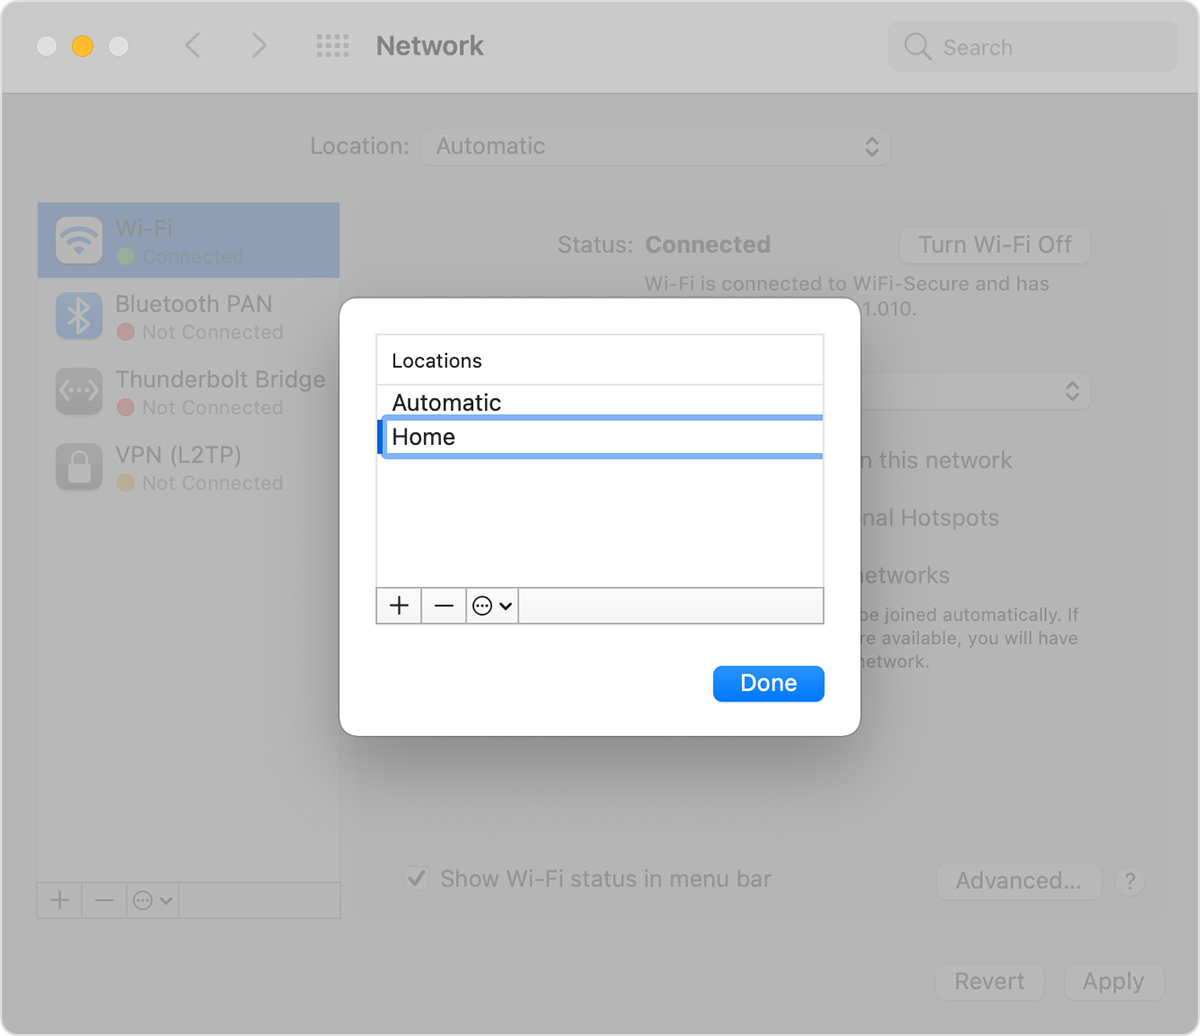
- The Location pop-up menu shows the name of your currently selected set of network settings. The default location is named Automatic. Choose Edit Locations from this menu.

- Click the add (+) button below the list of locations, then type a name for the new location, such as Work or Home or Mobile. (To remove a location, use the remove (–) button below the list.)
- Click Done. The Location menu should now show the name of your new location. Any changes you now make to your Wi-Fi, Ethernet, or other network settings will be saved to this location when you click Apply. The network settings in your previous location remain as you left them, so you can use the Location menu to switch back at any time.
- Click Apply to save your settings and complete the switch from the previous location to the new one. Your Mac then automatically tries to determine the correct settings for each type of network. If you need to change the settings manually, remember to click Apply again after making your changes.
How to switch between network locations
If you have more than one location, you can use either of these methods to switch between them:
- Use the Location pop-up menu in Network preferences, as described above. Remember to click Apply after choosing a location.
- Or choose Apple menu > Location from the menu bar, then choose your location from the submenu.
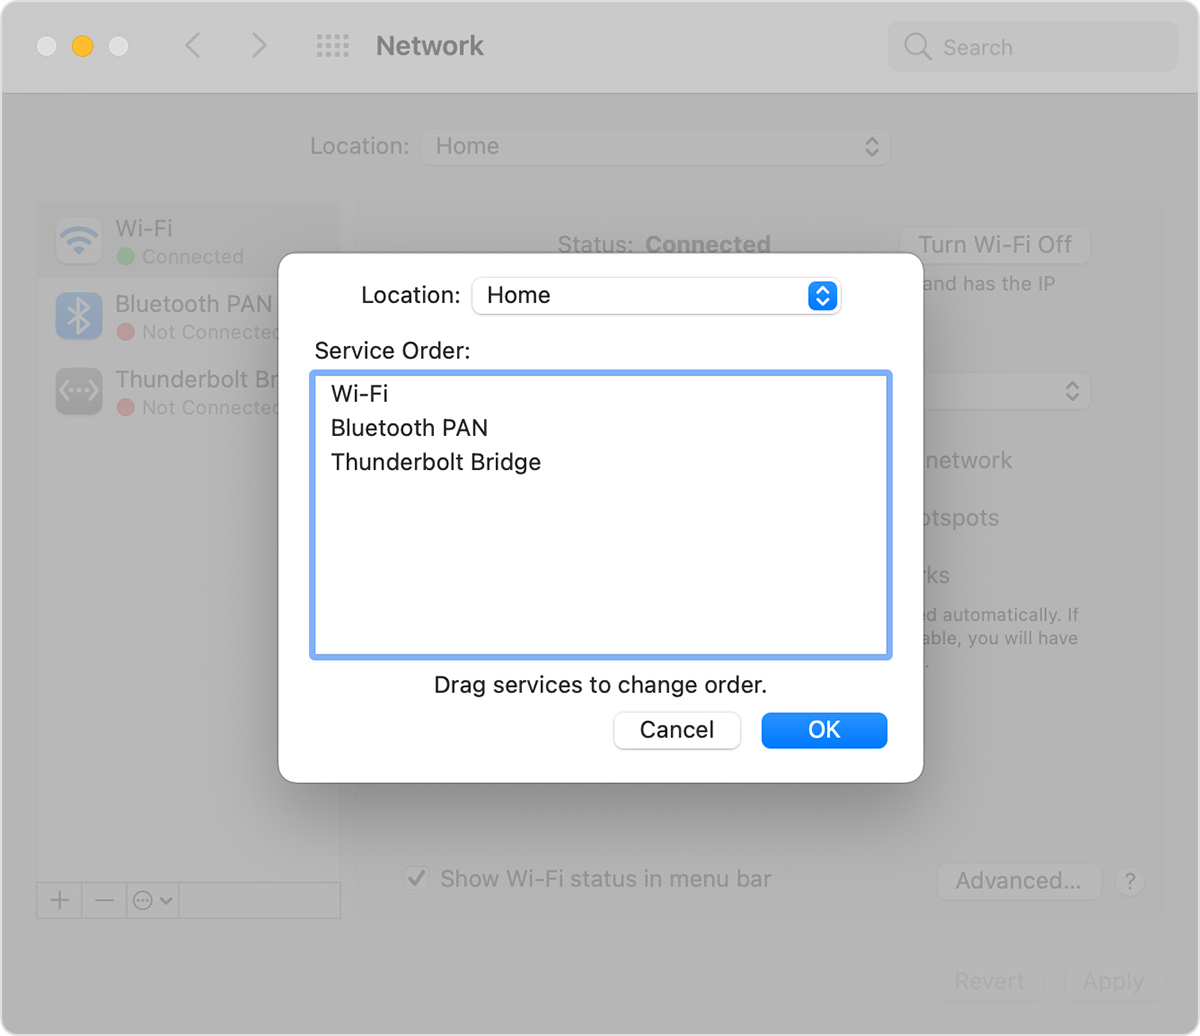
How to change the network service order
If you’re using network locations because you want each location to prefer a different network service (such as Wi-Fi or Ethernet) when connecting, follow these steps to change the service order (also known as port priority) in each location.
- Choose Apple menu > System Preferences, then click Network.
- Use the Location pop-up menu to choose the location you want to modify.
- Click the More Options icon or gear icon below the list of services, then choose Set Service Order.
- Drag services within the list to change their order. Your Mac will try to connect to the service at the top of the list first, then continue in descending order until a connection is successful.
Virtual private network (VPN) connections can’t be reordered, because they always take priority over other connections. - Click OK, then click Apply.

How to prevent a network service from being used
By default, the location named Automatic makes all available network services (also known as ports or network interfaces) active, whether or not they are being used to connect to a network. Your Mac automatically searches these services for a network or internet connection.
For example, you might use a Wi-Fi network at home but an Ethernet network at work. Your Mac automatically detects which of these network services to use when it connects.
If you want to make sure that your Mac doesn’t use a particular network service, such as Wi-Fi, you can make that service inactive in any of your network locations:
- Choose Apple menu > System Preferences, then click Network.
- Use the Location pop-up menu to choose the location you want to modify.
- Click the More Options icon or gear icon below of the list of services, then choose Make Service Inactive.
- Click Apply.
Источник


