- 3 ways to configure a network interface in Linux
- More Linux resources
- At installation time
- 13 Linux Network Configuration and Troubleshooting Commands
- 1. ifconfig
- Assigning IP Address and Gateway
- Enable or Disable Specific Interface
- Setting MTU Size
- Set Interface in Promiscuous mode
- 2. PING Command
- 3. TRACEROUTE Command
- 4. NETSTAT Command
- 5. DIG Command
- 6. NSLOOKUP Command
- 7. ROUTE Command
- 8. HOST Command
- 9. ARP Command
- 10. ETHTOOL Command
- 11. IWCONFIG Command
- 12. HOSTNAME Command
- 13. GUI tool system-config-network
- If You Appreciate What We Do Here On TecMint, You Should Consider:
- Настройка сети в Linux, диагностика и мониторинг
- Содержание
- Настройка TCP/IP в Linux для работы в сети Ethernet
- Параметры сети
- Файлы настроек сети в Linux (конфигурационные файлы)
- Настройка сети
- Диагностика сети Linux
- traceroute
3 ways to configure a network interface in Linux

More Linux resources
Editor’s note: This article was written while James Brigman was a member of the Red Hat Accelerator program.
Almost any useful work that one would want to do with a Linux system requires a network interface. Want to browse the web, watch YouTube, stream video, audio or files? It’s all done over the network interface. RPM-based Linux distributions using Gnome have several fundamental ways to configure the network interface. I’m describing three ways in this article. All of the configuration methods require the entry of sets of numbers that allow the network interface to operate.
You will need three fundamental pieces of numerical information in order to minimally configure a network interface to work over IPv4 and more if you want to define things like IPv6, hostnames, or DNS servers. This article covers the bare minimum for IPv4. Those three fundamental numerical pieces are:
IP Address: The unique number defining the access point to your network interface. It has the form: xxx.xxx.xxx.xxx, where “xxx” are three, or fewer, numbers between 0 and 255. It’s possible for this number to be purely made up, but normally it takes a form that works with the other three numbers. If you are using a home router with DHCP, which is the typical default configuration, the router will “assign” the IP address to your network interface. You won’t have to enter the number at all.
Gateway: The unique number assigned to the network interface at the «other end of the wire» that your computer must communicate through. Again, it has the general xxx.xxx.xxx.xxx format and takes a form that also works with the other two numbers. If you are using a home router, your home router generates this number because it is the gateway through which you communicate with the wider world.
Netmask: The non-unique number that defines the network itself. This number can be automatically generated but is sometimes requested by the method you use to configure the interface. It, too, has the format xxx.xxx.xxx.xxx.
Note that I’m not going into the how of these numbers; I’m just telling you they are needed to configure the network interface. I’ll skip that so you can get on into the point of the article: Three ways to configure network interfaces. In each case, the numbers I use will be real numbers applicable to the system I used to write this article. I used CentOS 8 to generate the images, but everything you see here is the same in Fedora and Red Hat Enterprise Linux.
At installation time
The Anaconda installer prompts for network configuration and you can’t complete the installation without providing these numbers to the installer. Here’s the initial screen, using “Network & Host Name” in the rightmost column, third selection down:
Источник
13 Linux Network Configuration and Troubleshooting Commands
Computers are connected in a network to exchange information or resources each other. Two or more computer connected through network media called computer network. There are number of network devices or media are involved to form computer network. Computer loaded with Linux Operating System can also be a part of network whether it is small or large network by its multitasking and multiuser natures. Maintaining of system and network up and running is a task of System / Network Administrator’s job. In this article we are going to review frequently used network configuration and troubleshoot commands in Linux.
![]() Linux Network Configuration and Troubleshooting Commands
Linux Network Configuration and Troubleshooting Commands
1. ifconfig
ifconfig (interface configurator) command is use to initialize an interface, assign IP Address to interface and enable or disable interface on demand. With this command you can view IP Address and Hardware / MAC address assign to interface and also MTU (Maximum transmission unit) size.
ifconfig with interface (eth0) command only shows specific interface details like IP Address, MAC Address etc. with -a options will display all available interface details if it is disable also.
Assigning IP Address and Gateway
Assigning an IP Address and Gateway to interface on the fly. The setting will be removed in case of system reboot.
Enable or Disable Specific Interface
To enable or disable specific Interface, we use example command as follows.
Enable eth0
Disable eth0
Setting MTU Size
By default MTU size is 1500. We can set required MTU size with below command. Replace XXXX with size.
Set Interface in Promiscuous mode
Network interface only received packets belongs to that particular NIC. If you put interface in promiscuous mode it will received all the packets. This is very useful to capture packets and analyze later. For this you may require superuser access.
2. PING Command
PING (Packet INternet Groper) command is the best way to test connectivity between two nodes. Whether it is Local Area Network (LAN) or Wide Area Network (WAN). Ping use ICMP (Internet Control Message Protocol) to communicate to other devices. You can ping host name of ip address using below command.
In Linux ping command keep executing until you interrupt. Ping with -c option exit after N number of request (success or error respond).
3. TRACEROUTE Command
traceroute is a network troubleshooting utility which shows number of hops taken to reach destination also determine packets traveling path. Below we are tracing route to global DNS server IP Address and able to reach destination also shows path of that packet is traveling.
4. NETSTAT Command
Netstat (Network Statistic) command display connection info, routing table information etc. To displays routing table information use option as -r.
For more examples of Netstat Command, please read our earlier article on 20 Netstat Command Examples in Linux.
5. DIG Command
Dig (domain information groper) query DNS related information like A Record, CNAME, MX Record etc. This command mainly use to troubleshoot DNS related query.
For more examples of Dig Command, please read the article on 10 Linux Dig Commands to Query DNS.
6. NSLOOKUP Command
nslookup command also use to find out DNS related query. The following examples shows A Record (IP Address) of tecmint.com.
For more NSLOOKUP Command, read the article on 8 Linux Nslookup Command Examples.
7. ROUTE Command
route command also shows and manipulate ip routing table. To see default routing table in Linux, type the following command.
Adding, deleting routes and default Gateway with following commands.
Route Adding
Route Deleting
Adding default Gateway
8. HOST Command
host command to find name to IP or IP to name in IPv4 or IPv6 and also query DNS records.
Using -t option we can find out DNS Resource Records like CNAME, NS, MX, SOA etc.
9. ARP Command
ARP (Address Resolution Protocol) is useful to view / add the contents of the kernel’s ARP tables. To see default table use the command as.
10. ETHTOOL Command
ethtool is a replacement of mii-tool. It is to view, setting speed and duplex of your Network Interface Card (NIC). You can set duplex permanently in /etc/sysconfig/network-scripts/ifcfg-eth0 with ETHTOOL_OPTS variable.
11. IWCONFIG Command
iwconfig command in Linux is use to configure a wireless network interface. You can see and set the basic Wi-Fi details like SSID channel and encryption. You can refer man page of iwconfig to know more.
12. HOSTNAME Command
hostname is to identify in a network. Execute hostname command to see the hostname of your box. You can set hostname permanently in /etc/sysconfig/network. Need to reboot box once set a proper hostname.
13. GUI tool system-config-network
Type system-config-network in command prompt to configure network setting and you will get nice Graphical User Interface (GUI) which may also use to configure IP Address, Gateway, DNS etc. as shown below image.
![]() Linux GUI Network Configuration Tool
Linux GUI Network Configuration Tool
This article can be useful for day to day use of Linux Network administrator in Linux / Unix-like operating system. Kindly share through our comment box if we missed out.
If You Appreciate What We Do Here On TecMint, You Should Consider:
TecMint is the fastest growing and most trusted community site for any kind of Linux Articles, Guides and Books on the web. Millions of people visit TecMint! to search or browse the thousands of published articles available FREELY to all.
If you like what you are reading, please consider buying us a coffee ( or 2 ) as a token of appreciation.

We are thankful for your never ending support.
Источник
Настройка сети в Linux, диагностика и мониторинг
Содержание
Доброго времени, уважаемые читатели. Публикую вторую часть статьи о сетевой подсистеме Linux. В текущей части основной упор сделан на реализацию сети в Linux (как настроить сеть в Linux, как продиагностировать сеть в Linux и поддерживать в рабочем состоянии сетевую подсистему в Linux).
Настройка TCP/IP в Linux для работы в сети Ethernet
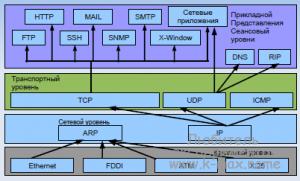 Для работы с сетевыми протоколами TCP/IP в Linux достаточно наличие только петлевого интерфейса, но если необходимо объединить хосты между собой, естественно, необходимо наличие сетевого интерфейса, каналов передачи данных (например витая пара), возможно, какого-либо сетевого оборудования. Так же, необходимо наличие установленных утилит для настройки сети (/sbin/ifconfig, /sbin/route и др.), обычно поставляемые в пакете net-tools. Так же необходимо наличие конфигурационных файлов для сети (например /etc/hosts) и поддержку сети ядром Linux.
Параметры сети
Начнем понимание сетевых механизмов Linux с ручного конфигурирования сети, то есть со случая, когда IP адрес сетевого интерфейса статичен. Итак, при настройке сети, необходимо учесть и настроить следующие параметры:
IP-адрес — как уже говорилось в первой части статьи — это уникальный адрес машины, в формате четырех десятичных чисел, разделенных точками. Обычно, при работе в локальной сети, выбирается из частных диапазонов, например: 192.168.0.1
Маска подсети — так же, 4 десятичных числа, определяющие, какая часть адреса относиться к адресу сети/подсети, а какая к адресу хоста. Маска подсети является числом, которое складывается (в двоичной форме) при помощи логического И, с IP-адресом и в результате чего выясняется, к какой подсети принадлежит адрес. Например адрес 192.168.0.2 с маской 255.255.255.0 принадлежит подсети 192.168.0.
Адрес подсети — определяется маской подсети. При этом, для петлевых интерфейсов не существует подсетей.
Широковещательный адрес — адрес, используемый для отправки широковещательных пакетов, которые получат все хосты подсети. Обычно, он равен адресу подсети со значением хоста 255, то есть для подсети 192.168.0 широковещательным будет 192.168.0.255, аналогично, для подсети 192.168 широковещательным будет 192.168.255.255. Для петлевых интерфейсов не существует широковещательного адреса.
IP адрес шлюза — это адрес машины, являющейся шлюзом по-умолчанию для связи с внешним миром. Шлюзов может быть несколько, если компьютер подключен к нескольким сетям одновременно. Адрес шлюза не используется в изолированных сетях (не подключенных к глобальной сети), потому что данным сетям некуда отправлять пакеты вне сети, то же самое относиться и к петлевым интерфейсам.
Файлы настроек сети в Linux (конфигурационные файлы)
Для понимания работы сети в Linux, я бы обязательно посоветовал ознакомиться со статьей «Этапы загрузки Linux». В целом, вся работа Linux основана на процессе init, который рождается при загрузке ОС и плодит своих потомков, которые в свою очередь и выполняют всю необходимую работу, будь то запуск bash или демона. Да, и вся загрузка Linux основана на скриптах bash, в которых прописана вся последовательность запуска мелких утилит с различными параметрами, которые последовательно запускаются/останавливаются при запуске/остановке системы. Аналогично запускается и сетевая подсистема Linux. Каждый дистрибутив Linux имеет слегка отличающийся от других механизм инициализации сети, но общая картина, думаю, после прочтения будет ясна. Если просмотреть стартовые скрипты сетевой подсистемы какого-либо дистрибутива Linux, то, как настроить конфигурацию сети с помощью конфигурационных файлов, станет более-менее понятно, например у Debian/Ubuntu (за основу возьмем эту ветвь дистрибутивов) за инициализацию сети отвечает скрипт /etc/init.d/networking , просмотрев содержимое которого:
можно найти несколько функций, проверяющих наличие подключенных сетевых файловых систем (check_network_file_systems(), check_network_swap()), а так же проверку существования какого-то пока непонятного конфига /etc/network/options (функция process_options()), а в самом низу, конструкцией case «$1» in проверяется первый параметр переданный скрипту и в соответствии с введенным параметром (start/stop/force-reload|restart или любое дугое) производит определенные действия. Из этих самых «определенных действий», на примере аргумента start видно, что сначала запускается функция process_options, далее отправляется в лог фраза Configuring network interfaces, и запускается команда ifup -a. Если посмотреть man ifup, то видно что данная команда читает конфиг из файла /etc/network/interfaces и согласно ключу -a запускает все интерфейсы имеющие параметр auto.
Соответственно, прочитав man interfaces (rus) или man interfaces (eng), становиться ясно, как же в Debian/Ubuntu настроить какой-либо сетевой интерфейс с помощью конфига /etc/network/interfaces. Ниже, пример данного конфигурационного файла для 3х интерфейсов: петлевой (lo), со статичным IP (eth2) и IP получаемым по dhcp (eth0):
В данном конфиге строки allow-hotplug и auto — это синонимы и интерфейсы будут подняты по команде ifup -a. Вот, собственно, и вся цепь работы сетевой подсистемы. Аналогично, в других дистрибутивах: в RedHat и SUSE сеть запускается скриптом /etc/init.d/network. Рассматрев его, аналогично можно найти, где лежит конфигурация сети.
/etc/hosts
Данный файл хранит перечень IP адресов и соответствующих им (адресам) имен хостов.Формат файла ничем не отличается от мастдайного:
/etc/networks
Данный файл хранит имена и адреса локальной и других сетей. Пример:
При использовании данного файла, сетями можно управлять по имени. Например добавить маршрут не route add 192.168.1.12, а route add home-network.
/etc/nsswitch.conf
Файл определяет порядок поиска имени хоста/сети, за данную настройку отвечают строки:
Параметр files указывает использовать указанные файлы (/etc/hosts и /etc/networks соответственно), параметр dns указывает использовать службу dns.
/etc/resolv.conf
Этот файл определяет параметры механизма преобразования сетевых имен в IP адреса. Пример:
В современных дистрибутивах Linux используется динамическая генерация данного файла, с помощью утилиты resolvconf. Она является посредником между службами, динамически предоставляющими сервера имен (например DHCP client) и службами, использующими данные сервера имен. Статические адреса DNS серверов, в случае использования resolvconf, задаются внутри /etc/network/interfaces (подробнее об этом — в разделе настройки).
Настройка сети
Настройка сети подробно разобрана в отдельной статье.
Диагностика сети Linux
Существует большое количество инструментов диагностики сети в Linux, зачастую, они очень похожи на утилиты от Microsoft. Я рассмотрю 3 основные утилиты диагностики сети, без которых выявить неполадки будет проблематично.
Думаю, что данная утилита знакома чуть ли не каждому. Работа этой утилиты заключается в отправке т.н. пакетов ICMP удаленному серверу, который будет указан в параметрах команды, сервер возвращает отправленные команды, а ping подсчитывает время требуемое отправленному пакету, чтобы дойти до сервера и вернуться. Например:
Так же, утилита ping интересна тем, что может позволить увидеть, где именно возникли неполадки. Допустим, утилита ping выводит сообщение network not reachable (сеть недоступна), либо другое аналогичное сообщение. Это, скорее всего, говорит о некорректной настройке вашей системы. В таком случае, можно послать пакеты по IP-адресу провайдера, чтобы понять, в каком месте возникает проблема (между локальным ПК или «дальше»). Если Вы подключены к интернету через маршрутизатор, то можно послать пакеты по его IP. Соответственно, если проблема проявиться уже на этом этапе, это говорит, о неправильном конфигурировании локальной системы, либо о повреждении кабеля, если маршрутизатор отзывается, а сервер провайдера нет, то проблема — в канале связи провайдера и т.д. Наконец, если неудачей завершилось преобразовании имени в IP, то можно проверить связь по IP, если ответы будут приходить корректно, то можно догадаться, что проблема в DNS .
Следует отметить, что данная утилита не всегда надежный инструмент для диагностики. Удаленный сервер может блокировать ответы на ICMP запросы.
traceroute
Простым языком, команда называется трассировка маршрута. Как можно понять из названия — данная утилита покажет по какому маршруту шли пакеты до хоста. Утилита traceroute несколько похожа на ping, но отображает больше интересной информации. Пример:
Источник


