- Подключение Mac к общим компьютерам и серверам
- Подключение к компьютеру или серверу, найденному в списке
- Подключение к компьютеру или серверу путем ввода его адреса
- Подключение к недавно использованному серверу
- How to use network locations on your Mac
- How to add or remove a network location
- How to switch between network locations
- How to change the network service order
- How to prevent a network service from being used
- Connect to the internet with your Mac
- Connect to a Wi-Fi network
- Connect using Personal Hotspot
- Connect using Ethernet
- Connect your Mac to the internet using Ethernet
Подключение Mac к общим компьютерам и серверам
Можно подключаться к общим компьютерам и файловым серверам в сети (включая компьютеры Mac и Windows), предоставляющим общий доступ к файлам, а также к файловым серверам, использующим SMB и другие протоколы.
Для подключения можно найти компьютер или сервер либо ввести его сетевой адрес. См. раздел Определение имени и сетевого адреса компьютера.
Подключение к компьютеру или серверу, найденному в списке
На Mac нажмите значок Finder  в Dock, чтобы открыть окно Finder, затем нажмите «Сеть» в разделе «Места» в боковом меню.
Если в разделе «Места» в боковом меню не отображается ни одного объекта, наведите указатель на слово Места, затем нажмите стрелку  .
.
В окне Finder дважды нажмите компьютер, к которому хотите подключиться, затем нажмите «Подключиться как».
Если Вы подключаетесь к компьютеру Mac, на котором включена функция общего экрана, и у Вас есть права доступа, нажмите «Общий экран».
Выберите, каким образом Вы хотите подключаться к этому компьютеру Mac.
Гость: Подключение в качестве гостя возможно, если на общем компьютере разрешен гостевой доступ.
Зарегистрированный пользователь: Подключение к другому компьютеру Mac с использованием действительного имени пользователя и пароля. Если на другом компьютере Mac выбран параметр «Только этим пользователям», убедитесь, что используемое имя пользователя присутствует в списке пользователей, которым разрешен доступ.
С помощью Apple ID: Подключение к другому компьютеру Mac с помощью Apple ID. Вы должны быть заданы в настройках пользователей и групп с этим Apple ID на этом и на другом компьютерах Mac.
При необходимости введите имя пользователя и пароль, затем выберите тома или общие папки сервера.
В некоторых случаях Вам понадобится информация о сети или рабочей группе, к которой относится общий компьютер. Если Вы не располагаете данной информацией, свяжитесь с владельцем компьютера или обратитесь к сетевому администратору.
Совет. Чтобы облегчить подключение к компьютеру в дальнейшем, установите флажок «Запомнить пароль в связке ключей» для добавления Вашего имени пользователя и пароля в связку ключей.
Подключение к компьютеру или серверу путем ввода его адреса
В Finder на Mac выберите «Переход» > «Подключение к серверу».
Введите сетевой адрес компьютера или сервера в поле «Адрес сервера».
О корректном формате сетевых адресов см. в разделе Форматы сетевых адресов и протоколы.
Выберите, каким образом Вы хотите подключаться к этому компьютеру Mac.
Гость: Подключение в качестве гостя возможно, если на общем компьютере разрешен гостевой доступ.
Зарегистрированный пользователь: Подключение к другому компьютеру Mac с использованием действительного имени пользователя и пароля. Если на другом компьютере Mac выбран параметр «Только этим пользователям», убедитесь, что используемое имя пользователя присутствует в списке пользователей, которым разрешен доступ.
С помощью Apple ID: Подключение к другому компьютеру Mac с помощью Apple ID. Вы должны быть заданы в настройках пользователей и групп с этим Apple ID на этом и на другом компьютерах Mac.
При необходимости введите имя пользователя и пароль, затем выберите тома или общие папки сервера.
Чтобы облегчить подключение к компьютеру в дальнейшем, установите флажок «Запомнить пароль в связке ключей» для добавления Вашего имени пользователя и пароля в Вашу связку ключей.
Подключение к недавно использованному серверу
Вот несколько вариантов удобного подключения к общим компьютерам и серверам, которые Вы часто используете:
На Mac можно сделать следующее.
Выберите меню «Apple»

> «Недавно использованные объекты», затем выберите сервер в списке недавно использованных серверов.
В Finder выберите меню «Переход» > «Подключение к серверу», нажмите раскрывающееся меню справа от поля «Адрес сервера» и выберите недавно использованный сервер.
Добавьте общие компьютеры, сети и рабочие группы в боковое меню Finder. Выберите объект, затем выберите «Файл» > «Добавить в боковое меню».
Добавьте общий компьютер или сервер в список избранных. В Finder выберите меню «Переход» > «Подключение к серверу», введите сетевой адрес, затем нажмите кнопку «Добавить»  .
.
Если Вы не можете обнаружить сервер или компьютер с включенным общим доступом или подключиться к нему, возможно, он недоступен, либо у Вас отсутствует разрешение на подключение к нему. Обратитесь за помощью к владельцу компьютера или администратору сети.
Источник
How to use network locations on your Mac
Use the Location feature of Network preferences to quickly switch between different sets of network settings.
The ability to switch between different sets of network settings (locations) can be useful in circumstances such as these:
- You use the same type of network (such as Ethernet) at work and at home, but the settings you use at work don’t allow your Mac to automatically connect to the same type of network at home.
- Your Mac connects to more than one type of network service (such as both Wi-Fi and Ethernet) at work and at home, but at work you want your Mac to try connecting to the Ethernet network first, and at home you want your Mac to try connecting to the Wi-Fi network first. In other words, you want to set a different service order for each location.
- Your Mac isn’t connecting to your network and you want to quickly reset your network settings for testing purposes, without losing your current network settings.

How to add or remove a network location
- Choose Apple menu > System Preferences, then click Network.
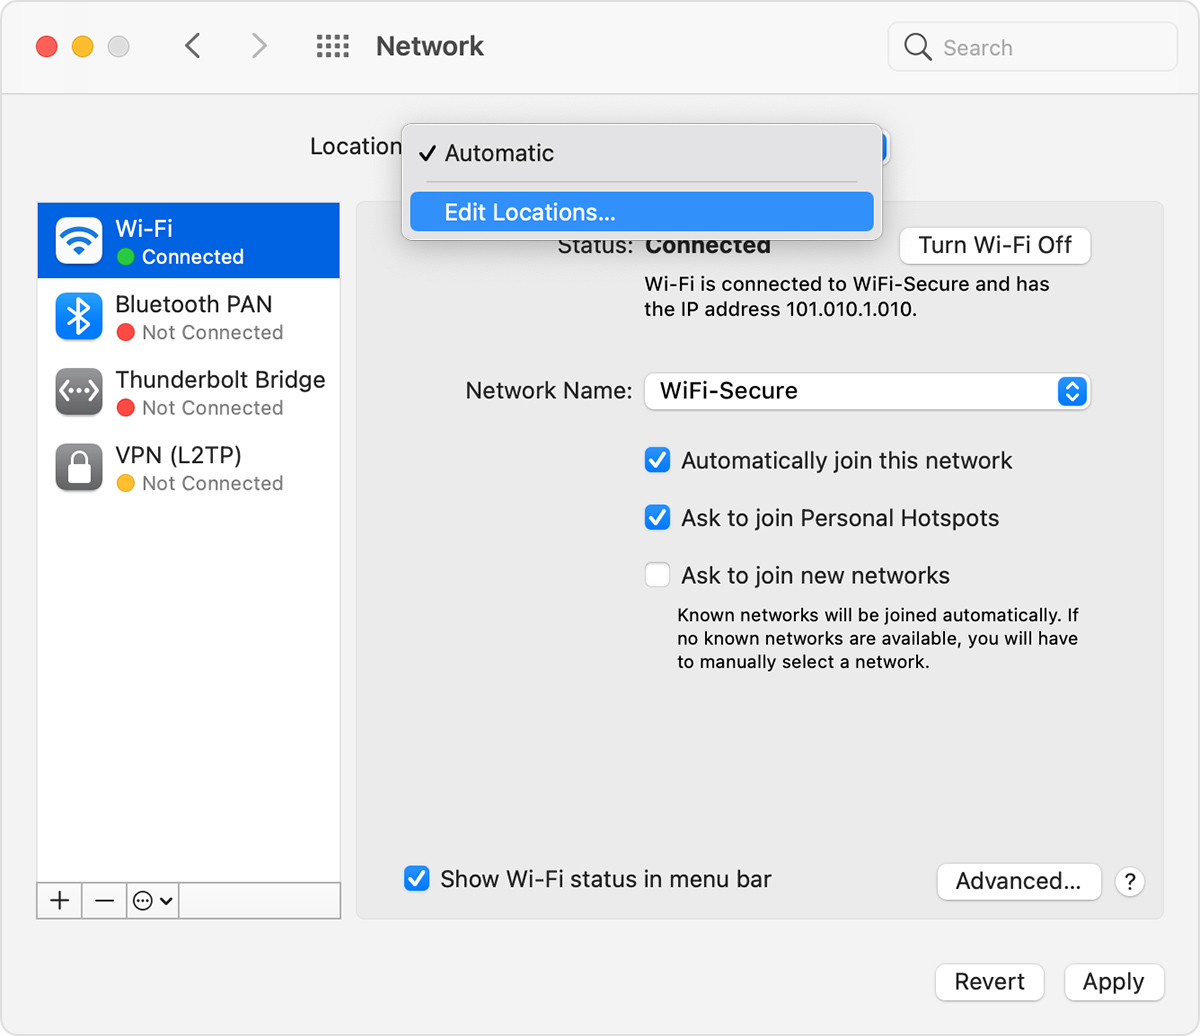
- The Location pop-up menu shows the name of your currently selected set of network settings. The default location is named Automatic. Choose Edit Locations from this menu.

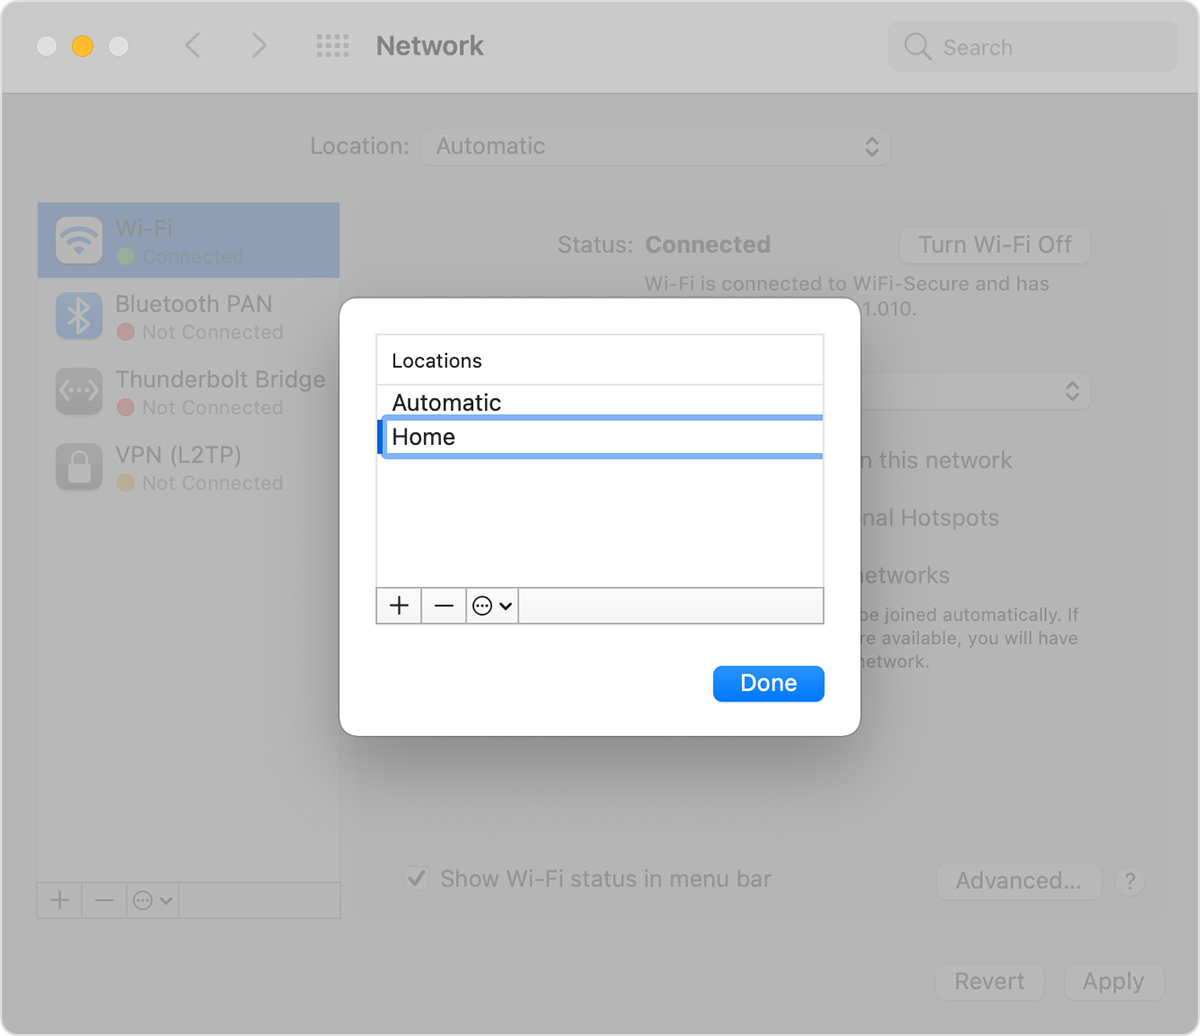
- Click the add (+) button below the list of locations, then type a name for the new location, such as Work or Home or Mobile. (To remove a location, use the remove (–) button below the list.)
- Click Done. The Location menu should now show the name of your new location. Any changes you now make to your Wi-Fi, Ethernet, or other network settings will be saved to this location when you click Apply. The network settings in your previous location remain as you left them, so you can use the Location menu to switch back at any time.
- Click Apply to save your settings and complete the switch from the previous location to the new one. Your Mac then automatically tries to determine the correct settings for each type of network. If you need to change the settings manually, remember to click Apply again after making your changes.
How to switch between network locations
If you have more than one location, you can use either of these methods to switch between them:
- Use the Location pop-up menu in Network preferences, as described above. Remember to click Apply after choosing a location.
- Or choose Apple menu > Location from the menu bar, then choose your location from the submenu.
How to change the network service order
If you’re using network locations because you want each location to prefer a different network service (such as Wi-Fi or Ethernet) when connecting, follow these steps to change the service order (also known as port priority) in each location.
- Choose Apple menu > System Preferences, then click Network.
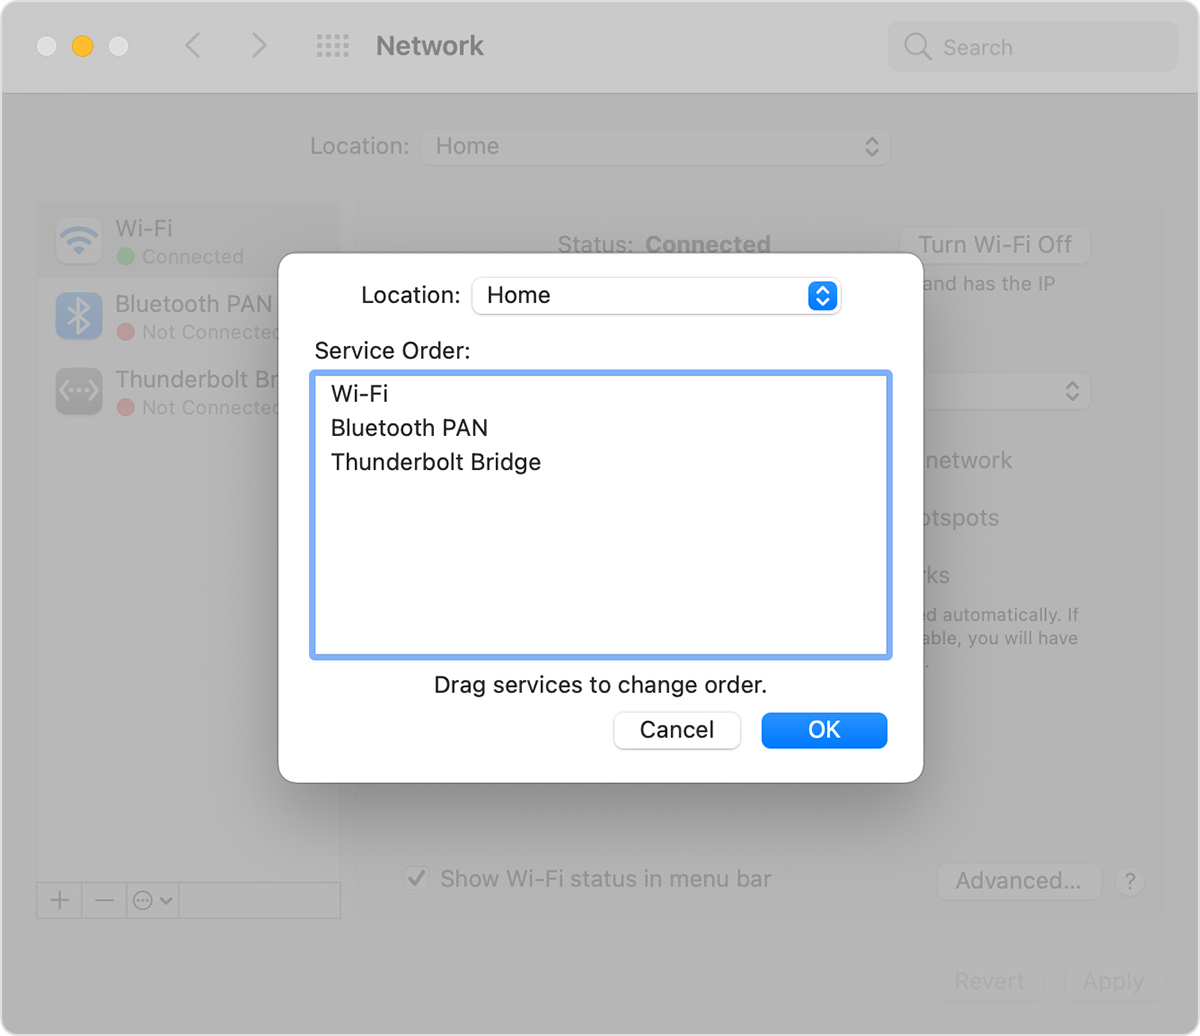
- Use the Location pop-up menu to choose the location you want to modify.
- Click the More Options icon or gear icon below the list of services, then choose Set Service Order.
- Drag services within the list to change their order. Your Mac will try to connect to the service at the top of the list first, then continue in descending order until a connection is successful.
Virtual private network (VPN) connections can’t be reordered, because they always take priority over other connections. - Click OK, then click Apply.

How to prevent a network service from being used
By default, the location named Automatic makes all available network services (also known as ports or network interfaces) active, whether or not they are being used to connect to a network. Your Mac automatically searches these services for a network or internet connection.
For example, you might use a Wi-Fi network at home but an Ethernet network at work. Your Mac automatically detects which of these network services to use when it connects.
If you want to make sure that your Mac doesn’t use a particular network service, such as Wi-Fi, you can make that service inactive in any of your network locations:
- Choose Apple menu > System Preferences, then click Network.
- Use the Location pop-up menu to choose the location you want to modify.
- Click the More Options icon or gear icon below of the list of services, then choose Make Service Inactive.
- Click Apply.
Источник
Connect to the internet with your Mac
Learn how to use Wi-Fi, Personal Hotspot, and Ethernet to connect to the internet.
Connect to a Wi-Fi network
Click the Wi-Fi icon in the menu bar, then choose a network from the menu. Before you can join the network, you might be asked to enter the network’s password or agree to terms and conditions.
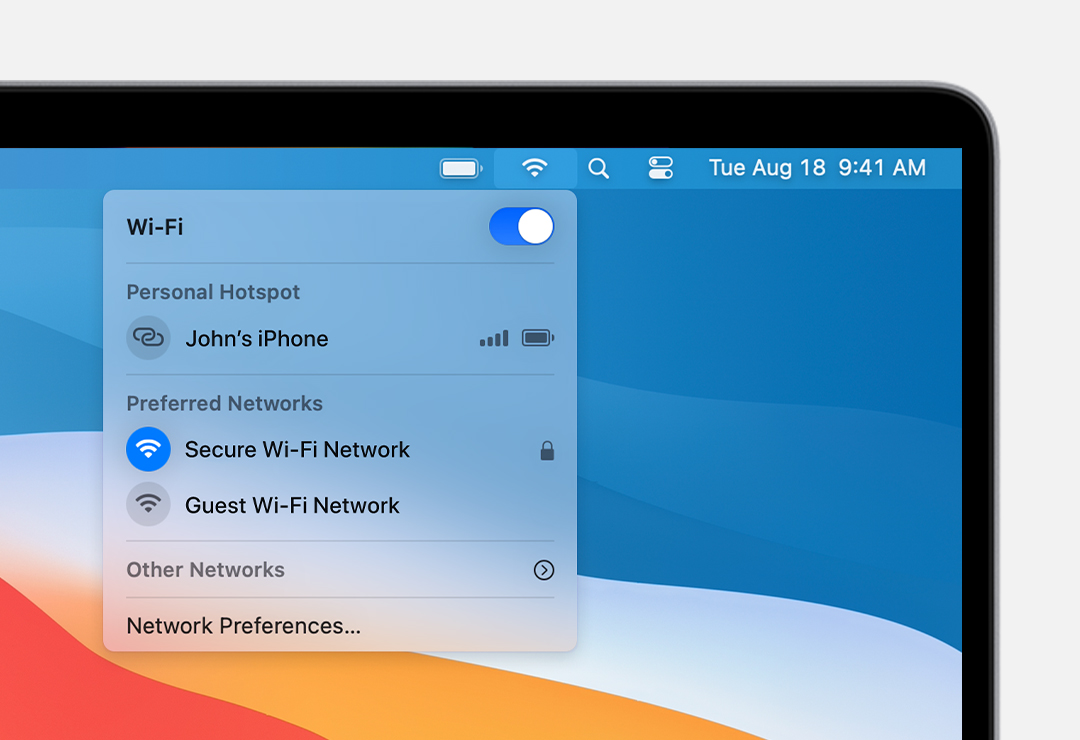
- If you don’t see the Wi-Fi icon icon in the menu bar, choose Apple menu > System Preferences, then click Network. Select Wi-Fi in the sidebar, then select ”Show Wi-Fi status in menu bar.”
- Lean what to do if your Mac doesn’t connect to the internet after joining the Wi-Fi network.
- To connect to a Wi-Fi network that you know is hidden, choose Other Networks (or Join Other Network) from the Wi-Fi menu , then choose Other. Enter the requested network name, security, and password information.
Connect using Personal Hotspot
With most carrier plans, you can share the cellular data connection of your iPhone or iPad (Wi-Fi + Cellular) with your Mac. Learn how to set up Personal Hotspot.
Connect using Ethernet
To use a wired connection to the internet, connect an Ethernet cable between your router or modem and the Ethernet port on your Mac. Some Mac models require an Ethernet adapter, such as the Belkin USB-C to Gigabit Ethernet Adapter or the Apple Thunderbolt to Gigabit Ethernet Adapter.
Information about products not manufactured by Apple, or independent websites not controlled or tested by Apple, is provided without recommendation or endorsement. Apple assumes no responsibility with regard to the selection, performance, or use of third-party websites or products. Apple makes no representations regarding third-party website accuracy or reliability. Contact the vendor for additional information.
Источник
Connect your Mac to the internet using Ethernet
You can use Ethernet to connect to the internet, either through an Ethernet network or through a DSL or cable modem. If you’re using a modem, make sure the modem is turned on and connected to the wall jack with the cable that came with the modem.
Use an Ethernet cable to connect your computer’s Ethernet port to a modem or other network device (for example, a switch or a router). If your computer doesn’t have an Ethernet port, try using a USB to Ethernet adapter, or a Thunderbolt to Gigabit Ethernet adapter.
In many cases, you’ll automatically connect to the internet. If not, complete the following steps to enter your network settings. If you aren’t sure what to enter, check with your network administrator or ISP.
On your Mac, choose Apple menu

> System Preferences, then click Network.
Select Ethernet in the list on the left.
Click the Configure IPv4 pop-up menu, then choose your ISP’s recommended configuration method.
Using DHCP: Choose this if you receive an IP address automatically from your ISP.
Using DHCP with manual address: Choose this if you received a specific IP address and your ISP uses DHCP or other network settings.
Using BootP: Choose this if your ISP uses BootP.
Manually: Choose this if you received a specific IP address, a subnet mask and a router address from your ISP.
Click Advanced, click DNS, click the Add button  below DNS Servers, then enter the IP address of your ISP’s DNS server.
If your ISP gave you search domain addresses, enter them as well. These may not be needed if you configure your IP settings to use DHCP.
If you were given other settings from your service provider, such as IPv6, proxy server or additional Ethernet settings, click Advanced to enter them.
Click OK to make the settings active for the Ethernet service.
Источник


