- Network Link Conditioner
- Installation
- Controlling Bandwidth, Latency, and Packet Loss
- Enabling Network Link Conditioner on iOS Devices
- As We May Code
- Network Link conditioner doesn’t work on macOS Sierra
- Answers
- Question: Q: Network Link Conditioner to control Wi-Fi
- All replies
- Network Link Conditioner
- Bad Network Connection
- Network Link Conditioner on the iOS simulator
- Network Link Conditioner on an iOS device
Network Link Conditioner
Product design is about empathy. Knowing what a user wants, what they like, what they dislike, what causes them frustration, and learning to understand and embody those motivations — this is what it takes to make something insanely great.
And so we invest in reaching beyond our own operational model of the world. We tailor our experience to different locales. We consider the usability implications of screen readers or other assistive technologies. We continuously evaluate our implementation against these expectations.
There is, however, one critical factor that app developers often miss: network condition, or more specifically, the latency and bandwidth of an Internet connection.
For something so essential to user experience, it’s unfortunate that most developers take an ad-hoc approach to field-testing their apps under different conditions (if at all).
This week on NSHipster, we’ll be talking about the Network Link Conditioner, a utility that allows macOS and iOS devices to accurately and consistently simulate adverse networking environments.
Installation
Network Link Conditioner can be found in the “Additional Tools for Xcode” package. You can download this from the Downloads for Apple Developers page.
Search for “Additional Tools” and select the appropriate release of the package.
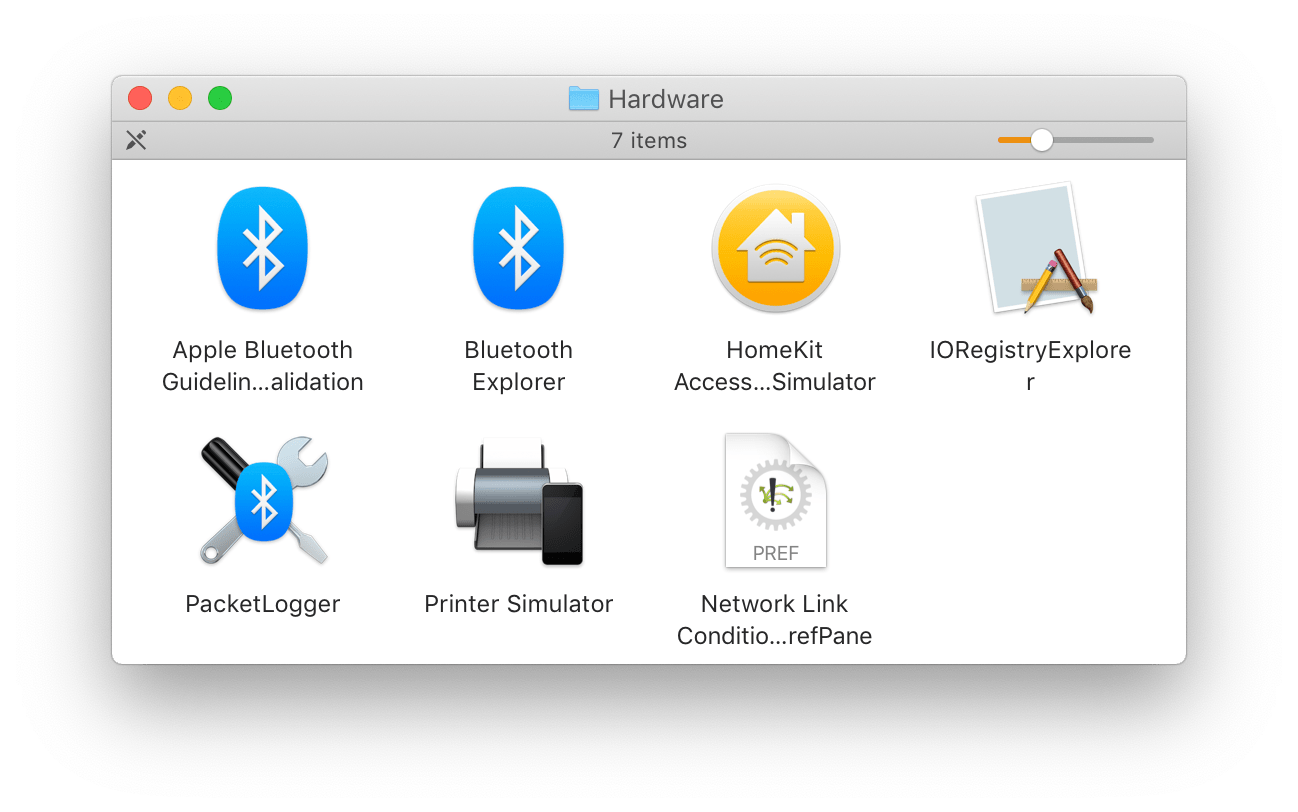
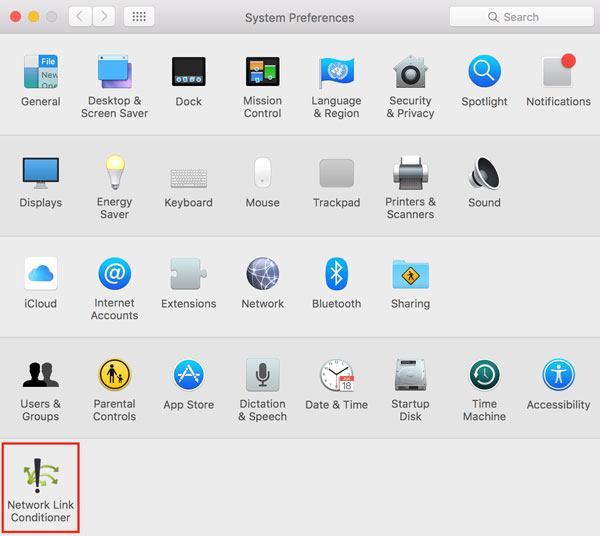
Once the download has finished, open the DMG, navigate to the “Hardware” directory, and double-click “Network Link Condition.prefPane”.
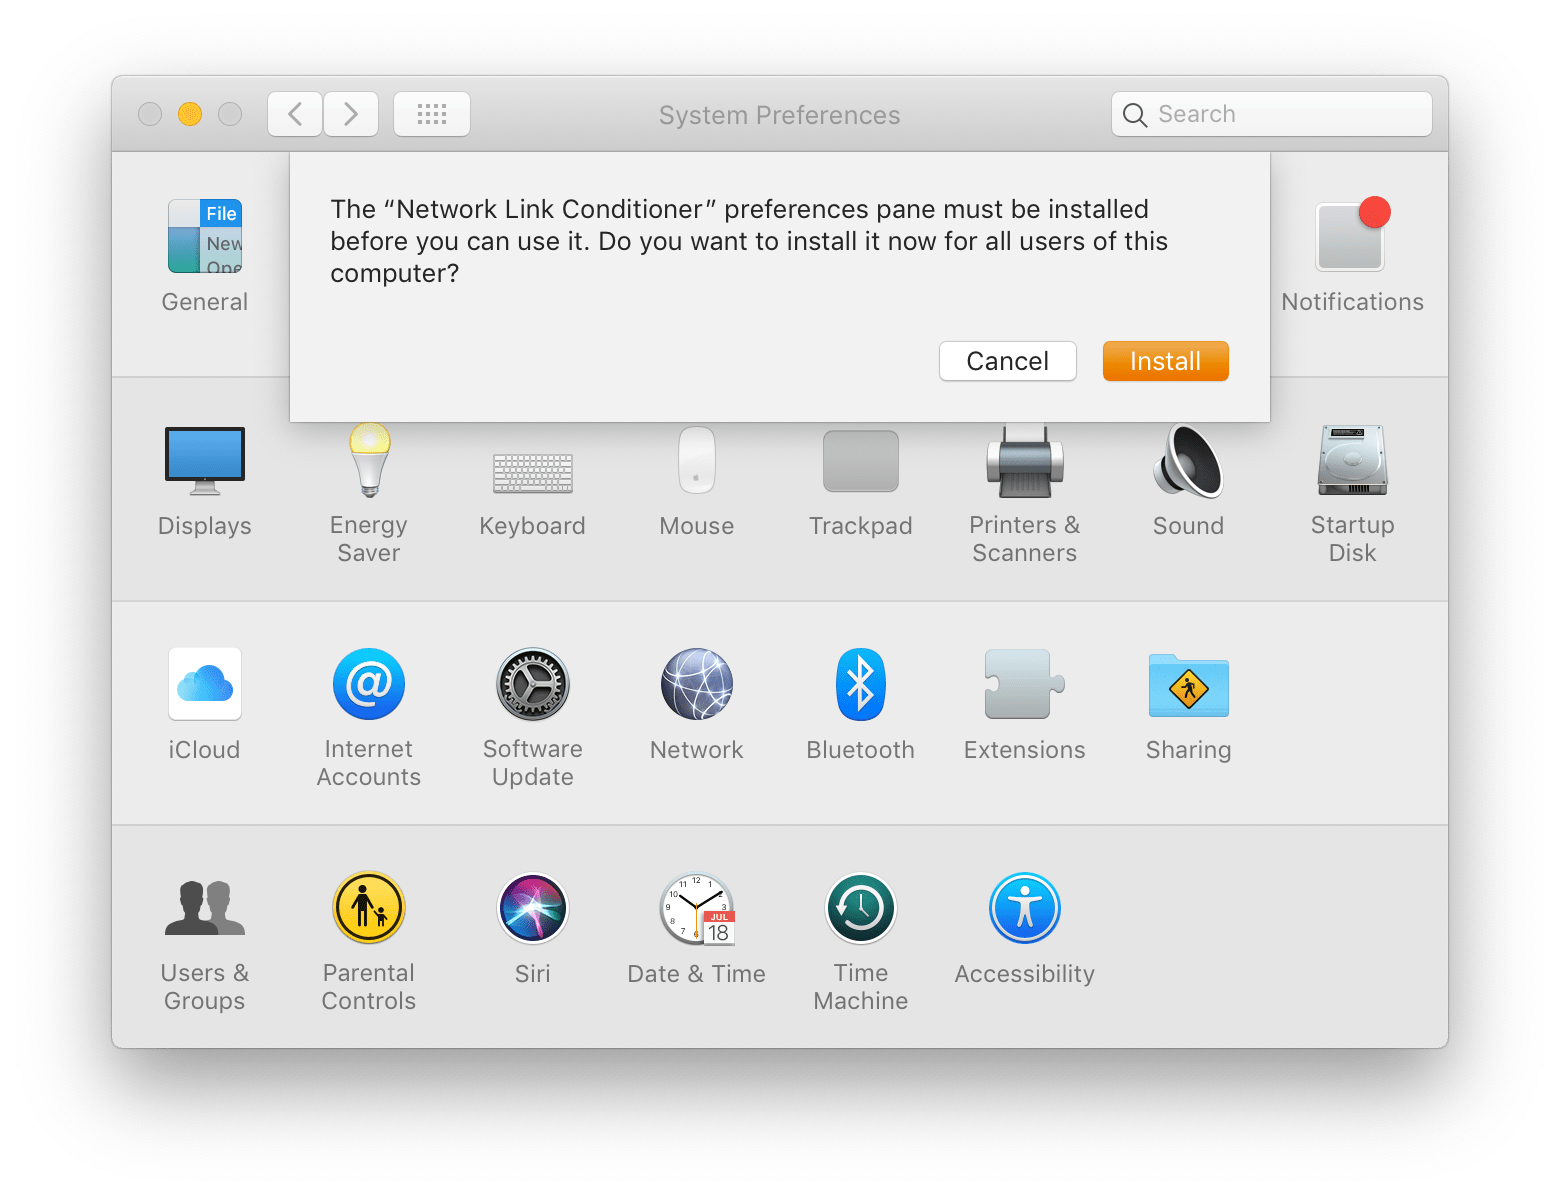
Click on the Network Link Conditioner preference pane at the bottom of System Preferences.
When you first install Network Link Conditioner on macOS 10.14, everything works as expected. But if you close and reopen System Preferences, the preference pane no longer appears, and attempting to reinstall results in the following error message:
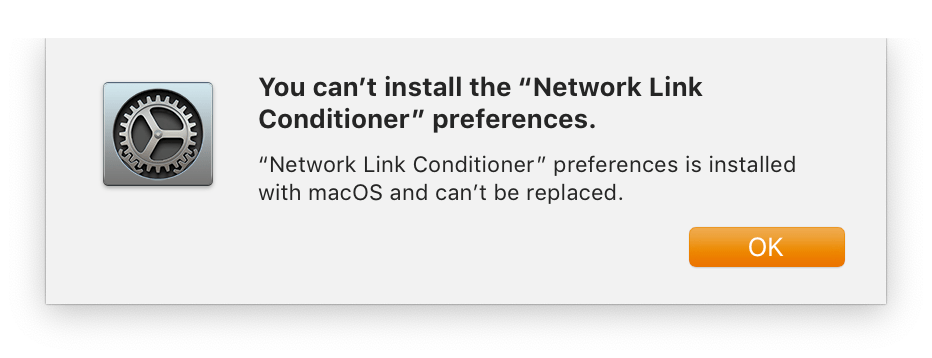
You can’t install the “Network Link Conditioner” preferences.
“Network Link Conditioner” preferences is installed with macOS and can’t be replaced.
As a workaround, you can move the preference pane from your user Preference Panes directory to the system-level directory by entering the following command in Terminal.app (you’ll be prompted for your password):
Once you’ve done this, Network Link Conditioner will appear the next time you open System Preferences.
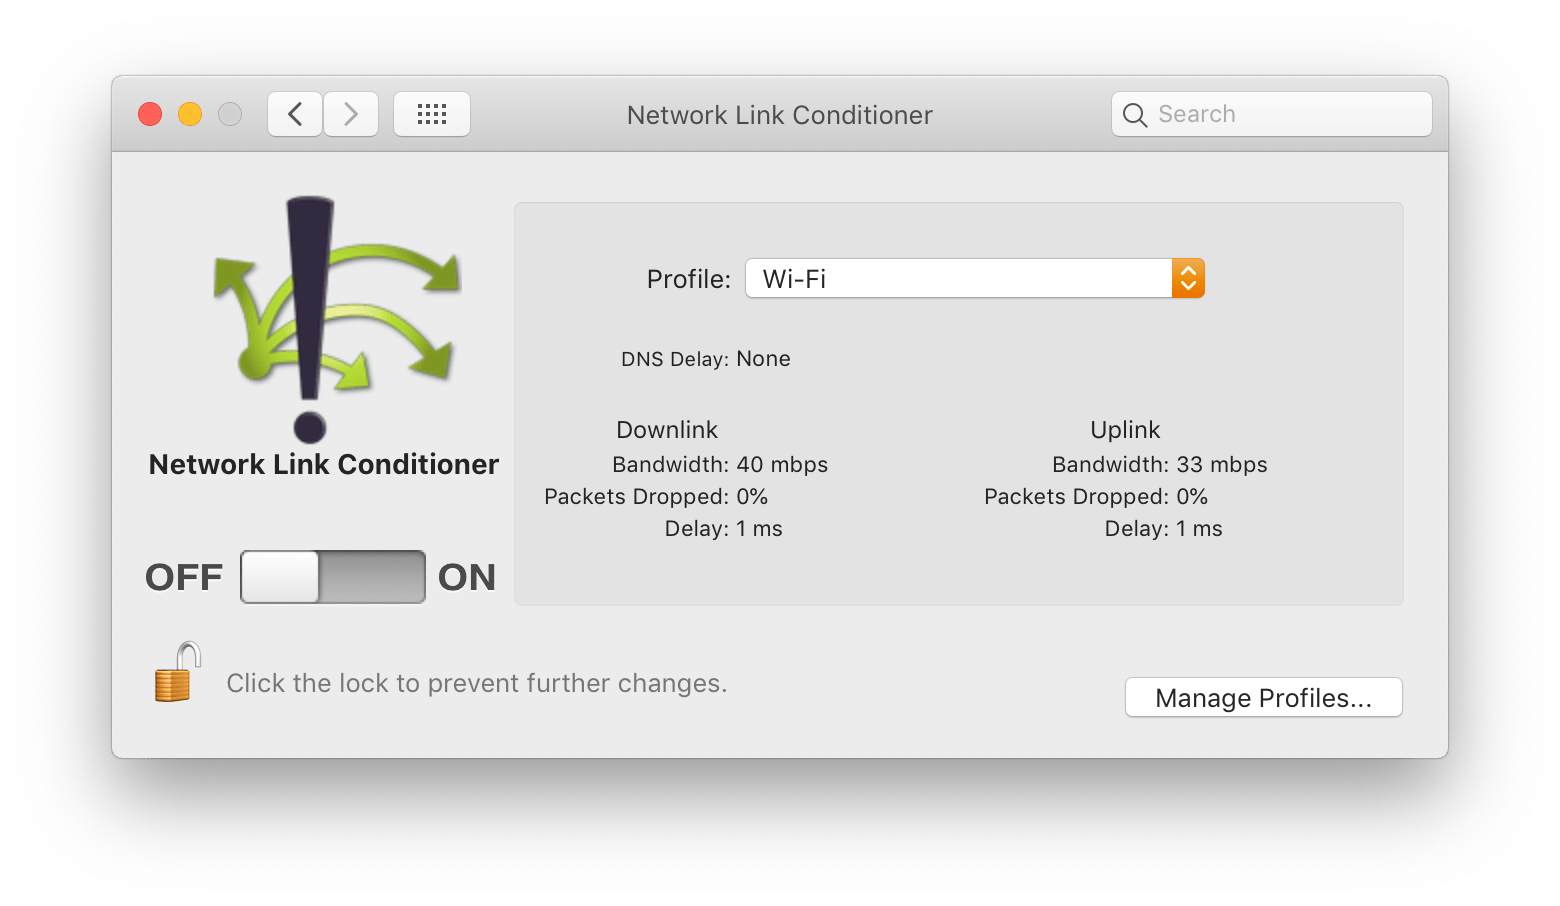
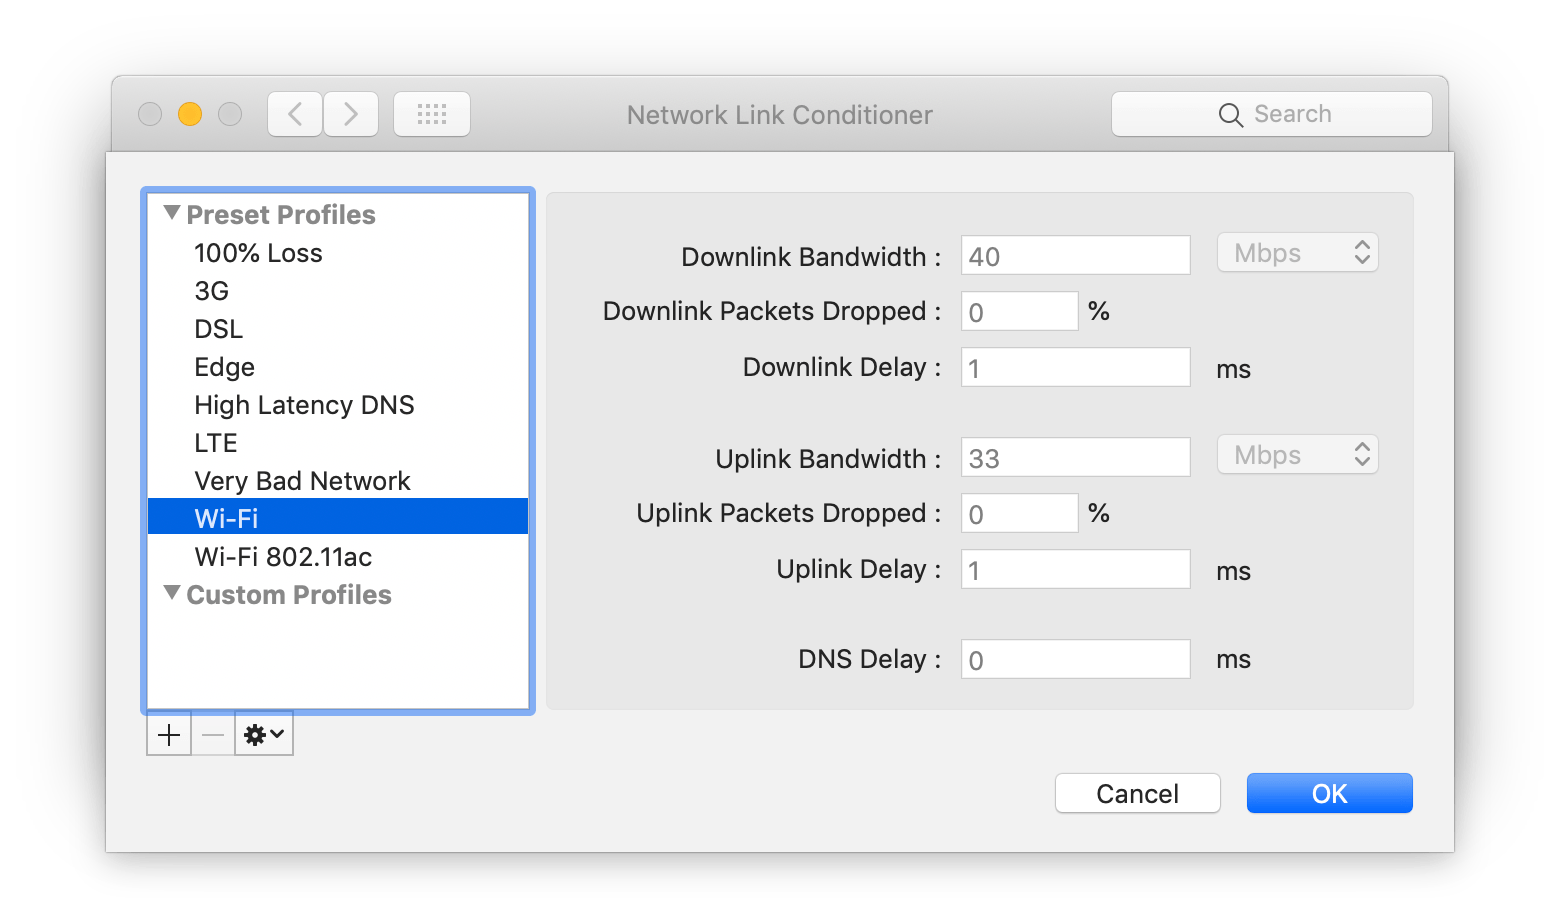
Controlling Bandwidth, Latency, and Packet Loss
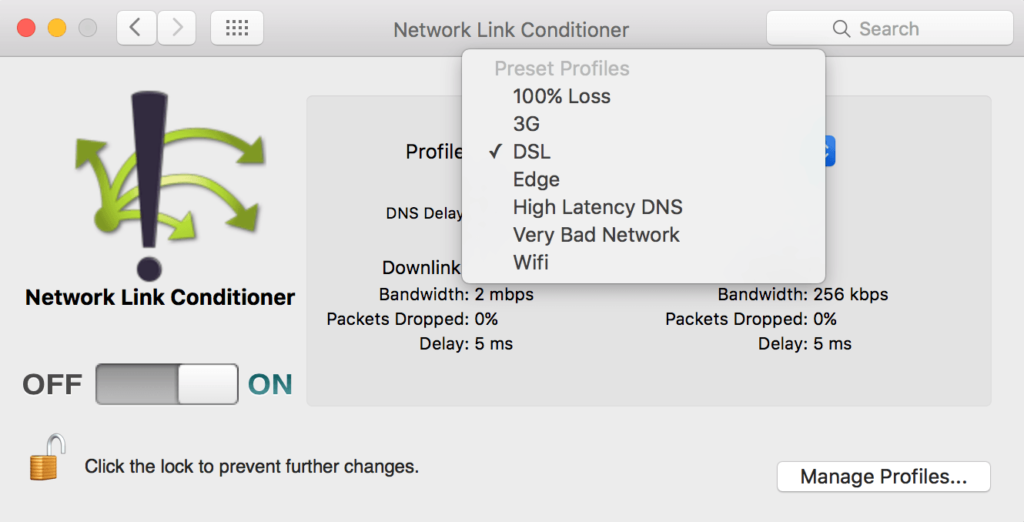
Enabling the Network Link Conditioner changes the network environment system-wide according to the selected configuration, limiting uplink or download bandwidth, latency, and rate of packet loss.
You can choose from one of the following presets:
- 100% Loss
- 3G
- DSL
- EDGE
- High Latency DNS
- LTE
- Very Bad Network
- WiFi
- WiFi 802.11ac
…or create your own according to your particular requirements.
Now try running your app with the Network Link Conditioner enabled:
How does network latency affect your app startup?
What effect does bandwidth have on table view scroll performance?
Does your app work at all with 100% packet loss?
Enabling Network Link Conditioner on iOS Devices
Although the preference pane works well for developing on the simulator, it’s also important to test on a real device. Fortunately, the Network Link Conditioner is available for iOS as well.
To use the Network Link Conditioner on iOS, set up your device for development:
- Connect your iOS device to your Mac
- In Xcode, navigate to Window > Devices & Simulators
- Select your device in the sidebar
- Click “Use for Development”
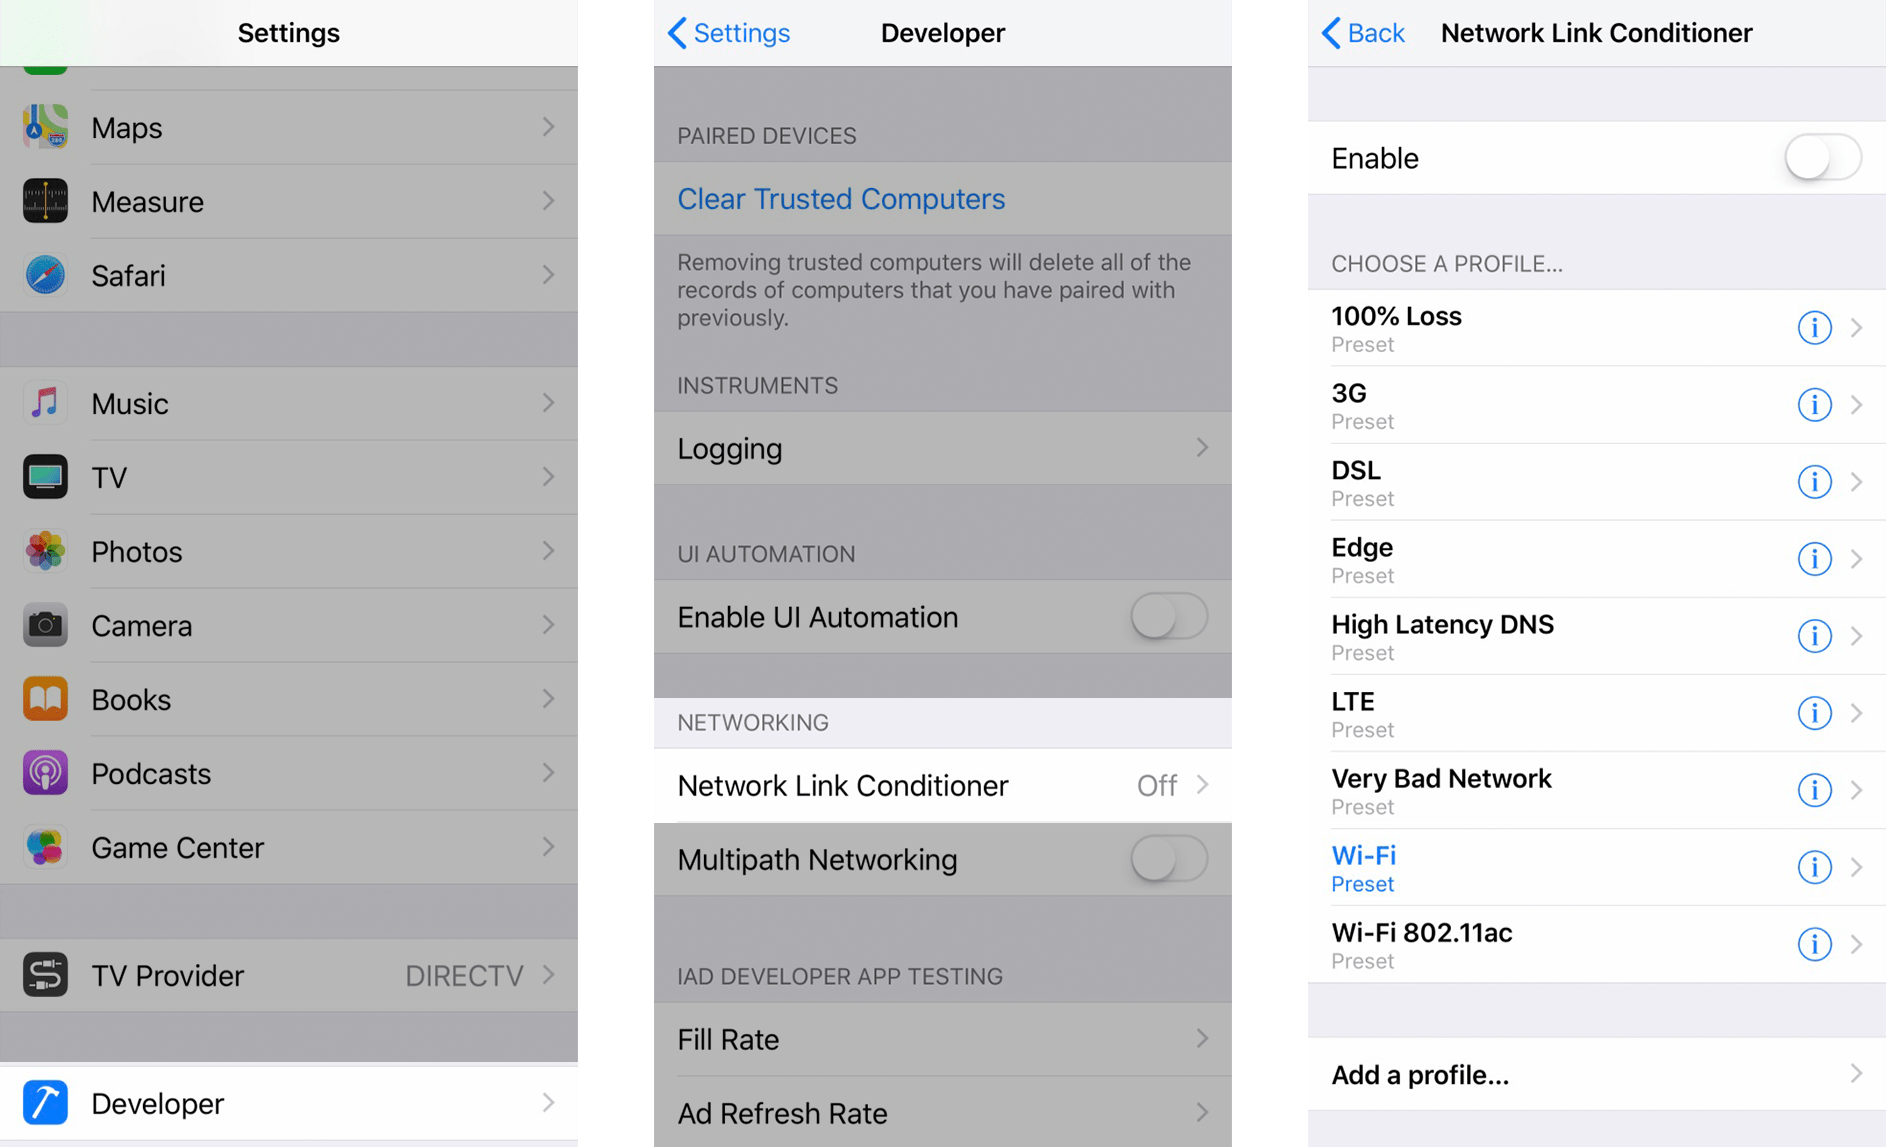
Now you’ll have access to the Developer section of the Settings app. You can enable and configure the Network Link Conditioner on your iOS device under Settings > Developer > Networking. (Just remember to turn it off after you’re done testing!).
Questions? Corrections? Issues and pull requests are always welcome.
Mattt (@mattt) is a writer and developer in Portland, Oregon. He is the founder of NSHipster and Flight School, and the creator of several open source libraries, including AFNetworking and Alamofire.
As We May Code
What if, instead of lowering source code down for the purpose of execution, we raised it for the purpose of understanding?
Источник
Network Link conditioner doesn’t work on macOS Sierra
I just upgraded to macOS Sierra last week and realized that Network Link Conditioner doesn’t work anymore.
Any solutions for fix it? Or if someone know a similar network traffic limiter app.
Thanks in advance.
Answers
Network Link Conditioner is quite tightly bound to the kernel architecture and, as such, has to be updated with each major OS release. Did you install the Xcode 8 version? If not, you should.
You can find this by:
launching Xcode 8
choosing Xcode > Open Developer Tool > More Developer Tools
finding, downloading and installing Additional Tools for Xcode 8
Share and Enjoy
—
Quinn “The Eskimo!”
Apple Developer Relations, Developer Technical Support, Core OS/Hardware
yes Xcode 8 it’s already on my computer, but when I launch Network link conditioner, I switch on but it has no effect on my network connectivity, even when set to 100% loss.
It’s working for me. Here’s what I did:
On 10.12, I downloaded the Additional Tools for Xcode 8 disk image.
I mounted it and double clicked Network Link Conditioner.prefPane.
That brought me to System Preferences, where I clicked Install to install preferences pane.
In the preferences pane, I created a new profile called
, where each of the Delay fields is see to 300 milliseconds.
In Terminal, I started pinging a local device; the ping time was a few milliseconds.
Back in the preferences pane, I activated my profile; looking at Terminal, I saw the ping time jump to over 300 milliseconds.
&. I then deactivate my profile; the ping time returned to normal.
Here’s a transcript of what I saw in Terminal:
Please try this out and let me know what you see.
Share and Enjoy
—
Quinn “The Eskimo!”
Apple Developer Relations, Developer Technical Support, Core OS/Hardware
Thanks for helping eskimo,
I am having trouble getting the «100% loss» profile to work appropiately on my computer. I’m on macOS Version: 10.12
I also installed the latest «Additional tools «from appledeveloper.com. I even erased the prior version and installed the latest network link conditioner. Still nothing.
Mac OS 10.12 + Xcode8 + Additional tools for Xcode8。Only «High Latency DNS» works for me!
Folks, it would help if you were more precise about what you tried, what worked, and what didn’t. I was hoping for something along the lines of I repeated the steps from your Oct 24 post and it worked as you described, but if I change step A to do X and change step B to Y then I see symptoms Z.
Share and Enjoy
—
Quinn “The Eskimo!”
Apple Developer Relations, Developer Technical Support, Core OS/Hardware
Only “DNS Delay” working.
I took another look at this and uncovered a known problem with Network Link Conditioner (r. 28793013) whereby the Xcode 8 version is not compatible with macOS 10.12. I don’t have any details to share as to when this will be fixed. For the moment, you’ll have to do this sort of testing on OS X 10.11 or iOS.
Share and Enjoy
—
Quinn “The Eskimo!”
Apple Developer Relations, Developer Technical Support, Core OS/Hardware
I took another look at this and uncovered a known problem with Network Link Conditioner (r. 28793013) whereby the Xcode 8 version is not compatible with macOS 10.12. I don’t have any details to share as to when this will be fixed.
Some good news here. The Additional Tools for Xcode 8.1, now available on the Downloads page, has the fixed Network Link Conditioner. Yay!
[You know, when I tell folks I can’t accurately predict the future I’m not joking; if my crystal ball hadn’t been on the fritz I would’ve delayed responding by a day (-:]
Share and Enjoy
—
Quinn “The Eskimo!”
Apple Developer Relations, Developer Technical Support, Core OS/Hardware
Источник
Question: Q: Network Link Conditioner to control Wi-Fi
I just finished installing and testing Network Link Conditioner that comes with Mac OS X Lion and Xcode4.1. It works great locally on the Mac, i.e. when I use the Internet connection that Network Link Condition is limiting directly.
However, when I create a Wi-Fi network on the Mac and share with it the Mac’s Internet connection, Network Link Conditioner blocks Internet access to the Wi-Fi network completely. When Network Link Conditioner is turned off, the phones that are connected to the Wi-Fi network are able to browse the Web without issues. But when I turn Network Link Conditioner back on, the phones lose Internet connectivity.
Does this mean NLC cannot be used to test actual iOS devices and is only useful when testing using the Simulator? Or is there a workaround for this?
Mac mini, Mac OS X (10.7.1)
Posted on Aug 25, 2011 11:48 AM
All replies
Loading page content
Page content loaded
+1 I was really hoping to use it for this exact test case and it will not work.
Oct 5, 2011 9:33 AM
I think the problem is caused by packets entering the firewall multiple times, inappropriately. This normally might be corrected via some MAC layer 2 filtering rules in ipfw, but those features are not present within ipfw as it appears in Mac OS X.
Note that Mac OS X Lion uses natpmpd for NAT in Internet Sharing, while Mac OS X Snow Leopard uses natd. These NAT solutions operate with different technical consequences, some of which affect the firewall rules used by Network Link Conditioner.
In the interim, I’ve found an acceptable, if not ideal solution. Instead of allowing Network Link Conditioner to create ipfw rules that modify every packet on every interface, modify the rules to only trap inbound packets traversing from the bridged interface to the LAN interface, and vice versa for outbound packets. After all, if you’re testing simulated network conditions on attached WiFi devices, you only need to degrade network conditions for those devices, and you don’t need (or probably want) your Mac’s internal Internet connection to be affected.
I’ve created a script that can be executed to automatically fix the appropriate ipfw rules in Mac OS X Lion. It needs to be executed as root every time you select a new profile in Network Link Conditioner. Or, run it once in polling mode ( ‘-p’ ), and it will run in the background and detect and fix Network Link Conditioner firewall rules automatically. It needs to be run as root because ipfw can only inspect and modify rules from an account with root privileges.
If you want to perform the same logic manually, simply look for rules in the following format using ‘ipfw list’:
Replace them with rules in the following format, assuming that en0 is your LAN connection and en1 is your bridged WiFi connection:
To perform the above modifications, issue the following commands:
You might need to reset your host and/or client WiFi connections before the modified rules work properly, as the firewall maintains packet state that sometimes directs packets according to previous firewall rules.
Note that in order for ipfw to allow rules to be created that span interfaces, you might have to modify the ‘scopedroute’ property to be disabled. Unfortunately, Mac OS X Lion has made this property read-only, and you can no longer modify the property by performing the following command, which works in Snow Leopard:
If you find yourself needing to fix this problem in order for Network Link Conditioner to work with bridged connections in Mac OS X Lion, read the following link for a solution on how to modify ‘scopedroute’:
Also note that after having implemented all of the above, sometimes the connection seems to freeze for several seconds at a time, after which it resumes normally. You can disable/reenable WiFi on the client to correct the situation immediately, or just wait it out. It’s an unfortunate side-effect of not having all the necessary tools to direct packets properly in Mac OS X Lion.
Источник
Network Link Conditioner

In this post we will discuss how you can simulate a bad network connection by using the Network Link Conditioner.
Bad Network Connection
iOS apps are running in a very difficult environment. Compared to a desktop computer you have limited memory and CPU resources. And even worse: The network connection is very inconsistent. We are using our apps not only at home but also on the train, while running and in the cafe. Many mobile apps depend on an internet connection, so that is very crucial that you are providing a good user experience even if the network connection is bad.
But on the other hand we normally have always a very good internet connection while developing apps. So you should not only test a bad network connection in the field, but also directly at development time. Fortunately that’s not a problem at all – you can simulate it with the network link conditioner, both on the simulator and on the iOS device.
Network Link Conditioner on the iOS simulator
To use the network link conditioner on the iOS simulator you have to install it on your Mac. For that you have to go to the Downloads for Apple Developers website and search for “hardware io tools for Xcode”. Then choose the newest one and after downloading and opening the .dmg file, you can choose “Network Link Conditioner.prefPane”. Now the Network Link conditioner is available as a new item on your system preferences panel:
After opening it you can choose between several profiles. In addition, you can also create your own profiles:
If you activate it, all the network traffic on your Mac is affected – not only the one in the simulator! So don’t forget to switch it off after you are done.
Network Link Conditioner on an iOS device
When you are developing iOS apps, you should not only test on the simulator but also on a real device. Fortunately, you can use the Network Link Conditioner also on iOS devices. It is available as long as the development mode is enabled on your iOS device.
You can find the network link conditioner at “Settings” -> “Developer” -> “Network Link Conditioner – Status”:
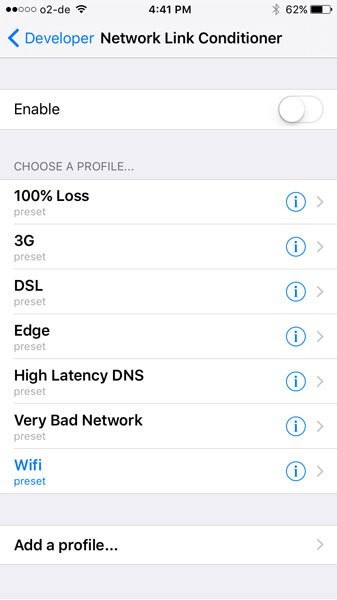
Again, you can choose between existing profiles and you can create new profiles.
[thrive_text_block color=”blue” headline=”Conclusion”]The network link conditioner is a great tool to test your iOS app under various network conditions.[/thrive_text_block]
Источник


