- Connect to a Windows computer from a Mac
- Connect to a Windows computer by browsing
- Connect to a Windows computer by entering its address
- Connect using an Ethernet cable
- Reconnect to recent computers or servers
- How to Network Windows 10 and OS X and Share Files
- Setup a Network Between OS X El Capitan and Windows 10
- Enable File Sharing and Network Discovery
- Ethernet or Wireless
- Connect to OS X El Capitan from Windows 10
- Other Troubleshooting Steps
- If you can’t connect Mac and Windows computers
- Share Mac files with Windows users
- Set up file sharing on the Mac
- Provide the information Windows users need
Connect to a Windows computer from a Mac
You can connect to Windows computers and servers on your network from your Mac.
For instructions on setting up the Windows computer, see Set up Windows to share files with Mac users.
Connect to a Windows computer by browsing
In the Finder  on your Mac, choose Go > Connect to Server, then click Browse.
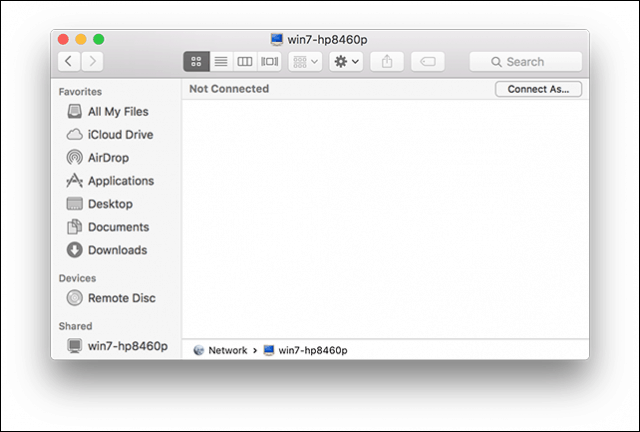
Find the computer’s name in the Shared section of the Finder sidebar, then click it to connect. You may need to click All to see all the shared computers.
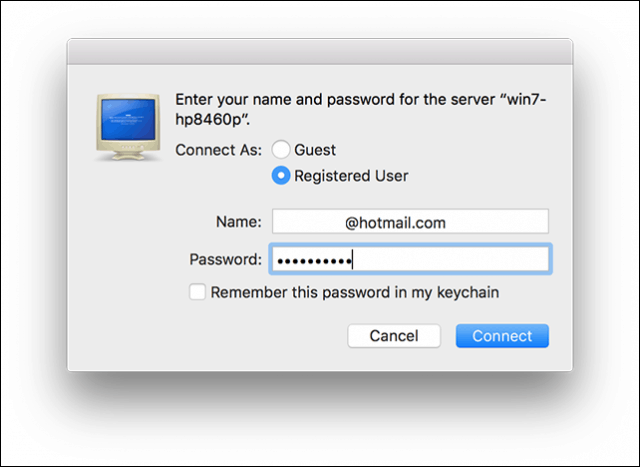
When you locate the shared computer or server, select it, then click Connect As.
In some cases you need the network area or workgroup for the shared computer. If you don’t have this information, contact the computer’s owner or your network administrator.
If necessary, enter your username and password, then select volumes or shared folders on the server.
Passwords for Windows computers and servers are often 14 characters or fewer. Check with the owner or administrator to be sure.
To make it easier to connect to the computer in the future, select “Remember this password in my keychain” to add your username and password for the computer to your keychain.
Connect to a Windows computer by entering its address
In the Finder on your Mac, choose Go > Connect to Server.
Type the network address for the computer in the Server Address field using one of these formats:
For information about the correct format for network addresses, see Network address formats for shared computers and servers.
Follow the onscreen instructions to type the workgroup name and a username and password, then choose the shared folder you want to access.
If you don’t know the workgroup name and the network name (called the computer name) for the Windows computer, contact the person who owns the computer or your network administrator.
If necessary, enter your username and password and select volumes or shared folders on the server.
Passwords for Windows computers and servers are often 14 characters or fewer. Check with the owner or administrator to be sure you have the correct password.
To make it easier to connect to the computer in the future, select “Remember this password in my keychain” to add your username and password for the computer to your keychain.
Connect using an Ethernet cable
Connect your Mac to the Windows computer using a standard Ethernet cable. If your Mac doesn’t have an Ethernet port, try using a USB-to-Ethernet adapter.
Connecting the two computers creates a small local network that consists of just the two computers.
On the Windows computer, turn on file sharing. Refer to the instructions that came with the Windows computer if you’re not sure how to do this.
Make sure the Internet Connection Firewall is turned off on the Windows computer, or if it’s on, make sure TCP port 445 is open to allow sharing connections.
For more information, refer to the user manual and onscreen help for the Windows computer.
On your Mac, choose Go > Connect to Server, then click Browse, or type the network address for the computer in the Server Address field.
Reconnect to recent computers or servers
Here are some ways to make it easy to reconnect to shared computers and servers you frequently use:
On your Mac, choose Apple menu

> Recent Items, then choose from the list of recent servers.
In the Finder on your Mac, choose Go > Connect to Server, click the pop-up menu to the far right of the Server Address field, then choose a recent server.
Add shared computers, network areas and workgroups to the Finder sidebar. Select the item, then choose File > Add To Sidebar or press Command-T.
Add a shared computer or server to your list of favourites. In the Finder on your Mac, choose Go > Connect to Server, enter the network address, then click the Add button  .
.
If you can’t locate a shared computer or server or connect to it, it may not be available, or you may not have permission to connect to it. Contact the person who owns the computer or the network administrator for help.
How to Network Windows 10 and OS X and Share Files


A decade ago, it was a headache trying to get Windows and OS X to talk to each other. Our previous article showed you how to set up a network between OS X Snow Leopard and Windows 7. Since then things have gotten easier, especially with Windows 10 and OS X El Capitan. There are many options available, which include file syncing and using external storage mediums. Setting up a peer to peer network is also an option. Let’s look at that.
Setup a Network Between OS X El Capitan and Windows 10
Before you begin, check to make sure both operating systems are updated. On OS X head to the Apple, menu > App Store > Updates to make sure it’s up-to-date.
Also, check to make sure your network adapters are functioning correctly. In Windows 10, press Windows key + X then click Device Manager. Expand Network Adapters; if there is no exclamation sign, then you are ready to go.

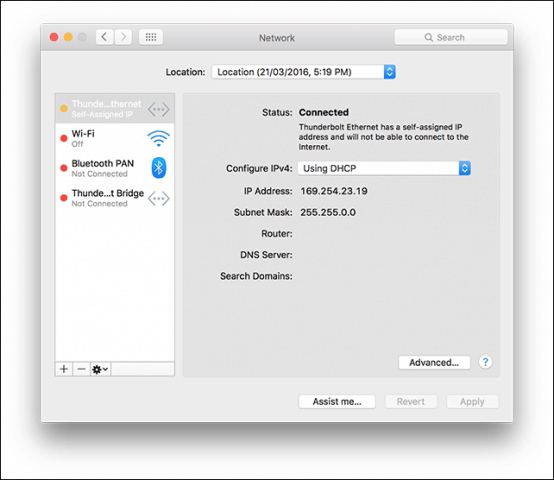
In OS X, launch System Preferences > Network and click your network connection.
Enable File Sharing and Network Discovery
Before you can browse each computer, you’ll need to enable the ability for both Windows 10 and OS X to see each other. In OS X, launch System Preferences > Sharing > check off File Sharing. Click Options then check off your user account. If you are unable to do this, your iCloud account might be preventing it. See instructions further down in this article on how to troubleshoot this problem.
In Windows 10, click Start > File Explorer then click Network in the Navigation pane. Click Turn on Network Discovery and File Sharing.

Ethernet or Wireless
This article assumes you are using an Ethernet Connection which is the best way to enable things to work. All you need is a CAT5 cable to connect both computers. You can also use a basic network switch or router to connect both machines. Depending on the model of Mac you own, you might need to invest in an Apple Thunderbolt to Gigabit Ethernet Adapter; if there is no built-in Ethernet port. The majority of Windows computers come built in with an Ethernet port; exceptions include Ultrabooks and a 2-in-1 device such as the Microsoft Surface.

After connecting both systems, launch the Finder or press Shift + Command + K to open the network folder. Your Windows 10 PC should automatically be mounted. Double click it.

On the next screen click the Connect As button.
Enter your Microsoft Account and password then click Connect.
Automatically, your Personal Folders and any other shared folders are mounted in the Finder.

You can proceed to browse and copy files.
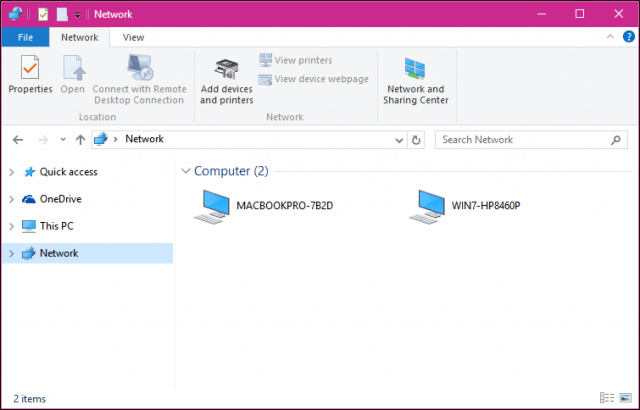
Connect to OS X El Capitan from Windows 10
Click Start > File Explorer > Network. Double-click the Mac icon, and then log in.
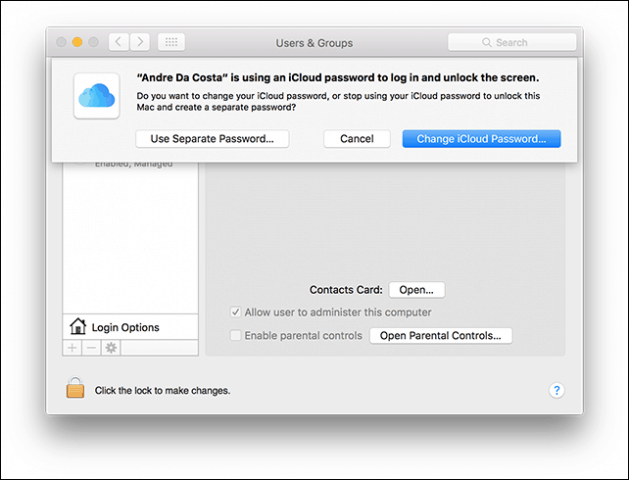
If you are not able to log in, your iCloud account on the Mac might be preventing you from doing so. If you use your iCloud credentials to log into your Mac, it is unfortunately not compatible with Windows File Sharing for security reasons. The workaround for this is to change your account password.
Open System Preferences > Users & Groups > Change Password, click Use Separate Password.
Enter a new password, confirm, restart your Mac and configure Windows File Sharing again. Launch System Preferences > Sharing > check off File Sharing > click Options then check off the account you want to share files from.
Other Troubleshooting Steps
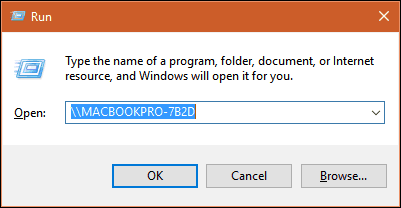
If you still don’t see the Mac, try connecting manually using the NETBIOS name. You can find this in the Network Preference on the Mac. Launch System Preferences > Network > Advanced > WINS tab.
From your Windows PC, press Windows key + R then type the machine name then click OK. Enter your credentials; you should be able to access your resources.
There are still some wrinkles in the network experience between OS X and Windows, but it has certainly gotten better – both from the setup and troubleshooting side. I hope Apple modifies the iCloud password policy in future versions of OS X. I was able to log into my Windows PC from the Mac using my Microsoft Account credentials, so I don’t see why it can’t be same for OS X.
Be sure to check out our other articles about file sharing:
If you can’t connect Mac and Windows computers
If you can’t connect Mac and Windows computers, make sure both computers are on the same network and the network connection is working. Here are some additional things to try.
Make sure your Mac is connected to the network. To check your connection, choose Apple menu
> System Preferences, then click Network. Your type of network connection is listed on the left. The indicator next to it should be green.
If the computers are supposed to be in the same workgroup and on the same local network or subnetwork, make sure the workgroup name is exactly the same on both.
Make sure you typed the computer names and workgroup name correctly.
Make sure you typed the Mac username and password correctly.
In some cases, you may need to reset the password for the account in Users & Groups preferences. To reset the password, choose Apple menu > System Preferences, then click Users & Groups.
Make sure you typed the Windows username and password correctly.
The password for the Windows user account you’re using may need to be changed on the Windows computer.
In some cases, the Windows computer may need to be restarted after the password is changed.
If you’re trying to connect to a shared folder on a Mac and see a message that the folder you specified isn’t valid, make sure you entered the information correctly. If the information is entered correctly, check to see whether the Mac is in sleep mode.
If you don’t have access to one or both computers, contact the computer or network administrator for help.
Check Windows Help and Microsoft support services for more information about setting up file sharing on your Windows computer.
Share Mac files with Windows users
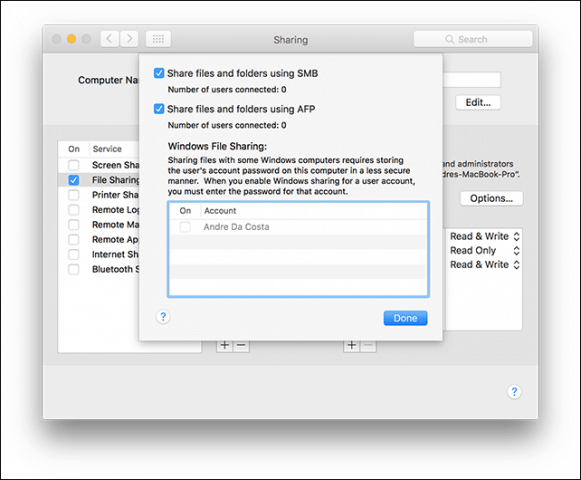
To let users connect to your Mac from a Windows computer, turn on file sharing and enable SMB sharing.
Set up file sharing on the Mac
On your Mac, choose Apple menu
> System Preferences, then click Sharing.
Select the File Sharing tickbox, then click Options.
Select “Share files and folders using SMB”.
In the Windows File Sharing list, select the tickbox next to the user account that will be used to share files with Windows users, enter the password for that user, then click OK.
Choose View > Network, select your active connection, then click Advanced.
Click the WINS tab, then enter the workgroup name used by the Windows computer.
If you don’t know the workgroup name, on the Windows computer open Control Panel > System and Security > System. (Windows computers normally use either WORKGROUP or MSHOME.)
Click OK, then click Apply.
Provide the information Windows users need
To connect to your Mac, Windows users need the network address for your Mac, and a username and password to use to log in to your Mac.
To find your Mac computer’s network address, choose Apple menu
> System Preferences, click Sharing, then select File Sharing. The address appears below the “File Sharing: On” indicator, and looks similar to this example: smb://17.212.167.33/.
Create an account on your Mac for each Windows user. To create accounts, choose Apple menu > System Preferences, then click Users & Groups.
If you want to use an account that existed before you installed the latest version of macOS, you may need to reset the password for the account in Users & Groups preferences.
Because the passwords of user accounts used for Windows sharing may be stored in a less secure manner, turn off the account when it’s not being used. Before you turn off Windows sharing, turn off all the accounts you enabled. Otherwise, the passwords are still stored less securely.


