- NetworkManager
- Features
- Documentation
- Wired Networks are Unmanaged
- Enabling Interface Management
- «Auto Ethernet» and «Auto eth0»
- Настройка Network Manager в консоли
- Собираем информацию о системе
- Синтаксис и опции nmcli
- Настройка сети с помощью nmcli
- 1. Запустить NetworkManager
- 2. Список подключений
- 3. Управление подключениями
- 4. Создание DHCP соединения
- 5. Создание соединения с статическим адресом
- 6. Настройка подключения
- 7. Настройка Wifi
- Выводы
- Debian Network Manager Tutorial
- Network-Manager graphical description
- Network settings:
- Network connections:
- Using nmcli, the command line interface for Network-Manager
- Getting information on network devices with nmcli Network Manager interface:
- Managing your wifi with nmcli Network Manager interface:
- Starting, stopping and disconnecting network interfaces with nmcli Network Manager interface:
- About the author
- David Adams
- NetworkManager
NetworkManager attempts to keep an active network connection available at all times.
The point of NetworkManager is to make networking configuration and setup as painless and automatic as possible. If using DHCP, NetworkManager is intended to replace default routes, obtain IP addresses from a DHCP server and change nameservers whenever it sees fit. In effect, the goal of NetworkManager is to make networking Just Work .
Whilst it was originally targeted at desktops, it has more recently been chosen as the default network management software for some non-Debian server-oriented Linux distributions. If you have special needs, the upstream’s developers would like to hear about them, but understand that NetworkManager is not intended to serve the needs of all users.
If not using Network Manager:
For basic or simple configurations (e.g. workstation), the regular way to configure the network was using interfaces configuration file at /etc/network/interfaces. Details are described in NetworkConfiguration. It still may be used.
Another way to configure: leverage on Systemd
NetworkManager is composed of two layers:
A daemon running as root: network-manager.
A front-end: nmcli and nmtui (enclosed in package network-manager), nm-tray, network-manager-gnome (nm-applet), plasma-nm.
Additionally, there are various plugins available that enable NetworkManager to handle other, special connections like different types of VPN connections.
NetworkManager will only handle interfaces not declared in /etc/network/interfaces (see README file).
NetworkManager keeps connection information on known individual networks in configuration files called profiles. Those are stored at /etc/NetworkManager/system-connections/. For options in these files refer to the manpage on nm-settings: man nm-settings or online. They can be edited (as root) using a text editor or the nm-connection-editor (enclosed in network-manager-gnome).
For changes in configuration to become effective, you may have to restart the NetworkManager daemon:
Starting with Debian 11 (bullseye), use:
Features
The features of NetworkManager are described on its homepage.
Documentation
Make sure you read the fine manual:
Wired Networks are Unmanaged
As of Debian 6.0 «Squeeze», NetworkManager does not manage any interface defined in /etc/network/interfaces by default.
Unmanaged devices means NetworkManager doesn’t handle those network devices. This occurs when two conditions are met:
The file /etc/network/interfaces contains anything about the interface, even:
And /etc/NetworkManager/NetworkManager.conf contains:
Enabling Interface Management
If you want NetworkManager to handle interfaces that are enabled in /etc/network/interfaces:
Set managed=true in /etc/NetworkManager/NetworkManager.conf.
Starting with Debian 11 (bullseye), use:
«Auto Ethernet» and «Auto eth0»
Auto Ethernet means «Select an Ethernet interface automatically»
Auto eth0 means «autoconfigure the eth0 interface».
A) Use nm-connection-editor or configure /etc/network/interfaces as described in NetworkConfiguration. Q. How can I configure DNS for NetworkManager?
A) The short answer is to use nm-connection-editor. For the long answer see the corresponding entry in NetworkConfiguration. Q. Why can’t I see NetworkManager with my new user account ?
A) Make sure human users are in the netdev group (see /usr/share/doc/network-manager-gnome/README.Debian). Q. How to setup a connection sharing («hotspot») for a wired interface ?
A) First make sure to install dnsmasq-base (but not dnsmasq unless you disable the system daemon in /etc/default/dnsmasq). Then use nm-connection-editor and setup a new profile using «shared to other computer» as the method for IPv4 (not possible from Gnome3’s gnome-control-center). This hides all the complexity (dnsmasq, iptables, sysctl). Finally, use that profile for the network interface connected to the shared network. For Wi-Fi interfaces, a hotspot functionality is provided which uses the same functionality besides setting up an ad-hoc WiFi network.
Источник
Настройка Network Manager в консоли
NetworkManager — популярный инструмент управления сетевыми подключениями в Linux, имеет удобный графический интерфейс как для Gnome, так и для KDE, но бывают ситуации когда окружение рабочего стола не запускается, и нужно поднимать сеть из консоли, или нужно настроить сеть на сервере где не установлено рабочее окружение.
В этой инструкции будет рассмотрена настройка Network Manager в консоли с помощью утилиты nmcli. С настройкой в графическом интерфейсе вы разберетесь без каких-либо инструкций, поэтому была выбрана именно эта тема. Также поговорим о том, как посмотреть информацию о сетевых интерфейсах в системе.
Собираем информацию о системе
Чтобы получить информацию обо всех установленных в системе сетевых интерфейсах используйте команду:

Для просмотра статистики переданных и полученных пакетов для интерфейса, например, enp24s0, наберите:
ip -s link show enp24s0

А чтобы посмотреть таблицу маршрутизации:
ip route show match 0/0

Синтаксис и опции nmcli
Утилита nmcli — многофункциональный и гибкий инструмент командной строки для настройки сети с помощью Network Mananger из консоли. Сначала рассмотрим ее синтаксис:
$ nncli опции объект команда
Чаще всего в nmcli мы будем использовать такие объекты:
- device — управление сетевыми интерфейсами;
- connection — управление соединениями;
- networking — управление сетью в целом;
- general — показывает состояние всех сетевых протоколов и NetworkManager в целом;
- radio — управление сетевыми протоколами, wifi, ethernent и т д.
Команды для каждого объекта разные, а опции нам не будут интересны. Дальше рассмотрим примеры nmcli network manager.
Настройка сети с помощью nmcli
1. Запустить NetworkManager
Первым делом нужно запустить NetworkManager из консоли:
sudo systemctl start NetworkManager
Теперь смотрим состояние интерфейсов с помощью nmcli:
nmcli general status

Еще мы можем посмотреть имя хоста:
nmcli general hostname

Получаем состояние интерфейсов
nmcli device status
2. Список подключений
Теперь самое интересное, управление сетью nmcli. Смотрим список доступных подключений:
nmcli connection show

Здесь вы можете видеть одно проводное подключение для интерфейса enp24s0. С помощью следующей команды можно посмотреть информацию о нём:
nmcli connection show «Проводное соединение 2»

3. Управление подключениями
Чтобы подключится к сети с помощью нужного подключения используйте команду up:
nmcli connection up «Проводное соединение 2»
Команды можно сокращать, например:
nmcli conn up «Проводное соединение 2»

А для деактивации подключения используйте команду down:
nmcli conn down «Проводное соединение 2»

4. Создание DHCP соединения
Чтобы создать новое подключение используйте команду add. Например создадим новое подключение с именем dhcp:
nmcli connection add con-name «dhcp» type ethernet ifname enp24s0
Команде надо передать параметр type — тип устройства, в нашем случае ethernet (Проводное соединение), а также ifname — название сетевого интерфейса, в этом примере enp24s0. По умолчанию используется тип подключения DHCP, поэтому больше ничего настраивать не надо и вы можете уже активировать это подключение как описано выше.
5. Создание соединения с статическим адресом
Для статического подключения настроек больше, вам надо передать команде add ip адрес, который будет использоваться в качестве основного в параметре ip4, а также шлюз с помощью параметра gw4:
nmcli connection add con-name «static» ifname enp2s0 autoconnect no type ethernet ip4 192.168.0.210 gw4 192.168.0.1

6. Настройка подключения
Продолжим настройку нашего статического соединения. Обычно оно уже может работать, но вы можете захотеть добавить DNS сервер. Для этого используется команда modify:
nmcli conn modify «static» ipv4.dns 8.8.8.8
И ещё один DNS сервер с помощью оператора +:
nmcli conn modify «static» +ipv4.dns 8.8.4.4
Для добавления дополнительной информации в поле используйте символ +. Например, вот так можно добавить еще один ip адрес:
nmcli conn modify «static» +ipv4.addresses 192.168.0.240/24
Обратите внимание, что IP адрес должен быть из той же подсети, что и ваш шлюз иначе может ничего не работать. Теперь можете активировать подключение:
nmcli connection up static
7. Настройка Wifi
В графическом интерфейсе это делается одной галочкой, здесь одной командой. Смотрим состояние wifi:
nmcli radio wifi

nmcli radio wifi on
nmcli radio wifi off
Такой командой можно посмотреть список доступных сетей wifi:
nmcli device wifi list
Команда для подключения к новой сети wifi выглядит не намного сложнее. Например, давайте подключимся к сети TP-Link с паролем 12345678:
nmcli device wifi connect «TP-Link» password 12345678 name «TP-Link Wifi»
Если всё прошло хорошо, то вы получите уже привычное сообщение про создание подключения с именем TP-Link Wifi и это имя в дальнейшем можно использовать для редактирования этого подключения и управления им, как описано выше.
Выводы
Как видите, все очень просто и быстро. Настройка network manager в консоли выполняется в пару команд, достаточно только их запомнить или где-нибудь написать, чтобы вы могли выполнить управление сетью nmcli когда это понадобится.
Источник
Debian Network Manager Tutorial
NetworkManager seeks to keep connectivity through Ethernet, WIFI, PPPoE and allows VPN (Virtual Private Network). It has several graphical interfaces for GNOME, KDE, Cinnamon and more, it simplifies the network configuration including network devices, gateways configuration, IP address assignation, VPN, bridges, DNS and additional options.
Learning where settings are on Network Manager can help for example when you want to know how to reveal the current or a former wifi connection password.
This tutorial focuses on network-manager itself and nmcli which is the command line interface to manage Network-Manager with a brief description of the graphical interface for GNOME which is really intuitive. Instructions are for Debian based Linux distributions which includes Network-Manager by default, therefore there are no installation instructions, but if you used WICD to manage your connections probably your network-manager won’t launch automatically, if that’s your case you need to remove the network manager and reinstall it.
Network-Manager graphical description
Note: This section describes the graphical interface of network-manager which is user friendly and intuitive, for command line instructions jump to nmcli tutorial section.
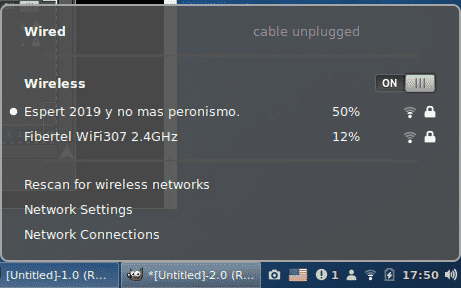
The network-manager is a daemon starting when the system boots, it can be graphically found in the Gnome applets, next to the clock or sound icons, if you are connected through wifi you’ll find a waves icon like in my example below, through Ethernet you’ll find connected wired devices.
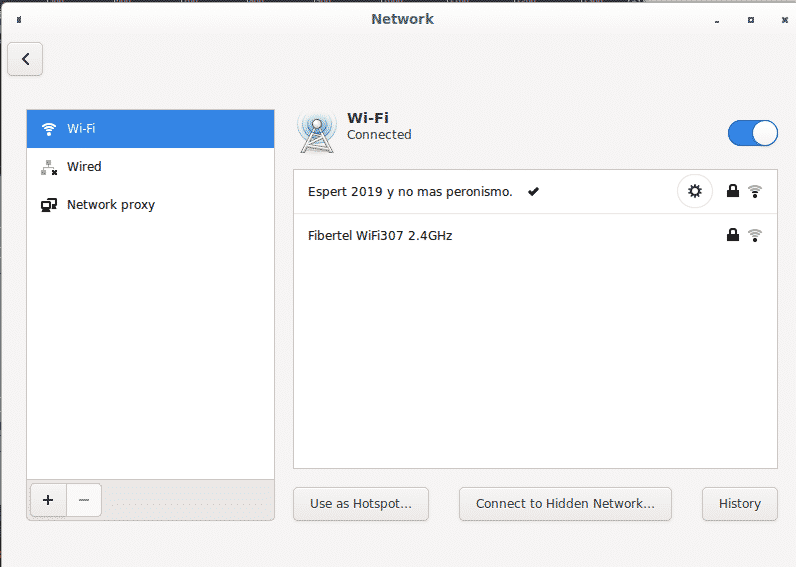
At the top you’ll find the wired connections, then the wireless connections with the option to disable your wireless card, the option to rescan for available networks, Network Settings and Network Connections.

Network settings:
On the network settings section you have options like disabling your wifi card or connect to networks,including hidden networks, setup proxies and more:
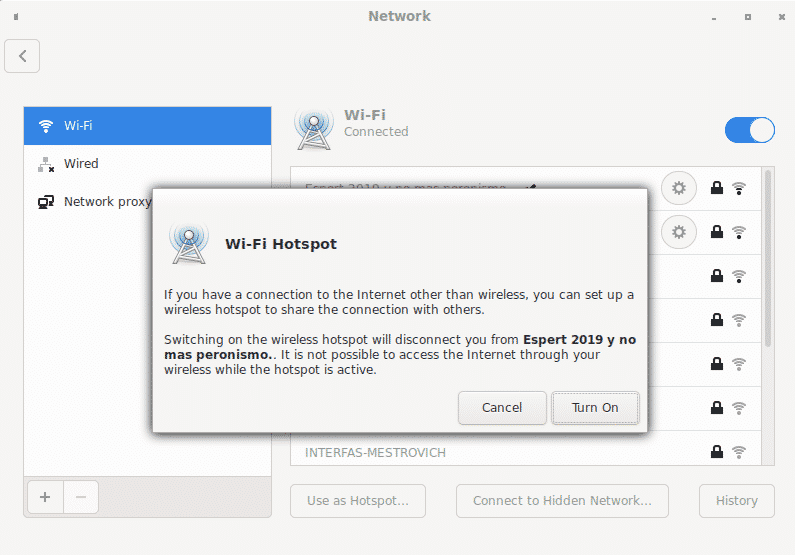
Among the available options you can use your device as hotspot easily if you have an additional connection, you can not use your device as hotspot while being used to connect to the internet, but you can share for example, your ethernet connection through your wifi device.
On the window bottom you can find symbols + and – to edit additional options to add and remove VPN connections importing files.
On the network settings main screen next to each connection there are a gear icon to access additional configuration options, a padlock showing if the connection is protected and the signal power:

By clicking on the gear of the established connection you can get and edit settings, the first section “details” will summarize the connection configuration:

The second section “security” displays the encryption type and allows to show the current wireless connection password:
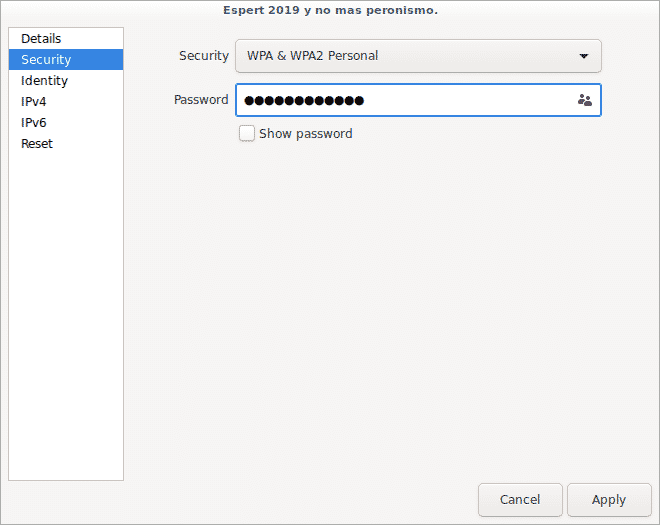
To show the password just mark the “show password” option.
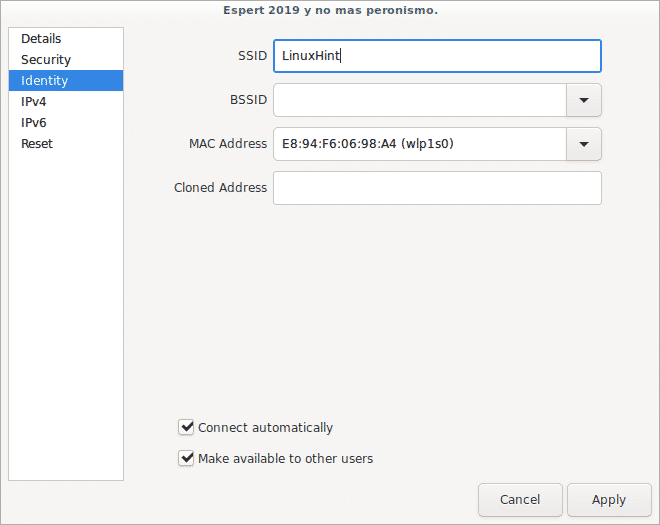
The third section “identity” shows the wifi connection name, the router and local mac addresses:
The fourth section “IPv4” allows to enable or disable this protocol, the DHCP service, the DNS and routing options for the IPv4 protocol only.

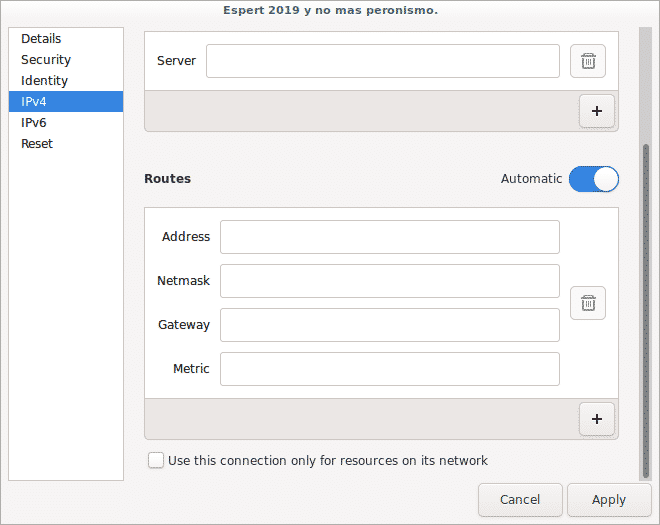
The fifth section “IPv6” is the same than above but for IPv6 protocol:

Finally on the last section you can reset all connection settings with option to keep the connection as preferred or not to prevent it from connecting automatically again.

Network connections:
Going back to the menu on the applets bar now click on Network Connections:
On the main menu you’ll see all available connections classified by type, at the bottom you’ll see symbols + and – to add and remove connections.

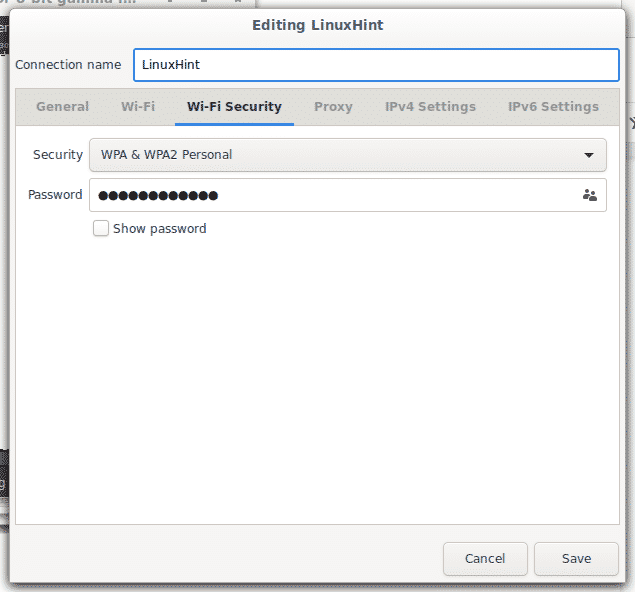
Next to them there is a gear icon to configure the same options we saw before, the first tab General allows to set the connection preference to connect automatically, to define which users can connect to the network and VPN automation:

The next tab Wi-Fi shows the connection name, the connection mode (client, hotspot or ad hoc), frequency, channel, mac addresses (bssid) and MTU (Max. transmission unit).

Next tab Wifi-Security shows the encryption type and allows to reveal the currentor former password (depending if you are checking a current connection or an outdated one).
Next tab allows to configure a proxy for the whole connection or to browse, you can specify it:

Tab IPv4 allows to change configuration for this protocol such as gateways, DNS and DHCP.

To edit your gateway click on Routes…

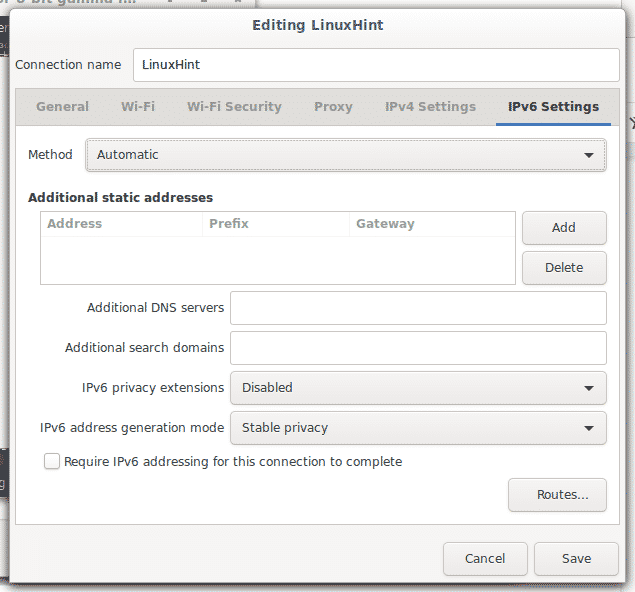
Finally you have the IPv6 tab similar to IPv4 but for the IPv6 protocol:
These are all available options on the Network Manager.
Now let’s see a little about nmcli to see some settings from the command line.
Using nmcli, the command line interface for Network-Manager
The option -h will display all available options for this command.
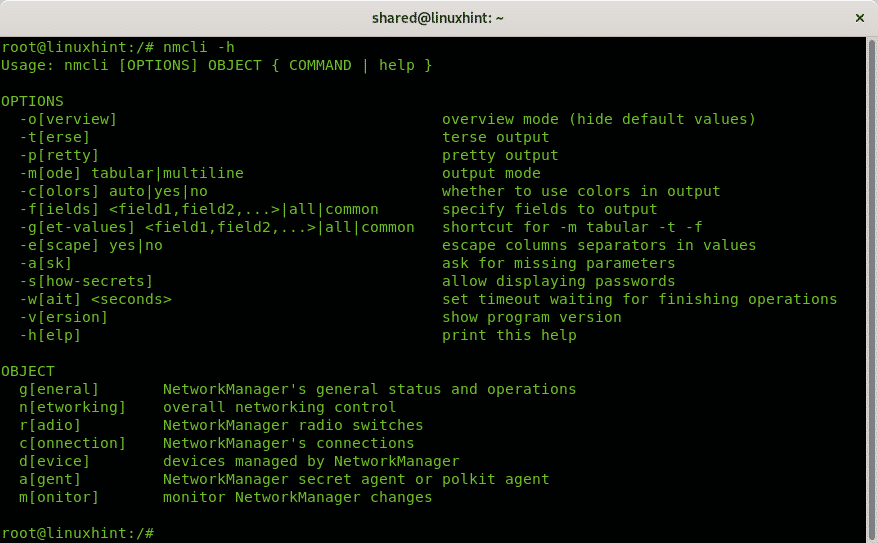
As you can see there are two categories, OPTIONS and OBJECT, where OPTIONS you can instruct how information should be printed and OBJECT what information should be printed.
Among the available options for nmcli you’ll find:
- -o: When using options to display information, the -o (overview) option is useful to summarize the output omitting empty properties and default settings
- -t: The options -t (terse) is used for scripting, by applying this options you can display only values.
- -p: Contrary to the -t option, the -p (pretty) option is to optimize the output for humans, by using this option the output will be listed in columns.
- -m: By default nmcli shows the output in tabular mode. The options -m (mode) allows to change the output to multiline mode.
- -c: This option is to color the output.
- -f: The option -f(field) is useful to specify what fields should include in the output.
- -g: Same than -m
- -e: The option -e (escape) is useful to escape separators (“:”, “\”).
- -a: The option -a (ask) instructs network-manager to ask additional information if needed, like passwords.
- -s: The option -s (show secret) shows passwords.
- -w: The option -w (wait) allows to limit the time for the requested operation.
- -v: The option -v (version) shows the nmcli version.
In the OBJECT section there are 7 options:
- general: This allows to display the Network-Manager status, permissions, hostname and logging level for domains.
- networking: This object is also useful to display the status, to enable and disable networking.
- radio: This object allows to check the wireless state and to turn off and turn on the wireless card.
- connection: This object allows to display connections, add, modify, clone, export, import connections and more.
- device: This object allows to display the status, to connect, disconnect network devices, to list, connect and rescan wifi networks.
- monitor: This object allows to monitor NetworkManager connectivity.
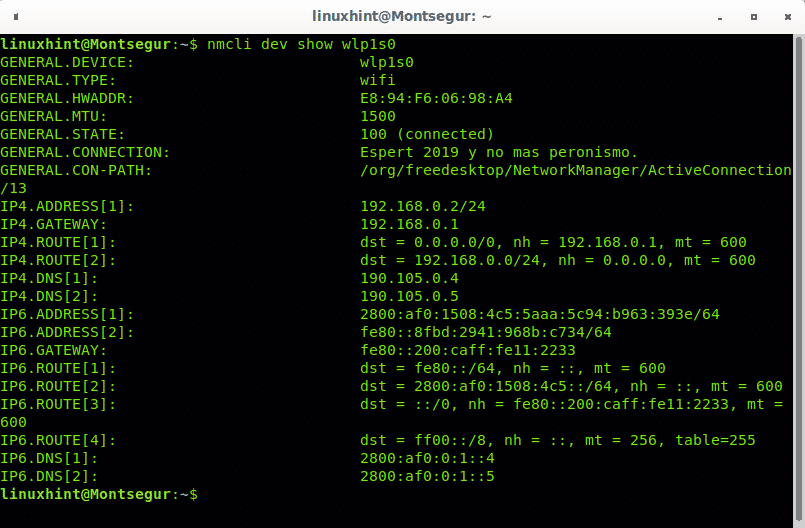
Getting information on network devices with nmcli Network Manager interface:
The following command will show complete information on each network device:

The following example shows the same output optimized for human view through the -p (pretty) option described above:

You can get a summarized view on all devices status by running:

You can also display information on a specific device:
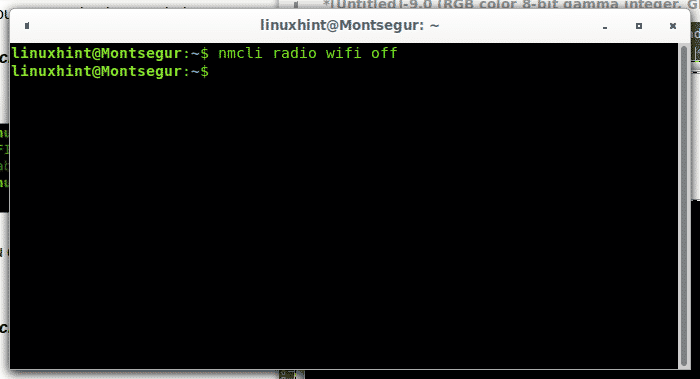
Managing your wifi with nmcli Network Manager interface:
If you want to check your wireless status use the object radio:

You can disable the wifi adapter by specifying it adding the option off:
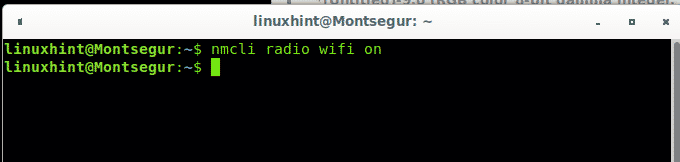
By using the option on you can enable your wifi:
When we establish a connection, a profile containing the necessary information to establish it again in the future is created,to print the profiles run:
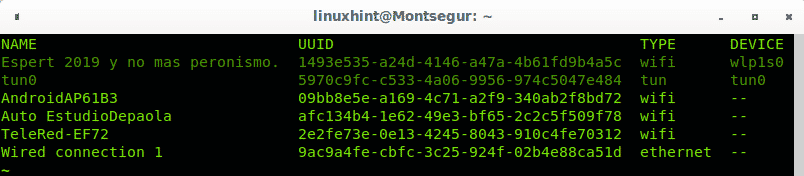
Starting, stopping and disconnecting network interfaces with nmcli Network Manager interface:
To disable a connection run:
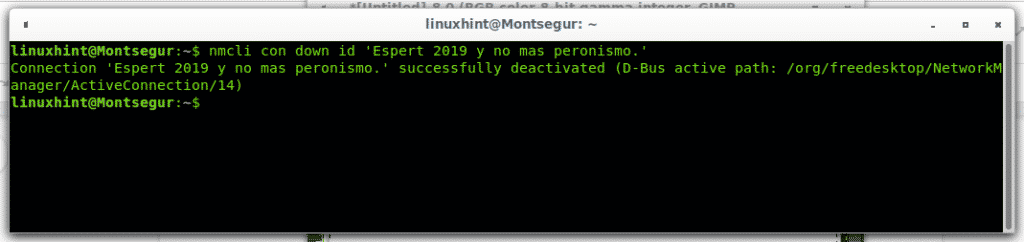
Note: while single quote are not mandatory they are useful for connections including spaces, usually on wireless connections.
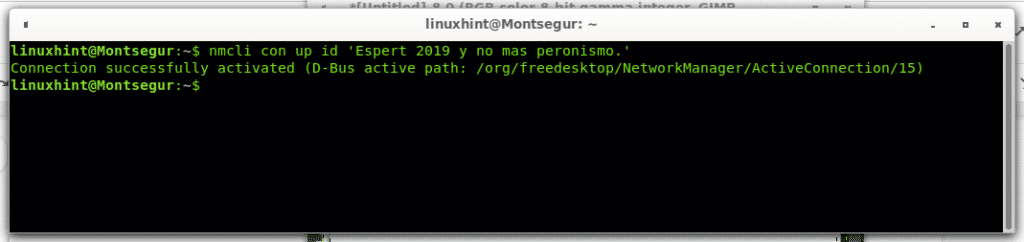
You can enable the connection by replacing the down for up as in the following example:
You can also disconnect and connect devices instead of connections, when you disable a connection invoking the device instead of the connection name it will prevent the connection from reestablishing automatically:

To connect just replace “disconnect” for “connect”:

I hope you found this tutorial on Network Manager useful. Keep following LinuxHint for more tips and updates on Linux and networking.
About the author
David Adams
David Adams is a System Admin and writer that is focused on open source technologies, security software, and computer systems.
Источник


