- A Practical Guide to Nmap (Network Security Scanner) in Kali Linux
- System Requirements
- Kali Linux – Working with Nmap
- How to Find Live Hosts on My Network?
- Find and Ping All Live Hosts on My Network
- Find Open Ports on Hosts
- Find Services Listening on Ports on Hosts
- Find Anonymous FTP Logins on Hosts
- Check for Vulnerabilities on Hosts
- If You Appreciate What We Do Here On TecMint, You Should Consider:
- Как пользоваться Nmap для сканирования сети
- Как работает Nmap?
- Синтаксис Nmap
- Как пользоваться Nmap для сканирования портов в Linux
- Выводы
A Practical Guide to Nmap (Network Security Scanner) in Kali Linux
In the second Kali Linux article, the network tool known as ‘nmap‘ will be discussed. While nmap isn’t a Kali only tool, it is one of the most useful network mapping tools in Kali.
Nmap, short for Network Mapper, is maintained by Gordon Lyon (more about Mr. Lyon here: http://insecure.org/fyodor/) and is used by many security professionals all over the world.
The utility works in both Linux and Windows and is command line (CLI) driven. However for those a little more timid of the command line, there is a wonderful graphical frontend for nmap called zenmap.
It is strongly recommended that individuals learn the CLI version of nmap as it provides much more flexibility when compared to the zenmap graphical edition.
What purpose does nmap server? Great question. Nmap allows for an administrator to quickly and thoroughly learn about the systems on a network, hence the name, Network MAPper or nmap.
Nmap has the ability to quickly locate live hosts as well as services associated with that host. Nmap’s functionality can be extended even further with the Nmap Scripting Engine, often abbreviated as NSE.
This scripting engine allows administrators to quickly create a script that can be used to determine if a newly discovered vulnerability exists on their network. Many scripts have been developed and included with most nmap installs.
A word of caution – nmap is a commonly used by people with both good and bad intentions. Extreme caution should be taken to ensure that you aren’t using nmap against systems that permission has not be explicitly provided in a written/legal agreement. Please use caution when using the nmap tool.
System Requirements
- Kali Linux (nmap is available in other operating systems and functions similar to this guide).
- Another computer and permission to scan that computer with nmap – This is often easily done with software such as VirtualBox and the creation of a virtual machine.
- For a good machine to practice with, please read about Metasploitable 2
- Download for MS2 Metasploitable2
- A valid working connection to a network or if using virtual machines, a valid internal network connection for the two machines.
Kali Linux – Working with Nmap
The first step to working with nmap is to log into the Kali Linux machine and if desired, start a graphical session (This first article in this series installed Kali Linux with the Enlightenment Desktop Environment).
During the installation, the installer would have prompted the user for a ‘root‘ user password which will be needed to login. Once logged in to the Kali Linux machine, using the command ‘startx‘ the Enlightenment Desktop Environment can be started – it is worth noting that nmap doesn’t require a desktop environment to run.
![]() Start Desktop Environment in Kali Linux
Start Desktop Environment in Kali Linux
Once logged into Enlightenment, a terminal window will need to be opened. By clicking on the desktop background, a menu will appear. Navigating to a terminal can be done as follows: Applications -> System -> ‘Xterm‘ or ‘UXterm‘ or ‘Root Terminal‘.
The author is a fan of the shell program called ‘Terminator‘ but this may not show up in a default install of Kali Linux. All shell programs listed will work for the purposes of nmap.
![]() Launch Terminal in Kali Linux
Launch Terminal in Kali Linux
Once a terminal has been launched, the nmap fun can begin. For this particular tutorial, a private network with a Kali machine and a Metasploitable machine was created.
This made things easier and safer since the private network range would ensure that scans remained on safe machines and prevents the vulnerable Metasploitable machine from being compromised by someone else.
How to Find Live Hosts on My Network?
In this example, both of the machines are on a private 192.168.56.0 /24 network. The Kali machine has an IP address of 192.168.56.101 and the Metasploitable machine to be scanned has an IP address of 192.168.56.102.
Let’s say though that the IP address information was unavailable. A quick nmap scan can help to determine what is live on a particular network. This scan is known as a ‘Simple List’ scan hence the -sL arguments passed to the nmap command.
![]() Nmap – Scan Network for Live Hosts
Nmap – Scan Network for Live Hosts
Sadly, this initial scan didn’t return any live hosts. Sometimes this is a factor of the way certain Operating Systems handle port scan network traffic.
Find and Ping All Live Hosts on My Network
Not to worry though, there are some tricks that nmap has available to try to find these machines. This next trick will tell nmap to simply try to ping all the addresses in the 192.168.56.0/24 network.
![]() Nmap – Ping All Connected Live Network Hosts
Nmap – Ping All Connected Live Network Hosts
This time nmap returns some prospective hosts for scanning! In this command, the -sn disables nmap’s default behavior of attempting to port scan a host and simply has nmap try to ping the host.
Find Open Ports on Hosts
Let’s try letting nmap port scan these specific hosts and see what turns up.
![]() Nmap – Network Ports Scan on Host
Nmap – Network Ports Scan on Host
Wow! This time nmap hit a gold mine. This particular host has quite a bit of open network ports.
These ports all indicate some sort of listening service on this particular machine. Recalling from earlier, the 192.168.56.102 IP address is assigned to the metasploitable vulnerable machine hence why there are so many open ports on this host.
Having this many ports open on most machines is highly abnormal so it may be a wise idea to investigate this machine a little closer. Administrators could track down the physical machine on the network and look at the machine locally but that wouldn’t be much fun especially when nmap could do it for us much quicker!
Find Services Listening on Ports on Hosts
This next scan is a service scan and is often used to try to determine what service may be listening on a particular port on a machine.
Nmap will probe all of the open ports and attempt to banner grab information from the services running on each port.
![]() Nmap – Scan Network Services Listening of Ports
Nmap – Scan Network Services Listening of Ports
Notice this time nmap provided some suggestions on what nmap thought might be running on this particular port (highlighted in the white box). Also nmap also tried to determine information about the operating system running on this machine as well as its hostname (with great success too!).
Looking through this output should raise quite a few concerns for a network administrator. The very first line claims that VSftpd version 2.3.4 is running on this machine! That’s a REALLY old version of VSftpd.
Searching through ExploitDB, a serious vulnerability was found back in 2011 for this particular version (ExploitDB ID – 17491).
Find Anonymous FTP Logins on Hosts
Let’s have nmap take a closer look at this particular port and see what can be determined.
![]() Nmap – Scan Particular Post on Machine
Nmap – Scan Particular Post on Machine
With this command, nmap was instructed to run its default script (-sC) on the FTP port (-p 21) on the host. While it may or may not be an issue, nmap did find out that anonymous FTP login is allowed on this particular server.
Check for Vulnerabilities on Hosts
This paired with the earlier knowledge about VSftd having an old vulnerability should raise some concern though. Let’s see if nmap has any scripts that attempt to check for the VSftpd vulnerability.
![]() Nmap – Scan VSftpd Vulnerability
Nmap – Scan VSftpd Vulnerability
Notice that nmap has a NSE script already built for the VSftpd backdoor problem! Let’s try running this script against this host and see what happens but first it may be important to know how to use the script.
![]() Learn Nmap NSE Script Usage
Learn Nmap NSE Script Usage
Reading through this description, it is clear that this script can be used to attempt to see if this particular machine is vulnerable to ExploitDB issue identified earlier.
Let’s run the script and see what happens.
![]() Nmap – Scan Host for Vulnerable
Nmap – Scan Host for Vulnerable
Yikes! Nmap’s script returned some dangerous news. This machine is likely a good candidate for a serious investigation. This doesn’t mean that the machine is compromised and being used for horrible/terrible things but it should bring some concerns to the network/security teams.
Nmap has the ability to be extremely selective and extremely quite. Most of what has been done so far has attempted to keep nmap’s network traffic moderately quiet however scanning a personally owned network in this fashion can be extremely time consuming.
Nmap has the ability to do a much more aggressive scan that will often yield much of the same information but in one command instead of several. Let’s take a look at the output of an aggressive scan (Do note – an aggressive scan can set off intrusion detection/prevention systems!).
![]() Nmap – Complete Network Scan on Host
Nmap – Complete Network Scan on Host
Notice this time, with one command, nmap has returned a lot of the information it returned earlier about the open ports, services, and configurations running on this particular machine. Much of this information can be used to help determine how to protect this machine as well as to evaluate what software may be on a network.
This was just a short, short list of the many useful things that nmap can be used to find on a host or network segment. It is strongly urged that individuals continue to experiment with nmap in a controlled manner on a network that is owned by the individual (Do not practice by scanning other entities!).
There is a official guide on Nmap Network Scanning by author Gordon Lyon, available from Amazon.
![]() Please feel free to post comments or questions (or even more tips/advice on nmap scans)!
Please feel free to post comments or questions (or even more tips/advice on nmap scans)!
If You Appreciate What We Do Here On TecMint, You Should Consider:
TecMint is the fastest growing and most trusted community site for any kind of Linux Articles, Guides and Books on the web. Millions of people visit TecMint! to search or browse the thousands of published articles available FREELY to all.
If you like what you are reading, please consider buying us a coffee ( or 2 ) as a token of appreciation.

We are thankful for your never ending support.
Источник
Как пользоваться Nmap для сканирования сети
Nmap — это очень популярный сканер сети с открытым исходным кодом, который может использоваться как в Windows, так и в Linux. Программа Nmap или Network Mapper была разработана Гордоном Луоном и на данный момент используется специалистами по безопасности и системными администраторами по всему миру.
Эта программа помогает системным администраторам очень быстро понять какие компьютеры подключены к сети, узнать их имена, а также посмотреть какое программное обеспечение на них установлено, какая операционная система и какие типы фильтров применяются. Функциональность программы может быть расширена за счет собственного скриптового языка, который позволяет администраторам автоматизировать много действий.
Например, с помощью скриптов можно автоматически обнаруживать новые уязвимости безопасности в вашей сети. Namp может использоваться с хорошими и плохими намерениями, будьте аккуратны, чтобы не использовать nmap против закона. В этой инструкции мы рассмотрим как пользоваться namp для сканирования портов в операционной системе Linux. Но сначала нужно попытаться понять как работает эта утилита.
Как работает Nmap?
В компьютерных сетях все подключенные устройства имеют свой ip адрес. Каждый компьютер поддерживает протокол ping, с помощью которого можно определить подключен ли он к сети. Мы просто отправляем ping запрос компьютеру, и если он отзывается, то считаем, что он подключен. Nmap использует немного иной подход. Компьютеры также определенным образом реагируют на те или иные сетевые пакеты, утилита просто отправляет нужные пакеты и смотрит какие хосты прислали ответ.
Но об этом вы, наверное, уже знаете. Более интересно то как Nmap узнает какие сервисы запущены на машине. Суть работы всех сетевых программ основана на портах. Чтобы получить сообщение из сети, программа должна открыть порт на вашем компьютере и ждать входящих соединений. А для отправки сообщения по сети нужно подключиться к уже другой программой (адресатом) порту. Затем программе необходимо будет открыть порт, на котором она будет ждать ответа.
Утилита nmap в процессе сканирования сети перебирает доступный диапазон портов и пытается подключиться к каждому из них. Если подключение удалось, в большинстве случаев, передав несколько пакетов программа может даже узнать версию программного обеспечения, которые ожидает подключений к этому порту. Теперь, после того, как мы рассмотрели основы, рассмотрим как пользоваться nmap для сканирования портов и сети.
Синтаксис Nmap
Команда запуска Nmap очень проста для этого достаточно передать ей в параметрах целевой IP адрес или сеть, а также указать опции при необходимости:
$ nmap опции адрес
Теперь давайте рассмотрим основные опции, которые понадобятся нам в этой статье.
- -sL — просто создать список работающих хостов, но не сканировать порты nmap;
- -sP — только проверять доступен ли хост с помощью ping;
- -PN — считать все хосты доступными, даже если они не отвечают на ping;
- -sS/sT/sA/sW/sM — TCP сканирование;
- -sU — UDP сканирование nmap;
- -sN/sF/sX — TCP NULL и FIN сканирование;
- -sC — запускать скрипт по умолчанию;
- -sI — ленивое Indle сканирование;
- -p — указать диапазон портов для проверки;
- -sV — детальное исследование портов для определения версий служб;
- -O — определять операционную систему;
- -T4 — скорость сканирования, чем больше, тем быстрее;
- -D — маскировать сканирование с помощью фиктивных IP;
- -S — изменить свой IP адрес на указанный;
- -e — использовать определенный интерфейс;
- —spoof-mac — установить свой MAC адрес;
- -A — определение операционной системы с помощью скриптов.
Теперь, когда мы рассмотрели все основные опции, давайте поговорим о том, как выполняется сканирование портов nmap.
Как пользоваться Nmap для сканирования портов в Linux
Дальше рассмотрим примеры nmap. Сначала давайте рассмотрим как найти все подключенные к сети устройства, для этого достаточно использовать опцию -sL и указать маску нашей сети. в моем случае это 192.168.1.1/24. Маску вашей локальной сети вы можете найти, выполнив команду:
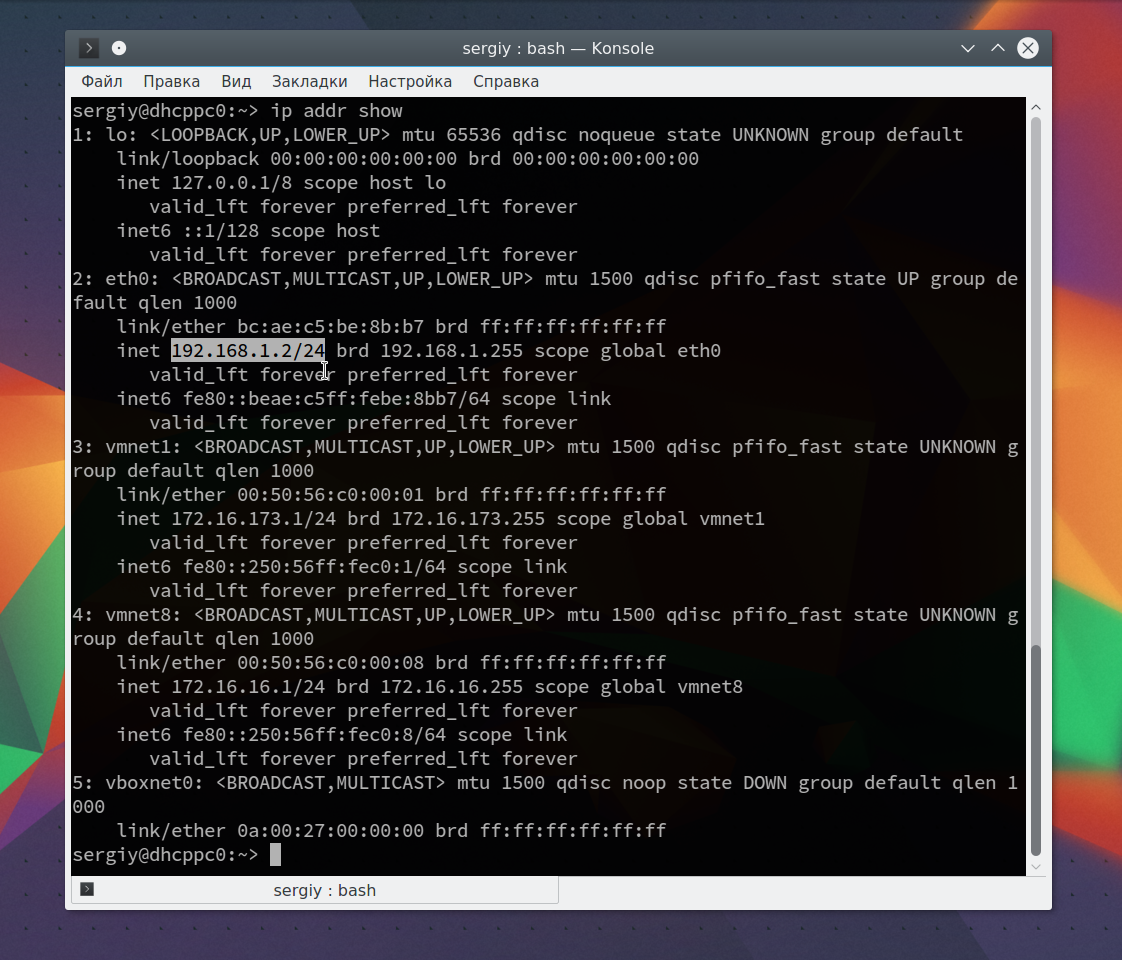
Из вывода для используемого интерфейса возьмите число после слеша, а до слэша укажите ip вашего роутера. Команда на сканирование сети nmap будет выглядеть вот так:
nmap -sL 192.168.1.1/24
Иногда это сканирование может не дать никаких результатов, потому что некоторые операционные системы имеют защиту от сканирования портов. Но это можно обойти, просто использовав для сканирования ping всех ip адресов сети, для этого есть опция -sn:
nmap -sn 192.168.1.1/24
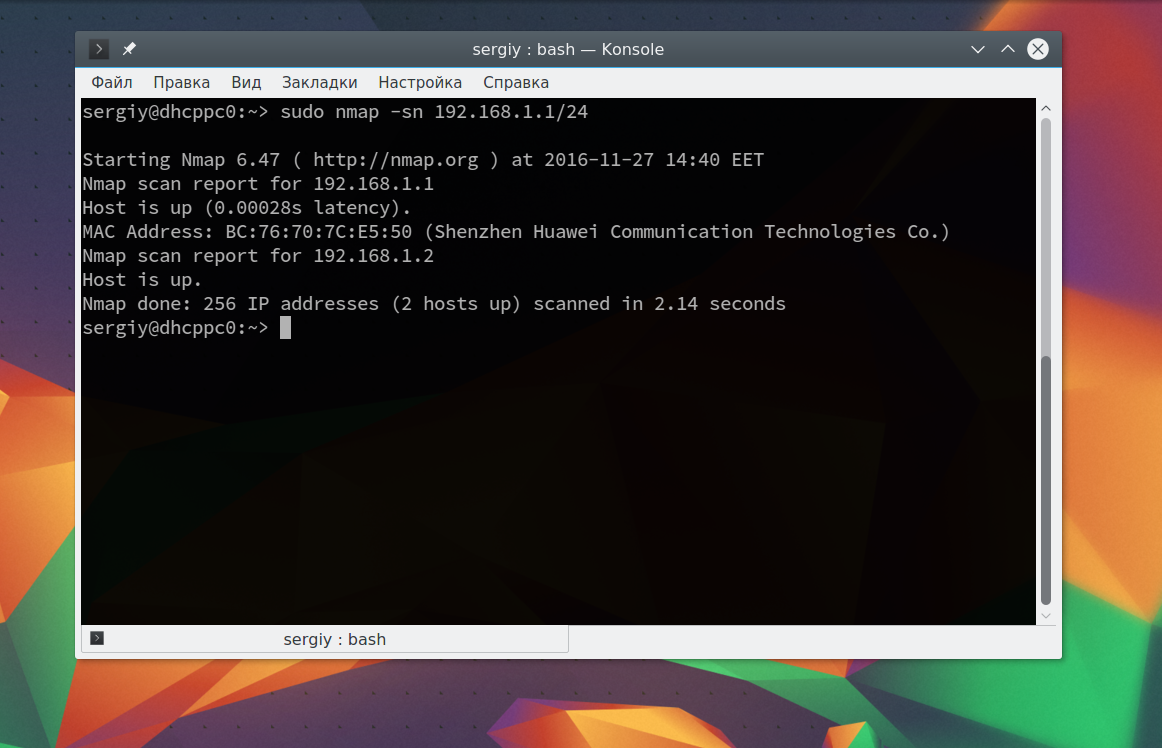
Как видите, теперь программа обнаружила активные устройства в сети. Дальше мы можем сканировать порты nmap для нужного узла запустив утилиту без опций:
sudo nmap 192.168.1.1
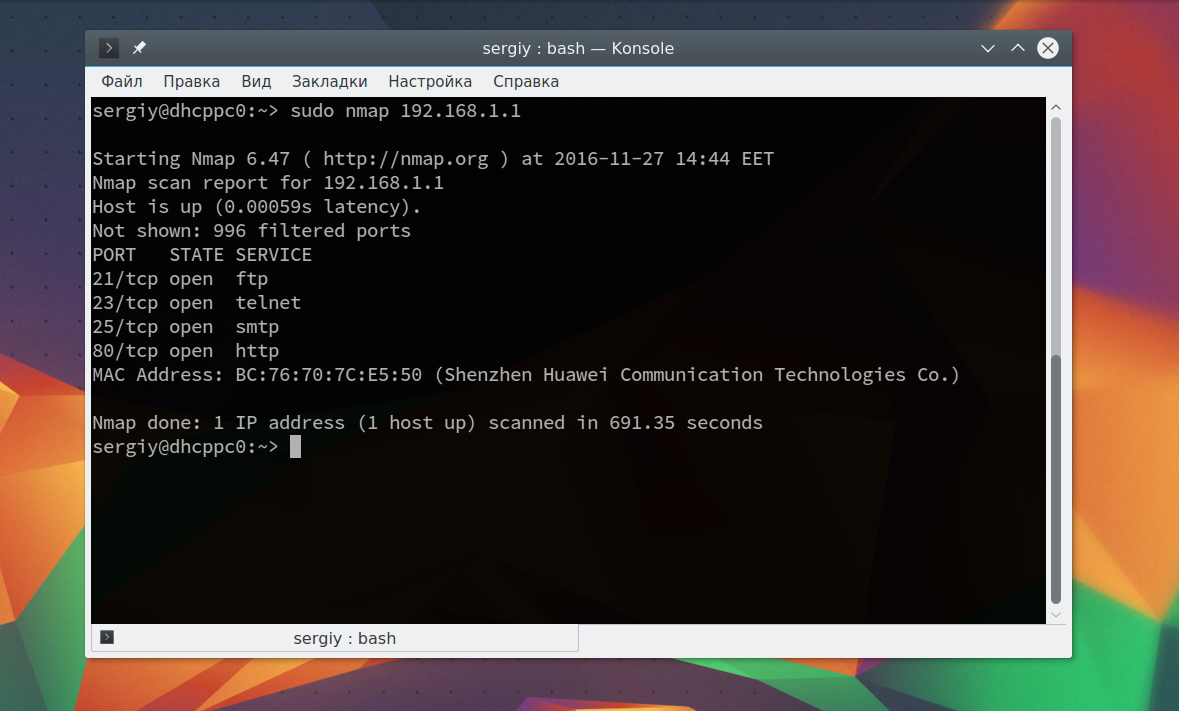
Теперь мы можем видеть, что у нас открыто несколько портов, все они используются каким-либо сервисом на целевой машине. Каждый из них может быть потенциально уязвимым, поэтому иметь много открытых портов на машине небезопасно. Но это еще далеко не все, что вы можете сделать, дальше вы узнаете как пользоваться nmap.
Чтобы узнать более подробную информацию о машине и запущенных на ней сервисах вы можете использовать опцию -sV. Утилита подключится к каждому порту и определит всю доступную информацию:
sudo nmap -sV 192.168.1.1
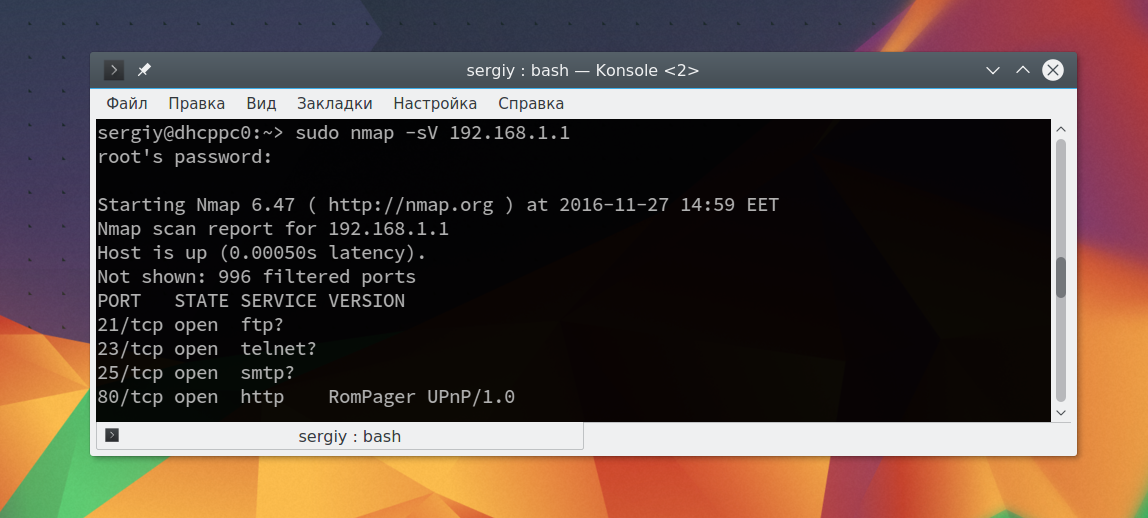
На нашей машине запущен ftp, а поэтому мы можем попытаться рассмотреть эту службу подробнее с помощью стандартных скриптов nmap. Скрипты позволяют проверить порт более детально, найти возможные уязвимости. Для этого используйте опцию -sC и -p чтобы задать порт:
sudo nmap -sC 192.168.56.102 -p 21
Мы выполняли скрипт по умолчанию, но есть еще и другие скрипты, например, найти все скрипты для ftp вы можете командой:
sudo find /usr/share/nmap/scripts/ -name ‘*.nse’ | grep ftp
Затем попытаемся использовать один из них, для этого достаточно указать его с помощью опции —script. Но сначала вы можете посмотреть информацию о скрипте:
sudo nmap —script-help ftp-brute.nse
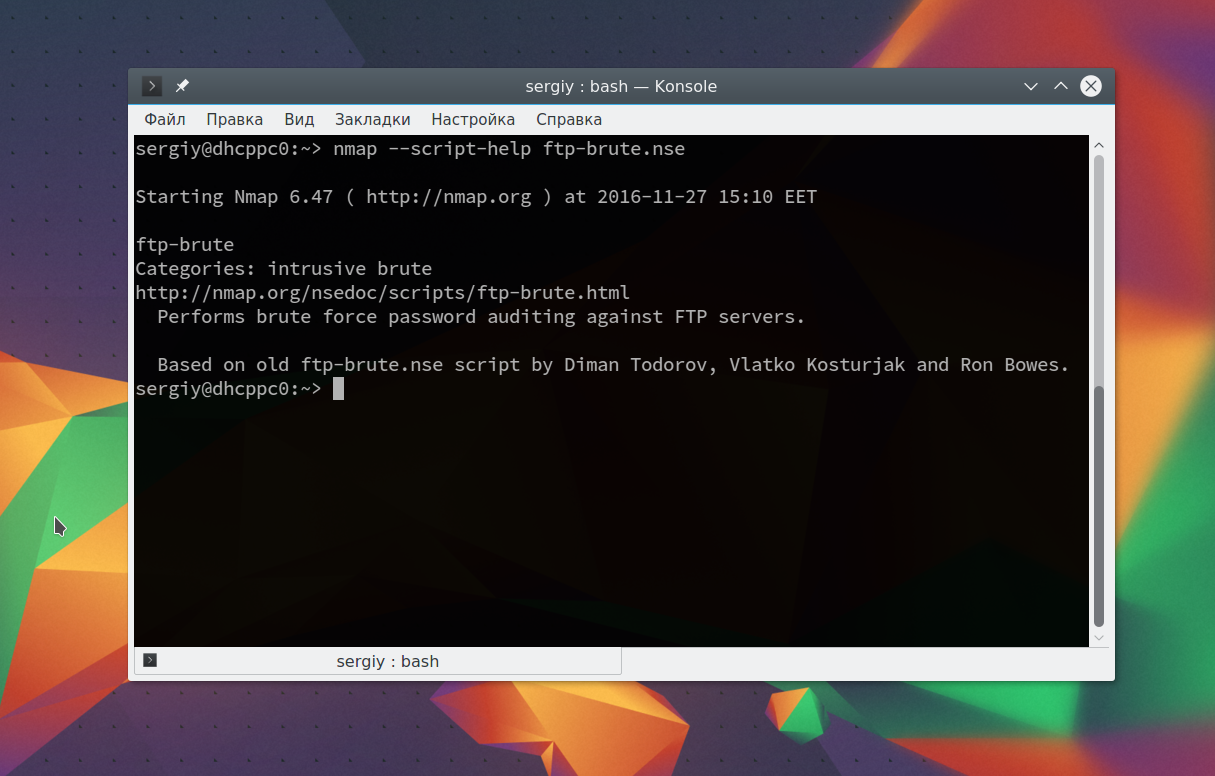
Этот скрипт будет пытаться определить логин и пароль от FTP на удаленном узле. Затем выполните скрипт:
sudo nmap —script ftp-brute.nse 192.168.1.1 -p 21
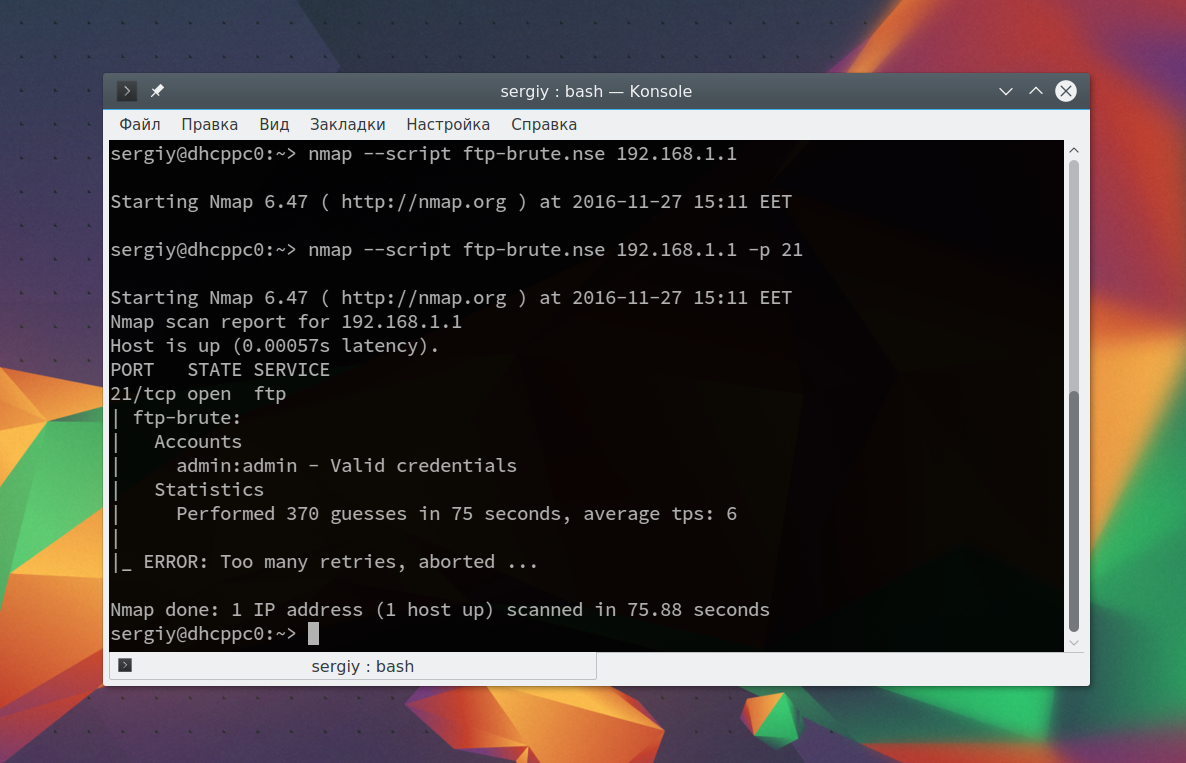
В результате скрипт подобрал логин и пароль, admin/admin. Вот поэтому не нужно использовать параметры входа по умолчанию.
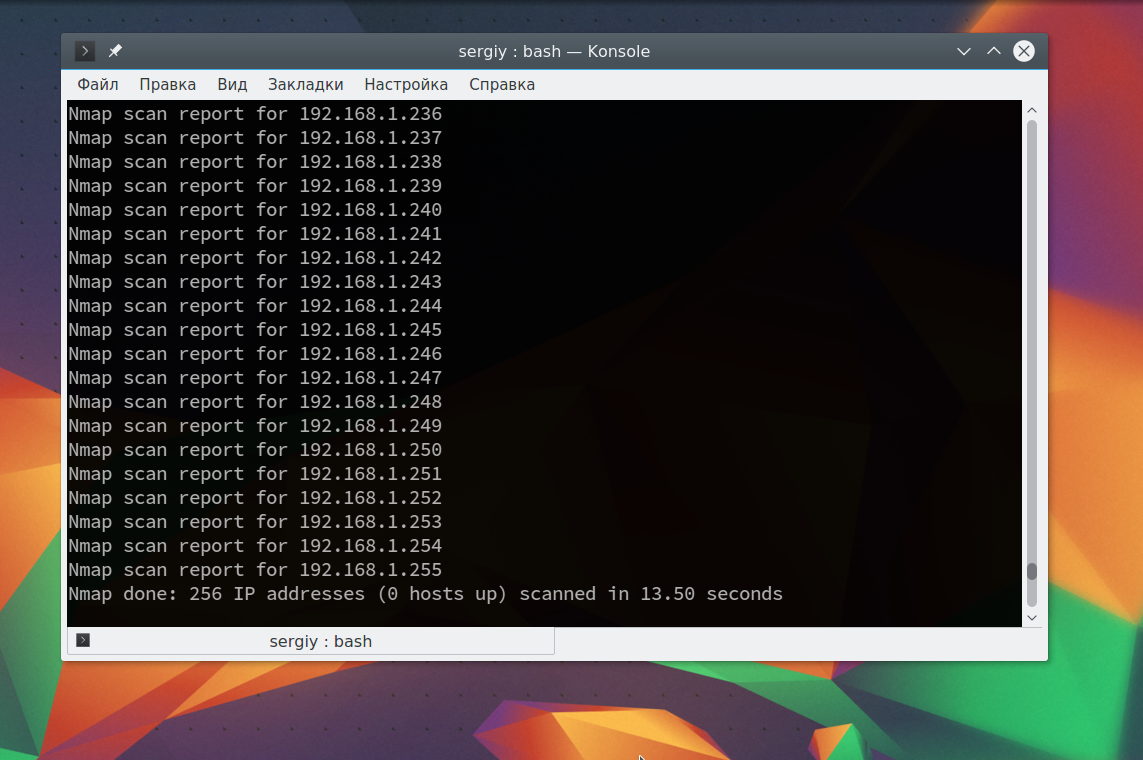
Также можно запустить утилиту с опцией -A, она активирует более агрессивный режим работы утилиты, с помощью которого вы получите большую часть информации одной командой:
sudo nmap -A 192.168.1.1

Обратите внимание, что здесь есть почти вся информация, которую мы уже видели раньше. Ее можно использовать чтобы увеличить защиту этой машины.
Выводы
В этой статье мы рассмотрели как выполняется сканирование портов nmap, а также несколько простых примеров использования этой утилиты. Эти команды nmap могут быть полезными многим системным администраторам, чтобы улучшить безопасность их систем. Но это далеко не все возможности утилиты. Продолжайте экспериментировать с утилитой чтобы узнать больше только не в чужих сетях!
Источник


