- Using networksetup for Wi-Fi networks on OS X systems
- How to use network locations on your Mac
- How to add or remove a network location
- How to switch between network locations
- How to change the network service order
- How to prevent a network service from being used
- Настройка интернет-подключения на Mac
- Your Mac / Linux Guy
- mac and linux tips/tricks/tools
- networksetup – Change Network Settings from the Command Line
- What if you want a one-size-fits-all command?
- Crash course in awk
- The payoff — a universal DNS changing command
- But wait, there’s more
Using networksetup for Wi-Fi networks on OS X systems
You can see if a system supports wireless connections using the command networksetup -listallnetworkservices . You should see «Wi-Fi» listed when you run the command.
To determine the device interface that supports Wi-Fi connections on the system, use the command networksetup -listallhardwareports .
In the example above, the device name for the Wi-Fi port is en1 . That device name is needed for some of the other networksetup commands you may use.
If the system is currently connected to a wifi network, you can get information such as the IP addres, subnet mask, gateway address ,etc. using the command networksetup -getinfo Wi-Fi .
If you wish to view the wireless networks the system is familiar with and will try to connect to, you can use the command networksetup -listpreferredwirelessnetworks device_name , where device_name is the port used for Wi-Fi connections. E.g.:
To see which wifi network the system is currently connected to, you can use the command networksetup -getairportnetwork device_name .
If you wish to use a specific Wi-Fi network, you can use the command networksetup -setairportnetwork device_name wifi_network password . If the wifi network is an unsecured one that doesn’t require you to know a WPA/WEP key in order to connect, you can omit the password at the end of the command. If you are already connected to a wifi network, the connection will be switched to the one you specify.
The SSID for a network is case-sensitive, so, if the network SSID is «casa», you need to specify «casa» not «CASA». If a password value is specified, it will be stored in the keychain. I have not found that specifying a password on the line to work for a wireless network that requires 802.1X authentication.
You can have different wifi networks associated with different locations. To view the locations that the system is aware of for wireless networks, you can use the command networksetup -listlocations .
To switch to a particular location, you can use the command networksetup -switchtolocation location_name . A location can be deleted with the command networksetup -deletelocation location_name .
You can turn the Wi-Fi connection off and on, i.e., you can enable/disable it, using the command networksetup -setairportpower device_name on/off .
If you set the power to off and then set it to on, you will be automatically connected to your preferred Wi-Fi network as shown above. You can check whether Wi-Fi has been enabled or disabled with the setairportpower option using the getairpower option.
Источник
How to use network locations on your Mac
Use the Location feature of Network preferences to quickly switch between different sets of network settings.
The ability to switch between different sets of network settings (locations) can be useful in circumstances such as these:
- You use the same type of network (such as Ethernet) at work and at home, but the settings you use at work don’t allow your Mac to automatically connect to the same type of network at home.
- Your Mac connects to more than one type of network service (such as both Wi-Fi and Ethernet) at work and at home, but at work you want your Mac to try connecting to the Ethernet network first, and at home you want your Mac to try connecting to the Wi-Fi network first. In other words, you want to set a different service order for each location.
- Your Mac isn’t connecting to your network and you want to quickly reset your network settings for testing purposes, without losing your current network settings.

How to add or remove a network location
- Choose Apple menu > System Preferences, then click Network.
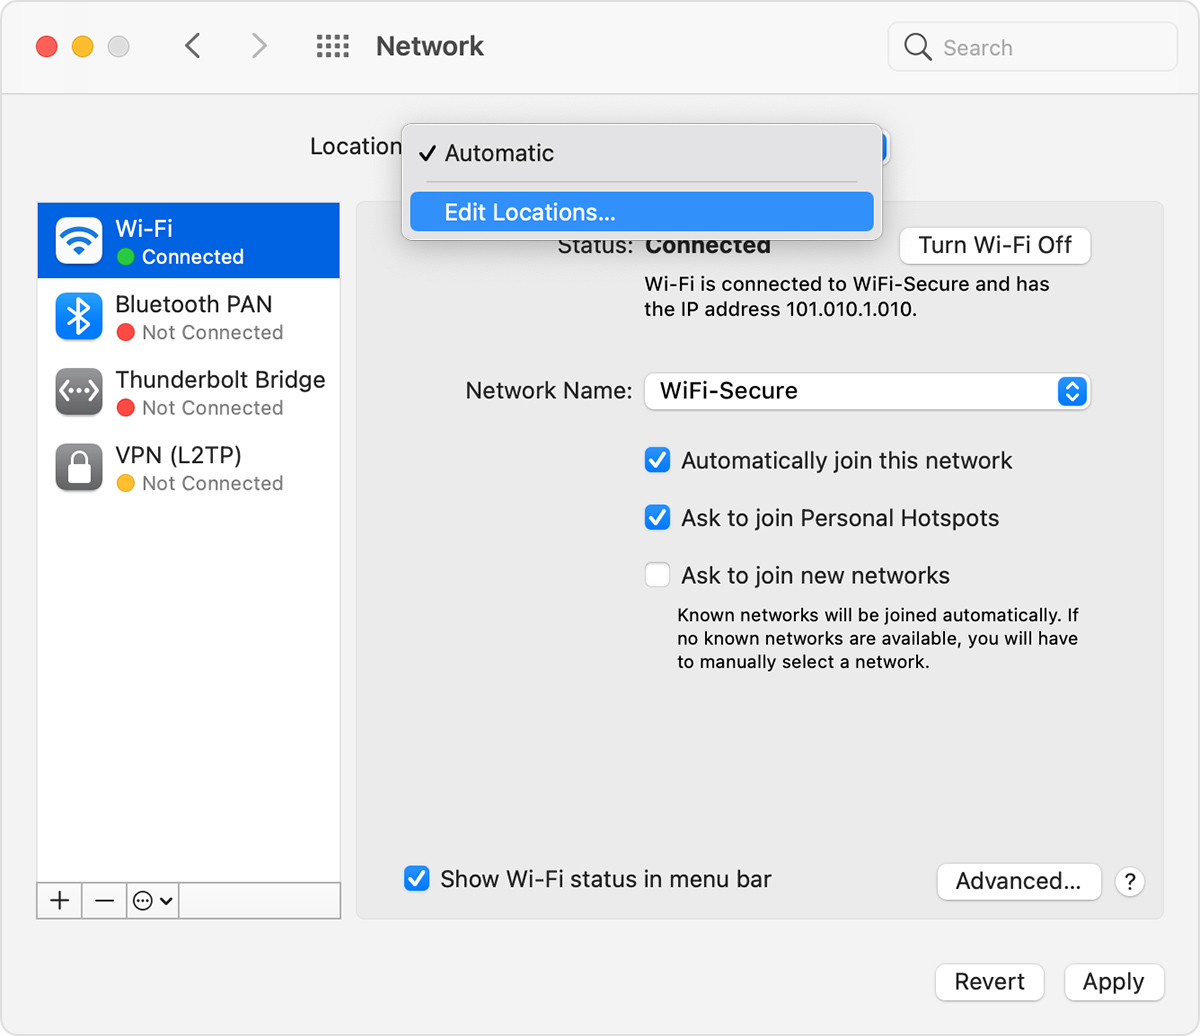
- The Location pop-up menu shows the name of your currently selected set of network settings. The default location is named Automatic. Choose Edit Locations from this menu.

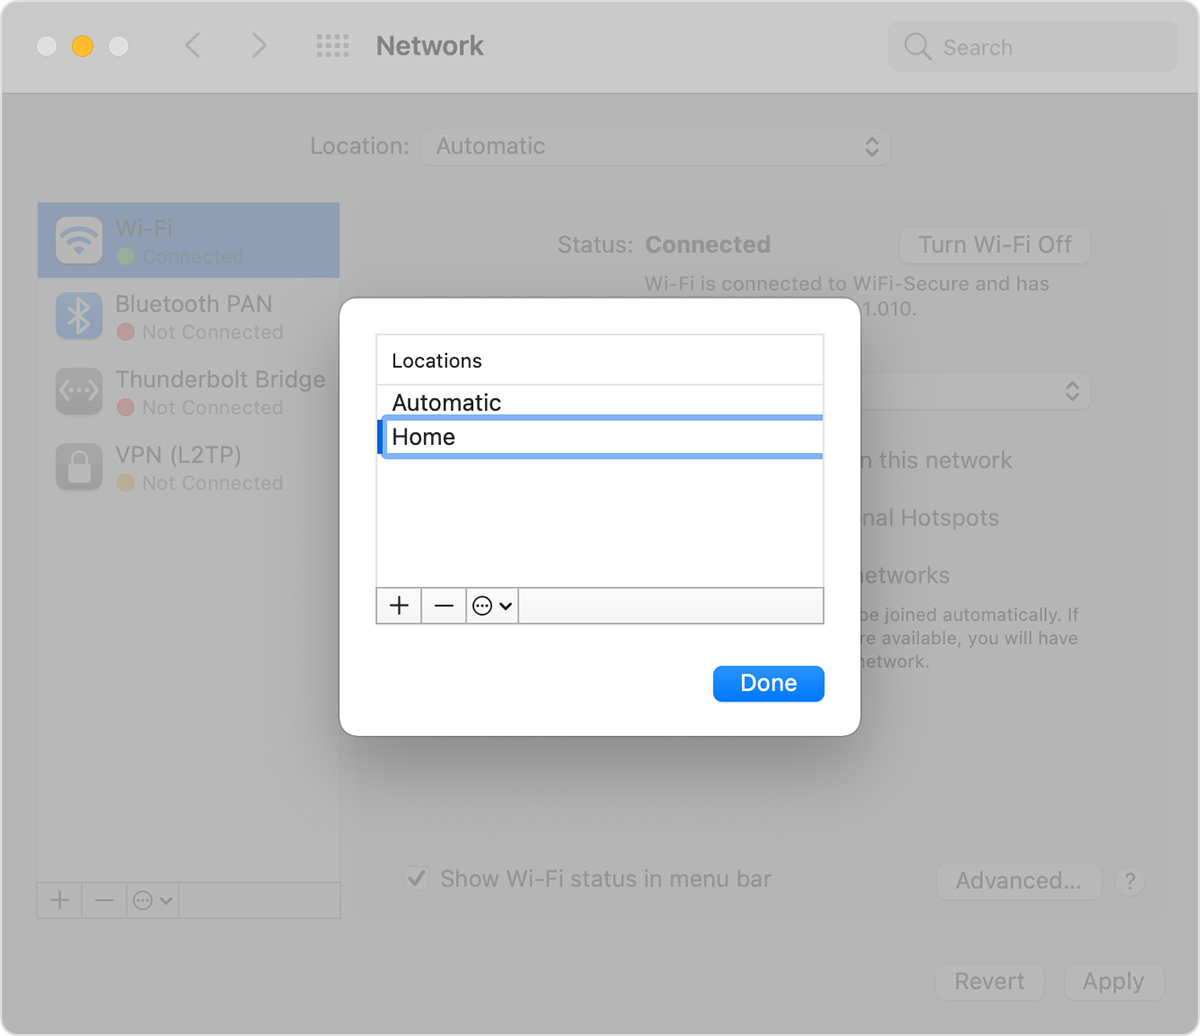
- Click the add (+) button below the list of locations, then type a name for the new location, such as Work or Home or Mobile. (To remove a location, use the remove (–) button below the list.)
- Click Done. The Location menu should now show the name of your new location. Any changes you now make to your Wi-Fi, Ethernet, or other network settings will be saved to this location when you click Apply. The network settings in your previous location remain as you left them, so you can use the Location menu to switch back at any time.
- Click Apply to save your settings and complete the switch from the previous location to the new one. Your Mac then automatically tries to determine the correct settings for each type of network. If you need to change the settings manually, remember to click Apply again after making your changes.
How to switch between network locations
If you have more than one location, you can use either of these methods to switch between them:
- Use the Location pop-up menu in Network preferences, as described above. Remember to click Apply after choosing a location.
- Or choose Apple menu > Location from the menu bar, then choose your location from the submenu.
How to change the network service order
If you’re using network locations because you want each location to prefer a different network service (such as Wi-Fi or Ethernet) when connecting, follow these steps to change the service order (also known as port priority) in each location.
- Choose Apple menu > System Preferences, then click Network.
- Use the Location pop-up menu to choose the location you want to modify.
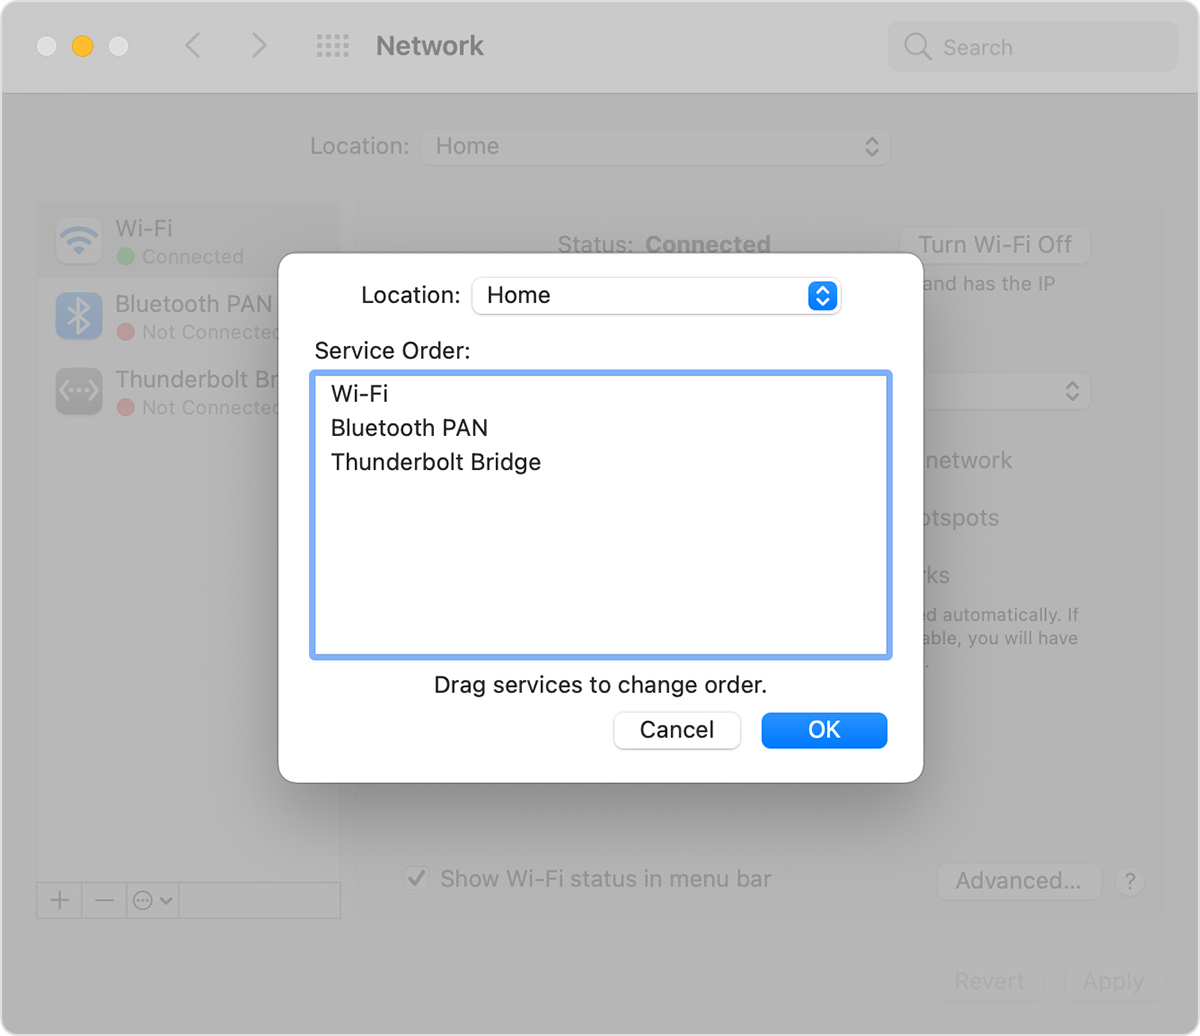
- Click the More Options icon or gear icon below the list of services, then choose Set Service Order.
- Drag services within the list to change their order. Your Mac will try to connect to the service at the top of the list first, then continue in descending order until a connection is successful.
Virtual private network (VPN) connections can’t be reordered, because they always take priority over other connections. - Click OK, then click Apply.

How to prevent a network service from being used
By default, the location named Automatic makes all available network services (also known as ports or network interfaces) active, whether or not they are being used to connect to a network. Your Mac automatically searches these services for a network or internet connection.
For example, you might use a Wi-Fi network at home but an Ethernet network at work. Your Mac automatically detects which of these network services to use when it connects.
If you want to make sure that your Mac doesn’t use a particular network service, such as Wi-Fi, you can make that service inactive in any of your network locations:
- Choose Apple menu > System Preferences, then click Network.
- Use the Location pop-up menu to choose the location you want to modify.
- Click the More Options icon or gear icon below of the list of services, then choose Make Service Inactive.
- Click Apply.
Источник
Настройка интернет-подключения на Mac
Прежде чем настраивать подключение к Интернету, убедитесь, что у Вас есть данные учетной записи, полученные от интернет-провайдера. См. раздел Информация, необходимая для подключения к Интернету.
В разделе настроек «Сеть» на Mac введите настройки подключения в зависимости от типа подключения и используемой службы.
Подключения Wi-Fi. Если Вы подключаетесь к Интернету через Wi-Fi, введите настройки подключения к Wi-Fi в разделе настроек «Сеть». См. раздел Изменение настроек Wi-Fi или Использование WWAN-подключения.
Ethernet с DSL или кабельным модемом. Если Вы подключаетесь к Интернету через Ethernet, DSL-модем или кабельный модем либо подключаетесь к локальной сети (LAN), уже подключенной к Интернету, введите настройки Ethernet в разделе настроек «Сеть». См. разделы Подключение Mac к Интернету через Ethernet и Подключение Mac к Интернету через кабельный модем.
PPPoE. Если у Вас кабельный модем и Вы используете учетную запись PPPoE (протокол двухточечной связи через Ethernet), введите параметры PPPoE в разделе настроек «Сеть». Подключение Mac к Интернету через PPPoE.
Коммутируемые модемные подключения. Если Вы используете коммутируемое модемное подключение PPP (Point to Point — двухточечная связь) с внешним или внутренним модемом, Bluetooth-модемом или WWAN-модемом (Wireless Wide Area Network — беспроводная глобальная сеть), введите параметры подключения в настройках сети. Подключение Mac к Интернету через телефонный модем.
Прочие настройки. Если Вы получили другие настройки для своей учетной записи интернет-службы, например настройки прокси или WINS-сервера или особые настройки для Ethernet, введите их в разделе настроек «Сеть».
Источник
Your Mac / Linux Guy
mac and linux tips/tricks/tools
networksetup – Change Network Settings from the Command Line
UPDATE (8/12/08): I simplified the awk portion of the command.
Mac OS X comes with a very convenient tool called networksetup that makes it relatively easy to view or change network settings from the command line. In Leopard, the command is readily available at /usr/sbin/networksetup . Since /usr/sbin exists in the default path, you can access the command directly. In Tiger, Panther, and Jaguar, the command is not anywhere in the default path, but lives buried within the bundled ARD Agent at /System/Library/CoreServices/RemoteManagement/ARDAgent.app/Contents/Support/networksetup . (If you’re not using Leopard, be sure to include the full path to the executable in all of your commands.) Apple’s man page for networksetup covers all the available options but it’s short on real examples of its use.
Let’s say you manage a menagerie of mottled (i.e. striped or spotted) Macs on a non-dhcp, statically-addressed network. Let’s also say that your network’s DNS servers are about to change addresses to 10.0.0.11 and 10.0.0.12. Without the convenience of dhcp, you’ll have to modify the network configurations of each Mac. Fortunately, networksetup makes it easy. The command you’ll need to use — which must be run as root — takes the following format:
networksetup -setdnsservers networkservice dns1 [ dns2 ] [. ]
where networkservice is the display name of the interface (e.g. Built-in Ethernet, Airport) that you want to modify, and dns1 , dns2 , etc. are the ip addresses of the new dns servers. Depending on the kinds of Macs you manage, you’ll likely have to use two or more versions of this command to update all Macs with your new network settings. Mac Pros have up to three network interfaces (Built-in Ethernet 1, Built-in Ethernet 2, AirPort), iMacs, MacBooks, and MacBook Pros have two (Built-in Ethernet, AirPort), and MacBook Airs have up to two (AirPort, USB Ethernet).
So, for example, an iMac that uses its ethernet interface to access your network needs to be sent
sudo networksetup -setdnsservers «Built-in Ethernet» 10.0.0.11 10.0.0.12
while a MacBook that uses its wireless interface needs
sudo networksetup -setdnsservers «AirPort» 10.0.0.11 10.0.0.12
to update its dns settings.
What if you want a one-size-fits-all command?
I’m glad you asked. Since you can safely assume, in most cases, that the default network interface is the one you want to update, this task begs for a scripty solution. We can use another feature of the networksetup command to determine the default network interface.
This lists the computer’s network interfaces in their priority order. On my MacBook Pro, I get
The only part of this result we care about is the text that comes after the “ (1) ” on the first line. awk can extract that for us.
networksetup -listnetworkserviceorder | awk -F’\\) ‘ ‘/\(1\)/
Crash course in awk
If you’re not an awk -lover, then this command may need some explanation. Before I dive in, I’ll just tell you that awk is a powerful text search and text-processing language. By default, it breaks down search results by whitespace and assigns resulting “words” into numbered variables. $0 is the entire result, $1 is the first word, $2 is the second word, etc. Any manipulation you want to do with the awk command is put into curly brackets and separated by semicolons.
There are many great resources online to help you learn awk , so I won’t go into too much detail here.
Now let’s break down the command.
-F’\\) ‘
The -F switch tells awk that the character or characters immediately following it should be used as word delimiters. In this case, I want awk to use a closing parenthesis followed by a space to delimit words — “) “. (Note that the closing parenthesis needs to be double-escaped.) If you’re using more than one consecutive character as a delimiter, the characters must be enclosed in single quotes. Including a space in your delimiter is a handy way of excluding leading spaces from your results.
/\(1\)/
This section tells awk that you want it to operate only on lines containing “(1)”. (You need to escape the parentheses.) In this example, we’re looking at the first line only: “ (1) Built-in Ethernet “. Now, moving within the curly brackets, we have…
print $2
This tells awk to spit out the second word of the line. Since we used “) ” as our delimiter, the second word will be everything after the “) ” on the line that contains “(1)”.
Also, note that the search portion and the command portion are enclosed in single quotes. The entire awk command turns this
The payoff — a universal DNS changing command
Now, attaining our universal command is simply a matter of assigning the output of our piped-to- awk command to a variable and then using that variable in the setdnsservers command. Since you’ll likely want to use ARD to send this command out, leave out the sudo portion as you can specify this to be run as root from ARD.
The quotes around $mainInt in the last line are important because the interface name may contain spaces.
But wait, there’s more
Now that you can get the default network interface name, you can easily change other network settings — e.g. proxies, search domains, dhcp — on all your Macs with the same basic command format.
Want to change your search domains?
Want to convert from static addressing to dhcp?
The possibilities may not be endless, but they’re definitely plentiful.
Источник


