- Как сделать общую сетевую папку в Linux (настройка SMB в Linux)
- How to share files between a Linux and Windows computer
- Create a shared folder on Windows
- Access a Windows shared folder from Linux, using Konqueror
- Access a Windows shared folder from Linux, using Nautilus
- Access a Windows shared folder from Linux, using the command line
- Монтирование сетевой папки в Linux
- Монтирование сетевой папки в Linux
- How to Share Network Folders on Linux
- Your Linux machine doesn’t have to feel alone
- The Public Folder
- Share the Public Folder
- Share Folders on Local Network Between Ubuntu and Windows
- Share folder on local network in Ubuntu
- Method 1. Share folders on local network without password
- Enable sharing on Ubuntu
- Step 2: Enable sharing on Windows
- 2. Share the folders on local network in Ubuntu with password protection
- What is Samba?
- Install Samba server on Ubuntu
- Configure Samba server on Ubuntu
- Create a system user for network file sharing
- Add new Samba user
- Share folders or files over the network
- Remove shared folders
Как сделать общую сетевую папку в Linux (настройка SMB в Linux)
Начните с установки пакетов samba и smbclient.
В Debian, Linux Mint, Ubuntu, Kali Linux и их производных для установки samba выполните команду:
В Arch Linux, BlackArch и их производных выполните команду:
Следующая команда не сработает, если отсутствует файл /etc/samba/smb.conf. Если у вас тоже нет этого файла, то создаёте его заглушку — к настройке самого файла smb.conf мы вернёмся позже:
Теперь нужно добавить пароль для пользователя Samba. Действует следующее правило: имя пользователя должно быть таким же, как у вашего текущего пользователя, а пароль можно установить иной, отличный от вашего системного пароля.
Для установки пароля Samba, выполните следующую команду:
Если вы хотите, чтобы у пользователя не было пароля, то укажите опцию -n.
Создайте папку, которая станет совместно используемой:
Узнаем абсолютный путь до папки
Откройте для редактирования файл /etc/samba/smb.conf:
Добавьте туда строки вида:
Обратите внимание, что все пробелы в строках выше являются обязательными.
Для моих данных это строки:
Теперь запустим службу SMB:
Для добавления службы в автозагрузку выполните:
Для подключения к этой общей сетевой папке на Linux нужно использовать IP адреса компьютера Linux.
Создадим файл, чтобы сетевая папка не была пустой:
Посмотрите локальный IP адрес компьютера, на котором запущена Linux:
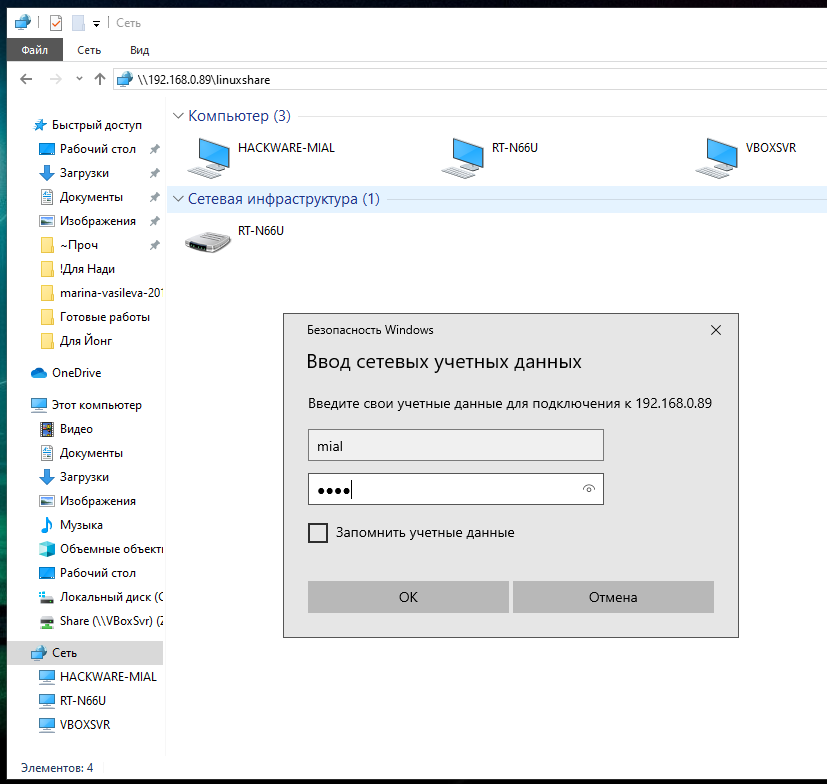
У меня этим IP является 192.168.0.89, а папку, как мы помним, я создал с именем linuxshare, тогда в Windows я перехожу в проводнике во вкладку «Сеть» и подключаюсь к этой папке следующим образом:
Вводим учётные данные (которые мы установили командой smbpasswd):
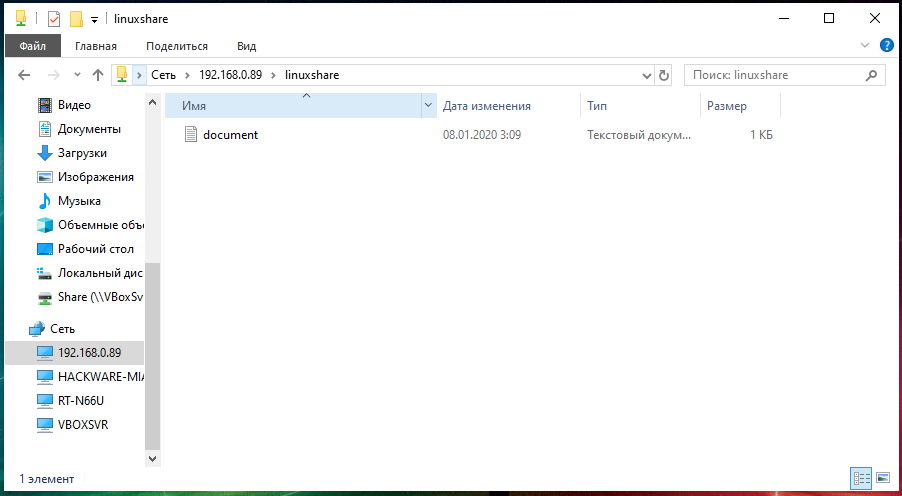
Видим содержимое совместно используемой папки, размещённой на Linux с помощью SMB:
Для подключения к сетевой папке из консоли Linux, запустите команду вида:
Для моего примера это:
После ввода пароля нам становится доступным содержимое сетевой папки.
Источник
How to share files between a Linux and Windows computer
The easiest and most reliable way to share files between a Linux and Windows computer on the same local area network is to use the Samba file sharing protocol. All modern versions of Windows come with Samba installed, and Samba is installed by default on most distributions of Linux.
Create a shared folder on Windows
First, create a shared folder on your Windows machine.
- Open the Control Panel.
- Go to Network and Sharing Options.
- Go to Change Advanced Sharing Settings.
- Select Turn on Network Discovery and Turn on File and Print Sharing.
Now, create a new folder to share or choose an existing folder that you’d like to share.
- Right-click the folder and select Properties.
- Go to the Sharing tab.
- Above the Share button is the network name of the share you are creating. It should look like \\YOURCOMPUTERNAME\Users\YourUserName\ShareFolderName. Make a note of this network name to use later on your Linux machine.
- Click Share.
Access a Windows shared folder from Linux, using Konqueror
Many Linux distributions use the KDE desktop environment and the Konqueror file manager/browser. If this is what you are using, you can follow these steps to access your Windows shared folder:
- Click the K menu icon.
- Select Internet ->Konqueror.
- In the Konqueror window that opens, click the Network Folders link, or type remote:/ in the address bar and press Enter .
- Click the Samba Shares icon.
- Click the icon of your Windows Home workgroup.
- Click the Workgroup icon.
- Click the icon for your computer.
- When prompted, enter the username and password for the Windows account that created the share.
- Click OK.
Access a Windows shared folder from Linux, using Nautilus
Many Linux distributions, especially those that use the GNOME desktop environment, use the Nautilus file manager. If this is what you’re using, you can follow these steps to access your Windows shared folder:
- Open Nautilus.
- From the File menu, select Connect to Server.
- In the Service type drop-down box, select Windows share.
- In the Server field, enter the name of your computer.
- Click Connect.
Alternatively, in the Nautilus address bar, you can type smb://ComputerName/ShareName and press Enter . For instance, when you created your Windows Share, if the share name was listed as:
Type smb://YOURCOMPUTERNAME/Users/YourUserName/ShareFolderName and press Enter . Note the smb: at the beginning; in Linux, use forward slashes instead of backslashes.
Access a Windows shared folder from Linux, using the command line
You can also access your Windows share from the Linux command line using the smbclient program.
- Open a terminal.
- Type smbclient at the command prompt.
- If you receive a «Usage:» message, this means smbclient is installed, and you can skip to the next step. If the command is not found, however, you need to install smbclient. Follow these steps to install it.
Источник
Монтирование сетевой папки в Linux
В одной из прошлых статей мы рассматривали как настраивать сетевые папки в Linux с помощью NFS. Если в Windows используется для этих целей Samba, то в Linux принято организовывать общие папки с помощью сетевой файловой системы NFS.
В этой статье мы поговорим о том как монтировать такие папки вручную, а также как настроить их монтирование при обращении с помощью autofs. Так вы будете экономить трафик между серверами и получите неплохую производительность.
Монтирование сетевой папки в Linux
Для того чтобы примонтировать сетевую папку в системе должен быть установлен пакет nfs-commons. В Ubuntu его можно установить такой командой:
sudo apt install nfs-common
Затем можно выполнять монтирование с помощью обычной команды mount, которой надо передать адрес сервера NFS и путь к папке в файловой системе сервера. Например, чтобы смонтировать папку /var/nfs выполните:
sudo mount ip_адрес:/var/nfs /mnt
Никакой авторизации в NFS нет, поддерживается только ограничение доступа по IP адресу, поэтому монтирование должно пройти успешно. Если статическое монтирование работает хорошо, можно переходить к настройке autofs. Не забудьте размонтировать сетевую папку:
sudo umount /mnt
Сначала нужно установить этот сервис. Для этого в Ubuntu выполните команду:
sudo apt install autofs
Все настройки сетевых папок, которые надо монтировать находятся в файле /etc/auto.master. Каждая строчка представляет из себя отдельную папку и имеет такой синтаксис:
/точка/монтирования /файл/с/карты —timeout=значение
Здесь файл карты, обычно это /etc/auto.misc — файл в котором более подробно описано что и куда надо монтировать. Синтаксис одной записи в файле /etc/auto.misc такой:
/точка/монтирования опции_монтирования ip_адрес:/путь/к/сетевой/папке
Для примера будем монтировать ту же сетевую папку /var/nfs на сервере 185.117.155.209 в локальную папку /mnt. В файл /etc/auto.master надо добавить такую строчку:
sudo vi /etc/auto.master
/mnt /etc/auto.nfs —timeout=100

Здесь мы сообщаем, что общая папка монтирования для всех ресурсов, описанных в файле /etc/auto.nfs — /mnt и если к ресурсу не обращаются на протяжении 100 секунд, то её следует размонтировать. Далее надо добавить описание монтирования в файл /etc/auto.nfs:
sudo vi /etc/auto.nfs
share -fstype=nfs4,rw 185.117.155.209:/var/nfs

Здесь — share это точка монтирования нашей сетевой папки в папке /mnt, затем идут опции монтирования, а потом адрес сервера и путь к папке на удалённой машине. Далее надо перезапустить сервис autofs:
sudo systemctl restart autofs
Затем можно попытаться обратиться к этой папке и она автоматически смонтируется:

Как видите, всё достаточно просто. Так и выполняется автоматическое монтирование сетевых папок в Linux. Но чтобы у вас появилась возможность создавать файлы в этой папке, надо чтобы сервер NFS был правильно настроен. Об этом смотрите предыдущую статью про настройку NFS.
Источник
How to Share Network Folders on Linux
Your Linux machine doesn’t have to feel alone
:max_bytes(150000):strip_icc()/JackWallen-56a71ed248bb42a48cf703edd2a2c3b4.jpg)
Sharing a folder across a network makes it possible for co-workers and family to access specific files on your computer. It’s a great way to avoid emailing files to those who use the same network resources as you.
If your operating system of choice is Linux, you are just as capable of sharing those folders like the Windows and macOS counterparts. The process has been made simple with the Linux Ubuntu distribution and the GNOME desktop. Here’s how to share folders on Linux without manually editing configuration files.
Instructions in this article use Ubuntu 19.04 with GNOME 3.32.0. Other distributions and desktop environments take different approaches to the task.
The Public Folder
On many modern Linux distributions, there’s a folder in your home directory called Public. This folder is not automatically shared, but it’s a great place to start sharing (as it has the necessary permissions needed for you to share).
:max_bytes(150000):strip_icc()/sharea-90f8454398b149129c24af560bfd00be.jpg)
Share the Public Folder
To make the Public folder available to a network, first, install the necessary components. This can be done from the file manager (also known as Nautilus). To do this, follow these steps:
Open the File Manager.
Right-click the Public folder, then select Properties.
:max_bytes(150000):strip_icc()/shareb-91e5e825893a40f180be9e434a1d9297.jpg)
Select Local Network Share.
:max_bytes(150000):strip_icc()/sharec-34567ef9fdae4f3a833b8af31eb24c41.jpg)
Select the Share this folder check box.
:max_bytes(150000):strip_icc()/shared-30e7ca622b924247827f90f5de6d6772.jpg)
When prompted, select Install service, then select Install.
:max_bytes(150000):strip_icc()/sharee-3850f2aefb9a418983934f67326b6adc.jpg)
Enter your user password, then select Authenticate.
:max_bytes(150000):strip_icc()/sharef-d72a0fd4afaa439e8c98415fe6b8e1c2.jpg)
Allow the installation to complete.
When the installation finishes, you are returned to the Folder Sharing window. Here you need to give the folder a Share name and an optional Comment.
:max_bytes(150000):strip_icc()/shareg-1fa82782ec7d4cf3815b099ce9d65eb4.jpg)
The next step is to decide what kind of permissions you want to allow for the folder.
- If those who use the folder need to create and delete subfolders in the Public folder, select Allow others to create and delete files.
- If you want to allow anyone on your network to have access to the Public folder, select Guest access. If you leave that box unchecked, the only people who will have access to that folder are those with a user account on your machine.
If you’re concerned about security, clear the Guest access check box and then create a user account for anyone that needs access to your Public folder. Click Create Share and then, when prompted, click Add the permissions automatically.
:max_bytes(150000):strip_icc()/shareh-c22925765e2048129427a733dac1d633.jpg)
Once that completes, close the Folder Sharing window. The Public folder is now accessible from your network. How users access that drive depends on the operating system they use. For example, in Windows 10, the Public folder is located under Network and then the name of the machine that is sharing the folder.
:max_bytes(150000):strip_icc()/sharei-4858d43c2d8d45369e5b0fdae66cb587.jpg)
That’s all there is to sharing folders to your network from a Linux machine. Add all the files you need to that folder and let your fellow users have at them.
Источник
Share Folders on Local Network Between Ubuntu and Windows
Last updated October 29, 2020 By Mohd Sohail 51 Comments
This is a complete tutorial to show you how to share folders over the local network between Windows and Ubuntu.
Do you have multiple devices in your home? Do you have to use Flash Drive or SD card to transfer data from Ubuntu to another computer? Do you find it annoying? We know you do. Because we don’t want you to waste your precious time while you can transfer your files, documents, and other large stuff quickly and easily, over the local network. It’s one-time setup and then with some clicks you will be able to share files between Ubuntu and Windows or any other Linux system. And don’t worry it’s easy and takes only a little time.
One more thing to add, while we performed this tutorial on Ubuntu, this tutorial should be valid for any other Linux OS.
Share folder on local network in Ubuntu

If you are using Ubuntu, there are two ways you can share your local files over the local network to access it from Windows or other Linux computers.
- Share it for everyone’s access on local network, without password
- Password protect the folders for restricted access
We’ll see both methods in this post and will let you decide which one you would prefer to use.
Method 1. Share folders on local network without password
You’ll have to do some settings on both Windows and Ubuntu.
Enable sharing on Ubuntu
To share a folder on the local network in Ubuntu, right click on the desired folder and select Local Network Share:

Possible troubleshoot: If you do not see the option of Local Network Share in right click menu, open a terminal and use the following command to install nautlius-share:
You’ll need to restart Nautilus. Either log out and log in back or use the command below:
When you click on Local Network Share, you will see the option of sharing the folder. Just check the option of Share this folder:

Possible troubleshoot: If you are prompted about Sharing service not being installed, like in the screenshot below, just click on Install service and follow the instructions.

When you check the option of Share this folder, you’ll see option of Create Share available for you. You can also allow other users to edit the files in the shared folder. Option for guest access can be checked as well.

You’ll see that the folder icon have been changed to show that it has been shared. To stop sharing a folder, just uncheck the Share this folder option.
Now access the shared folder on Windows machine.
Step 2: Enable sharing on Windows
On Windows, right click on “This PC” or “My Computer”, and select “Add a new connection”.
Adding New Connection 1
Click on “next” button.
Adding New Connection 2 2
Now it’s time to enter server address and the name of folder which we’ve shared. Please enter in following format.
You can find your server’s address, i.e. IP address of Linux machine by entering ip a command.
In my case, IP address of Linux machine is 192.168.0.102 and folder I’ve shared is share.
Now add the location in the following manner:
Entering Server Address
Now you will see this screen, just click next.
Adding New Connection
Now, you can access the shared folder in “This PC” or “My Computer” under “Network Location” section.
New Shared Folder
Now this was the easy way out. This provides access to anyone on your local network to access these files.
In normal condition, you should prefer this. I mean, devices on your home network should be generally known devices. But this could not be the case always. What if you want only certain people to access it?
This is where Samba server comes in picture. We’ll see that in the second part of the tutorial.
2. Share the folders on local network in Ubuntu with password protection
To do this, we need to configure Samba server. Actually, we did use Samba in the previous part of this tutorial. We just did not emphasize on it. Before we go on seeing how to set up Samba server for local network sharing in Ubuntu, let’s first have a quick look on what actually is Samba.
What is Samba?
Samba is the software package that allows you to share files, documents and printers across a network, irrespective of whether you are using Linux, Windows and Mac. It’s available for all major platforms and can work tremendously nice in all of them. Quoting from Wikipedia:
Samba a free software re-implementation of the SMB/CIFS networking protocol, and was originally developed by Andrew Tridgell. As of version 3, Samba provides file and print services for various Windows Clients and can integrate with a Windows Server domain, either as a Primary Domain Controller (PDC) or as a domain member. It can also be part an Active Directory domain.
Install Samba server on Ubuntu
You can easily install Samba on you Ubuntu box. Before installing update your system so that you can install any available updates.
Now install Samba serer and few other required stuffs with the following command:
Once you’ve installed Samba server, it’s time to configure Samba from the graphical interface window to share files.
Configure Samba server on Ubuntu
Open Samba Configuration tool from the dash:

Go to Preference->Server Settings. Although the default settings are good and may be same you need. But you may need to make change to it in some cases.
Now in Server Settings you’ve two tabs, ‘Basic’ and ‘Security’. Under Basic tab you’ve the following options that mean:
- Workgroup – This is the name of the Workgroup of the computer you want to connect to. For example, if you want to connect to a Windows computer so you will enter the workgroup name of Windows computer, and in Windows you already have the same workgroup name as is set by default in Samba Server Settings. But if you have a different workgroup name on Windows then you will enter that workgroup name in this field. (In Windows 7 to get the workgroup name, right-click Computer icon and go to Properties, there you’ll see Windows Workgroup name.)
- Description – This is the name of your computer as seen by others. Don’t use spaces or non-internet friendly characters.

Allowing ‘Guests’ is not advisable so there is no reason to change security settings. Keep as it is.

It is all done! You’ve setup Samba Server. We are not far from sharing our first folder on network.
Create a system user for network file sharing
We will now create a system user for sharing file on network. This is how simple it is.
- Go to System Settings.
- Under Systems Settings Click User Accounts.
- Click unlock to Enable + (plus) icon.
- Click + (plus) icon to create a new system user.

Now as you can see the above image, you can enter ‘Full name’. As you enter ‘Full name’ Username will be taken as Full name automatically. Because we are creating this user to share files so we will assign Account Type to ‘Standard‘.
Done above steps? Click add. You have created a system user. The user is not yet activated so we will activate it by setting up password for this account. Make sure Users accounts panel is unlocked. Click Account disabled and type a new password, then confirm password and click Change.

Yipee… Upto now we have installed and configured Samba and We have created a System user to share files on network from the account and we have activated our newly created account, too. Now We will move to Samba for the last step of configuring everything, then we will share a folder.
Add new Samba user
Open Samba and click Samba Users under Preference. Fill up the the simple dialogue. Here are couple of details about the fields:
Unix Username – In this case I am selecting the user that I just created.
Windows Username – You will enter this username when you are accessing from Windows Machine.
Samba Password – You will enter this password when you are accessing from Windows Machine.

Once you’ve done click OK. Now take a deep breath. You have successfully created a network with the help of Samba. Now restart the network or Samba services and ready to share files with other machines.
Share folders or files over the network
To share files with Samba it’s simple with graphical user interface. Click the Plus icon in Samba and you will get dialogue like this:

Complete the fields. In ‘Directory‘ browse the folder you want to share. Here are the details about the fields you will see here:
- Share name is the name of the folder that other would see.
- Description is simply about the content you are sharing on network.
- Writable You shared folders are ‘read only’ by default. You can set them to writable if you want others on network to change them.
- Visible As the name suggests when you click Visible, the shared folder will be visible to the people on network.
Now you can set permissions for the folder you are sharing. To do this click ‘Access’ tab and check the users you want to share the folder with. When you select Allow access to everyone, the folder will be accessible to everyone on the network.

Finally click OK to complete the sharing. Now the folder is shared with the people you want. You have completed sharing file on network. Is there everything left? Yes! How to remove the folders from the network?
Remove shared folders
We will also need to remove some of the folders after sometime from network. It is very simple and here is how we can do that.

This is all done! We can also share files over network using terminal but that would not be as easy as this one. If you request for command line sharing then I will write a tutorial on how to share files over network with command line in Linux.
So, how do you find this tutorial to share files on local network in Ubuntu? I hope with this tutorial you can easily share files between Ubuntu and Windows. If you have questions or suggestions, feel free to ask it in the comment box below.
This tutorial was requested by Kalc. If you would like, you can request your own tutorial. We would be happy to help you out along with other readers facing the same issue.
Like what you read? Please share it with others.
Источник


