- Sleep Mode Disconnects Wireless Connections in Windows 10
- Replies (16)
- How to Keep Internet Connection Active When in Sleep Mode on Windows 10
- Keep Internet Connection Active When in Sleep Mode on Windows 10
- Keep Internet Connection Active When in Sleep Mode (Plugged in)
- Keep Internet Connection Active When in Sleep Mode (On Battery)
- Conclusion
- Password Recovery
- Windows 10 disconnects from Wi-Fi after Sleep Mode? Fix it now
- Sleep Mode disconnects network connection? Fix it with these solutions
- 1. Change Power Management Settings
- 2. Uncheck the IPv6 box
- 3. Use Network troubleshooter
- 4. Change your power settings
- 5. Disable Broadcom Bluetooth
- 6. Disable your antivirus
- 7. Make sure that Ethernet is disabled
- 8. Change your connection to Private
- 9. Disable Require sign-in
- 10. Perform a System Restore
Sleep Mode Disconnects Wireless Connections in Windows 10
I upgraded from Windows 7 Ultimate (x86) to Windows 10 Enterprise (x86).
Everytime my laptop goes into sleep mode, it will no longer re-connect to my wireless network. When I click on my network, it says «Unable to connect», and I have to restart the machine to get internet access again.
Replies (16)
* Please try a lower page number.
* Please enter only numbers.
* Please try a lower page number.
* Please enter only numbers.
I upgraded from Windows 7 Ultimate (x86) to Windows 10 Enterprise (x86).
Everytime my laptop goes into sleep mode, it will no longer re-connect to my wireless network. When I click on my network, it says «Unable to connect», and I have to restart the machine to get internet access again.
It may be the driver, but there is a chance it is a messed up windows 10 setting. Hit the windows key and type in «settings» and hit enter. Then go to «system > Power and sleep». Make sure at the bottom of the page that both boxes are checked under «Wi-Fi». I am sorry if that doesn’t solve the problem or they were both already checked. BTW I am using windows 10 Pro (x64), not enterprise so I don’t know if the settings are exactly the same.
1 person found this reply helpful
Was this reply helpful?
Sorry this didn’t help.
Great! Thanks for your feedback.
How satisfied are you with this reply?
Thanks for your feedback, it helps us improve the site.
How to Keep Internet Connection Active When in Sleep Mode on Windows 10
Do you prefer to Keep Internet Connection Active When in Sleep Mode on Windows 10 PC? Many users are reporting that their WiFi or Ethernet gets disconnected after the PC is resumed from sleep. This instability of network connection adversely affects their background processes. If you don’t like sleep mode, you can Prevent Windows 10 from Go to Sleep.
So, to Keep Internet Connection Active When in Sleep Mode on Windows 10, you need to change a policy setting. In this concern, Group Policy Editor includes a sleep setting that helps in retaining the network connectivity. If your network is creating issues, just try to Reset Network Settings to Default in Windows 10. See the guide –
Keep Internet Connection Active When in Sleep Mode on Windows 10
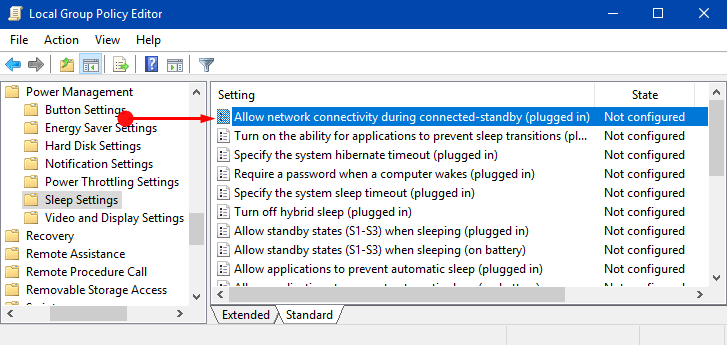
Step 1 – Open Group Policy Editor to Keep Internet Connection Active When in Sleep Mode. To do so, first, type gpedit on Cortana and select Edit group policy that pops up as a result.
Step 2 – Browse to the below-mentioned path on the Group Policy window.
Computer Configuration => Administrative Templates => System => Power Management => Sleep Settings
Now, network connectivity is important for both plugged in and on battery devices. So, follow the below steps to do the changes accordingly.
Keep Internet Connection Active When in Sleep Mode (Plugged in)
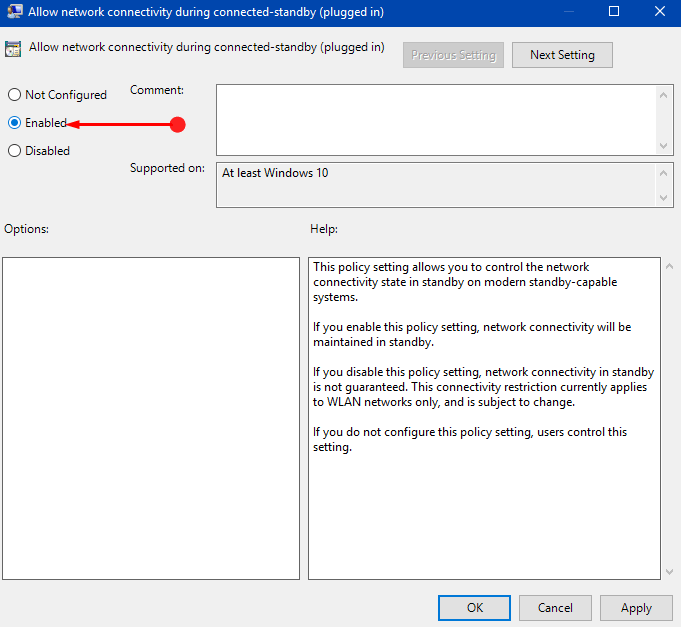
Step 3 – Locate and double-click the policy namely Allow network connectivity during connected-standby (plugged in) on the right pane of Sleep Settings.
Step 4 – Select Enabled on its edit window to Keep Internet Connection Active When in Sleep Mode on Windows 10. Click Apply and henceforth OK button to save the changes of this sleep policy.
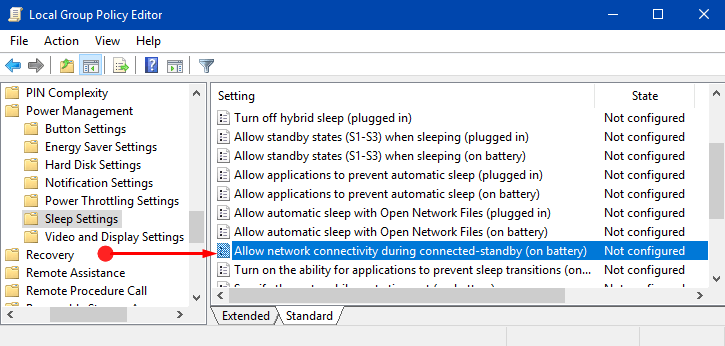
Keep Internet Connection Active When in Sleep Mode (On Battery)
Step 5 – Here also, on the right pane of Sleep Settings, search a policy Allow network connectivity during connected-standby (on battery). When you see the policy, double-click on it.
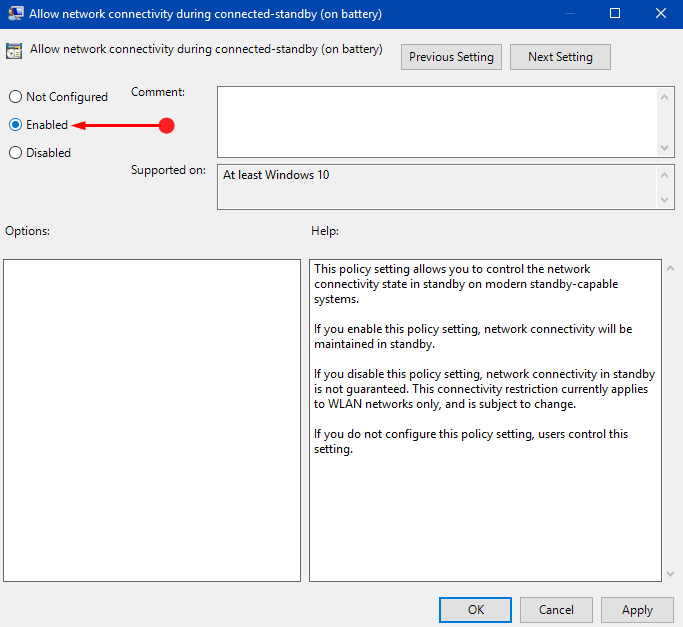
Step 6 – Click Enabled on the edit window of the setting that opens up.
Step 7 – Click Apply and OK button to implement the changes and also to maintain the network connectivity when the computer is running On Battery.
If your device runs on battery, you may like to read Windows 10 – How to Boost Laptop Battery Life.
Group Policy explains both the settings as follows –
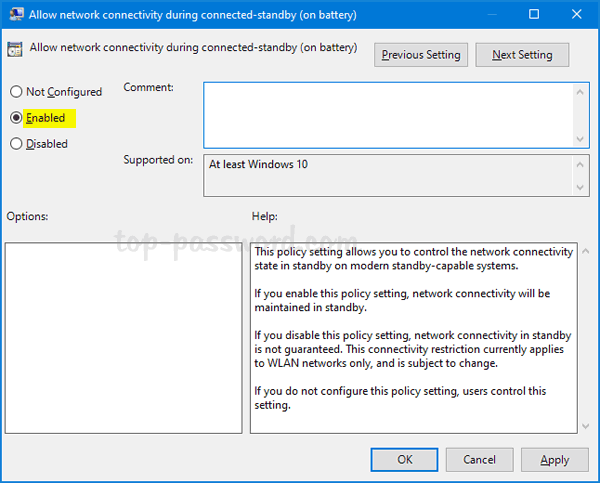
“This policy setting allows you to control the network connectivity state in standby on modern standby-capable systems.
If you enable this policy setting, network connectivity will be maintained in standby.
If you disable this policy setting, network connectivity in standby is not guaranteed. This connectivity restriction currently applies to WLAN networks only and is subject to change.
If you do not configure this policy setting, users control this setting.”
Conclusion
The Group Policy offers numerous settings to organize power options, including network connectivity. Once you follow the above steps, the network connectivity during the sleep mode gets stable. Well, there are other tweaks that can help you out in this concern. However, configuring Group Policy maintains the network connection.
Password Recovery
Windows 10 disconnects network during sleep? Is there a way to keep network connection active even when the PC is in sleep mode? In this tutorial we’ll show you 3 ways to prevent Windows 10 from disconnecting network during sleep.
Method 1: Keep Network Connection Active When in Sleep Mode (On Battery & Plugged in)
Open the Power Options. Locate and expand the “Network connectivity in Standby” setting. By default, this setting is hidden and you can make it shown with this trick.

Click to select Enable for both “On battery” and “Plugged in“. Once saving the changes, your computer should stay connected to the network when in sleep mode.
Method 2: Prevent Sleep Mode from Disconnecting Network to Save Battery Power
Open the Settings app and navigate to System -> Power & sleep. On the right-side pane, click the option “When my PC is asleep and on battery power, disconnect from the network” and change it to Never.
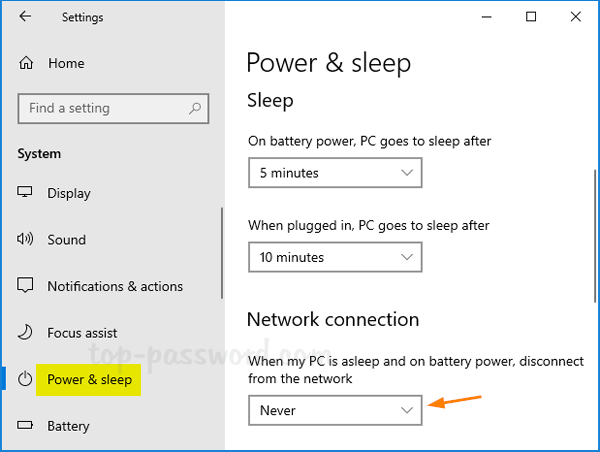
Note that this option is only available for Windows 10 laptops and tablets with built-in battery.
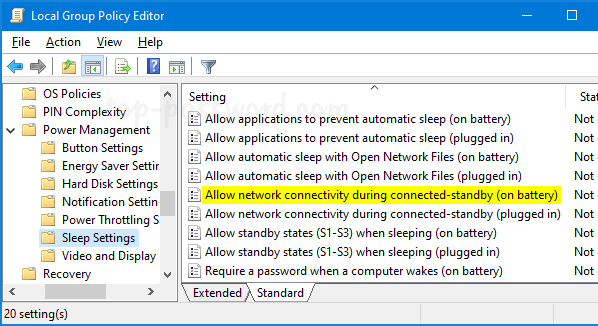
Method 3: Use GPO to Allow Network Connectivity during Connected-Standby
- Open the Local Group Policy Editor and browse to:
Computer Configuration -> Administrative Templates -> System -> Power Management -> Sleep Settings - On the right pane, you can find the two settings: “Allow network connectivity during connected-standby (on battery)” and “Allow network connectivity during connected-standby (plugged in)“. Double-click on each of them to modify.
Select Enabled and click OK.
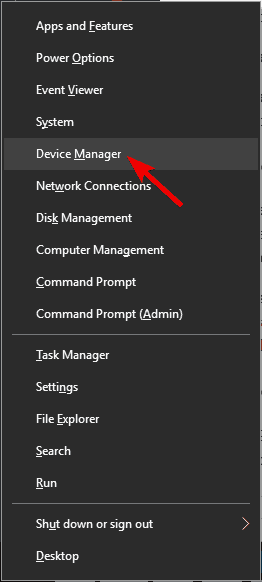
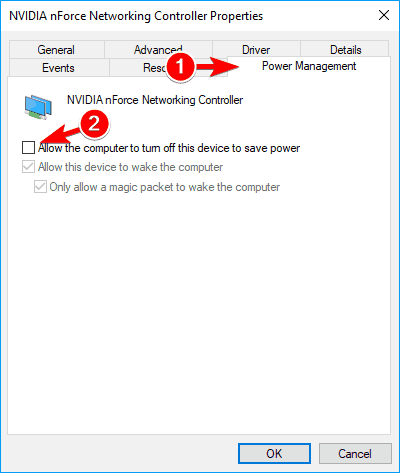
If your computer still loses network connection in sleep mode, open the Device Manager and access the Properties of your Ethernet/Wi-Fi adapter. Make sure the “Allow the computer to turn off this device to save power” option is unchecked.
Windows 10 disconnects from Wi-Fi after Sleep Mode? Fix it now


Many users reported that Wi-Fi disconnects after Sleep Mode on their PC, and this can be an annoying issue. However, there’s a way to fix this problem once and for all, and we’re going to show you how to do it.
Everyone is talking about Windows 10 Technical Preview and its pros and cons. But we mustn’t forget about the problems of other operating systems. Some users say that they’re unable to connect to WiFi after waking from sleep mode. But there are some fixes that may help them.
Sleep Mode disconnects network connection? Fix it with these solutions
- Change Power Management Settings
- Uncheck the IPv6 box
- Use Network troubleshooter
- Change your power settings
- Disable Broadcom Bluetooth
- Disable your antivirus
- Make sure that Ethernet is disabled
- Change your connection to Private
- Disable Require sign-in
- Perform a System Restore
There are many problems with Wi-Fi that can occur, and in this article we’re going to cover the following issues:
- No internet after sleep Windows 10 – According to users this is a common problem. Even though their PC wakes up from Sleep Mode, there’s no Internet connection available.
- Windows 10 WiFi keeps dropping – Another common problem that users can experience is Wi-Fi dropping. This is an annoying problem, but you should be able to fix it with one of our solutions.
- Windows keeps disconnecting from WiFi – This is another common problem that can occur with Wi-Fi. According to users, Windows keeps disconnecting from Wi-Fi after waking up from Sleep Mode.
- WiFi disconnects sign in required – By default, Windows will ask you to sign in when you wake up from Sleep Mode. This is a standard security feature, but it can sometimes cause problems with Wi-Fi.
- Sleep mode WiFi will not connect – This is another problem that can occur after you put your PC to sleep. According to users, they can’t connect to Wi-Fi at all after waking up their PC.
- Sleep mode WiFi doesn’t work – This is another variation of this problem, and users reported that their Wi-Fi doesn’t work after waking up their PC. Although this is an annoying problem, you should be able to fix it with one of our solutions.
1. Change Power Management Settings
One of the most common causes of this issue is the wrong Power Managements plan. You should check if your Wireless network adapter is not set to be turned off to save power when computers goes to sleep mode.
If it the current Power Management plan turns off your Wireless adapter while in sleep mode, just change it and your problem will be solved. You can check if it is the case and change your current Power Management plan in Device Manager. Do do so, follow these instructions:
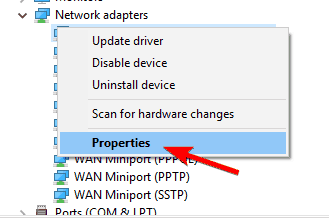
- Press Windows logo key and X key together and choose Device Manager.

- Expand Network Adapters, right-click the adapter, click Properties.
- Click the Power Management tab, and then clear the Allow the computer to turn off this device to save power check box.
2. Uncheck the IPv6 box
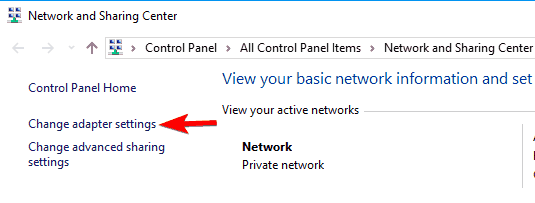
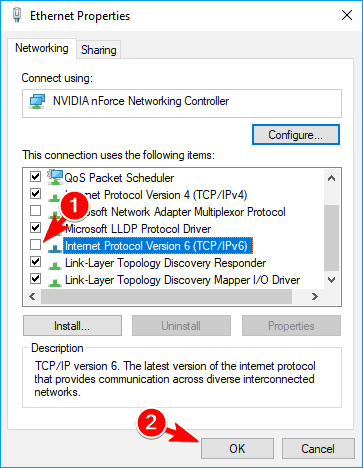
If wrong Power Management plan is not an issue, you might have some problems with IPv6 protocol. In order to disable it, you should perform a couple of operations in your Network and Sharing Center. To untick the IPv6 box, follow these steps:
- Go to the Network and Sharing Center.
- Click on Change adapter settings (in the left pane).
- Right-click on the connection you‘re using. Click Properties.
- Now remove the tick from the IPv6 and click OK to save changes.

- READ ALSO: Fix: Unable to Connect to Wi-Fi After Updates in Windows 8.1/ Windows 10′
3. Use Network troubleshooter
If Windows disconnects from Wi-Fi after sleep, you might be able to fix this problem with this simple workaround. According to users, you just have to run the Network troubleshooter by following these steps:
- Right click the network icon in the bottom right corner. Choose Troubleshoot problems from the menu.
- Network troubleshooter will now start and try to fix your problem.


After the troubleshooter is finished, check if the issue still appears. Many users reported that this solution worked for them, so feel free to try it. We have to mention that this might not be a permanent solution, so you’ll have to repeat it whenever the issue appears.
4. Change your power settings
According to users, sometimes Windows disconnects from Wi-Fi after sleep due to your power settings. Users reported that they fixed the problem simply by following these steps:
- Press Windows Key + I to open the Settings app.
- When Settings app opens, navigate to System section.
- In the left pane navigate to Power & sleep section. Scroll all the way down and check both boxes under Wi-Fi section.

After doing that, your problems with Wi-Fi should be completely resolved.
5. Disable Broadcom Bluetooth
If Windows disconnects from Wi-Fi after sleep, the problem might be your Bluetooth adapter. It seems that Broadcom Bluetooth starts automatically with Windows causing this problem to occur. To fix this problem, you can do the following:
- Press Ctrl + Shift + Esc to open Task Manager.
- When Task Manager opens, go to Startup tab and locate your Bluetooth service. Right click it and choose Disable from the menu.

If you can’t find the Bluetooth service in Startup tab, you can disable it by doing the following:
- Press Windows Key + R and enter msconfig. Press Enter or click OK.
- Navigate to the Services tab and click on Hide all Microsoft services. Locate Bluetooth service and disable it. Now click on Apply and OK to save changes.

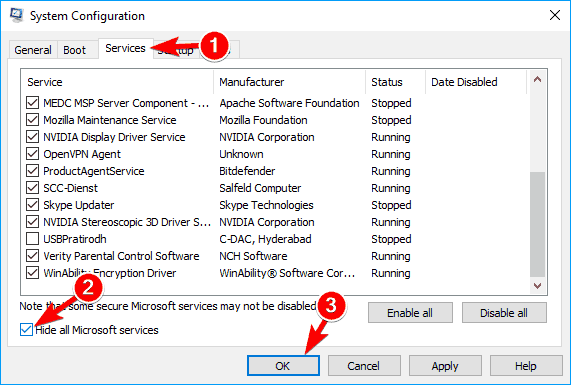
After making the necessary changes you need to restart your PC in order to apply them. Keep in mind that disabling the Bluetooth service might not be the best solution if you use Bluetooth devices frequently. To use your Bluetooth devices again, you’ll have to enable the disabled services.
6. Disable your antivirus

According to users, if Windows disconnects from Wi-Fi after sleep the problem might be related to your third-party antivirus software or firewall. To fix this problem, it’s advised to disable any third-party antivirus software or firewall and check if that solves the issue.
If disabling your antivirus software or firewall doesn’t solve the issue, you might have to uninstall your antivirus software completely. To do that, it’s advised to use a dedicated removal tool to remove all files associated with your antivirus software.
After removing your antivirus and firewall, check if the issue still appears. If the issue is resolved, you might have to reinstall your antivirus again or switch to a different antivirus solution. If you’re looking for a new antivirus that won’t interfere with your system, you might want to try out Bitdefender.
7. Make sure that Ethernet is disabled
If Windows disconnects from Wi-Fi after sleep, the problem might be your Ethernet connection. One of the fastest ways to fix this problem is to make sure that your Ethernet connection is disabled. This is rather simple and you can do it by following these steps:
- Open Network and Sharing Center and navigate to Change adapter settings.
- Locate your Ethernet connection, right click it and choose Disable from the menu.

After disabling your Ethernet connection check if the issue is resolved. In addition, you can also perform this solution simply by disconnecting your Ethernet cable from your PC.
8. Change your connection to Private
Sometimes this issue can occur because your network connection is set to Public. Public network connections use a different set of rules, and sometimes that can cause certain issues to occur. If Windows disconnects from Wi-Fi after sleep, you can fix that by doing the following:
- Click your Wi-Fi icon in the bottom right corner and click on Properties.
- Now locate Make this PC discoverable section and enable it.
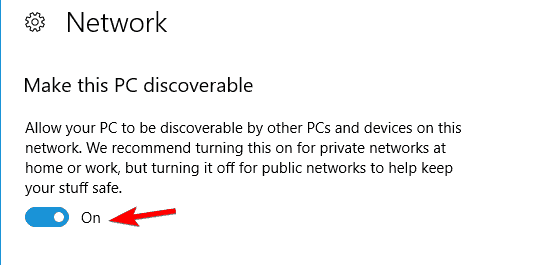
After enabling this option your connection will automatically change to Private fixing any Wi-Fi issues.
9. Disable Require sign-in
According to users, sometimes Wi-Fi problems can be caused by your settings. By default, Windows will ask you for your password once you wake up your PC.
This is a security measure, but many users reported that this feature is causing Windows to disconnect from Wi-Fi. To fix this problem, you just have to disable this feature by following these steps:
- Open the Settings app and go to Accounts section.
- Select Sign-in options from the menu on the left. In the right pane, in Require sign-in section select Never.

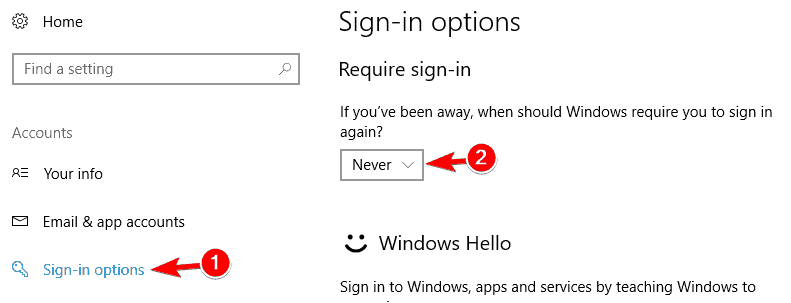
After changing this setting your PC won’t require you to login after waking up from Sleep Mode. Disabling this feature can be a slight security concern, but it should help you with this problem.
10. Perform a System Restore
If you’re still having this problem, perhaps you can fix it by performing System Restore. To do that, follow these steps:
- Press Windows Key + S and type system restore. Now choose Create a restore point from the list.
- The SystemProperties window should appear. Click the System Restore
- Once the System Restore window opens, click the Next button to proceed.
- Check Show more restore points option, if available. Now you need to select the desired restore point and click Next.
- Follow instructions on the screen to complete the process.
Once your PC is restored, check if the problem is resolved.
If this solutions didn’t worked out for you, or you have some other suggestions, comments, or maybe other useful solutions for this problem, please write them down in the comment section below, we would love to read your feedback.


