- File sharing over a network in Windows 10
- Подключение сетевого диска в Windows 10
- Способ 1: Папка «Этот компьютер»
- Способ 2: Корень сетевого расположения
- Способ 3: Подключение Яндекс.Диска в качестве сетевого
- Installing and Configuring the External Storage: Windows Network Drives App
- Introduction
- Installation
- Example
- Creating a New Share
- Personal WND Mounts
- libsmbclient Issues
- Windows Network Drive Listener
- Setting Up the WND Listener
- wnd:listen
- wnd:process-queue
- Basic Setup for One ownCloud Server
- Password Options
File sharing over a network in Windows 10
In Windows 10, some features of file and folder sharing over a network have changed, including the removal of HomeGroup. Read on for answers to common questions about other changes to file and folder sharing in Windows 10.
To share a file or folder in File Explorer, do one of the following:
Right-click or press a file, select Give access to > Specific people.

Select a file, select the Share tab at the top of File Explorer, and then in the Share with section select Specific people.

If you select multiple files at once, you can share them all in the same way. It works for folders, too—share a folder, and all files in it will be shared.
To stop sharing in File Explorer, do one of the following:
Right-click or press a file or folder, then select Give access to > Remove access.

Select a file or folder, select the Share tab at the top of File Explorer, and then in the Share with section select Remove access.

File Explorer shows the «Remove access» option («Stop sharing» in older versions of Windows 10) for all files, even those that aren’t being shared over a network.
Open File Explorer, then type \\localhost into the address bar.
Note: When you’ve shared a file from a folder in your user profile and you go to \\localhost, you’ll see your user profile and all its files there. This doesn’t mean that all of your files are shared—just that you have access to all your own files.
If you open File Explorer, go to Network, and see an error message («Network discovery is turned off….»), you’ll need to turn on Network discovery to see devices on the network that are sharing files. To turn it on, select the Network discovery is turned off banner, then select Turn on network discovery and file sharing.

To troubleshoot problems with sharing files or folders, follow the steps below on all computers from which you’re trying to share.
Make sure the computers are on the same network. For example, if your computers connect to the internet through a wireless router, make sure they all connect through the same wireless router.
If you’re on a Wi-Fi network, set it to Private. To find out how, read Make a Wi-Fi network public or private in Windows 10.
Turn on network discovery and file and printer sharing, and turn off password protected sharing.
Select the Start button, then select Settings > Network & Internet , and on the right side, select Sharing options.
Under Private, select Turn on Network discovery and Turn on file and printer sharing.
Under All Networks, select Turn off password protected sharing.
Make sharing services start automatically.
Press the Windows logo key + R.
In the Run dialog box, type services.msc, and then select OK.
Right-click each of the following services, select Properties, if they’re not running, select Start, and next to Startup type, select Automatic:
Подключение сетевого диска в Windows 10

Сетевым диском называется одна или несколько директорий, находящихся в общем доступе и имеющих определенную метку тома в виде буквы. Благодаря этому становится возможным обмен файлами между всеми участниками локальной сети без каких-либо трудностей. Подключение сетевого диска в операционной системе Windows 10 доступно всем пользователям, обладающим соответствующими правами, и сегодня мы хотим рассказать о трех методах осуществления этой операции.
Перед началом рассмотрения инструкций мы советуем убедиться в том, что локальная сеть и общий доступ в Windows 10 были настроены правильно. Более детальные инструкции по данной теме вы найдете в отдельных материалах на нашем сайте, кликнув по ссылкам ниже.
Способ 1: Папка «Этот компьютер»
Самый простой метод создания сетевого диска — использование меню «Этот компьютер». Там пользователю нужно только нажать на несколько кнопок, чтобы справиться с поставленной задачей. Давайте более детально рассмотрим этот вариант, разобрав каждый шаг.
- Откройте Проводник и перейдите в раздел «Мой компьютер». Здесь нажмите по кнопке «Компьютер», чтобы раскрыть список дополнительных опций.

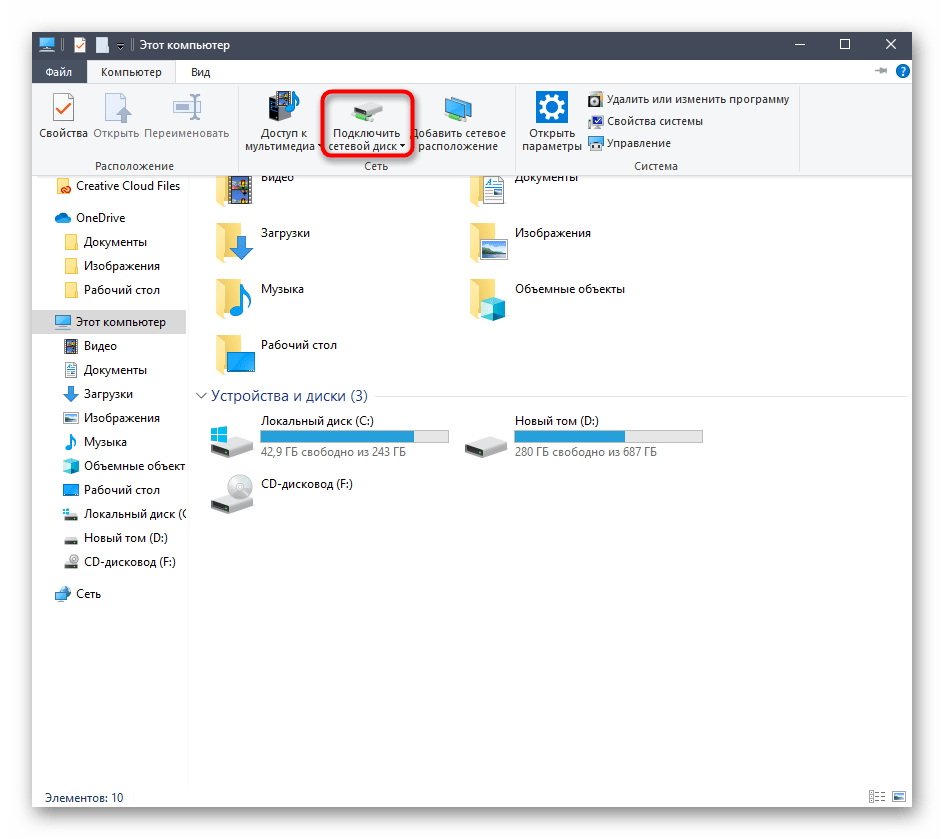
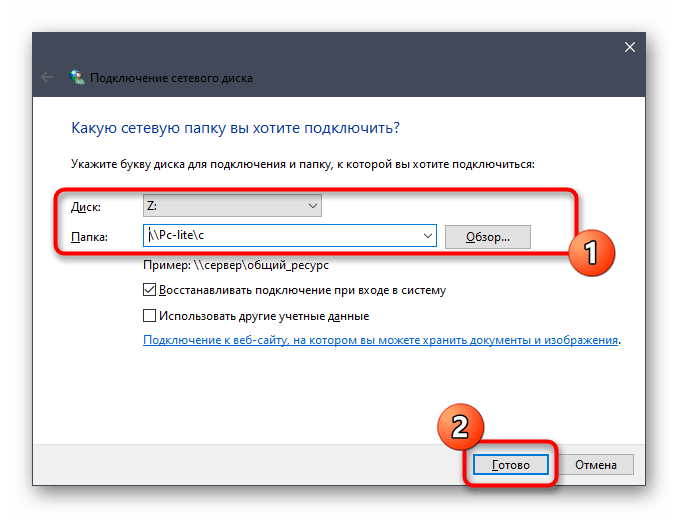
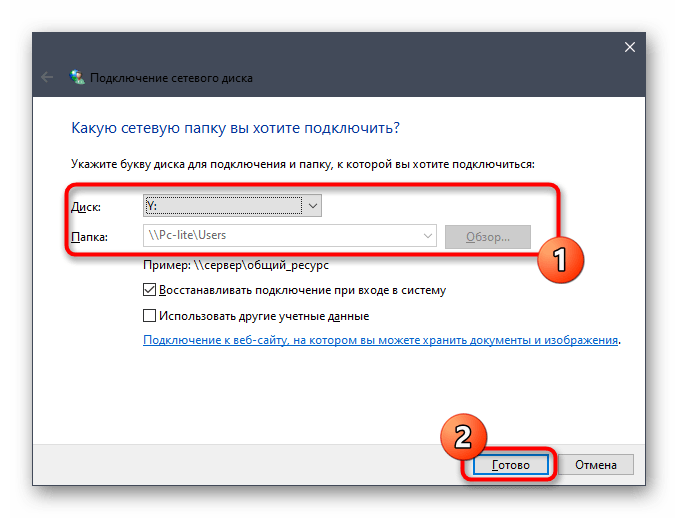
Остается только заполнить соответствующую форму, чтобы подключить накопитель. Для этого указывается буква диска, вводится полный путь к папке и указываются дополнительные параметры.
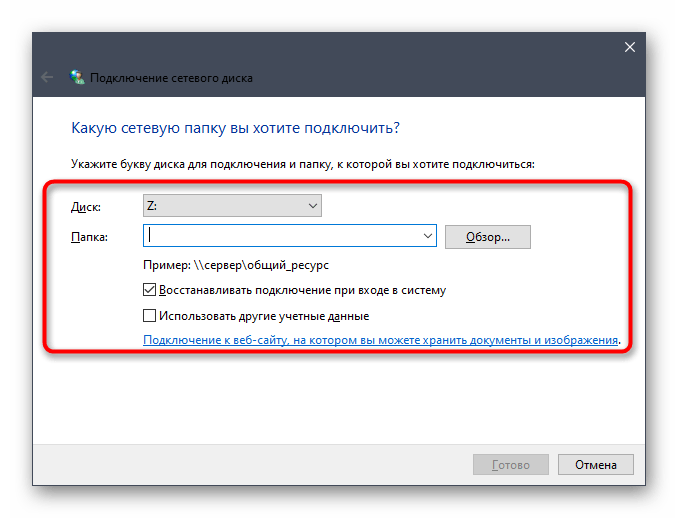
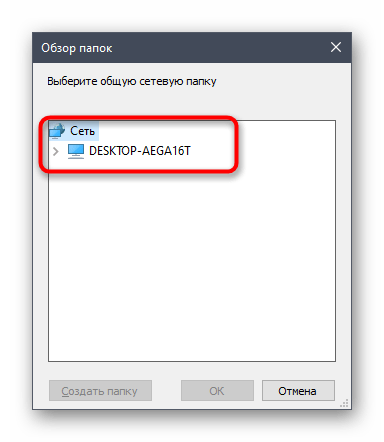
Если вы нажмете по кнопке «Обзор», сможете выбрать одно из стандартных общих сетевых расположений в качестве диска.
Произойдет автоматическое перемещение в корень созданного диска. Здесь вы можете осуществлять управление им, удалять или перемещать файлы.
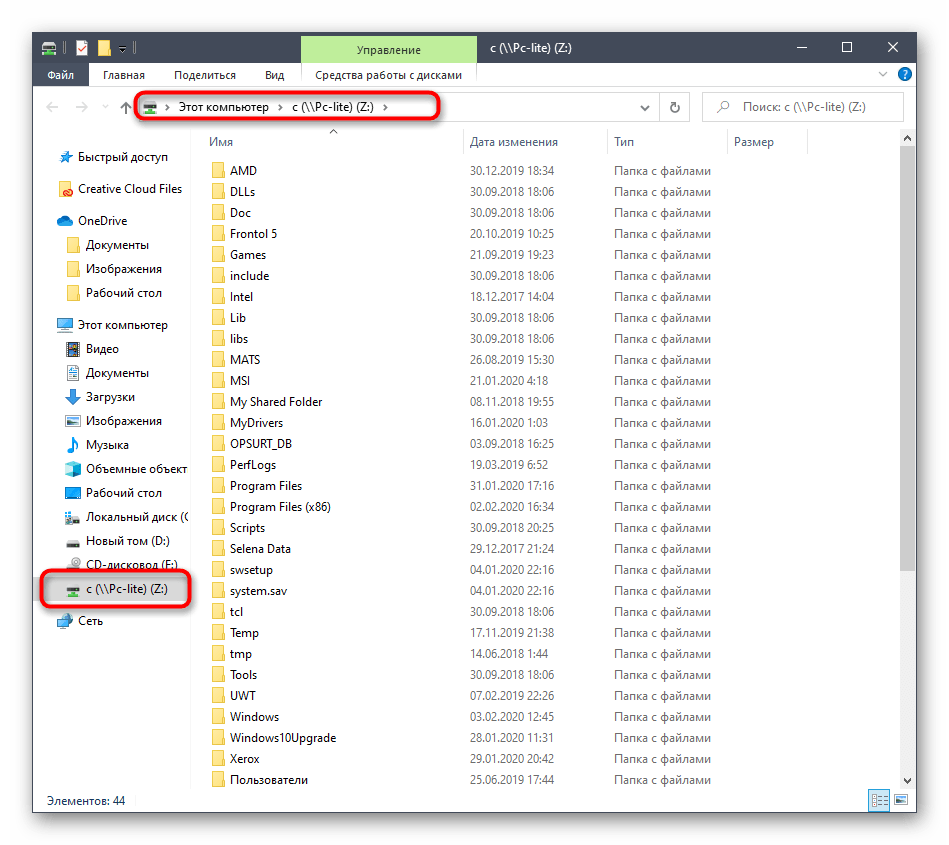
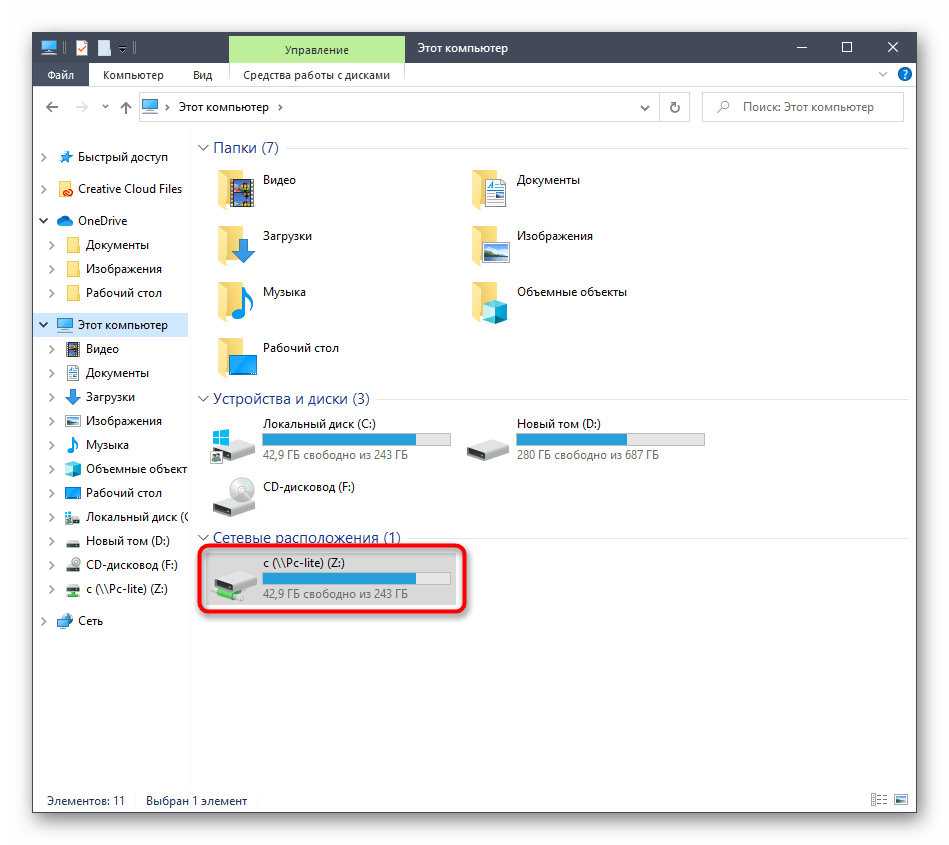
До момента отключения сетевой диск будет располагаться в разделе «Этот компьютер» в списке «Сетевые расположения».
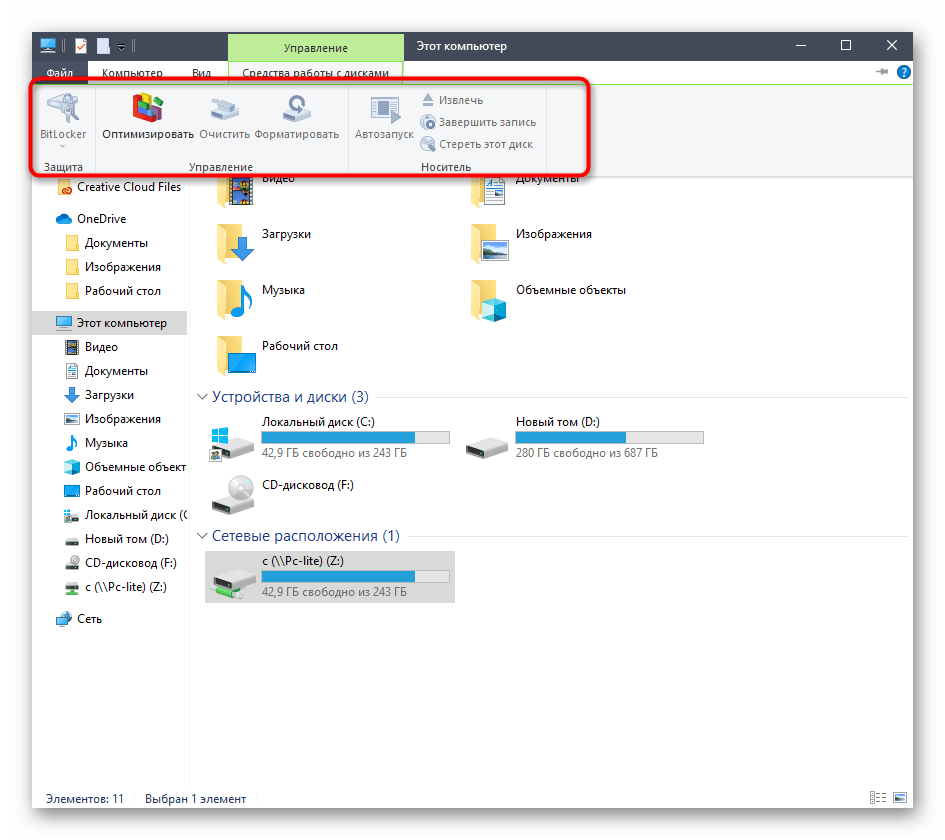
Здесь же его можно будет оптимизировать и совершать другое управление в соответствии с имеющимися правами.
Точно таким же образом можно добавлять неограниченное количество дисков, обладая соответствующими правами доступа. Если же этот вариант вам не подходит, переходите к ознакомлению со следующим, а при возникновении проблем обратитесь к завершающему разделу сегодняшнего материала.
Способ 2: Корень сетевого расположения
Иногда пользователю требуется подключить в качестве сетевого диска уже имеющуюся общую папку. В таком случае тоже можно воспользоваться первым методом, однако немного быстрее будет осуществить это при помощи соответствующего контекстного меню.
- Откройте утилиту Выполнить, зажав горячую клавишу Win + R. В строке введите \\Name , где Name — название стандартного сетевого расположения, например, имя текущего компьютера или устройства локальной сети.
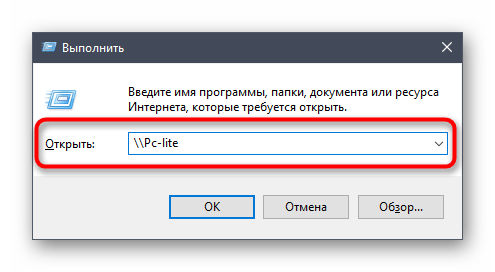
Щелкните по любой из находящихся в открывшемся каталоге папке ПКМ и в контекстном меню выберите «Подключить сетевой диск».
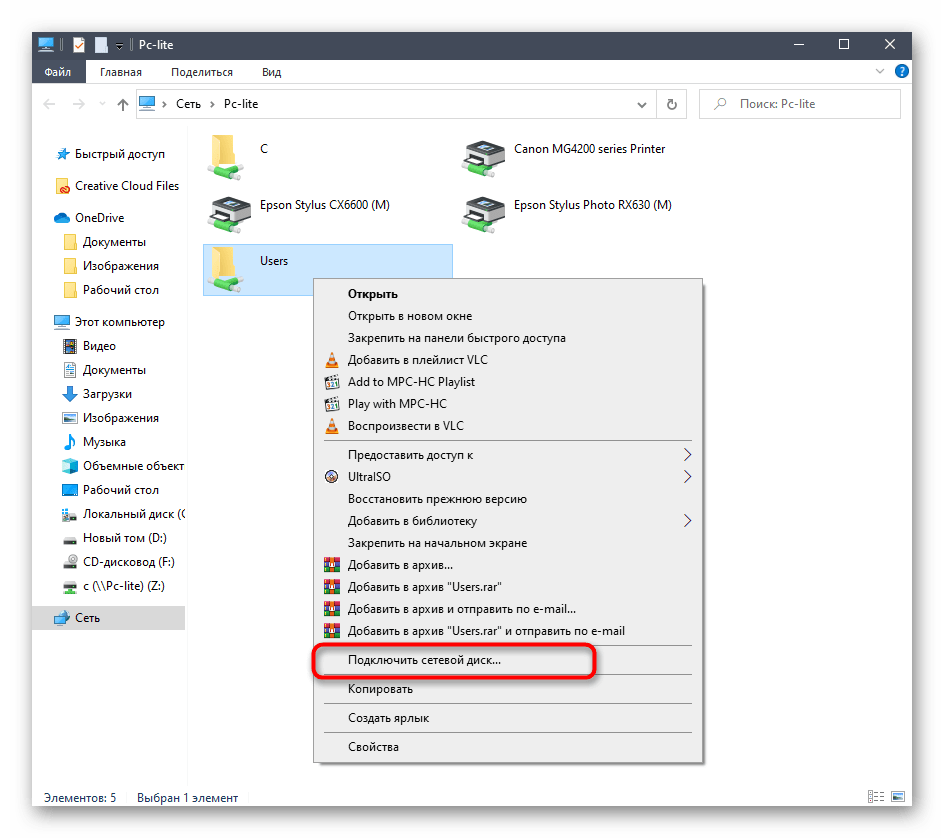
Задайте название диску и нажмите на «Готово». Как видите, папка будет определена автоматически.
Этот метод можно применять к любому каталогу, находящемся в общем доступе. Для реализации данной задачи потребуется выполнить всего три простых действия, поэтому с этим не должно возникнуть проблем даже у начинающих юзеров.
Способ 3: Подключение Яндекс.Диска в качестве сетевого
Если вы являетесь пользователем Яндекс.Диска, скорее всего, обратились к этой статье, чтобы разобраться, как именно подключать это облачное хранилище в качестве сетевого диска. Принцип осуществления этого действия практически соответствует тем, о которых мы уже говорили в предыдущих способах. Другой наш автор в отдельной статье более детально рассказал, как именно производится подключение. Рекомендуем ознакомиться с ней, кликнув по ссылке далее.
Это были все методы, позволяющие подключить сетевой диск в Windows 10. Осталось только разобраться с возможными проблемами, которые возникают во время этого процесса. Начнем с самой распространенной, связанной с неправильно установленными параметрами реестра. Исправляется эта неполадка следующим образом:
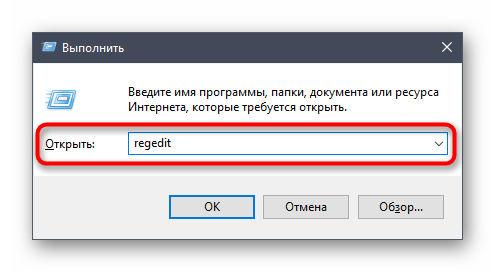
- Откройте утилиту «Выполнить» (Win + R), а затем введите в строке regedit и нажмите на Enter.
В открывшемся меню следует перейти по пути HKEY_LOCAL_MACHINE\SYSTEM\CurrentControlSet\Control\Lsa .
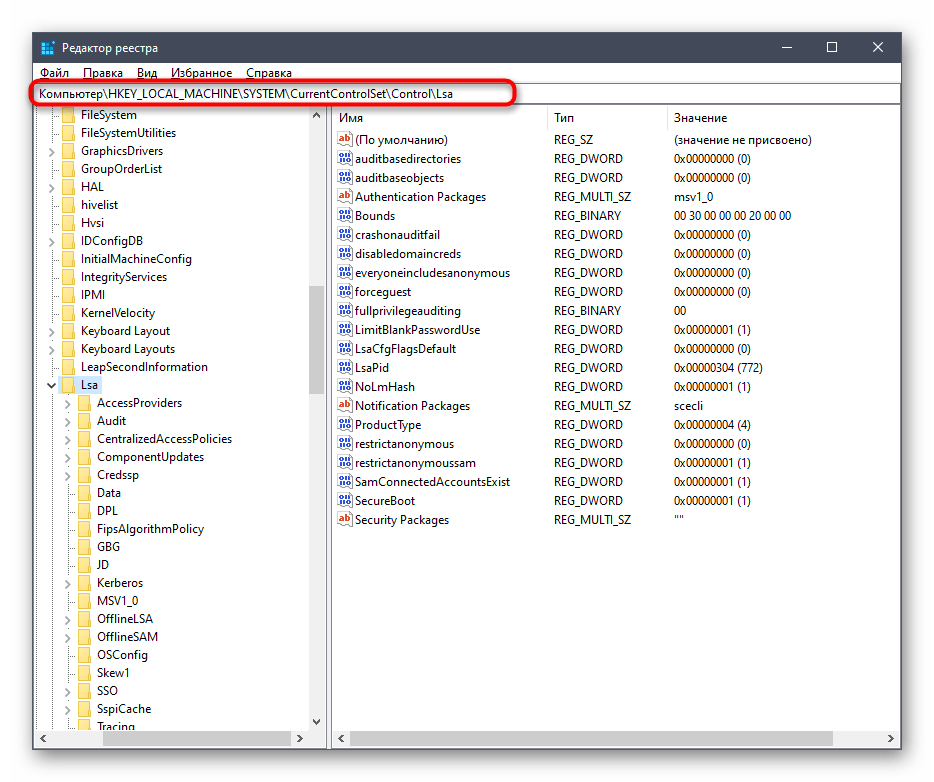
Здесь щелкните по пустому месту ПКМ и создайте параметр DWORD, выбрав соответствующий пункт.
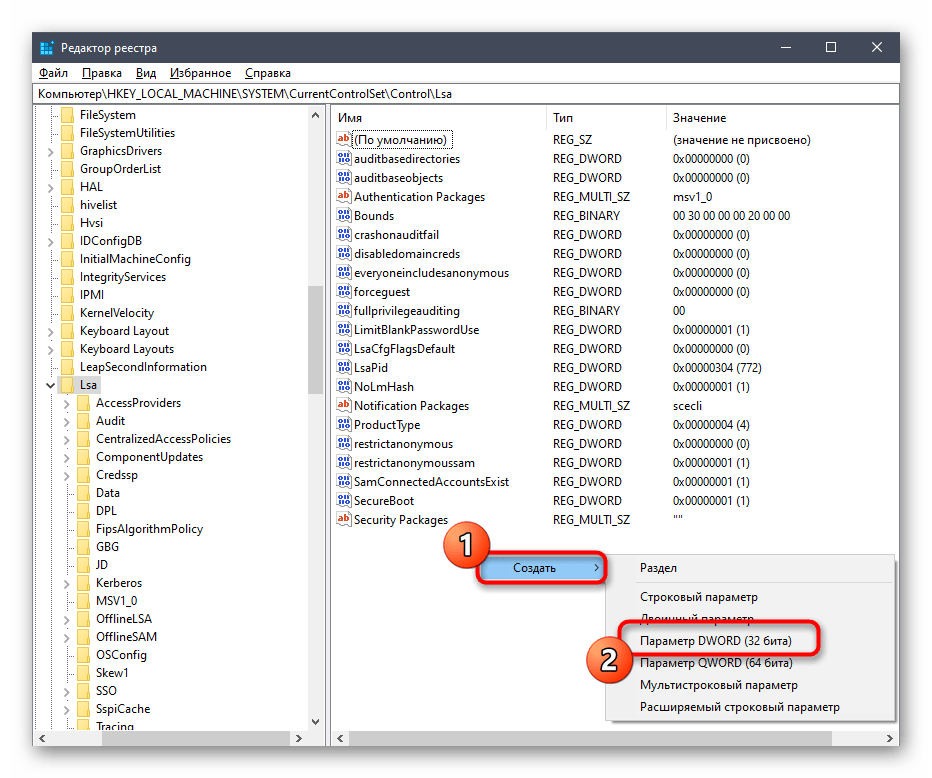
Задайте ему название «LMCompatibilityLevel» и нажмите на Enter, чтобы применить изменения.
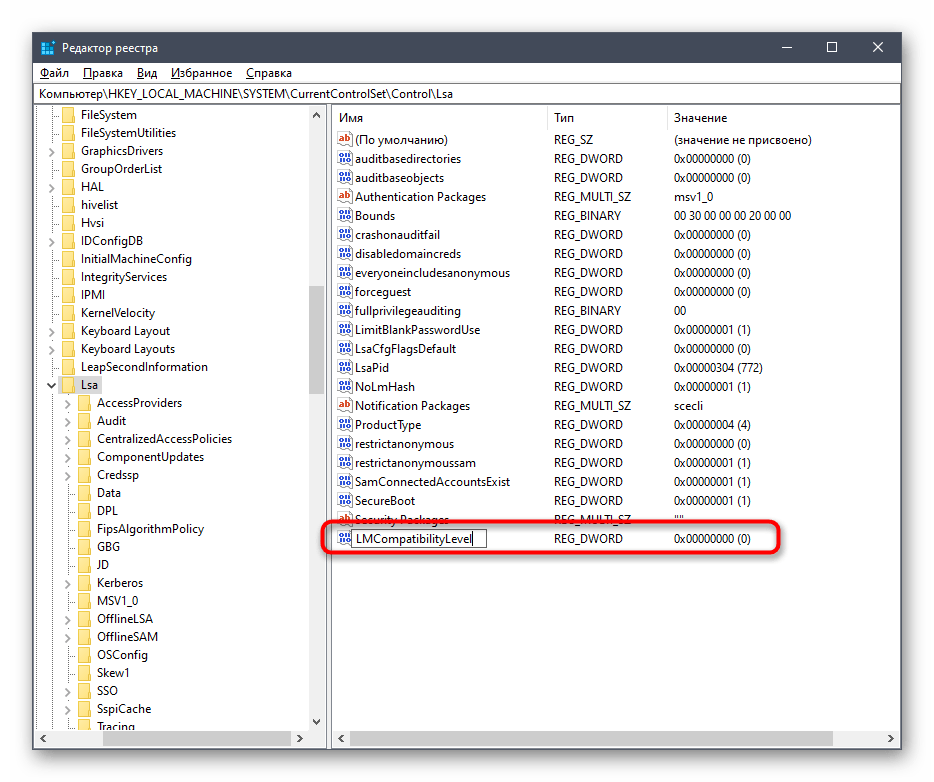
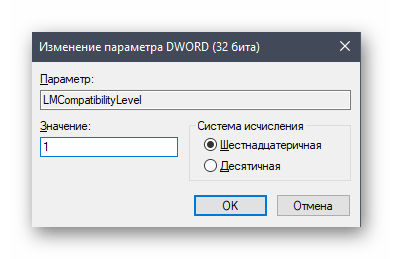
После этого дважды кликните по строке, чтобы открыть ее свойства. Измените значение на 1 и примените настройку.
Теперь вам следует перейти по пути HKEY_LOCAL_MACHINE\SYSTEM\CurrentControlSet\Control\Lsa\MSV1_0 .
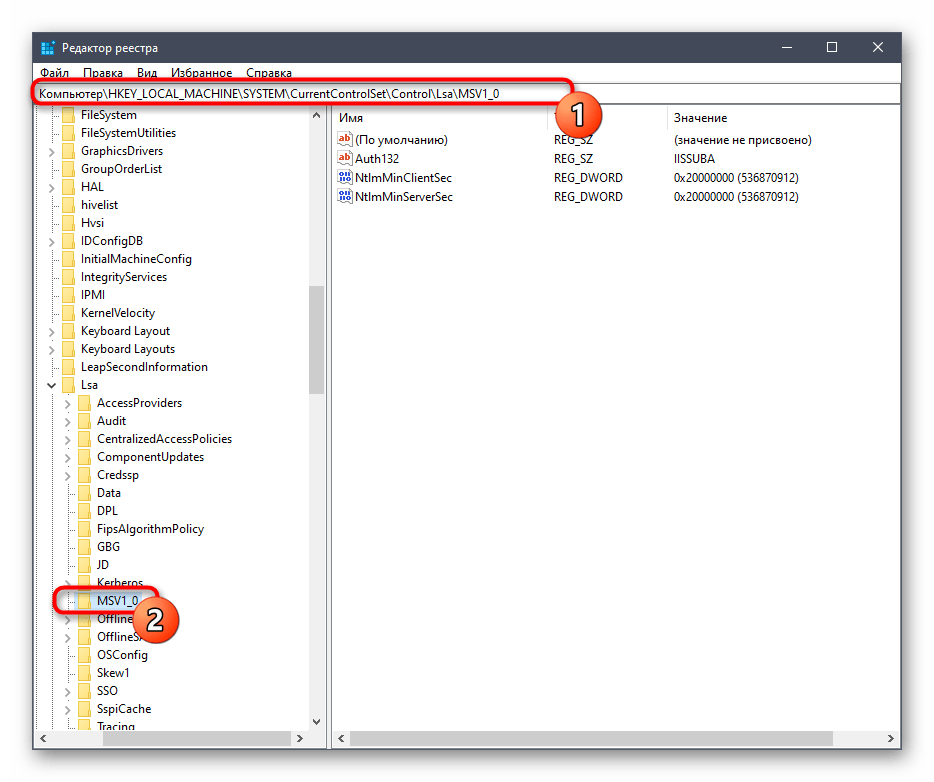
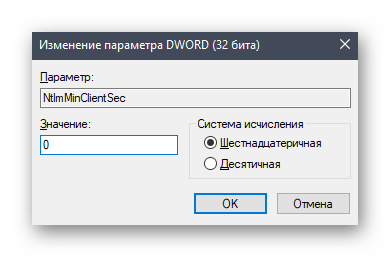
Отыщите там параметр «NtlmMinClientSec» и «NtlmMinServerSec».
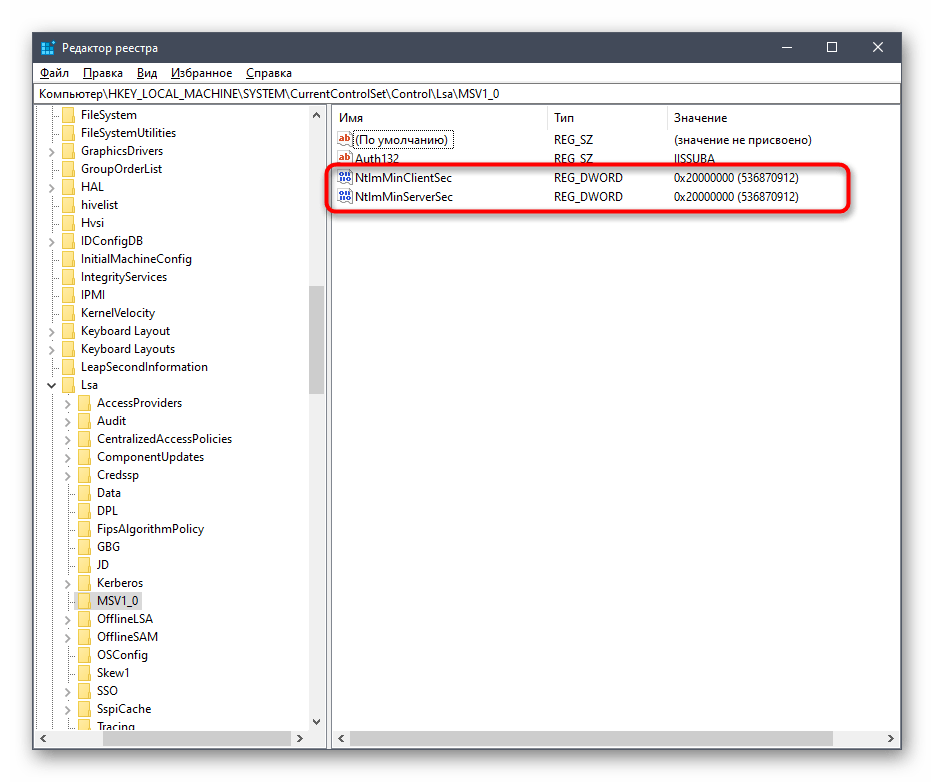
Значение каждого из них потребуется изменить на 0.
Внесенные только что изменения связаны с задержкой стороны клиента и общими параметрами сетевого окружения. После их применения при перезагрузке компьютера подключение сетевого диска должно пройти успешно. Если этого добиться не удалось, обратите внимание на приведенное далее руководство. Там описаны другие причины возникновения подобной проблемы.
Это было все, что мы хотели рассказать о подключении сетевого диска в Виндовс 10. Как видите, ничего в этом сложного нет, а возможность выбора оптимального варианта позволит любому пользователю быстро и легко справиться с этой задачей.
Installing and Configuring the External Storage: Windows Network Drives App
Introduction
The External Storage: Windows Network Drives app creates a control panel in your Admin page for seamlessly integrating Windows and Samba/CIFS shared network drives as external storages.
Any Windows file share and Samba servers on Linux and other Unix-type operating systems use the SMB/CIFS file-sharing protocol. The files and directories on the SMB/CIFS server will be visible on your Files page just like your other ownCloud files and folders.
They are labeled with a little four-pane Windows-style icon, and the left pane of your Files page includes a Windows Network Drive filter. Figure 1 shows a new Windows Network Drive share marked with red warnings.
These indicate that ownCloud cannot connect to the share because it requires the user to login, it is not available, or there is an error in the configuration.

| For more information on SMB/CIFS in ownCloud, refer to the Samba file server configuration documentation. |
Files are synchronized bi-directionally, and you can create, upload, and delete files and folders. ownCloud server admins can create Windows Network Drive mounts and optionally allow users to set up their own personal Windows Network Drive mounts.
Depending on the authentication method, passwords for each mount are encrypted and stored in the ownCloud database, using a long random secret key stored in config.php , which allows ownCloud to access the shares when the users who own the mounts are not logged in. Or, passwords are not stored and available only for the current session, which adds security.
Installation
Install the External Storage: Windows Network Drives app from the ownCloud Market App or ownCloud Marketplace. To make it work, a few dependencies have to be installed.
A Samba client. This is included in all Linux distributions. On Debian, Ubuntu, and other Debian derivatives it is called smbclient . On SUSE, Red Hat, CentOS, and other Red Hat derivatives it is samba-client .
php-smbclient (version 0.8.0+). It should be included in most Linux distributions. You can use eduardok/libsmbclient-php, if your distribution does not provide it.
which and stdbuf . These should be included in most Linux distributions.
Example
Assuming that your ownCloud installation is on Ubuntu, then the following commands will install the required dependencies:
Other method using PECL is:
Regardless of the method you use, remember to check if an smbclient.ini file exists in /etc/php/ /mods-available and contains the following line:
If so, then make it available via by running the following command:
Creating a New Share
When you create a new WND share you need three things:
The login credentials for the share
The server address, the share name; and
The folder you want to connect to
Although some parts of the app might work properly, regardless of case, other parts might have problems if case isn’t respected.
Enter the ownCloud mount point for your new WND share. This must not be an existing folder.
Then select your authentication method; See enterprise_only_auth for complete information on the five available authentication methods.

Enter the address of the server that contains the WND share.
The Windows share name.
The root folder of the share. This is the folder name, or the $user variable for user’s home directories. Note that the LDAP Internal Username Attribute must be set to the samaccountname for either the share or the root to work, and the user’s home directory needs to match the samaccountname . (See User Authentication with LDAP.)
Select users or groups with access to the share. The default is all users.
Click the gear icon for additional mount options. Note that previews are enabled by default, while sharing is not (see figure 2). Sharing is not available for all authorization methods; see enterprise_only_auth. For large storages with many files, you may want to disable previews, because this can significantly increase performance.

Your changes are saved automatically.
| When you create a new mountpoint using Login credentials, you must log out of ownCloud and then log back in so you can access the share. You only have to do this the first time. |
Personal WND Mounts
Users create their own WND mounts on their Personal pages. These are created the same way as Admin-created shares. Users have four options for login credentials:
Username and password
Log-in credentials, save in session
Log-in credentials, save in database
libsmbclient Issues
If your Linux distribution ships with libsmbclient 3.x , which is included in the Samba client, you may need to set up the HOME variable in Apache to prevent a segmentation fault. If you have libsmbclient 4.1.6 and higher it doesn’t seem to be an issue, so you won’t have to change your HOME variable. To set up the HOME variable on Ubuntu, modify the /etc/apache2/envvars file:
In Red Hat/CentOS, modify the /etc/sysconfig/httpd file and add the following line to set the HOME variable in Apache:
By default, CentOS has activated SELinux, and the httpd process can not make outgoing network connections. This will cause problems with the curl , ldap and samba libraries. You’ll need to get around this to make this work. First, check the status:
Then enable support for network connections:
In openSUSE, modify the /usr/sbin/start_apache2 file:
Restart Apache, open your ownCloud Admin page and start creating SMB/CIFS mounts.
Windows Network Drive Listener
The SMB protocol supports registering for notifications of file changes on remote Windows SMB storage servers. Notifications are more efficient than polling for changes, as polling requires scanning the whole SMB storage. ownCloud supports SMB notifications with an occ command, occ wnd:listen .
| The notifier only works with remote storage on Windows servers. It does not work reliably with Linux servers due to technical limitations. |
Your smbclient version needs to be 4.x, as older versions do not support notifications. The ownCloud server needs to know about changes to files on integrated storage so that the changed files will be synced to the ownCloud server, and to desktop sync clients.
Files changed through the ownCloud Web Interface, or sync clients are automatically updated in the ownCloud file cache, but this is not possible when files are changed directly on remote SMB storage mounts.
To create a new SMB notification, start a listener on your ownCloud server with occ wnd:listen . The listener marks changed files, and a background job updates the file metadata.
Windows network drive connections and setup of occ wnd:listen often does not always work the first time. If you encounter issues using it, then try the following troubleshooting steps:
Check the connection with smbclient on the command line of the ownCloud server
Take the example of attempting to connect to the share named MyData using occ wnd:listen . Running the following command would work:
However, running this command would not:
Setting Up the WND Listener
The WND listener for ownCloud 10 includes two different commands that need to be executed:
wnd:listen
This command listens and stores notifications in the database coming from one specific host and share. It is intended to be run as a service. The command requires the host and share, which the listener will listen to, and the Windows/Samba account that will listen. The command does not produce any output by default, unless errors happen.
| You can increase the command’s verbosity by using -vvv . Doing so displays what the listener is doing, including a timestamp and the notifications received. Although the exact permissions required for the Windows account are unknown, read-only should be enough. |
The simplest way to start the wnd:listen process manually, perhaps for initial testing, is as follows
The password is an optional parameter and you’ll be asked for it if you didn’t provide it, as in the example above. In order to start the wnd:listen without any user interaction, provide the password as the user’s 4th parameter, as in the following example:
For additional options to provide the password, check Password Options
Note that in any case there won’t be any processing of the password by default. This means that spaces or newline chars won’t be removed unless explicitly told. Use the —password-trim option in those cases.
You should be able to run any of those commands, and/or wrap them into a systemd service or any other startup service, so that the wnd:listen command is automatically started during boot, if you need it.
wnd:process-queue
This command processes the stored notifications for a given host and share. This process is intended to be run periodically as a Cron job, or via a similar mechanism. The command will process the notifications stored by the wnd:listen process, showing only errors by default. If you need more information, increase the verbosity by calling wnd:process-queue -vvv .
As a simple example, you can check the following:
You can run that command, even if there are no notifications to be processed.
As said, you can wrap that command in a Cron job so it’s run every 5 minutes for example.
Basic Setup for One ownCloud Server
First, go to the admin settings and set up the required WND mounts. Be aware though, that there are some limitations. These are:
We need access to the Windows account password for the mounts to update the file cache properly. This means that «login credentials, saved in session» won’t work with the listener. «login credentials, saved in DB» should work and could be the best replacement.
The $user placeholder in the share, such as //host/$user/path/to/root , for providing a share which is accessible per/user won’t work with the listener. This is because the listener won’t scale, as you’ll need to setup one listener per/share. As a result, you’ll end up with too many listeners. An alternative is to provide a common share for the users and use the $user placeholder in the root, such as //host/share/$user/folder .
Second, start the wnd:listen process if it’s not already started, ideally running it as a service. If it isn’t running, no notification are stored. The listener stores the notifications. Any change in the mount point configuration, such as adding or removing new mounts, and logins by new users, won’t affect the behavior, so there is no need to restart the listener in those cases.
In case you have several mount point configurations, note that each listener attaches to one host and share. If there are several mount configurations targeting different shares, you’ll need to spawn one listener for each. For example, if you have one configuration with 10.0.0.2/share1 and another with 10.0.0.2/share2 , you’ll need to spawn 2 listeners, one for the first configuration and another for the second.
Third, run the wnd:process-queue periodically, usually via a Cron job . The command processes all the stored notifications for a specific host and share. If you have several, you could set up several Cron jobs, one for each host and share with different intervals, depending on the load or update urgency. As a simple example, you could run the command every 2 minutes for one server and every 5 minutes for another.
As said, the command processes all the stored notifications, squeeze them and scan the resulting folders. The process might crash if there are too many notifications, or if it has too many storages to update. The —chunk-size option will help by making the command process all the notifications in buckets of that size.
On the one hand the memory usage is reduced, on the other hand there is more network activity. We recommend using the option with a value high enough to process a large number of notifications, but not so large to crash the process. Between 200 and 500 should be fine, and we’ll likely process all the notifications in one go.
Password Options
There are several ways to supply a password:


