- Network Troubleshooting with Oracle Linux
- Introduction
- Tools for Network Troubleshooting
- Conclusion
- See Also
- About the Author
- How to troubleshoot network connectivity with Linux server
- Check your network configuration
- Check the network configuration file
- Check the servers DNS records
- Test the connection both ways
- Find out where the connection fails
- Firewall settings
- Host status information
Network Troubleshooting with Oracle Linux
by Robert Chase
Published June 2014
Use built-in Oracle Linux tools to troubleshoot network connectivity problems.
Introduction
When applications that use network connectivity for communication are not working, the cause is often a mystery. Despite advances in modern operating systems, many users believe there is no way to directly «see» what’s going over the wire, and that often leads to confusion and difficulties when something goes wrong.
The reality is that you can actually see what’s going over the wire, and there are a number of tools built into Oracle Linux for troubleshooting network issues. This article will help solve some of the mystery and make network connectivity a bit more user friendly.
Tools for Network Troubleshooting
The most basic test you can perform to determine network connectivity is the ping test. The ping application is a simple utility that sends an Internet Control Message Protocol (ICMP) packet to a remote host on your network to see whether you get a reply. ICMP is part of the TCP/IP stack.
In the example shown in Listing 1, we are going to ping the test2 system from the test1 system to see whether test2 responds on the network. The ping application will continue to run until you terminate it by pressing Ctrl-C.
Listing 1. Example of using the ping utility
In the output shown in Listing 1, you can see that test2 is responding. It was sent six ICMP packets and responded to all of them and had an average response time of 0.218ms.
The ping command can also be used to identify network latency issues. If one of the packets had an abnormally long reply time, that might be an indicator of some type of network congestion or issue.
Many networks are quite complicated, and packets move through many different layers of routing and switching equipment to reach the intended destination. The traceroute application can show us the path that packets are taking to reach their destination.
The example shown in Listing 2 uses traceroute to trace the path to a popular search engine from the demo cloud instance. The IP address of the cloud instance has been replaced with x.x.x.x in this example.
Listing 2. Example of using the traceroute utility
Both ping and traceroute are quite useful on their own, but in a lot of cases, they can provide only limited information based on a short duration of time. A very useful application for looking at network latency is mtr . (mtr stands for My Traceroute, although it originally stood for Matt’s Traceroute because the application was written by Matt Kimball in 1997.)
The mtr application can provide real-time data about latency and routing changes for end users. Figure 1 shows an example of the output from the cloud instance to the same popular search engine used in the Listing 2.
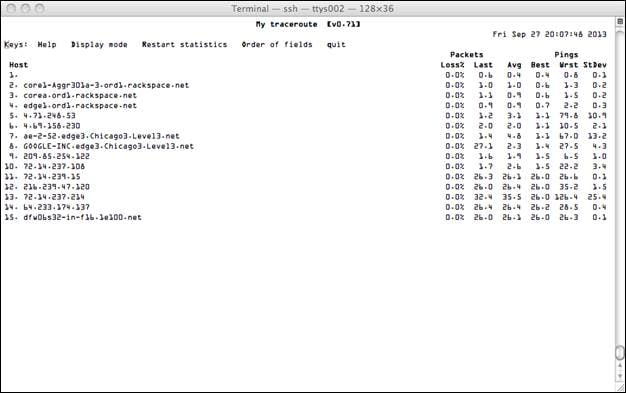
Figure 1. Example of output from the mtr application
Have you ever had a situation in which you could contact a host but were not sure you were communicating with the correct host or using the correct IP address? The nmap utility is a very powerful tool for network scanning and diagnostics, and it can provide exactly that information.
In example shown in Listing 3, we are verifying that the ocfs2-2 node is actually the node we are looking for. You can verify you have the correct node by looking at its running services and its OS fingerprint. The nmap utility can identify a number of operating systems based on their fingerprints if the fingerprints are contained in the nmap database of known operating systems.
Listing 3. Example of using the nmap utility with a host’s name
The example in Listing 3 is quite useful, but what if you did not have the correct host? That’s no problem for nmap . You can scan the entire subnet and nmap will report back which hosts are responding on the network.
In the example shown in Listing 4, we are using nmap with the «scan and ping» option ( -sP ) to scan 256 IP addresses using a /24 subnet with the mask of 255.255.255.0. The output shows that we get a response back from three hosts that are up: 10.0.0.1, 10.0.0.2, and 10.0.0.3.
Listing 4. Example of using nmap with the «scan and ping» option
Once you know what hosts are available on your subnet, you can do an additional scan on the host that you want to explore further.
Firewalls are indispensable tools for securing systems, but they often pose a problem when you inadvertently block traffic you are not intending to block. To further complicate matters, sometimes you don’t have full administrative rights to the systems that you are connecting to, so you can’t verify the firewall settings and make any needed changes. Even with these challenges, there are ways of determining connectivity through a firewall by using simple tools.
One of the first tools that you can use is telnet . Let’s say for example that you want to check whether port 7777 is open on another host. You can use telnet to do this, as shown in Listing 5, which indicates you were able to connect to remote host 10.0.0.3 on port 7777.
Listing 5. Example of using telnet to check whether a port is open
If a firewall was blocking access, the output would instead look like Listing 6:
Listing 6. Example of telnet output when a port is blocked
A much better way to check your ability to connect would be to use a utility called netcat . Before you can use netcat , you need to install it on your system by running the following command.
Once netcat is installed, you can try to connect to remote host 10.0.0.3 again, just as you did in Listing 5 and Listing 6. Listing 7 shows the successful connection.
Listing 7. Example of using netcat to successfully connect to a remote host
The output shown in Listing 8 is an example of a failed connection using netcat .
Listing 8. Example of netcat output when connection to a remote host fails
Conclusion
These are just some of the techniques you can use to troubleshoot issues you are experiencing on the network. There are many other tools available and many other techniques that work just as well, depending on the specific needs of the environment that you are working in.
See Also
About the Author
Robert Chase is a member of the Oracle Linux product management team. He has been involved with Linux and open source software since 1996. He has worked with systems as small as embedded devices and with large supercomputer-class hardware.
Источник
How to troubleshoot network connectivity with Linux server
When your Linux server seems to be offline or otherwise inaccessible, you should always be able to log in with the web console at your UpCloud control panel or through a VNC connection. Once logged in, test your server’s internet connection using ping and a public IP address such as Google’s public DNS server, which is most likely to reply provided your internet connection works.
Your output should show something like
If the server is unable to reach the destination, there may be a problem with your configuration. Follow the steps described here in order to troubleshoot the most common network issues with Linux cloud server.
Check your network configuration
Make sure the network interfaces such as eth0 are enabled. To see all the configured interfaces, use this command.
The output of the command will show the status of each network interface on the server with “state UP” or “state DOWN”, for example as below.
Turn on any disabled interfaces with the next command.
Here the interface name is one of the names listed in the ip addr command output like eth0, eth1 or eth2.
When all network interfaces have been enabled, try using the ping command again. If the problem persists, check that the network interfaces have IPs assigned to them, and they match with the information on Network section of the UpCloud control panel.
Try restarting any problematic interface with the following commands.
If either of these commands fails, it is possible that the interface is in a state unknown to the command script. Try the same commands again with --force parameter to resolve any such issues.
If restarting the network interface fixed the issue, great! If not, continue with the troubleshooting.
Check the network configuration file
Linux commonly stores network settings in specific files and reads them for example at boot or when using the ifup command. To make changes to the network configuration, you’ll need to open the right file in a text editor. In Debian and Ubuntu based distributions this can be done with
In most cases the interfaces file should list at least the following interfaces.
In CentOS and other Red Hat variants, these configurations are split into separate files for each network interface and stored in /etc/sysconfig/network-scripts/. The default interface for internet connection is usually called eth0, open the corresponding configuration file.
The configuration file for eth0 should look like this.
If the interfaces configuration files do not match the example here, edit the file specific to your system to restore the original functionality. For any changes made to these files to take an effect, you must restart the interfaces to which the changes apply to as described previously with ifdown and ifup commands.
Check the servers DNS records
When ping with an IP works, but the regular connection still fails, try pinging a domain name instead. For example, you can ping the UpCloud domain with like so.
If the domain does not reply, the problem is most likely with the way your server resolves domain names to IP addresses. Check your server’s DNS records.
The list should contain a minimum 1 name server. All default DNS resolvers at UpCloud have the same IP addresses regardless of the availability zone. The DNS servers are provided automatically by the DHCP protocol and there should be no need for manual configurations in the operating system.
The UpCloud DNS resolver IPv4 addresses are:
- 94.237.127.9
- 94.237.40.9
If your server has a public IPv6 address, you can also use IPv6 with the following servers:
- 2a04:3540:53::1
- 2a04:3544:53::1
If the list is empty do not edit it manually, because if you have a nameserver manager installed any changes you make will just get reverted. Instead, on Ubuntu and some Debian systems, you can try to update it with this command.
On Debian servers, which do not have resolvconf installed, you can edit the resolv.conf file directly.
Add the lines shown below to the file, save and exit.
Those with resolvconf installed, in case resolv.conf is still empty after the update command, you can add nameservers to your interfaces file. Open it for edit.
Add a name server to the end of eth0 section.
Afterwards, save the file and exit. You will also need to restart the network service with the following command.
In CentOS and other Red Hat variants the resolv.conf file is populated a little differently, if the file is empty, you can add up to two DNS entries in your network configuration file for the network interface responsible for the public IP. For example, open ifcfg-eth0 it with the next command.
Edit the file to look like this.
Exit the editor and restart the interface which configuration file you just edited using ifdown and ifup commands.
Test the connection both ways
Try pinging your server over the internet. Open a terminal or command prompt on your own computer and try pinging your server’s public IP, which you can find in the UpCloud control panel under the Network section.
Test the internet connection by pinging and another site from your server, for example, use the following command to ping Google’s public DNS.
If you have a second server deployed on your account and the problem is with the interface assigned with the private IP address, try ping with your other server, to and from it, using the private IPs listed in the UpCloud control panel.
Should ping fail to receive a reply, try restarting all of your server’s network services. In Debian and Ubuntu 12.04 or older, use the command below.
On CentOS and other Red Hat based systems, restart the network with the command underneath instead.
In Ubuntu 14.04 and newer you’ll need to run the command for each network interface separately, for example, you can restart eth0 simply with the following.
After restarting the network services, try running ping again both ways. If ping works in one direction but not in the other, check your firewall settings.
Find out where the connection fails
Your internet connecting in its basic form boils down to knowing the route to take to your destination. It is sometimes possible for the connection routing to hit a dead end, which then results as a failed connection. Run a route trace from your server to see at which network node the connection gets lost.
Ubuntu servers have a networking tool called mtr for this purpose, start it with the following command.
And to quit just press q on your keyboard.
To do this on Debian systems where mtr is usually not installed by default, you can use traceroute instead.
On CentOS servers use tracepath command.
Different distributions run different tools and the output of these tools also differs slightly. The mtr runs on the foreground until cancelled, updating the response table on each pass, example output is shown below.
Traceroute and tracepath are very similar to one another, they run pass over the network to the given destination and show the latency to each node that replied. Example of traceroute shown underneath has much of the same information as mtr.
Try the same from your own computer to the server using one of the tools mentioned above, for example using the command below.
If an outbound trace does not reach even the first node, check your network settings and firewall. The firewall may also be responsible for connection rejections if trace over the internet to your server falls short of just before reaching the server.
Firewall settings
Check that your connection is not getting blocked by a firewall. CentOS and some other Red Hat based distributions have strict firewall rules by default. The following command will list all server-side firewall rules on your system.
Iptables is the Linux built-in software firewall, and the command above prints out the following.
This is an example of a simple firewall table. It has rules to allow SSH and HTTP traffic, but block all other input, which also blocks ping attempts. Check your server’s iptable for any is shown that might block your connection.
Your UpCloud control panel also provides an easily configurable firewall in your server settings under the Firewall tab.
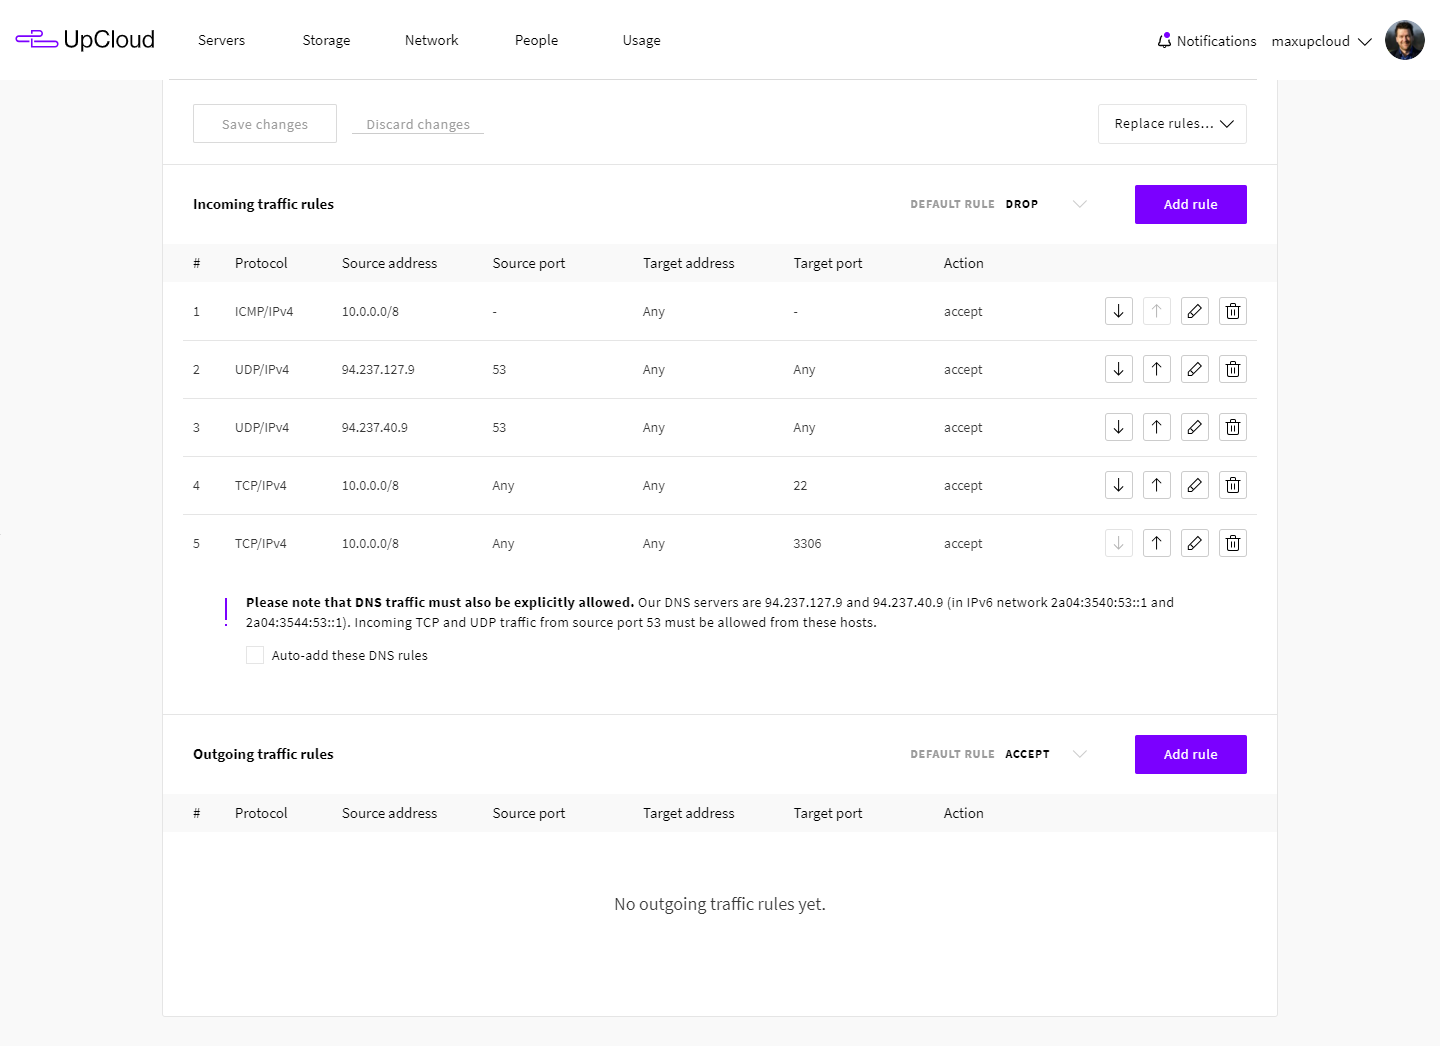
The example image above has a few accepted incoming rules, but the default rule is set to reject. Make sure there are no rules blocking your desired connection.
Host status information
Check the most up to date information on UpCloud infrastructure at status.upcloud.com, where you can also subscribe to updates by email, SMS, and Atom or RSS feeds.
If everything seems to be in order, but the network connection still just doesn’t work, or you are otherwise unable to troubleshoot the connection issues, don’t hesitate to ask for help.
Источник


