- Создание настраиваемого поля ввода Creating a Custom Input Box
- Создание настраиваемого графического поля ввода Create a custom, graphical input box
- Клёвый код
- Решаем задачи Абрамян на C. Matrix78
- Решаем задачи Абрамян на C. Matrix77
- Решаем задачи Абрамян на C. Matrix76
- Решаем задачи Абрамян на C. Matrix75
- Решаем задачи Абрамян на C. Matrix74
- Решаем задачи Абрамян на C. Matrix73
- Решаем задачи Абрамян на C. Matrix72
- Решаем задачи Абрамян на C. Matrix71
- Решаем задачи Абрамян на C. Matrix70
- Решаем задачи Абрамян на C. Matrix69
- New-Object
- Syntax
- Description
- Examples
- Example 1: Create a System.Version object
- Example 2: Create an Internet Explorer COM object
- Example 3: Use the Strict parameter to generate a non-terminating error
- Example 4: Create a COM object to manage Windows desktop
- Example 5: Pass multiple arguments to a constructor
- Example 6: Calling a constructor that takes an array as a single parameter
- Parameters
- Inputs
- Outputs
- Создаем простой графический интерфейс GUI для скрипта PowerShell
Создание настраиваемого поля ввода Creating a Custom Input Box
Создание сценария настраиваемого графического поля ввода с помощью функций создания форм Microsoft .NET Framework в Windows PowerShell 3.0 и более поздних версиях. Script a graphical custom input box by using Microsoft .NET Framework form-building features in Windows PowerShell 3.0 and later releases.
Создание настраиваемого графического поля ввода Create a custom, graphical input box
Скопируйте и вставьте следующий код в интегрированную среду сценариев Windows PowerShell, а затем сохраните файл как сценарий Windows PowerShell (PS1-файл). Copy and then paste the following into Windows PowerShell ISE, and then save it as a Windows PowerShell script (.ps1).
Сценарий начинается с загрузки двух классов .NET Framework: System.Drawing и System.Windows.Forms. The script begins by loading two .NET Framework classes: System.Drawing and System.Windows.Forms. Затем вы запускаете новый экземпляр класса .NET Framework System.Windows.Forms.Form, предоставляющий пустую форму или окно, в которые можно добавить элементы управления. You then start a new instance of the .NET Framework class System.Windows.Forms.Form; that provides a blank form or window to which you can start adding controls.
После создания экземпляра класса «Форма» назначьте значения для трех свойств этого класса. After you create an instance of the Form class, assign values to three properties of this class.
Text. Text. Это будет заголовком окна. This becomes the title of the window.
Size. Size. Это размер формы в пикселях. This is the size of the form, in pixels. Предыдущий сценарий создает форму шириной 300 пикселей и высотой 200 пикселей. The preceding script creates a form that’s 300 pixels wide by 200 pixels tall.
StartingPosition. StartingPosition. Для этого дополнительного свойства задается значение CenterScreen в предыдущем сценарии. This optional property is set to CenterScreen in the preceding script. Если это свойство не добавлено, Windows выберет расположение после открытия формы. If you don’t add this property, Windows selects a location when the form is opened. Если для StartingPosition задать значение CenterScreen, форма будет автоматически отображаться в центре экрана при загрузке. By setting the StartingPosition to CenterScreen, you’re automatically displaying the form in the middle of the screen each time it loads.
Далее создайте кнопку OК для формы. Next, create an OK button for your form. Укажите размер и поведение кнопки ОК. Specify the size and behavior of the OK button. В этом примере кнопка расположена на 120 пикселей ниже верхней границы формы и на 75 пикселей правее левой границы. In this example, the button position is 120 pixels from the form’s top edge, and 75 pixels from the left edge. Высота кнопки — 23 пикселя, а длина — 75 пикселей. The button height is 23 pixels, while the button length is 75 pixels. Сценарий использует предопределенные типы Windows Forms для определения поведения кнопок. The script uses predefined Windows Forms types to determine the button behaviors.
Аналогичным образом создайте кнопку Отмена. Similarly, you create a Cancel button. Кнопка Отмена расположена на 120 пикселей ниже верхней границы и на 150 пикселей правее левой границы окна. The Cancel button is 120 pixels from the top, but 150 pixels from the left edge of the window.
Далее введите текст метки в окне, который должны получить пользователи. Next, provide label text on your window that describes the information you want users to provide.
Добавьте элемент управления (в данном случае текстовое поле), который позволит пользователям указать сведения, описанные в тексте метки. Add the control (in this case, a text box) that lets users provide the information you’ve described in your label text. Помимо текстового поля существует много других элементов управления, которые можно применить. Их описание см. в статье Пространство имен System.Windows.Forms. There are many other controls you can apply besides text boxes; for more controls, see System.Windows.Forms Namespace.
Задайте для свойства Topmost значение $true, чтобы принудительно открыть окно поверх других диалоговых окон. Set the Topmost property to $true to force the window to open atop other open windows and dialog boxes.
Затем добавьте следующую строку кода, чтобы активировать форму и установить фокус на текстовое поле, которое вы создали. Next, add this line of code to activate the form, and set the focus to the text box that you created.
Добавьте следующую строку кода для отображения формы в Windows. Add the following line of code to display the form in Windows.
Наконец, код внутри блока If указывает Windows, что следует делать с формой после того, как пользователь выберет параметр из списка и нажмет кнопку ОК или клавишу ВВОД. Finally, the code inside the If block instructs Windows what to do with the form after users provide text in the text box, and then click the OK button or press the Enter key.
Клёвый код
Скриптописание и кодинг
Решаем задачи Абрамян на C. Matrix78
Matrix78. Дана матрица размера $$M \times N$$. Упорядочить ее строки так, чтобы их минимальные элементы образовывали убывающую последовательность.
Решаем задачи Абрамян на C. Matrix77
Matrix77. Дана матрица размера $$M \times N$$. Упорядочить ее столбцы так, чтобы их последние элементы образовывали убывающую последовательность.
Решаем задачи Абрамян на C. Matrix76
Matrix76. Дана матрица размера $$M \times N$$. Упорядочить ее строки так, чтобы их первые элементы образовывали возрастающую последовательность.
Решаем задачи Абрамян на C. Matrix75
Matrix75. Дана матрица размера $$M \times N$$. Элемент матрицы называется ее локальным максимумом, если он больше всех окружающих его элементов. Поменять знак всех локальных максимумов данной матрицы на противоположный. При решении допускается использовать вспомогательную матрицу.
Решаем задачи Абрамян на C. Matrix74
Matrix74. Дана матрица размера $$M \times N$$. Элемент матрицы называется ее локальным минимумом, если он меньше всех окружающих его элементов. Заменить все локальные минимумы данной матрицы на нули. При решении допускается использовать вспомогательную матрицу.
Решаем задачи Абрамян на C. Matrix73
Matrix73. Дана матрица размера $$M \times N$$. После последнего столбца, содержащего только отрицательные элементы, вставить столбец из нулей. Если требуемых столбцов нет, то вывести матрицу без изменений.
Решаем задачи Абрамян на C. Matrix72
Matrix72. Дана матрица размера $$M \times N$$. Перед первым столбцом, содержащим только положительные элементы, вставить столбец из единиц. Если требуемых столбцов нет, то вывести матрицу без изменений.
Решаем задачи Абрамян на C. Matrix71
Matrix71. Дана матрица размера $$M \times N$$. Продублировать столбец матрицы, содержащий ее минимальный элемент.
Решаем задачи Абрамян на C. Matrix70
Matrix70. Дана матрица размера $$M \times N$$. Продублировать строку матрицы, содержащую ее максимальный элемент.
Решаем задачи Абрамян на C. Matrix69
Matrix69. Дана матрица размера $$M \times N$$ и целое число $$K$$ $$(1 \le K \le $$N$$)$$. После столбца матрицы с номером $$K$$ вставить столбец из единиц.
New-Object
Creates an instance of a Microsoft .NET Framework or COM object.
Syntax
Description
The New-Object cmdlet creates an instance of a .NET Framework or COM object.
You can specify either the type of a .NET Framework class or a ProgID of a COM object. By default, you type the fully qualified name of a .NET Framework class and the cmdlet returns a reference to an instance of that class. To create an instance of a COM object, use the ComObject parameter and specify the ProgID of the object as its value.
Examples
Example 1: Create a System.Version object
This example creates a System.Version object using the «1.2.3.4» string as the constructor.
Example 2: Create an Internet Explorer COM object
This example creates two instances of the COM object that represents the Internet Explorer application. The first instance uses the Property parameter hash table to call the Navigate2 method and set the Visible property of the object to $True to make the application visible. The second instance gets the same results with individual commands.
Example 3: Use the Strict parameter to generate a non-terminating error
This example demonstrates that adding the Strict parameter causes the New-Object cmdlet to generate a non-terminating error when the COM object uses an interop assembly.
Example 4: Create a COM object to manage Windows desktop
This example shows how to create and use a COM object to manage your Windows desktop.
The first command uses the ComObject parameter of the New-Object cmdlet to create a COM object with the Shell.Application ProgID. It stores the resulting object in the $ObjShell variable. The second command pipes the $ObjShell variable to the Get-Member cmdlet, which displays the properties and methods of the COM object. Among the methods is the ToggleDesktop method. The third command calls the ToggleDesktop method of the object to minimize the open windows on your desktop.
Example 5: Pass multiple arguments to a constructor
This example shows how to create an object with a constructor that takes multiple parameters. The parameters must be put in an array when using ArgumentList parameter.
PowerShell binds each member of the array to a parameter of the constructor.
This example uses parameter splatting for readability. For more information, see about_Splatting.
Example 6: Calling a constructor that takes an array as a single parameter
This example shows how to create an object with a constructor that takes a parameter that is an array or collection. The array parameter must be put in wrapped inside another array.
The first attempt to create the object in this example fails. PowerShell attempted to bind the three members of $array to parameters of the constructor but the constructor does not take three parameter. Wrapping $array in another array prevents PowerShell from attempting to bind the three members of $array to parameters of the constructor.
Parameters
Specifies an array of arguments to pass to the constructor of the .NET Framework class. If the constructor takes a single parameter that is an array, you must wrap that parameter inside another array. For example:
$cert = New-Object System.Security.Cryptography.X509Certificates.X509Certificate -ArgumentList (,$bytes)
For more information about the behavior of ArgumentList, see about_Splatting.
The alias for ArgumentList is Args.
| Type: | Object [ ] |
| Aliases: | Args |
| Position: | 1 |
| Default value: | None |
| Accept pipeline input: | False |
| Accept wildcard characters: | False |
Specifies the programmatic identifier (ProgID) of the COM object.
| Type: | String |
| Position: | 0 |
| Default value: | None |
| Accept pipeline input: | False |
| Accept wildcard characters: | False |
Sets property values and invokes methods of the new object.
Enter a hash table in which the keys are the names of properties or methods and the values are property values or method arguments. New-Object creates the object and sets each property value and invokes each method in the order that they appear in the hash table.
If the new object is derived from the PSObject class, and you specify a property that does not exist on the object, New-Object adds the specified property to the object as a NoteProperty. If the object is not a PSObject, the command generates a non-terminating error.
| Type: | IDictionary |
| Position: | Named |
| Default value: | None |
| Accept pipeline input: | False |
| Accept wildcard characters: | False |
Indicates that the cmdlet generates a non-terminating error when a COM object that you attempt to create uses an interop assembly. This feature distinguishes actual COM objects from .NET Framework objects with COM-callable wrappers.
| Type: | SwitchParameter |
| Position: | Named |
| Default value: | None |
| Accept pipeline input: | False |
| Accept wildcard characters: | False |
Specifies the fully qualified name of the .NET Framework class. You cannot specify both the TypeName parameter and the ComObject parameter.
| Type: | String |
| Position: | 0 |
| Default value: | None |
| Accept pipeline input: | False |
| Accept wildcard characters: | False |
Inputs
None
You cannot pipe input to this cmdlet.
Outputs
Object
New-Object returns the object that is created.
Создаем простой графический интерфейс GUI для скрипта PowerShell
Одним из существенных недостатков скриптов PowerShell при использовании их простыми пользователями (не сисадминами или программистами) — его консольный интерфейс. Результат выполнения скрипта PoSh отображается также в командной строке и не всегда удобен для восприятия конечного пользователя. Однако Powershell это мощное и современное средство автоматизации для Windows, которое позволяет прозрачно использовать разнообразные объекты .NET Framework. К примеру, с помощью API. NET вы сможете легко создать простой графический интерфейс для ваших PowerShell скриптов.
В этом примере вы покажем, как с помощью PowerShell создать простую Windows форму и расположить на ней различные стандартные диалоговые элементы (кнопки, поля для ввода, текстовые элементы, выпадающие списки). К примеру наша задача – написание простого GUI для определения времени последней смены пароля пользователя в Active Directory. Логика скрипта следующая — из AD в выпадающий список загружается список всех учетных записей в домене. Пользователь выбирает учетную запись, нажимает кнопку и в текстовом поле отображается данные о последнем времени смены пароля пользователя.
В данном примере мы используем PowerShell 3.0+ (я буду писать скрипт в PowerShell ISE в Windows 10).
Для использования функционала .NET по созданию форм мы воспользуемся классом System.Windows.Forms. Загрузить данный класс в сессию PowerShell можно так:
Add-Type -assembly System.Windows.Forms
Теперь создадим графическую форму (окно):
$window_form = New-Object System.Windows.Forms.Form
Установим заголовок и размеры окна формы (в пикселях):
$window_form.Text =’Пример графического интерфейса для скрипта PowerShell’
$window_form.Width = 500
$window_form.Height = 200
Чтобы форма автоматически растягивалась, если элементы расположенные на форме выйдут за границы, нужно включить атрибут AutoSize:
Теперь можно отобразить форму на экране.
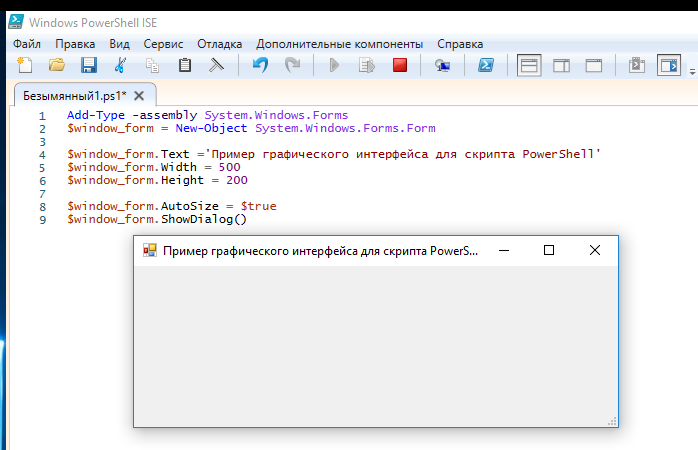
Как вы видите, на экране появилась пустая форма указанных размеров. Чтобы добавить не нее различные графические диалоговые элементы, перед строкой $window_form.ShowDialog() добавим следующие строки.
Создадим на форме надпись:
$FormLabel1 = New-Object System.Windows.Forms.Label
$FormLabel1.Text = «Выберите пользователя домена AD»
$FormLabel1.Location = New-Object System.Drawing.Point(0,10)
$FormLabel1.AutoSize = $true
$window_form.Controls.Add($FormLabel1)
Создадим выпадающий список и заполним его списком учетных записей из домена, полученных с помощью командлета Get-ADuser (входит в модуль ActiveDirectory для PowerShell).
$FormComboBox = New-Object System.Windows.Forms.ComboBox
$FormComboBox.Width = 250
$Users = get-aduser -filter * -Properties SamAccountName
Foreach ($User in $Users)
<
$FormComboBox.Items.Add($User.SamAccountName);
>
$FormComboBox.Location = New-Object System.Drawing.Point(60,10)
$window_form.Controls.Add($FormComboBox)
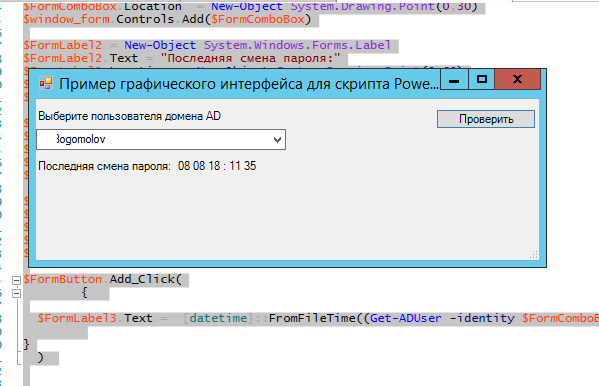
Отобразим еще две надписи. Во второй будет отображаться время последней смены пароля выбранного пользователя.
$FormLabel2 = New-Object System.Windows.Forms.Label
$FormLabel2.Text = «Последняя смена пароля:»
$FormLabel2.Location = New-Object System.Drawing.Point(0,40)
$FormLabel2.AutoSize = $true
$window_form.Controls.Add($FormLabel2)
$FormLabel3 = New-Object System.Windows.Forms.Label
$FormLabel3.Text = «»
$FormLabel3.Location = New-Object System.Drawing.Point(140,60)
$FormLabel3.AutoSize = $true
$window_form.Controls.Add($FormLabel3)
Теперь поместим на форму кнопку действия с надписью «Проверить»:
$FormButton = New-Object System.Windows.Forms.Button
$FormButton.Location = New-Object System.Drawing.Size(400,10)
$FormButton.Size = New-Object System.Drawing.Size(100,20)
$FormButton.Text = «Проверить»
$window_form.Controls.Add($FormButton)
Теперь к созданной кнопке привяжем скрипт проверки, которые должен вызываться при щелчке на кнопке (событие Add_Click). Для преобразования даты из формата TimeStamp в нормальный вид воспользуемся функцией [datetime]::FromFileTime.
$FormButton.Add_Click(
<
$FormLabel3.Text = [datetime]::FromFileTime((Get-ADUser -identity $FormComboBox.selectedItem -Properties pwdLastSet).pwdLastSet).ToString(‘dd mm yy : hh ss’)
>
)
Запустите PowerShell скрипт. Как вы видите, он заполняет выпадающий список именами учётных записей из AD. Если вы выберите нужную учетную запись пользователя и нажмите на кнопку, в поле отобразится время последней смены пароля данного пользователя в Active Directory.
Аналогичным образом вы можете создать следующие графические элементы на форме:
- CheckBox
- RadioButton
- TextBox
- ChekedListBox
- GroupBox
- ListBox
- TabControl
- ListView
- TreeView
- DateTimePicker
- TrackBar
- PictureBox
- ProgressBar
- HScrollBar
- VScrollBar
- ContextMenu
- Menu
Для вывода диалогового окна с уведомлением пользователю можно испоьзоват следующий код:
[System.Windows.Forms.MessageBox]::Show(«Запущен процесс расчета»,»Предупреждение»,0)
Для более удобного и быстрого создания графических элементов для PowerShell форм вы можете воспользоваться онлайн редактор для создания GUI формы для Powershell : https://poshgui.com/Editor.
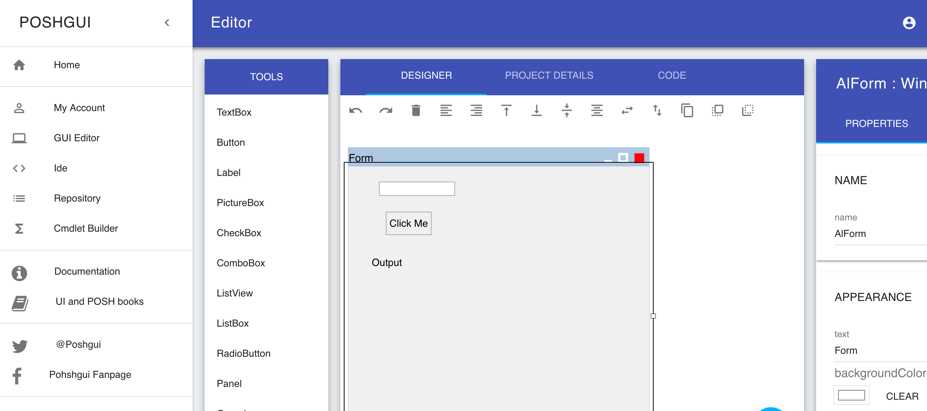
С помощью него вы сможете создать красивую форму с необходимыми диалоговыми элементами. И получить готовый код графической формы с разными элементами и кнопками для ваших PowerShell скриптов.


