- How do I change sign in options on Windows 10?
- How to change Windows 10 sign in settings
- How to change sign in settings on Windows 10
- Windows 10 sign-in options and account protection
- Change or manage your password
- Windows Hello
- What data is collected, and why
- To manage Windows Hello
- Using a security key
- Lock your device
- Dynamic lock
- Other sign-in options
- Manage when you’re required to sign in
- To show your account details on the sign-in screen
- To automatically finish setup after an update
- What is new in Windows 10 version 20H2 Feature Update?
- Windows 10 version 20H2 – New Features
- 1] Redesigned start Menu
- 2] Improved Notifications display experience
- 3] Less annoying tablet mode
- 4] New Microsoft Edge
- 5] Improved settings
- 6] Personalization options
- Windows 10 indexing — reset to default options
- Replies (14)
- Announcing Windows 10 Insider Preview Build 21354
- What’s new in Build 21354
- New personalization options for news and interests on the taskbar
- Improvements to Display Settings
- New Camera Settings page
- Inbox app updates
- Changes and Improvements
- Fixes
- Known issues
- Important Insider Links
How do I change sign in options on Windows 10?


Here at WindowsReport we share plenty of useful Windows 10 and Windows 8.1 tips and tricks so that you could learn more about the new version and understand why it is much better than previous one. Today we’re going to cover the sign-in options in Windows 8.1 and Windows 10. 
Those of you who are new to Windows 10 or Windows 8.1, you are probably wondering about many features and settings and everything must seem so unknown and strange. But, as a matter of fact, things are much easier to do than before, and you just need to know the right steps to follow in order to solve your problems or get to know better the operating system that you use. Below, we’re going to quickly explain how you can change the sign-in options and what exactly each choice means.
How to change Windows 10 sign in settings
This guide applies to Windows 8.1. If you’re running Windows 10, scroll down to the guide section where we show you how to change sign-in options for this OS version.
1. Open the search box, either by swiping your muse to the top right corner or by pressing the Windows logo key + W or logo key + Q. After that, type ‘PC settings‘ there.
2. Now, from PC Settings, you will need to select the ‘Accounts‘ sub-menu.

3. From Accounts, you are now good to go and select ‘sign-in options’.
4. Now you can choose what kind of sign-in option you want to enable for your Windows 8.1 account: password, picture password, PIN or Password policy.

The most “interesting” option of them all is probably the picture password, as it allows you to protect your Windows 10, 8.1 touch device by enabling gestures that are known only by you.

How to change sign in settings on Windows 10
On Windows 10, the Settings UI is a bit different but the steps to follow are pretty much the same.
- Go to Settings > Account > Sign-in options.

- You’ll see a series of sign-in options that you can edit. For example, you can enable the option ‘Require sign in‘ so that Windows 10 requires you to sign in again if you’ve been away. You can also change password, fingerprint, PIN and picture password settings.
I hope you can now easily master the sign-in options to your Windows 10, Windows 8.1 touch and desktop device and that you have thus enhanced the security of your system.
RELATED STORIES TO CHECK OUT:
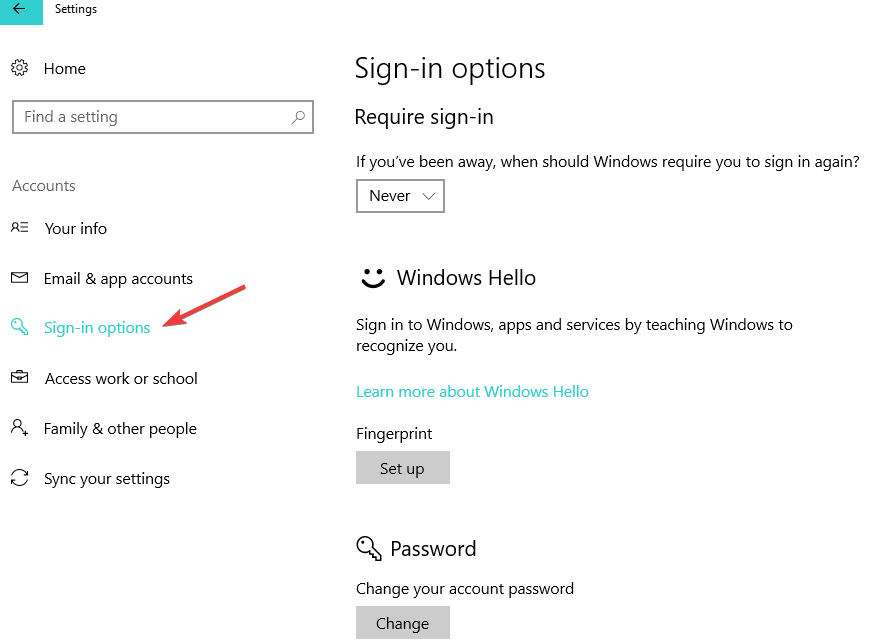
Windows 10 sign-in options and account protection
To access your sign-in options, go to Start > Settings > Accounts > Sign-in options. On the Sign-in options page, the following sign-in methods are available:
Windows Hello Face
Windows Hello Fingerprint
Windows Hello PIN
You’ll also find these settings:
Require sign-in—Requires you to sign in to your device after being away.
Dynamic lock—Automatically locks your device when you’re away.
Privacy—Shows or hides personal info on the sign-in screen, and allows your device to use your sign-in info to reopen your apps after an update or restart.
Change or manage your password
To change your password, go to Start > Settings > Accounts > Sign-in options. Select Password, and then select Change.
Note: To change your password if you’re on a domain, press Ctrl+Alt+Del and then select Change a password.
Windows Hello
Windows Hello lets you sign in to your devices, apps, online services, and networks using your face, iris, fingerprint, or a PIN. Even if your Windows 10 device can use Windows Hello biometrics, you don’t have to. If it’s the right choice for you, you can rest assured that the info that identifies your face, iris, or fingerprint never leaves your device. Windows does not stores pictures of your face, iris, or fingerprint on your device or anywhere else.
What data is collected, and why
When you set up Windows Hello biometrics, it takes the data from the face camera, iris sensor, or fingerprint reader and creates a data representation—or graph—that is then encrypted before it’s stored on your device.
To help us keep things working properly, to help detect and prevent fraud, and to continue improving Windows Hello, we collect diagnostic data about how people use Windows Hello. For example, data about whether people sign in with their face, iris, fingerprint, or PIN; the number of times they use it; and whether it works or not is all valuable information that helps us build a better product. The data is pseudonymized, does not include biometric information, and is encrypted before it’s transmitted to Microsoft. You can choose to stop sending diagnostic data to Microsoft at any time. Learn more about diagnostic data in Windows 10
To manage Windows Hello
To turn on Windows Hello, go to Start > Settings > Accounts > Sign-in options, select the Windows Hello method that you want to set up, and then select Set up. If you don’t see Windows Hello in Sign-in options, then it may not be available for your device.
To remove Windows Hello and any associated biometric identification data from the device, go to Start > Settings > Accounts > Sign-in options. Select the Windows Hello method you want to remove, and then select Remove.
Using a security key
A security key is a hardware device that you can use instead of your user name and password to sign in on the web. Since it’s used in addition to a fingerprint or PIN, even if someone has your security key, they won’t be able to sign in without the PIN or fingerprint that you create. Security keys are usually available for purchase from retailers that sell computer accessories. Learn more about security keys
To set up a security key, go to Start > Settings > Accounts > Sign-in options, and select Security Key. Select Manage and follow the instructions.
Lock your device
If you’re stepping away from your device for a few minutes it’s a good idea to lock it so that others can’t see what’s on your screen, or access anything on it. Press the Windows Logo Key + L to immediately lock in. When you return you’ll just need to authenticate and you’ll be right where you left off.
Dynamic lock
Windows can use devices that are paired with your PC to help detect when you’re away, and lock your PC shortly after your paired device is out of Bluetooth range. This makes it more difficult for someone to gain access to your device if you step away from your PC and forget to lock it.
On your Windows 10 PC, select Start > Settings > Accounts > Sign-in options.
Under Dynamic lock, select the Allow Windows to automatically lock your device when you’re away check box.
Use Bluetooth to pair your phone with your PC. Learn how to pair devices using Bluetooth
Once they’re paired, take your phone with you when you walk away, and your PC will automatically lock a minute or so after you’re out of Bluetooth range.
Other sign-in options
Manage when you’re required to sign in
Go to Start > Settings > Accounts > Sign-in options. Under Require sign-in, select an option for when Windows should require you to sign in again.
To show your account details on the sign-in screen
Go to Start > Settings > Accounts > Sign-in options. Under Privacy, turn the first setting On if you want to show your account details on the sign-in screen.
To automatically finish setup after an update
Go to Start > Settings > Accounts > Sign-in options. Under Privacy, turn the second setting On if you want to use your sign-in info to automatically finish setting up your device after an update or restart.
What is new in Windows 10 version 20H2 Feature Update?
Building upon the earlier release, Windows 10 Version 20H2 offers some performance improvements, enterprise features, and quality enhancements. In addition, the update extends services related to bug and security fixes by 6 more months.
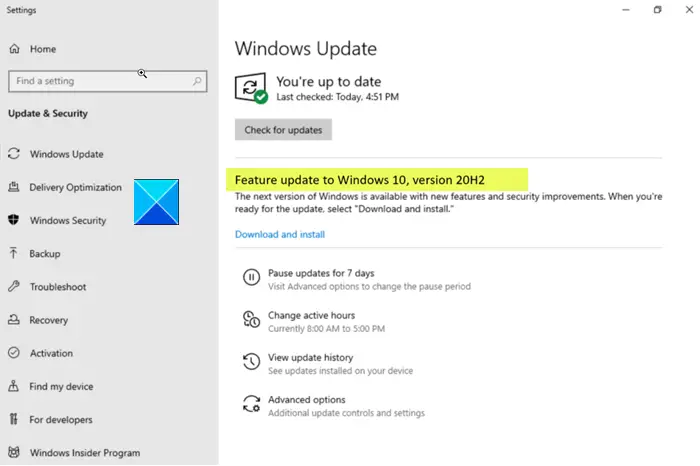
Windows 10 version 20H2 – New Features
The release of Windows 10 20H2, October 2020 Update marks the 10th major update since the original release and the second semi-annual update of the year. Find what’s new in it!
- Redesigned start Menu
- Improved Notifications display experience
- Less annoying tablet mode
- New Microsoft edge
- Improved settings
- Personalization options
Let’s cover these features in a bit of detail!
1] Redesigned start Menu
The change in the Start Menu adds more transparency to the tiles which matches the color scheme of the app. This makes your favorite apps easier to discover. Also, you can change the color of the menu, but you’ll need to enable the Dark mode first. As earlier, you get an option to choose either, dark mode or a Light mode.
2] Improved Notifications display experience
The notification banner now displays the app logo to the top left and adds a clear close X mark to dismiss the notification, right away.
3] Less annoying tablet mode
The Toast notifications that showed up while switching from Desktop mode to Tablet mode have disappeared for good. Previously, it prompted users whenever they attempted to enter the dedicated tablet mode.
4] New Microsoft Edge
If you haven’t installed Microsoft Edge chromium yet, the fall update does it for you. In fact, the browser comes preinstalled with the feature update. However, in comparison to its earlier iterations, the new Edge offers better performance and promises faster web page rendering. There’s also a new Collections feature!
5] Improved settings
A new About page under Settings shows links to some older programs/utilities earlier found in the Control Panel. Besides, an option has been added in the Multitasking section of System Settings to show individual browser tabs when using the Alt+Tab task switcher. With this new option, you can not only switch between open apps but also the tabs in Microsoft Edge.
6] Personalization options
Lastly, an updated Advanced display settings page features a nifty option to change the monitor refresh rate. This enables smooth motion. Earlier, users had to install some third-party apps to change the same.
It’s important to note here that Windows 10, versions 2004 and 20H2 share a common core operating system with an identical set of system files. As such, the new features in the update are also included in the latest monthly quality update for Windows 10, version 2004 (released October 13, 2020), but are in an inactive or dormant state and will continue to exist in that state until enabled via an ‘enablement package,’ a small, quick-to-install ‘master switch’ that activates the Windows 10, version 20H2 features.
Date: October 21, 2020 Tags: Windows Updates
Windows 10 indexing — reset to default options
How do I reset the Windows 10 indexing locations to the default values?
I would like to set it back to the «out of the box» state.
Replies (14)
* Please try a lower page number.
* Please enter only numbers.
* Please try a lower page number.
* Please enter only numbers.
By default, Windows will use the index when searching to give you faster search results. The search index only includes your selected locations . These locations can be filtered for what file types , file properties, and file contents you want yo be indexed. Here are the steps that you can follow to rebuild search index in Windows 10:
- Open the Control Panel (icons view) , click/tap on the Indexing Options icon, and close the Control Panel.
- Click/tap on the Advanced button.
- In the Index Settings tab, click/tap on the Rebuild button under Troubleshooting .
- Click/tap on OK to confirm.
- Indexing will now be in progress.
- When indexing has completed, click/tap on Close .
Let us know if you need further help.
18 people found this reply helpful
Was this reply helpful?
Sorry this didn’t help.
Great! Thanks for your feedback.
How satisfied are you with this reply?
Thanks for your feedback, it helps us improve the site.
Announcing Windows 10 Insider Preview Build 21354
Hello Windows Insiders, today we are releasing Windows 10 Insider Preview Build 21354 to Windows Insiders in the Dev Channel.
Starting with today’s build, Windows Insiders will notice that the name of the branch we are releasing builds as shown on the desktop watermark at the lower right of the desktop from has changed to CO_RELEASE. Just like we did back in October when we released builds from the FE_RELEASE branch, we can change which branch we flight builds from. As our engineers work in development cycles internally, we may prioritize work being done in a specific branch and may need to move Insiders between branches. We are treating these builds the same as we would treat builds from the RS_PRERELEASE branch.
What’s new in Build 21354
New personalization options for news and interests on the taskbar
Thanks for your continued feedback for news and interests on the Windows taskbar! We’re continuing to develop the experience based on your suggestions. Today, we’re pleased to announce a new set of features rolling out for personalizing the feed to suit your interests.
Now, when you hover on the weather on your taskbar, you’ll see a new “Manage interests” button appear at the top of the window. This button links to a new full-page personalization experience, where you can choose the topics that you’re interested in. New users may also see a personalization card in their feed to help them get started.

Use the search box at the top of the “My interests” page to search for the topics or publishers you want to follow. You can also discover interests by browsing over a dozen categories, including different types of news, entertainment, and sports topics. When you select a topic to follow, you’ll see more stories about it in your feed as stories become available. You can manage the topics you’re following by selecting “Followed interests” in the left navigation.

We’re also excited to announce, “Tune your feed”, available from the left navigation on the “My interests” page. This experience makes it easy to explore and follow publishers from our partner ecosystem and select example articles that pique your interest. Select a couple of publishers and stories to get started or scroll to see more. You can see and manage the publishers you’re following by clicking “Followed Publishers” on the left navigation. You can also tune your feed wherever you see a story. Click the “X” on the top right of the card to remove the article and provide feedback: “Not interested in this story”, “Don’t like the source”, or “Report an issue”. We’ve refined this experience based on user feedback, to give you another way to fine-tune your feed for your preferences.
These new personalization experiences are now available in several markets, including the U.S., U.K., Canada, India, and Australia, with global rollout continuing. We look forward to hearing what you think about these new options for personalizing news and interests!
Reminder: We continue to roll out news and interests to Windows Insiders, so it isn’t available to everyone in the Dev Channel just yet.
Improvements to Display Settings
Content adaptive brightness control (CABC) disabling: CABC helps improve battery performance on PCs, but with the trade-off of decreased image quality. It can result in distracting brightness changes that interfere in experiences where image quality is of high importance such as for creative professionals looking for color accuracy. The ability to turn CABC off has been a highly requested feature and Windows Insiders can now disable CABC directly in the Display settings via Settings > System > Display.
Note: Depending on your device, you may see just one (or both) of the checkboxes seen under the brightness slider below. To find out if your device has CABC support, you can look at your GPU control panel.
HDR certification: To bring awareness to high quality HDR displays and educate customers, we are bringing HDR certification to Settings > System > Display under “Advanced display settings” with the latest Insider Preview builds. Under this settings page, a display’s HDR certifications will be shown.
We will be rolling out this feature over time and are starting with select Dolby Vision and VESA DisplayHDR models, so please don’t be alarmed if in the Advanced display settings, you see that your display has no HDR certification even though it is certified.
New Camera Settings page
We are extremely excited to introduce a new Camera Settings page we’ve been working on, giving users the ability to add/remove cameras and configure the default image settings of each one.

This page allows you to manage cameras through the Settings app, whether they’re connected directly to the device (like a webcam) or are ONVIF IP cameras on your local network (for more info on ONVIF support in Windows, see this blog post). This new Settings page can be found at Settings > Devices > Camera. Each camera has a “Configure” button that lets you make changes to the default brightness and contrast – letting you get rid of the pesky backlight that always shadows your face in your video calls. Depending on what features are supported by your camera, you can configure brightness and contrast, enable Video HDR or Eye Contact, or correct for camera rotation.

We look forward to hearing your feedback about this new feature. Please try out the Configure default image settings for your camera Quest on Feedback Hub and then send us your feedback at the end – we’d love to hear what other features you’d like to see, and if you run into any issues with your specific PC, camera and/or video app.
Inbox app updates
MSPaint is now updated via the Microsoft Store:
MSPaint is now updateable via the Microsoft Store outside major OS updates. It also has a new icon and has been promoted out of the Windows Accessories folder to its own place in the Start menu.
Snipping Tool is now updated via the Microsoft Store:
Snipping Tool is now updateable via the Microsoft Store outside major OS updates. It has been packaged together with Snip & Sketch so we can deliver updates for both at the same time. It has also been promoted out of the Windows Accessories folder to its own place in the Start menu.
NOTE: Because we’re combining both Snip & Sketch and Snipping Tool, Insiders who previously did not have Snip & Sketch installed will see Snipping Tool removed after updating to this build and will have to go and install Snip & Sketch from the Store to get it back.
Organizing all the admin and system tools under Windows Tools:
In Build 21343, we announced we changed the name of the Windows Administrative Tools folder in Start to Windows Tools as part of an effort to better organize all the admin and system tools in Windows 10. In Build 21354, we are continuing that effort. The Windows Accessories, Windows Administrative Tools, Windows PowerShell, and Windows System folders have now been removed from Start and the apps within these folders can now be accessed via the Windows Tools entry point that directs to the full apps list in File Explorer. All these apps will still appear in via search, launch via any method, can be pinned to Start or taskbar, and any customized shortcuts in the folder paths will remain intact. Also, File Explorer has been moved into its own place in the Start menu as part of this work.
Changes and Improvements
- [News and interests] As mentioned previously, we have enabled the ability to deselect “Open on hover” in the “News and interests” taskbar options. This is based on your feedback.
- The default path to access Linux files from Windows using the Windows Subsystem for Linux has been changed from `\\wsl\\` to `\\wsl.localhost\\` to improve performance and reliability. You will still be able to access Linux files using `\\wsl$\\`.
- Under Settings > Update & Security > Change active hours, you will find the toggle turned on for “Automatically adjust active hours for this device based on activity”, if you have never adjusted this feature. We are starting a roll out a change for Insiders that makes this setting on by default. With this setting turned on, Windows Update will be able to schedule automatic restarts when you are typically not using your device more accurately.
- As of the latest versions of Microsoft Edge, all pinned sites (regardless of what version you were using when you pinned them), should now use the taskbar behavior described here without you first having to unpin and re-pin the site.
- On ARM64 devices, you can now toggle compatibility settings for x64 applications.
- Under Settings > Personalization > Device usage, you can select all the ways you plan to use your device to get customized suggestions for tips, tools, and services.
Fixes
- [Gaming] We fixed an issuewhere certain games may crash, will not sync save data when a game is played on a different device, or will not save when a new game is installed.
- [File Explorer] We fixed an issue resulting in all folders pinned to Quick Access in File Explorer disappearing if you installed Build 21343. Please note that this fix prevents the issue from occurring going forward, it will not bring back the ones that were unpinned if you installed the impacted build previously.
- [File Explorer] We fixed an issue resulting in some Insiders experiencing that the entire folders section of Quick Access was missing after installing the previous flight.
- We fixed an issue impacting Search reliability in the previous flight.
- [News and interests] Fixed an issue where news and interests could occlude other content on the taskbar especially on smaller screens.
- We fixed an issue where the tooltip text for items in Start’s Power button menu wasn’t displaying correctly.
- We fixed an issue resulting in a crash if you entered WinPE and tried to enable Narrator using WIN + CTRL + Enter.
- We fixed an issue resulting in some Insiders experiencing a bug check with error SYSTEM_THREAD_EXCEPTION_NOT_HANDLED when rebooting or shutting down in the previous flight.
- We fixed an issue that could result in a bugcheck when starting WSL.
- We fixed an issue that could result in the Windows Update Settings page showing progress dots but never loading.
- We fixed an issue where navigating to Power and Sleep in Settings would crash Settings.
- We fixed the issue where a random toggle that didn’t do anything was appearing under Settings > Personalization > Lock screen.
- We fixed an error resulting in some Insiders recently seeing an error when trying to add a password to a local account that was created without a password.
- We fixed an issue where if you opened the Pinyin IME settings via Search, the Settings page would be unexpectedly blank.
- We fixed an issue that could result in your desktop background going black after snapping an app to the side of your screen.
- We fixed an issue where some of the text in Snipping Tool wasn’t displaying correctly.
- We fixed an issue causing the Handwriting Input Panel to not work for pen input on ARM64 PCs.
- We fixed an issue impacting clipboard history reliability.
- We fixed an issue resulting in characters being duplicated in certain apps when typing with the Korean IME.
- We fixed an issue resulting in not being able to insert composition strings when typing with an IME after copying and pasting a text box in PowerPoint.
- We fixed an issue resulting in key events being lost when renaming files in File Explorer while typing with an IME.
- We fixed an issue where when typing with the Japanese or Chinese IMEs in certain apps that have their own UI for IME candidates, the IME candidates were not displayed in the app’s UI.
- The fix we mentioned in Build 21327 to address an issue where a toggled key on the touch keyboard had the wrong background color is now rolling out to all Insiders in the Dev Channel.
- We fixed an issue causing an increase in login time in the previous flight.
- We fixed an issue resulting in some Insiders finding that boot time was longer in the previous flighting.
- We fixed an issue resulting in the network button on the login screen not working and potentially crashing.
- We fixed an issue causing some logins to hang on a black screen. If you continue to see a similar problem, please file a new feedback in Feedback Hub.
- We fixed an issue that could result in freezes when watching videos in Chromium-based browsers in recent Dev Channel builds.
Known issues
- We’re looking into reports of the update process hanging for extended periods of time when attempting to install a new build.
- [News and interests] Pressing ESC key to dismiss an opened context menu in the flyout dismisses the whole flyout instead.
- [News and interests] Sometimes the news and interests flyout cannot be dismissed with pen.
- [ARM64] Insiders who installed the preview version of the Qualcomm Adreno graphics driver on the Surface Pro X may experience reduced brightness of the display. This issue is fixed with an updated version of the preview graphics driver at https://aka.ms/x64previewdriverprox. If you are experiencing this issue, please see the feedback collection for more information.
- We’re investigating an issue where elements of Search (including the search box in File Explorer) are no longer displaying correctly in dark theme.
- We’re working on a fix for an issue introduced in the previous flight impacting WSUS users where the “Check online for updates from Microsoft Update” option is greyed out. If you are impacted, you can run the following command from an elevated Command Prompt to set the reg key so that scan will check Microsoft servers:
- reg add “HKLM\Software\Microsoft\WindowsUpdate\UX\Settings” /f /v ScanMicrosoftOnly /t REG_DWORD /d 0x01
Then click the regular “Check for updates” button in Windows Update Settings. Please note, if the scan needs to be done repeatedly the reg key will need to be re-added each time, as scanning reads and erases the key.
- Due to an issue with migrating the shortcuts into the new Windows Tools location, This PC shows up with the display name “computer.” We already have a bug fix on the way to address this issue.
- Some non-administrative apps, such as 3D Viewer and Print 3D, that were previously in the Windows Accessories folder are now in Windows Tools. These app shortcuts will be moved back into Start with an upcoming bug fix. They are still searchable and accessible via Windows Tools in the meantime.
- The Windows Camera App currently does not respect the default brightness setting set via the new Camera Settings page.
- Some cameras currently may not support adjustment in the Camera Settings App when the camera is also in use by another app.
- Accessing the virtual GPU is broken for Windows and Linux guests, adding a vGPU to a VM will have no effect and the VM will continue running with software rendering.
- [ADDED] Theme-aware splash screens have disappeared in this build. A fix is coming to re-enable this in a future flight.
- [ADDED] In some cases, Auto HDR might not correctly enable for all eligible titles. To ensure that Auto HDR is enabled for all eligible titles, please visit Settings > Display > HDR settings and confirm that Auto HDR is turned on. If you still run into trouble, please reach out to us via the Feedback Hub, on our Twitter (@DirectX12), or on the DirectX Discord.
- [ADDED 4/9] Split screen mode for Auto HDR does not work in this build; please look to the next build for a fix.
- [ADDED 4/12] We’re working on a fix for an issue where in some cases user accounts will be migrated during the upgrade, but the user profile was not. This may occur if a device is abruptly restarted during the upgrade process. The user profile can be recovered from the Windows.old folder, or by simply rolling back to the previous version.
Important Insider Links
You can check out our Windows Insider Program documentation here, including a list of all the new features and updates released in builds so far. Are you not seeing any of the features listed for this build? Check your Windows Insider Settings to make sure you’re in the Dev Channel. Submit feedback here to let us know if things weren’t working the way you expected.
If you want a complete look at what build is in which Insider channel, head over to Flight Hub. Please note, there will be a slight delay between when a build is flighted and when Flight Hub is updated.
Thanks,
Brandon
(Amanda is enjoying some much-needed time off this week!)


