- Nmap Portable скачать бесплатно
- Описание программы
- Introduction
- Communication
- Nmap для windows portable
- Microsoft Windows binaries
- Linux RPM Source and Binaries
- Mac OS X Binaries
- Source Code Distribution
- Other Operating Systems
- Nmap/Ncat Portable
- Contents
- Building Ncat Portable for Windows
- Requirement Details
- Microsoft Visual Studio 2013
- OpenSSL Source Code
- Netwide Assembler (NASM)
- Nmap Source Code
- Build OpenSSL Statically
- Build Ncat Statically
- Known problem
Nmap Portable скачать бесплатно
- Версия: полная, бесплатная
- Ограничения: нет
- Язык: русский, английский, украинский
- Разработчик: Gordon Lyon
- Операционка: Windows XP, 7, 8, 8.1, 10
- Разрядность: x32, x64, 32 bit, 64 bit
Описание программы

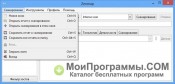
Nmap Portable — программное обеспечение, применяемое для комплексного анализа защиты системы, портов, сетей, компьютера в целом. Использовался в киноиндустрии для реального взлома ПК.
Нмап является многосторонней программой. Ее можно использовать не только для сканирования сетевых соединений, подключений, защиты ОС. Интегрирована возможность обратного процесса. Пользователи, обладающие определенными умениями, с помощью утилиты взламывают компьютеры на Виндовс, Линукс.
ПО известно благодаря фильму «Матрица: Перезагрузка». С его помощью в кино произвели взлом ПК.
Рекомендуем Nmap Portable скачать бесплатно с официального сайта без регистрации, смс, вирусов и рекламы.
© Copyright 2018 МоиПрограммы — каталог программного обеспечения.
Introduction
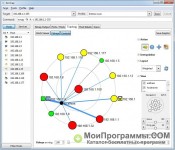
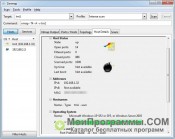
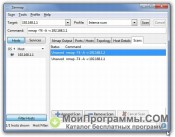
Nmap («Network Mapper») is a free and open source (license) utility for network discovery and security auditing. Many systems and network administrators also find it useful for tasks such as network inventory, managing service upgrade schedules, and monitoring host or service uptime. Nmap uses raw IP packets in novel ways to determine what hosts are available on the network, what services (application name and version) those hosts are offering, what operating systems (and OS versions) they are running, what type of packet filters/firewalls are in use, and dozens of other characteristics. It was designed to rapidly scan large networks, but works fine against single hosts. Nmap runs on all major computer operating systems, and official binary packages are available for Linux, Windows, and Mac OS X. In addition to the classic command-line Nmap executable, the Nmap suite includes an advanced GUI and results viewer (Zenmap), a flexible data transfer, redirection, and debugging tool (Ncat), a utility for comparing scan results (Ndiff), and a packet generation and response analysis tool (Nping).
Nmap was named “Security Product of the Year” by Linux Journal, Info World, LinuxQuestions.Org, and Codetalker Digest. It was even featured in twelve movies, including The Matrix Reloaded, Die Hard 4, Girl With the Dragon Tattoo, and The Bourne Ultimatum.
Nmap is .
- Flexible : Supports dozens of advanced techniques for mapping out networks filled with IP filters, firewalls, routers, and other obstacles. This includes many port scanning mechanisms (both TCP & UDP), OS detection, version detection, ping sweeps, and more. See the documentation page.
- Powerful : Nmap has been used to scan huge networks of literally hundreds of thousands of machines.
- Portable : Most operating systems are supported, including Linux , Microsoft Windows , FreeBSD , OpenBSD , Solaris , IRIX , Mac OS X , HP-UX , NetBSD , Sun OS , Amiga , and more.
- Easy : While Nmap offers a rich set of advanced features for power users, you can start out as simply as «nmap -v -A targethost «. Both traditional command line and graphical (GUI) versions are available to suit your preference. Binaries are available for those who do not wish to compile Nmap from source.
- Free : The primary goals of the Nmap Project is to help make the Internet a little more secure and to provide administrators/auditors/hackers with an advanced tool for exploring their networks. Nmap is available for free download, and also comes with full source code that you may modify and redistribute under the terms of the license.
- Well Documented : Significant effort has been put into comprehensive and up-to-date man pages, whitepapers, tutorials, and even a whole book! Find them in multiple languages here.
- Supported : While Nmap comes with no warranty, it is well supported by a vibrant community of developers and users. Most of this interaction occurs on the Nmap mailing lists. Most bug reports and questions should be sent to the nmap-dev list, but only after you read the guidelines. We recommend that all users subscribe to the low-traffic nmap-hackers announcement list. You can also find Nmap on Facebook and Twitter. For real-time chat, join the #nmap channel on Freenode or EFNet.
- Acclaimed : Nmap has won numerous awards, including «Information Security Product of the Year» by Linux Journal , Info World and Codetalker Digest. It has been featured in hundreds of magazine articles, several movies, dozens of books, and one comic book series. Visit the press page for further details.
- Popular : Thousands of people download Nmap every day, and it is included with many operating systems (Redhat Linux, Debian Linux, Gentoo, FreeBSD, OpenBSD, etc). It is among the top ten (out of 30,000) programs at the Freshmeat.Net repository. This is important because it lends Nmap its vibrant development and user support communities.
Nmap Security Port Scanner
Communication
Nmap users are encouraged to subscribe to the Nmap-hackers mailing list. It is a low volume (6 posts in 2017), moderated list for the most important announcements about Nmap, Insecure.org, and related projects. You can join more than 128,000 current subscribers by submitting your email address here:
We also have a development list for more hardcore members (especially programmers) who are interested in helping the project by helping with coding, testing, feature ideas, etc. New (test/beta) versions of Nmap are sometimes released here prior to general availability for QA purposes. You can subscribe at the Nmap-dev list info page.
Nmap для windows portable
Nmap and Zenmap (the graphical front end) are available in several versions and formats. Recent source releases and binary packages are described below. Older version (and sometimes newer test releases) are available from the dist directory (and really old ones are in dist-old). For the more security-paranoid (smart) users, GPG detached signatures and SHA-1 hashes for each release are available in the sigs directory (verification instructions). Before downloading, be sure to read the relevant sections for your platform from the Nmap Install Guide. The most important changes (features, bugfixes, etc) in each Nmap version are described in the Changelog. Using Nmap is covered in the Reference Guide, and don’t forget to read the other available documentation, particularly the new book Nmap Network Scanning!
Nmap users are encouraged to subscribe to the Nmap-hackers mailing list. It is a low volume (7 posts in 2015), moderated list for the most important announcements about Nmap, Insecure.org, and related projects. You can join the 128,953 current subscribers (as of September 2017) by submitting your email address here:
You can also get updates from our Facebook and Twitter pages.
Nmap is distributed with source code under custom license terms similar to (and derived from) the GNU General Public License, as noted in the copyright page.
Microsoft Windows binaries
Please read the Windows section of the Install Guide for limitations and installation instructions for the Windows version of Nmap. You can choose from a self-installer (includes dependencies and also the Zenmap GUI) or the much smaller command-line zip file version. We support Nmap on Windows 7 and newer, as well as Windows Server 2008 and newer. We also maintain a guide for users who must run Nmap on earlier Windows releases..
Note: The version of Npcap included in our installers may not always be the latest version. If you experience problems or just want the latest and greatest version, download and install the latest Npcap release.
The Nmap executable Windows installer can handle Npcap installation, registry performance tweaks, and decompressing the executables and data files into your preferred location. It also includes the Zenmap graphical frontend. Skip all the complexity of the Windows zip files with a self-installer:
Latest stable release self-installer: nmap-7.91-setup.exe
Latest Npcap release self-installer: npcap-1.30.exe
We have written post-install usage instructions. Please notify us if you encounter any problems or have suggestions for the installer.
For those who prefer the command-line zip files (Installation Instructions; Usage Instructions), they are still available. The Zenmap graphical interface is not included with these, so you need to run nmap.exe from a DOS/command window. Or you can download and install a superior command shell such as those included with the free Cygwin system. Also, you need to run the Npcap and Microsoft Visual C++ 2013 Redistributable Package installers which are included in the zip file. The main advantage is that these zip files are a fraction of the size of the executable installer:
Linux RPM Source and Binaries
Many popular Linux distributions (Redhat, Mandrake, Suse, etc) use the RPM package management system for quick and easy binary package installation. We have written a detailed guide to installing our RPM packages, though these simple commands usually do the trick: You can also download and install the RPMs yourself:
Mac OS X Binaries
Nmap binaries for Mac OS X (Intel x86) are distributed as a disk image file containing an installer. The installer allows installing Nmap, Zenmap, Ncat, and Ndiff. The programs have been tested on Intel computers running Mac OS X 10.8 and later. See the Mac OS X Nmap install page for more details. Users of PowerPC (PPC) Mac machines, which Apple ceased selling in 2006, should see this page instead for support information.
Source Code Distribution
This is the traditional compile-it-yourself format. The Nmap tarball compiles under Linux, Mac OS X, Windows, and many UNIX platforms (Solaris, Free/Net/OpenBSD, etc.) It includes Zenmap, the GUI frontend.
Detailed Linux/BSD/Solaris compilation instructions and options are provided here, though this usually does the trick:
Most Mac OS X users install with our Mac installer, but we also provide Mac OS X source code compilation instructions.
If you are compiling Nmap anyway, you might prefer to get the very latest code from our SVN source code repository rather than downloading a tarball here.
Other Operating Systems
Many other operating systems support Nmap so well that I have no need to create and distribute binary packages myself. You can choose to use the packages below, or compile the source distribution, which is often newer. We have created installation pages for the following platforms:
Nmap/Ncat Portable
Contents
Building Ncat Portable for Windows
The step-by-step instructions in this section will guide you through the process of building a portable version of Ncat for the Microsoft Windows platform by means of static linking. The resulting binary, ncat.exe, can be run as a standalone executable, with no runtime dependencies, across all versions of Microsoft Windows starting from Windows XP to Windows 10.
Before you proceed with building a static version of Ncat, we strongly recommend building a normal, dynamic build of Ncat first, just to get the hang of it or spot building issues that might not pertain to building a static version. Details on how you can achieve that can be found at http://nmap.org/install/.
Now that you have successfully built Ncat with dynamic linking, let’s proceed to building Ncat Portable for Windows.
Requirement Details
The requirements below include the tools and code needed to build both OpenSSL statically from source as well as Ncat. In some cases, such as with Perl, there are multiple alternative distributions and/ or versions of a tool available. In these instances, the specific distributions and/ or versions included below are simply recommendations. The available alternatives may work in place of the recommendations; however, you may encounter issues or minor diversions from the steps outlined here that are not covered.
Microsoft Visual Studio 2013
As of the time of this writing, Microsoft Visual Studio 2013 can still be obtained for free from the link below, but will require that you log in with either a Microsoft or GitHub account in order to proceed to the download page.
- Navigate to https://visualstudio.microsoft.com/vs/older-downloads/.
- Expand the section for «2013» under Still want an older version? and click «Download.»
- Log in with either a Microsoft or GitHub account.
- Select and download one of the available editions/ versions of Visual Studio 2013 (Note: tested with Visual Studio Express 2013 for Windows Desktop with Update 5).
OpenSSL Source Code
The easiest way to obtain the sources for the latest releases of OpenSSL is to visit https://www.openssl.org/source/ and download the source code tarball for the desired OpenSSL version from the release table. The very latest sources for each version can be cloned or downloaded from the relevant branch on the official GitHub mirror of the OpenSSL git repository at this link https://github.com/openssl/openssl. As of the time of this writing, the current stable version of OpenSSL is the 1.1.1 series and the current master branch is OpenSSL 3.0, which is still in pre-release. It is worth noting that although, in testing, Ncat will build successfully against a static build of OpenSSL 3.0, this version is still in development and you may encounter unexpected issues. Use it at your own risk.
Perl is needed to build OpenSSL. Strawberry Perl is recommended and is available from http://strawberryperl.com/. The Text::Template module, which is not part of the core Perl modules, is required to build OpenSSL. The Test::More module, which is also not part of the core Perl modules, is an optional requirement for running the tests. If you do not plan on running the tests on your OpenSSL build, this module is not needed. If you are using Strawberry Perl, you should be able to install any required modules from the command prompt using CPAN.
- Install Text::Template (required):
- Install Test::More (optional):
Netwide Assembler (NASM)
The Netwide Assembler (NASM) is also needed to build OpenSSL. It is the only supported assembler and is available from https://www.nasm.us. After installing NASM on your machine, ensure that it is on your %PATH% .
Nmap Source Code
Download the Nmap source code tarball from https://nmap.org/download. If you would prefer to use the very latest code, it can be otained from the Nmap SVN source code repository. Instructions for obtaining Nmap from the Subversion (SVN) Repository are available at https://nmap.org/book/install.html#inst-svn.
nmap-mswin32-aux
Precompiled binaries of the dependencies for building Nmap on Windows are stored in Subversion, in the directory /nmap-mswin32-aux . The build files are configured to look for dependencies in this checked-out directory. Even though we will be replacing the contents of the /nmap-mswin32-aux/OpenSSL directory with the files from our static build of OpenSSL, maintaining this directory structure is the easiest way to avoid needing to reconfigure the Visual Studio project files to point to an alternate directory. This directory can be obtained from Subversion with the command svn checkout https://svn.nmap.org/nmap-mswin32-aux , which requires that you have a Subversion client installed on your machine. All versions of Microsoft Visual Studio except the Express edition include VisualSVN. If you are using the Express edition of Microsoft Visual Studio, an alternative SVN client is TortoiseSVN available from https://tortoisesvn.net/ and distributed under GPL.
Note: The /nmap-mswin32-aux directory and the directory containing the Nmap source code, whether extracted from a tarball or checked-out from SVN, must be placed in the same parent directory in order for the the Visual Studio project files to be able to find the dependencies contained in the /nmap-mswin32-aux directory at build time. In other words, the directory structure should look like the directory tree shown below.
Build OpenSSL Statically
Once you have downloaded and installed all of the tools required to build OpenSSL and retreived a copy of the OpenSSL source code, you are ready to build OpenSSL statically.
- If you are using a source code tarball of one of the official releases of OpenSSL, begin by extracting the source code from the archive to a working directory.
- If you have opted to clone the OpenSSL GitHub repository, the directory that you cloned it to will be your working directory for the build.
- Create the directory C:\OpenSSL . This will be our installation directory.
- Prepare a command line environment to perform the build using one of the two methods below (see also https://docs.microsoft.com/cpp/build/building-on-the-command-line):
- Use Visual Studio Developer Command Prompt with administrative privileges.
- OR start an elevated command prompt and run the vcvarsall.bat script.
- Verify that Perl and NASM are both on %PATH% :
- If both of the commands below return a valid response, proceed to the next step. If either returns an error, add the offending tool(s) to the %PATH% .
- Change directory to the directory where you extracted or cloned the OpenSSL source and execute the following commands:
- Assuming the build completes without issue, you should be prepared to move on to build Ncat statically.
Build Ncat Statically
- Begin by replacing the contents of the \nmap-mswin32-aux\OpenSSL directory with the contents of the C:\OpenSSL directory from the static build of OpenSSL you just completed.
- Within the directory containing your local copy of the OpenSSL source code, locate the \ms subdirectory. Within the \ms directory, locate and copy the file applink.c (i.e. C:\openssl-x.x.x\ms\applink.c ) to the directory \nmap-mswin32-aux\OpenSSL\include\openssl .
- Within the directory containing your local copy of the Nmap source code, open the Nmap solution (i.e. nmap.sln ) from the \mswin32 subdirectory (e.g. C:\Nmap\nmap\mswin32\nmap.sln ) in Visual Studio 2013.
- Change the «Active solution configuration» to Ncat Static by following the steps below:
- Right-click on Solution nmap in the «Solution Explorer» and select «Configuration Manager.»
- Click the dropdown under «Active solution configuration» and select Ncat Static.
- Important: Set the liblua project to build by checking the box in the «Build» column for that project. It is not set to build by default but is needed to build Ncat statically.
- Close the «Configuration Manager.»
- Change the liblua project runtime library for linking from «Multi-threaded DLL (/MD)» to «Multi-threaded (/MT)» by following the steps below:
- Right-click the liblua project in the «Solution Explorer» and select «Properties.»
- Within the navigation pane of the liblua «Property Pages,» navigate to «Configuration Properties» > «C/C++» > «Code Generation.»
- Within the configuration pane of «Code Generation,» click the dropdown next to «Runtime Library» and select «Multi-threaded (/MT).»
- Click «Apply» and then click «OK» to close the «Property Pages.»
- Add the directory ..\liblua to the «Additional Include Directories» and crypt32.lib to the «Additional Dependencies» of the ncat project by following the steps below:
- Right-click the ncat project in the «Solution Explorer» and select «Properties.»
- Within the navigation pane of the ncat «Property Pages,» navigate to «Configuration Properties» > «C/C++» > «General.»
- Within the configuration pane of «General,» click the dropdown next to «Additional Include Directories» and select » .»
- Within the «Additional Include Directories» editor, click the «New Line» icon or press Ctrl-Insert and add the directory path ..\liblua .
- Click «OK» to exit the «Additional Include Directories» editor.
- Once again within the navigation pane of the ncat «Property Pages,» navigate to «Configuration Properties» > «Linker» > «Input.»
- Within the configuration pane of «Input,» click the dropdown next to «Additional Dependencies» and select » .»
- Within the «Additional Dependencies» editor, add a new line by hitting the enter key and enter CRYPT32.LIB .
- Click «OK» to exit the «Additional Dependencies» editor and then hit «Apply» and «OK» to exit the ncat «Property Pages.»
- Right-click the ncat project in the «Solution Explorer» and select «Set as StartUp Project.»
- Right-click the ncat project in the «Solution Explorer» and select «Build.» Alternatively you can press the F7 key to start building.
Ncat should now be compiling. Wait for the build process to complete and then, assuming the build completes without error, the Ncat Portable static binary ncat.exe should be located in the directory \ncat\Release within the directory containing your local copy of the Nmap source code.
If you’re having trouble or questions regarding the steps outlined in this document, feel free to e-mail nmap-dev insecure.org.
Known problem
If you found this error at compilation:
‘openssl/applink.c’: No such file or directory
or the resulting exe fails to open sockets:


