- Fix AMD or NVIDIA Graphics Card Not Detected on Windows 10
- Show Hidden Devices
- April 2021 Update:
- Install the Latest Nvidia or AMD Drivers
- Use the Command Prompt
- Check BIOS Settings
- Removing the IGP or Integrated Graphics Drivers
- Fix: Graphics Card Not Detected
- Method 1: Check Graphics Card Slot
- Method 2: Uninstall and Reinstall Graphics Drivers
- Method 3: Set your Graphics Card to Default
- Method 4: Check Power Supply
- Method 5: Change BIOS Settings
- Method 6: Uninstall Windows Updates
- Windows 10
- Windows 8, 8.1 and 7
- Method 7: Restore BIOS to Default
- Method 8: Update BIOS
Fix AMD or NVIDIA Graphics Card Not Detected on Windows 10
The graphics card is one of the most important hardware components of your PC and is responsible for generating the image you see on the screen. Unfortunately, some users have reported that their Nvidia or AMD graphics card is not recognized under Windows 10.

Here are some possible reasons for this problem:
- Incompatible drivers
- Incorrect BIOS settings
- GPU Slot Problems
- Hardware problems

If you encounter the problem “Nvidia graphics card not recognized” or “AMD graphics card not recognized”, you can try these solutions individually.
Show Hidden Devices
If you have recently purchased a new graphics card for your computer, chances are it will appear to be hidden. So we may have to reveal it again. Here’s a brief overview:
April 2021 Update:
We now recommend using this tool for your error. Additionally, this tool fixes common computer errors, protects you against file loss, malware, hardware failures and optimizes your PC for maximum performance. You can fix your PC problems quickly and prevent others from happening with this software:
- Step 1 : Download PC Repair & Optimizer Tool (Windows 10, 8, 7, XP, Vista – Microsoft Gold Certified).
- Step 2 : Click “Start Scan” to find Windows registry issues that could be causing PC problems.
- Step 3 : Click “Repair All” to fix all issues.

- On your keyboard, press the Windows logo key and R at the same time, then type devmgmt.msc in the box and press Enter.
- Click Show, and then click Show Hidden Devices.
- Click Action > Find Hardware Changes.
- Check to see if your Nvidia graphics driver appears under Graphics Adapters (aka.graphics card, video card, GPU card). If so, fine. But if it doesn’t, don’t worry – here are some other solutions you should try
Install the Latest Nvidia or AMD Drivers
If your Nvidia or AMD graphics card is not recognized in Windows 10, you can solve this problem by downloading the latest drivers for your device.
Before doing so, be sure to uninstall any Nvidia or AMD drivers you already have. Here’s how to do so:
- Open the Settings application and go to System
- Navigate to the Apps & Features tab
- Find the Nvidia/AMD drivers and remove all software related to Nvidia or AMD.
- Just click on the software you want to remove and select Uninstall.
Use the Command Prompt
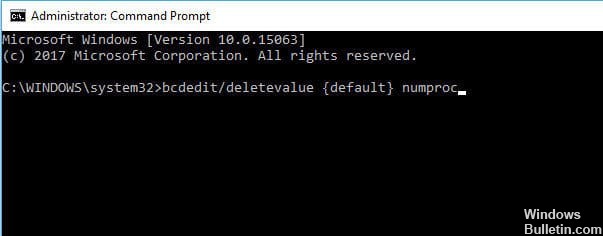
Several users have reported that the Nvidia or AMD drivers cannot detect the graphics card, and you can solve this problem by using the command prompt. To do so, follow these steps:
- Open the command prompt as an administrator. You can do this by pressing the Windows + X key and selecting the command prompt (Admin) from the menu.
- Once the command prompt is open, type bcdedit /set pciexpress forceable and press Enter to run it.
- Close the command prompt and try installing your drivers again.
Check BIOS Settings
If you are installing the video card for the first time, you can disable the embedded video and set the graphics or main video to PEG (PCI Express Graphics). The different BIOSes have different names here, but the process is the same for disabling the embedded graphics and setting the primary graphics on the video card.
Removing the IGP or Integrated Graphics Drivers
If you are upgrading from an integrated or onboard graphics card to a dedicated graphics card, first uninstall the drivers for your embedded graphics card before installing the graphics card in your PC. Otherwise, your graphics card may not be correctly recognized by the Windows operating system.
After removing the embedded graphics drivers, you can install the graphics drivers for your dedicated graphics card.

CCNA, Web Developer, PC Troubleshooter
I am a computer enthusiast and a practicing IT Professional. I have years of experience behind me in computer programming, hardware troubleshooting and repair. I specialise in Web Development and Database Design. I also have a CCNA certification for Network Design and Troubleshooting.
Fix: Graphics Card Not Detected
If you have an external GPU then you are likely to experience this problem sooner or later. The problem you will face is that your graphics card won’t be detected by the system. There are multiple scenarios where you would experience this issue. For example, you might have bought a new graphics card and the system might not be detecting it. In other cases, your graphics card might not be a new one and it might have been working fine a day before but your system suddenly stopped detecting it. The most common way you will find out about this is either your applications, which depend on the graphics card, will stop running or you will notice that your graphics card is not appearing in the device manager.
There can be a lot of reasons for this problem. The problem might be because of the faulty drivers or incorrect BIOS settings or hardware issues or GPU slot issues. The problem can also be caused by a faulty graphics card as well. Another reason for this problem can be the power supply issue. So, there can be a lot of things that can cause your system to not detect the graphics card and these reasons can vary depending on whether you are using the graphics card for the first time or your system stopped detecting the graphics card out of the blue.
Method 1: Check Graphics Card Slot
Sometimes the issue might be the graphics card slot. There are slots on your motherboard where you can insert your graphics card. One of these slots can be damaged hence causing this issue.
Note: Even if your graphics card was working fine we advise you to check the slots. The slots can get damaged or faulty all of a sudden as well. So, even if your slot was fine there’s still a chance that the problem is caused by your GPU slot.
- Open the back cover of your PC
- Look at the motherboard and the graphics card slots. Turn on the computer and check if the graphics card is running e.g. its fan is running.
- If the graphics card doesn’t turn on then the issue might be with the slot i.e. the slot might be faulty or damaged.
- Turn off your computer and take out the graphics card. Insert the graphics card in another slot and check if this makes it work.
If the graphics card is still not getting detected and you have more slots available then try each of them. Sometimes there can be multiple damaged or faulty slots.
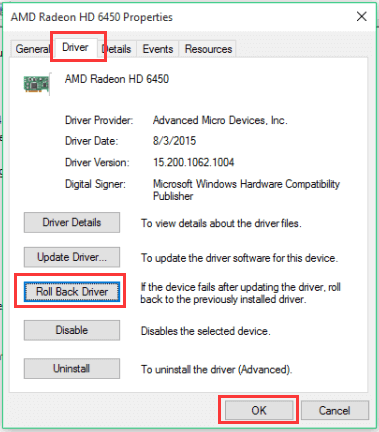
Method 2: Uninstall and Reinstall Graphics Drivers
Make sure your graphic card drivers are installed and updated. If you already have the drivers installed then it would be in your best interest to reinstall the drivers (probably clean install) and check if reinstalling resolves the issue.
We have an article that will help you go through the process of uninstalling and reinstalling your graphics drivers without leaving any trace of the previous drivers. Clean installing the drivers help resolve a lot of issues. So, click catalyst control center cannot be started and follow the instructions given in either method 2 or method 3.
Once done, check if this resolves your issue or not.
Note: The linked article provides steps for clean installing the AMD drivers. If your graphic card is of another manufacturer then the steps might vary a little bit. However, the general steps are still similar. You should go to the manufacturer’s website and download the latest drivers for your graphic card model. You should also look for a cleanup utility that will erase all the files related to the previous driver. Now, go into Safe Mode > uninstall the drivers > run the uninstall utility > reboot > install the latest drivers and then get out of Safe Mode.
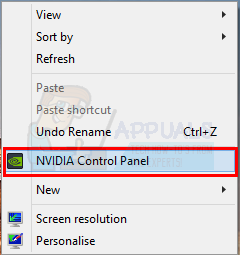
Method 3: Set your Graphics Card to Default
Sometimes the problem can easily be solved by setting your graphics card as the default graphics. This option is for those who can see their graphic card on their NVidia panel (or other graphic card panels).
Note: The instructions given below are for the NVidia graphics cards. The steps for changing the default graphics card will vary for other manufacturers.
- Open the NVIDIA control panel. You can simply right-click on your Desktop and select NVIDIA Control Panel
- Click 3D Settings
- Select Manage 3D Settings from the left pane. It should be under 3D Settings

- Select Program Settings tab
- Now, select a program that you want to select your graphics card for. You can select the program from the drop-down list in Select a program to customize section
- Select High-performance NVidia processor from the drop-down list in Select thepreferred graphics processorfor this program section

Once done, close the panel and try to run the program that has the NVidia graphics card as the default device. If it runs fine then you can repeat the above steps for other major applications.
Method 4: Check Power Supply
If you are trying the graphics card for the first time and you are sure that your graphics card is fine then the issue could be your power supply. A lot of the times the power supply cannot provide enough power for the graphics card. Even if your graphics card seems to be running it still doesn’t mean that your power supply is properly powering the graphics card.
We cannot tell you how powerful of power supply you need because it depends on your power supply and your graphics card. Some graphic cards need more power than others. So, check the power ratings of your power supply and check how much power your graphics card needs. If your power supply meets the minimum requirements then you need to get a different power supply. Just make sure that your power supply provides a considerable amount of more wattage than the power required by your graphics card.
Also, make sure your graphics card is powered properly and the power leads are connected to it. Just because your graphic card’s fans are running it doesn’t mean that the power leads are properly connected. Sometimes the graphic card is partially powered which might be creating this problem.
Note: Make sure you get a power supply of a good manufacturer. These will cost a bit more but it getting a power supply of a good brand will make sure that it delivers the power that it promises. Some of the best brands are EVGA, Corsair, SeaSonic and Cooler Master.
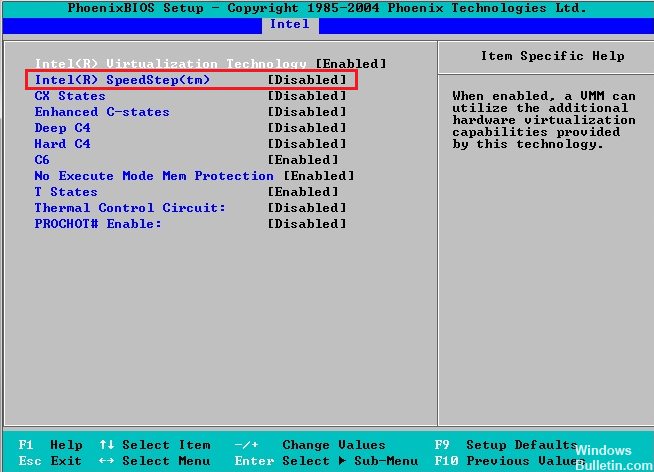
Method 5: Change BIOS Settings
There are a couple of settings of BIOS that you can change. This will ensure that the problem isn’t caused by incorrect settings of the BIOS.
The settings that need to be changed as well as the steps needed to change those settings are given below
- Turn on the system
- When you restart your computer, press either Esc, F8, F12 or F10 when your manufacturer’s logo appears. You can also check which button to press by looking at the corner of the screen that has your manufacturer’s logo. The button changes from manufacturer to manufacturer.
- You might be in the BIOS menu or you might be seeing a list of options. If you are seeing a list of options then there should be a BIOS menu option in that list. You can use the arrow keys to navigate to that option and press Enter to select the BIOS menu.
- Look for a setting named IGPU or IGPU Multi Monitors. This setting basically lets you set up and use multiple monitors. If you are using a single monitor then make sure this option is disabled.
- Look for settings related to PCI and PCI-E. You should have options like PCI, Onboard, PCI-e and PCI-e / onboard backup (the options might vary depending on the manufacturer). Try selecting the options related to PCI-e and check if that resolves the issue. If you have multiple options like PCI-e and PCI-e / onboard backup then try to select one at a time and check if it helps resolve the issue.
Method 6: Uninstall Windows Updates
Sometimes the problem is caused by the Windows updates. There are lots of cases where the Windows update introduced a bug that causes problems with the drivers and several other things. So, if you started noticing the problem right after installing the Windows updates or you remember installing Windows update around the time when you started noticing this issue then there’s a high chance that the problem might be caused by the Windows update.
There is a very easy way to get rid of the Windows updates, actually. Windows provide you with an option to roll back to a previous build. Although this option is only available for a short period of time, it’s still worth a check.
Here are the steps to roll back to the previous build
Windows 10
- Hold Windows key and press I
- Select Updates & Security

- Click Recovery from the left pane
- Click the button Get Started in the section Go back to an earlier build. Note: If the button is greyed out then that simply means you cannot go back to the previous build.
- Follow the on-screen instructions and you should be good to go.

Windows 8, 8.1 and 7
You can use this method to delete Windows 10 updates as well.
- Hold Windows key and press R
- Type appwiz.cpl and press Enter

- Click View installed updates

- Locate and select the update that you recently installed. You can look at their installation date to determine the newest updates.
- Click Uninstall and follow the on-screen instructions
- Delete other updates from the same day as well
Once done, reboot and check if it resolved the issue or not.
Method 7: Restore BIOS to Default
Restoring BIOS to the default has also worked for a lot of users. Simply reset your BIOS to default and check if that resolves the issue.
- Turn on the system
- When you restart your computer, press either Esc, F8, F12 or F10 when your manufacturer’s logo appears. You can also check which button to press by looking at the corner of the screen that has your manufacturer’s logo. The button changes from manufacturer to manufacturer.
- You might be in the BIOS menu or you might be seeing a list of options. If you are seeing a list of options then there should be a BIOS menu option in that list. You can use the arrow keys to navigate to that option and press Enter to select the BIOS menu.
- Once you are in the BIOS menu, look for an option named Restore to defaults or a variation of that. Again, the options will vary from manufacturer to manufacture but you should have this option. Simply select this option and press Enter. Follow any additional on-screen instructions.
Once your BIOS is set back to the default values, reboot and check if it has resolved the issue.
Method 8: Update BIOS
A lot of users resolved the issue by updating their BIOS to the latest version. Updating your BIOS to the latest version makes sure that your system is compatible with the latest hardware. There are, of course, a lot more benefits of updating your BIOS that cannot be covered in this article.
Note: Updating BIOS is a very critical step that requires a little bit of technical knowledge. If you aren’t sure or you haven’t updated the BIOS before then we will advise you to take your computer to an expert or to someone who has some experience in updating BIOS. Any mishap in updating the BIOS can brick your computer.
We already have detailed articles on how to update your BIOS. These articles have step by step instructions that are very easy to follow. Kindly visit these articles and follow the steps given in these articles
Update BIOS on Lenovo: Click here
Update BIOS on Dell: Click here
Update BIOS on HP: Click here
Update BIOS on GATEWAY: Click here


