No main classes found netbeans linux
Find centralized, trusted content and collaborate around the technologies you use most.
Teams
Connect and share knowledge within a single location that is structured and easy to search.
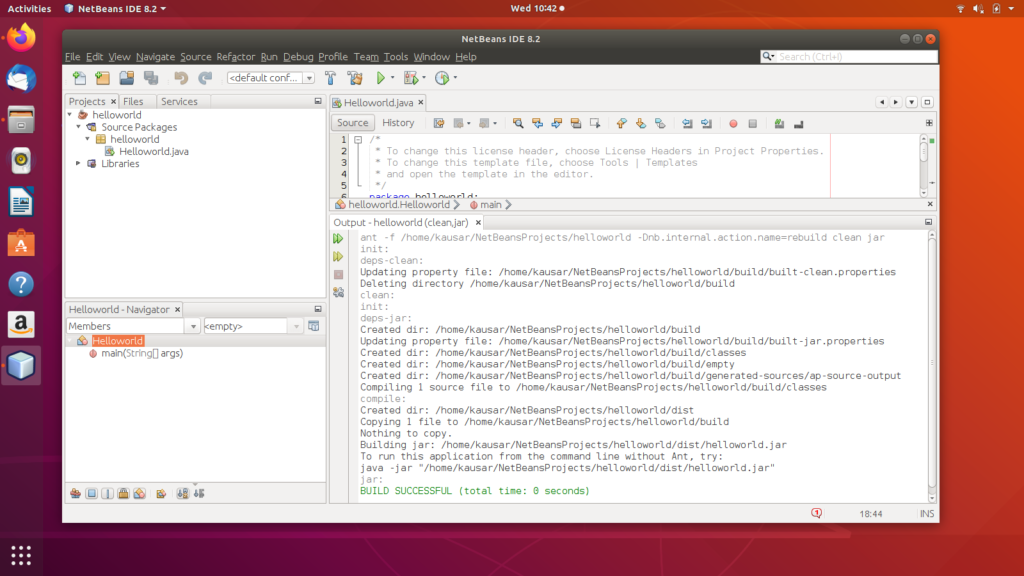
Followed an oracle tutorial on creating a GUI, the tutorial promised that upon running the application I will have to select the main class, however, Netbeans doesn’t find any Main classes?
Here is my code:
Please note I’m very new to Java, and really appreciate your time.
2 Answers 2
Your understanding is correct, and I can’t see anything obviously wrong with your main class.
Although having said that:
If you right click on the Java file in your project window and select «run this file» or «debug this file» that will tell netbeans to execute that file ignoring the project settings.
If that works then go in the properties of your project and set the main class in there for future use.
Your best bet to track this down will be divide an conquer. Create a new file, create an empty main() method in it that just prints «hello world», then transfer your code across a section at a time until you find the thing that breaks it.
- Right click on your Project in the project explorer
- Click on properties
- Click on Run
- Make sure your Main Class is the one you want to be the entry point. (Make sure to use the fully qualified name i.e. mypackage.MyClass)
- Click OK.
- Right-click on your project; click ‘Clean and Build`
- Run Project
If you just want to run the file, right click on the class from the package explorer, and click Run File, or ( Alt + R , F ), or ( Shift + F6 )
The mistake I’ve made before is when I create a new Project, I forget to unclick the «Create Main Class` check box and so it create a Class for me, which I don’t like so I delete the class. In this case, I would have to do the above steps to fix the problem so it will run correctly. The Main class NetBeans creates for you, is the launching class. If you delete it, you need to manually specify the new launching class for the project, then clean and build.
Источник
How To Solve Error: “No Main Class Found in NetBeans”
Let’s start with knowing what NetBeans actually is. So NetBeans is an integrated development environment (IDE) originally used for Java but in addition to Java development, it also has extensions for other languages like PHP, C++, C, HTML5, and JavaScript. It can be run on different operating systems like Windows, macOS, Linux, and Solaris. NetBeans based applications which include the NetBeans IDE and others can also be extended by third-party developers. In July 2006, under Sun’s Common Development and Distribution License (CDDL) the NetBeans IDE got licensed. Recently NetBeans IDE and Platform were donated to the Apache Foundation by Oracle. In April 2019, it underwent a business development cycle and passed out as a top-level project so right now NetBeans is licensed under the Apache License 2.0.
NetBeans integrated development environment is an open source platform. NetBeans IDE supports the development of all Java application types which include Java SE, JavaFX Java ME, web, EJB, and mobile applications out of the box. The other features of IDE include Maven support, refactorings, an Ant-based project system, version control (which supports Git, CVS, Mercurial, Subversion and Clearcase).
NetBeans provide the facility to build software applications from a set of modular components also known as modules. These modules provide all the basic functions of the IDE. each of them have a well-defined function such as supporting different languages, editing or support for the CVS versioning system and SVN, it got all the components to support development of Java in a single download, allowing the user to start working immediately, but for other languages and new features NetBeans needs to be extended, new modules and packages need to be installed. For instance, Sun Java Studio Creator from Sun Microsystem, Sun Java Studio Enterprise, and Sun Studio are all based on the NetBeans IDE.
Main Method
Moving on to the main method, in Java language, a Java application can’t be built without a main method. A Java application is defined as a public Java class with a main() method.
- The main() function acts as the starting point for any application. Whenever a program is executed main is the first function that is executed. All the other functions can be called by the main function. In a classic standard way, there is one main function which uses other instances of classes to function
- Without the main() method, JVM will not execute the program.
- Java main method return type is void i.e it doesn’t return anything, that’s why it’s return type is void. This has been done because once the main ends, the Java program terminates so return type should be null to keep the program simple and avoid any type of memory leaks
- The signature of the method is always: public static void main(String[] args)
public: It is an access specifier. The public keyword is used before the main so that the Java virtual machine can identify the program’s point of execution. If the access specifier is other than public, that is private or protected, it will not be visible to JVM and the program wouldn’t know its execution point.
static: any function becomes static can be made static by using the keyword static. Static methods are the functions that can be run or invoked without the creation of any objects, so to call the main function, objects are not needed. It is necessary to call the main method without creating an object hence static is used
void: this specifies the run-type which is null. The compiler acknowledges that the method isn’t returning any kind of value.
main(): It is a default syntax that is already defined in the Java Virtual Machine. JVM calls this function to compile a program line by line and end the compilation after the function is completed. The main method can also be overloaded
String args[]: The main() method also accepts some kind of data input from the user. It accepts an array of strings through cmd line arguments. Command-line arguments are passed through the args parameter, which is an array of Strings.
Resolving the Error
Now we know that the main method is quite important to run a program on a JVM. Following are the possible solutions to overcome the error “Main class not found in NetBeans”:
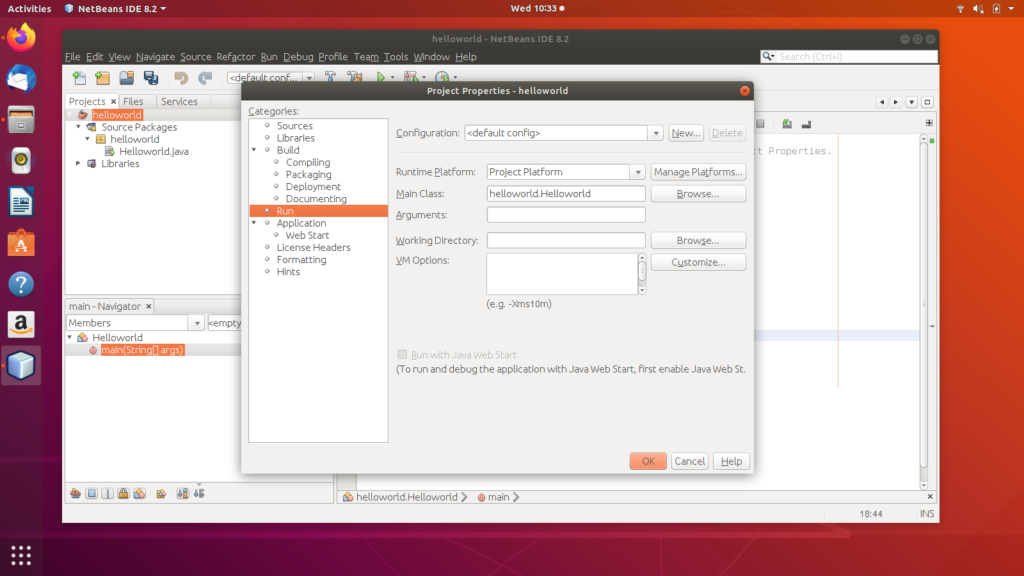
The standard way of running the project with main:
- Right-click on your project in the project explorer
- Select ‘Properties’
- Select ‘Run’
- Make sure your main class is the one you want to be executed first when the program starts running
- Make sure to use the fully qualified name i.e. mypackage.MyClass
- Click OK
- Run Project
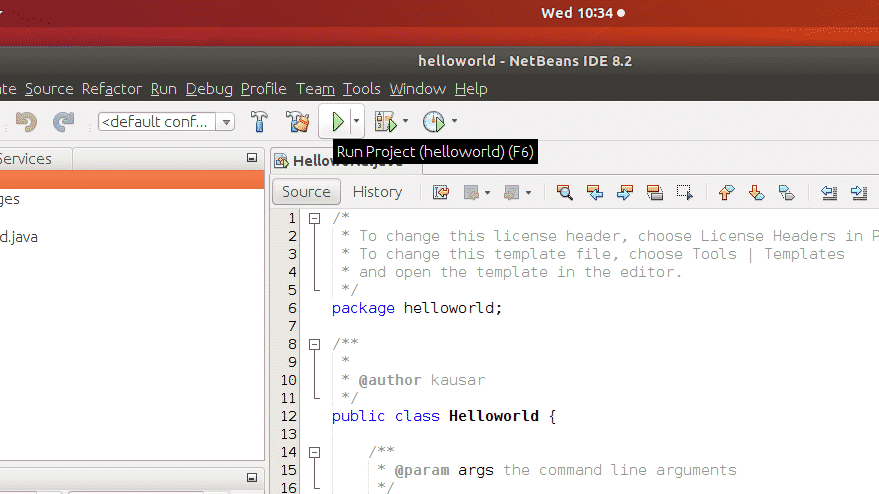
If you just want to run the file, right-click on the class from the package explorer, and click Run File, or (Alt + R, F), or (Shift + F6)
Correct syntax signature of main:
- Sometimes you often face a problem where NetBeans doesn’t find a class when you’re browsing from “main classes dialog window”
- It could be that your main method does have the proper signature. e.g you forgot the public access specifier
- The modifiers public and static can be written in either order (public static or static public), but the convention is to use public static as shown above
- Args: You can name the argument anything you want, but most commonly used convention is “argv” or “args”
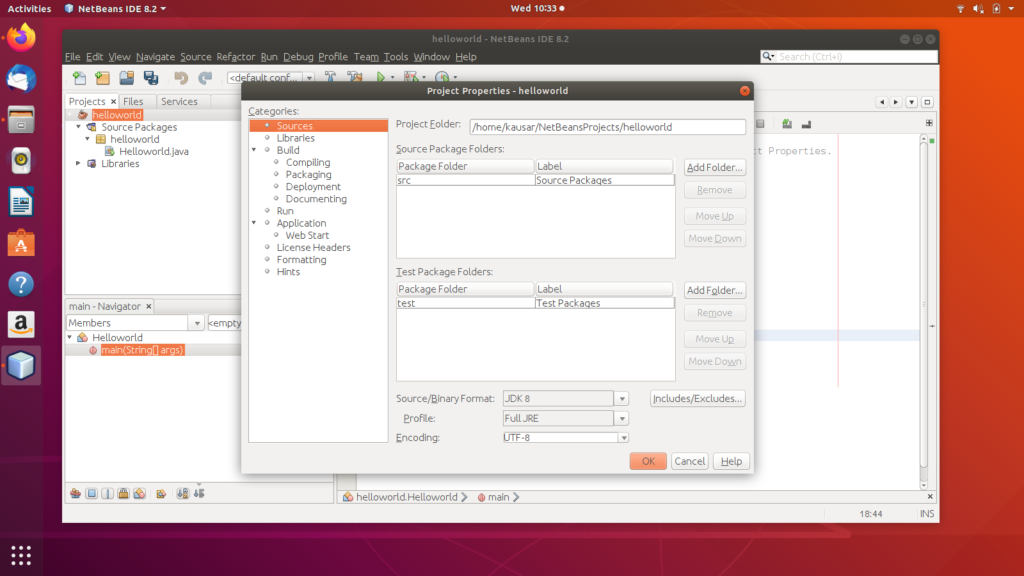
Specifying the main class:
- Make sure that in the project properties, under the run tab you’ve specified your main class.
- Furthermore, to avoid the issue by making sure to check the main class in the properties, specifying it would help resolve the issue.

Memory/Cache SPACE ERROR:
- Sometimes due to out of memory space error, NetBeans is unable to load or find the main class
- RightClick on the project node and go to Set configuration
- Select the main class for your application
- Then clean and build
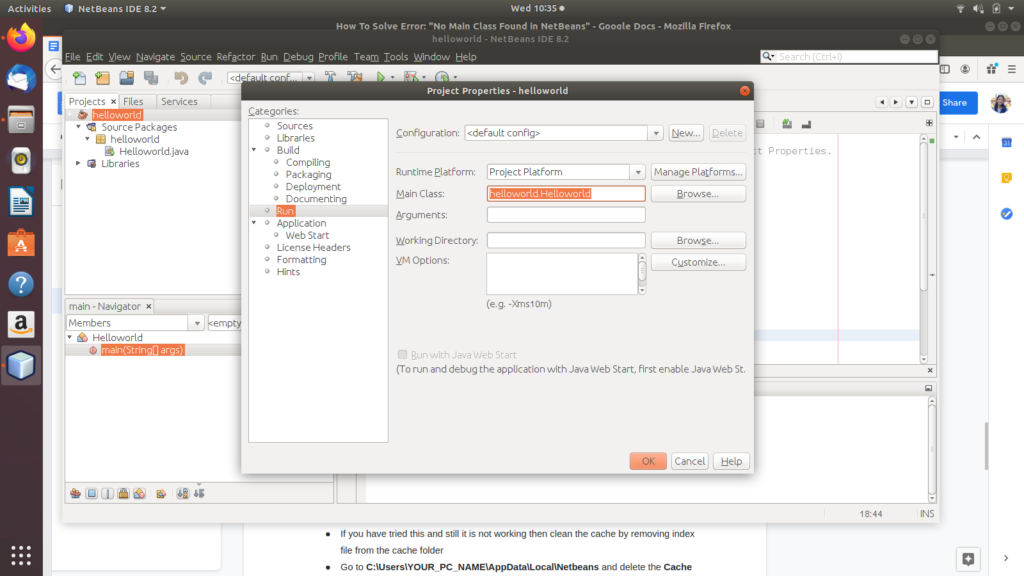
If you have tried this and still it is not working then:
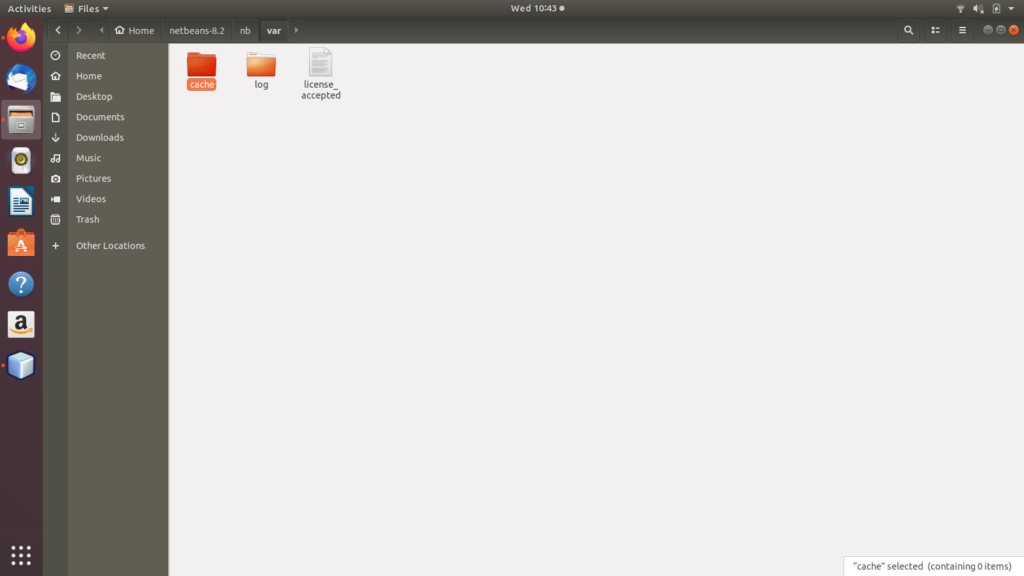
- Clean the cache by removing index file from the cache folder
Go to Home/NetBeans/nb/var/cache and delete the Cache folder. Then open the NetBeans IDE again and run the project
If things still don’t work, then try the following steps:
- Select the project from the project explorer
- Select Run from the Menu Bar
About the author
![]()
Zeeman Memon
Hi there! I’m a Software Engineer by degree, Blogger by skills who loves to write about tech, develop websites & do SEO. You can reach out to me on LinkedIn.
Источник
Основной класс не найден в NetBeans
Я работаю над заданием для своего класса по программированию. Я работаю с NetBeans. Я закончил свой проект, и он сработал отлично. Я получаю сообщение о том, что «основной класс не найден», когда я пытаюсь его запустить. Вот некоторые из кода с основным:
я опубликовал это раньше, но имел пару проблем. я исправил остальные, и теперь остался только этот. Любой совет будет очень признателен.
14 ответов
- щелкните правой кнопкой мыши на своем проекте в project explorer
- нажимаем на свойства
- нажмите на Run
- убедитесь, что ваш основной класс, который вы хотите быть точка входа. (Обязательно используйте полное имя, т. е. mypackage.Класса MyClass)
- нажмите OK.
- Запустить Проект 🙂
если вы просто хотите запустить файл, щелкните правой кнопкой мыши класс из проводника пакетов и выберите запустить файл или ( Alt + R , F ) или ( Shift + F6 )
кроме того, для других там с немного другой проблемой, где Netbeans не найдет класс, когда вы хотите, делая обзор из «диалогового окна основных классов».
возможно, ваш основной метод имеет правильную подпись. В моем случае я забыл аргументы.
пример: public static void main (String[] args)
модификаторы public и static могут быть написаны в любом порядке (public static или static public), но соглашение используйте public static, как показано выше.
Args: вы можете назвать аргумент как угодно, но большинство программистов выбирают «args» или «argv».
У меня была такая же проблема в Eclipse, поэтому, возможно, то, что я сделал, чтобы решить ее, может вам помочь. В свойствах проекта мне пришлось установить конфигурации запуска в файл, содержащий main-метод (я не знаю, почему он не был установлен в нужный файл автоматически).
в свойствах проекта на вкладке выполнить укажите основной класс. Кроме того, чтобы избежать этой проблемы, вам нужно проверить «создать основной класс» во время создания нового проекта. Указание основного класса в свойствах всегда должно работать, но если в некоторых редких случаях он не работает, то проблема может быть решена путем повторного создания проекта и не забудьте проверить «создать основной класс», если он не установлен.
при создании нового приложения project — Maven-Java в Netbeans IDE не распознает основной класс при входе в 1-й класс. (на шаге 8 ниже мы не видим классов).
когда сначала создается общий класс, а затем создается основной класс, Netbeans регистрирует основной класс, и приложение может быть запущено и отлажено.
шаги, которые сработали для меня:
- создать новый проект-Maven-Java приложение (проект создан:образом: mytest; пакет создан: com.меня.испытание)
- щелкните правой кнопкой мыши пакет: com.меня.тест
- New > Java Class > назвал его «все, что угодно» вы хотите
- щелкните правой кнопкой мыши пакет: com.меня.тест
- New > java Main Class > назвал его:’Main‘ (должно быть ‘Main‘)
- щелкните правой кнопкой мыши на Project образом: mytest
- клик о свойствах
- нажмите «Выполнить» > рядом с текстовым полем «основной класс»: > обзор
- вы должны увидеть: com.меня.тест.Главная
- выберите его и нажмите «Выбрать основной класс»
надеюсь, что это работает для других.
если все это ваш код, вы забыли закрыть основной метод
все остальное звучит хорошо для меня
если Совет по добавлению закрывающих скобок работает, я предлагаю добавить отступ в ваш код, чтобы каждая закрывающая скобка находилась на расстоянии отдельно, т. е.:
Это просто помогает читабельности.
Если, с другой стороны, вы просто забыли скопировать закрывающие фигурные скобки в своем коде, или вышеупомянутое предложение не работает: откройте конфигурацию и посмотрите, можете ли вы вручную установить основной класс. Боюсь, я не часто использовал NetBeans, поэтому я не могу помочь вам с тем, где это вариант. Мое лучшее предположение находится в разделе «Конфигурация запуска» или что-то в этом роде.
Edit: посмотреть peeskillet это если закрывающих скобок не работает.
в этой ситуации может быть пара вещей, идущих не так (предполагая, что у вас был код после вашего примера, а не просто оставил свой код без маркировки).
во-первых, если вы используете весь проект, а не только текущий файл, убедитесь, что ваш проект является основным проектом, а основной класс проекта установлен в правильный файл.
в противном случае, я видел одноклассников с их кодом в порядке, но у них все еще была эта же проблема. Иногда, в Netbeans простое исправление:
- скопируйте текущий код (или создайте резервную копию в другом месте)
- удалить текущий файл
- создайте новый основной класс в своем проекте (вы можете назвать его старым)
- вставить код обратно в
Если это не работает, попробуйте очистить кэш Netbeans, а если все остальное не удается, просто выполните чистую установку и повторную установку Netbeans.
Источник


