- Fix: No Wifi Networks Found in Windows 10
- Reasons why your available Wi-Fi network is not visible in your Wi-Fi list
- Method 1: Update Wi-Fi adapter drivers
- Method 2: Rollback Wi-Fi adapter drivers
- Method 3: Uninstall your current Wi-Fi adapters and restart your PC
- Step 1: Uninstall drivers
- Step 2: Option 1
- Step 2: Option 2
- Step 2: Option 3
- Method 4: Disable conflicting Wi-Fi network adapters
- Method 5: Change the adapter region
- Windows 10 «No Wi-Fi networks found»
- Replies (1)
- FIX: No Wi-Fi network found on Windows 10 (8 solutions)
- What can I do if Windows 10 can’t find any Wi-Fi networks or adapters?
- Run initial checkups
- Roll back the Wi-Fi adapter driver
- Reinstall the corrupt Wi-Fi adapter driver
- Correctly update your Wi-Fi adapter driver
- DriverFix
- Run the network adapter troubleshooter
Fix: No Wifi Networks Found in Windows 10
Most laptops come with a Wi-Fi (WLAN) card. You can also get a USB Wi-Fi dongle other than an extension card for your standalone PC. The general idea is that your computer is able to scan for available Wi-Fi networks that are within range and list them in the available networks or connect to them if set to do so.
One of the many problems being faced by those who choose to upgrade to Windows 10 is related to Wi-Fi which seems to be broken after the upgrade. Several users have reported that they wireless networks do not show up despite being available on other devices. Other than the PC not being able to identify any wireless network, some users might be able to connect to previous networks, but no new networks are available for connection. Others say that the PC indicates that Wi-Fi networks are available but nothing shows up on the list.
Reasons why your available Wi-Fi network is not visible in your Wi-Fi list
Usually, this issue is related to the WLAN network card drivers. Either the drivers are not compatible, or they are corrupt. Updating to Windows 10 from previous Windows versions e.g. Windows 7, 8 or 8.1 will almost certainly cause a driver incompatibility issue. Drivers from previous Windows versions are not always compatible with the next version of Windows. In both cases of incompatible or corrupt drivers, your WLAN network card is not able to communicate properly with your PC; therefore your PC is unable to identify wireless networks.
Wi-Fi adapters also have a region setting. The primary reason for the this setting is that various world regions have allocated different amounts of frequency space around 2.4GHz for Wi-Fi and so some of them have fewer (or more) channels available than others. The region setting ensures that your router will only let you use the Wi-Fi channels valid in your location and won’t scan beyond those channels. If your Wi-Fi network is on one of the forbidden channels, then it won’t be available. This usually happens to routers transmitting on channel 13.
To resolve this issue we are going to try a few methods that are aimed at getting the correct drivers and channel frequency for your Wi-Fi adapters. However you must first make sure that you are within the radio signal range of your Wi-Fi device and that the network is not hidden. For a good measure, restart your router to ensure that the problem is not originating from the router.
Method 1: Update Wi-Fi adapter drivers
If your problem appeared as soon as you had installed Windows 10, then probably the current drivers are not compatible with Windows 10. You will need to update your drivers. Here is how to do it:
- Press Windows Key + R to open run
- Type devmgmt.msc in the run textbox and hit enter to open the device manager window.
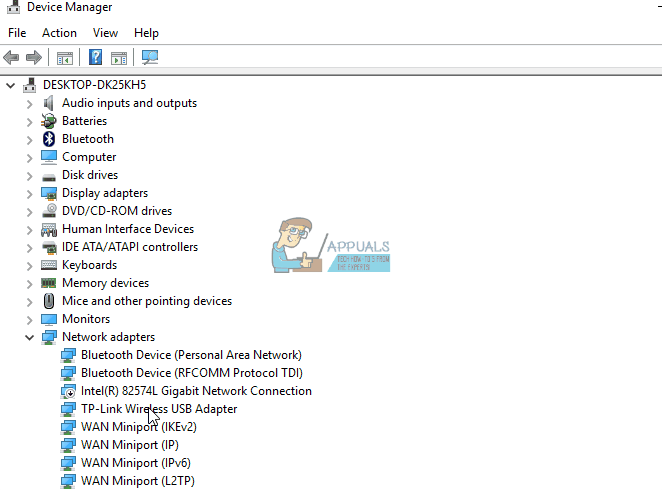
- In Device Manager, go to ‘Network adapters’ and expand that section. You will find the WLAN card drivers here. If you do not see your Wi-Fi network card here, it is probably not installed so you will find it in the ‘Others’ section with a yellow triangle beside it.
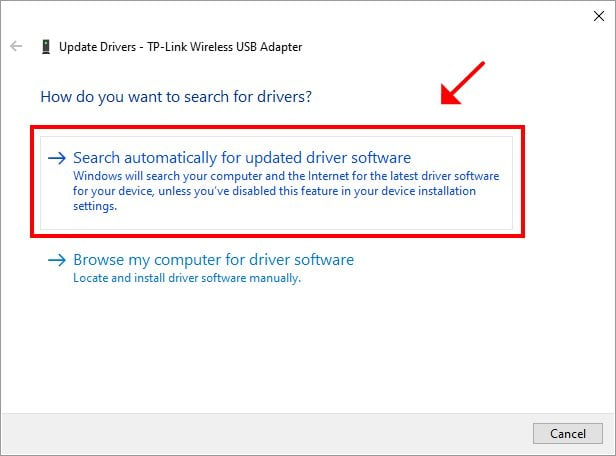
- Right click on the device and select, “Update Driver Software”
- Click on “Search automatically for updated driver software” to allow an automatic search. Connect to the internet via Ethernet for better results.
- Let the computer search for the drivers and install them.
You can also download the latest drivers from your manufacturer’s website.
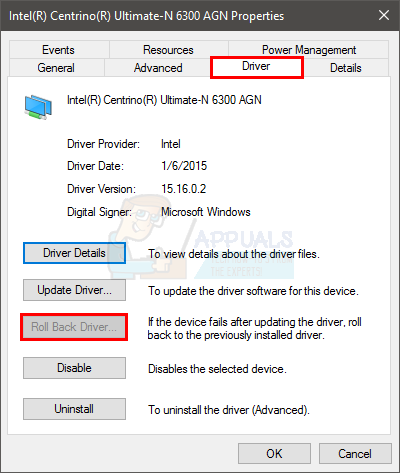
Method 2: Rollback Wi-Fi adapter drivers
If your previous drivers were working correctly before you updated them, you will need to roll back to the previous drivers.
- Press the Windows logo key + R to open the Run dialog box.
- Type devmgmt.msc in the Run dialog box, then press Enter to open the device manager
- In Device Manager, go to ‘Network adapters’ and expand that section. You will find the WLAN card drivers here. Right click on your WLAN card device and then click Roll back drivers or from Properties go to Driver and choose Rollback Driver.
- Allow the roll back. This will take you back to the previous drivers that functioned fully.
Method 3: Uninstall your current Wi-Fi adapters and restart your PC
This method will clear bad or corrupt drivers and reinstall the right drivers.
Step 1: Uninstall drivers
- Press the Windows logo key + R to open the Run dialog box.
- Type devmgmt.msc in the Run dialog box, then press Enter to open the device manager
- In Device Manager, go to ‘Network adapters’ and expand that section. You will find the WLAN card drivers here. Right click on your WLAN card device and then click Uninstall.
- Allow the uninstallation. This will clear the corrupt or incompatible drivers.
Step 2: Option 1
- Restart your PC. Restarting your PC is likely going to pick up the hardware changes and install the correct drivers the next time you PC boots.
Step 2: Option 2
- If restarting your PC doesn’t work, we will have to reinstall the correct drivers manually. To do this, click on ‘action’ on your device manager window and choose ‘Scan for hardware changes.’
- This will find the uninstalled driver and install it.
- If scanning for hardware changes doesn’t reinstall your device, we will have to find them manually. From the device manager window, click View and select show hidden devices (unless it already has a tick on the left). If you still don’t see your device, click on Action then select scan for hardware changes.
- Your Wi-Fi adapter device is likely to be listed under ‘Other Devices’ (usually lists uninstalled devices) with a yellow triangle on it.
- Right click on the device and select, “Update Driver Software”
- Click on “Search automatically for updated driver software” to allow an automatic search
- Let the computer search for the drivers and install them.
- Restart your PC
Step 2: Option 3
- You can run the hardware troubleshooter to install your Wi-Fi device drivers. Press the Windows logo key + R to open the Run dialog box.
- Type control in the Run dialog box, then press Enter.
- In the Search box in Control Panel, type troubleshooter, and then click Troubleshooting.
- Under the Hardware and Sound item, click Configure a device. If you are prompted to enter an administrator password or provide confirmation, type the password or provide confirmation.
- Press Next and let the troubleshooter scan for problems. Fix all emerging problems. This will install the missing Wi-Fi adapter drivers.
- You may have to restart your PC.
Method 4: Disable conflicting Wi-Fi network adapters
If the first Network adaptor driver fails to properly install, Windows will not start the WLAN service and even though the subsequent Wireless network adaptor drivers install and go through fine, the available networks are not visible to the system. Check if there is any failed Wireless network adaptor and disable it in order to avoid conflict with the actual drivers. Follow the steps below:
- Press Windows Key + R to open run
- Type devmgmt.msc and hit enter to open the device manager
- Go to the ‘Network adapters’ section and check if there are any unknown devices or network controller with a yellow exclamation. Also check in the ‘Other devices’ section that hosts unidentified/unknown devices.
- Right click and select properties.
- Select driver tab and hit disable.
- Apply changes.
- Back to Device manager and expand Network Adaptors.
- Right click on the wireless driver and select uninstall.
- Apply changes and hit OK.
- Restart the computer which will load the generic drivers for your Wi-FI devices.
Method 5: Change the adapter region
Your Wi-Fi adapter region setting must match that of your Wi-Fi router otherwise your computer won’t be able to find your network. To change the region:
- Press Windows key + R to open Run
- Type devmgmt.msc and hit enter to open device manager
- Go to ‘Network Adapters’ section and expand it
- Right click on your Wi-Fi adapter and select properties
- Go to the advanced tab and find the ‘Country and Region’ property. Set the value according to your region or according to the channels e.g. (1-11 or 1-13). Try a different combination, some wifi routers do not support 5 GHz.
- Not all Wi-Fi adapters have this property. For some, you can find it in the ‘Channels Number’ property or its equivalent.

You can also change your Wi-Fi router channels from it WLAN advanced settings to match your adapter settings.
Windows 10 «No Wi-Fi networks found»
Replies (1)
![]()
Thank you for posting your query on Microsoft Community.
We regret the inconvenience caused to you. Let me assist you.
Provide us with the below details for better clarity on the issue.
1. Are you able to connect to internet on plugging in the Ethernet cable?
2. What is the make and model of the computer?
If you are able to connect to internet using the Ethernet cable, try install all pending updates on the system and check if the issue is resolved. If the issue persists, you may try running the Network troubleshooter that will automatically fix some common issues with the network.
Open the Network troubleshooter by following these steps:
a) Press Windows key + X and click on Control Panel.
b) Click on Troubleshooting and click on View All.
c) Click on “Network Adapter” troubleshooter to fix problems with Network Adapter.
d) Follow the on-screen directions to run this troubleshooter and restart the computer to check if this helps.
Further, you may reset the Winsock settings and check if this helps:
a) Run CMD as administrator.
b) In the command line type: “netsh winsock reset”.
c) Press Enter then restart your PC to check if this helps.
You may also refer the below article.
Hope this information is helpful. Please do let us know if you need further assistance, we’ll be glad to assist you.
FIX: No Wi-Fi network found on Windows 10 (8 solutions)

- If you can’t get online through Wi-Fi because Windows 10 can’t find any Wi-Fi adapters, run some initial checkups to determine the root of the problem. It’s usually due to faulty router or computer settings.
- Use this long but easy step-by-step guide to fix Wi-Fi connectivity issues and restore Internet access on your PC, laptop, or tablet. Start by checking your Wi-Fi drivers.
- Join our Wi-Fi Troubleshooting Hub to repair additional wireless problems.
- Discover more Internet and Network Solutions for your computer.

- Download Restoro PC Repair Tool that comes with Patented Technologies (patent available here).
- Click Start Scan to find Windows issues that could be causing PC problems.
- Click Repair All to fix issues affecting your computer’s security and performance
- Restoro has been downloaded by 0 readers this month.
If you’re trying to connect to the Internet on your Windows 10 PC but can’t find any available Wi-Fi networks, we’re here to help.
Even if you were previously able to join a wireless network connection but can’t anymore, it’s likely an issue that you can easily resolve at the software level to regain Internet access.
So, before looking to buy a new Wi-Fi adapter for your Windows desktop, laptop or tablet, follow the intuitive troubleshooting guide below.
It doesn’t matter if you’re running Windows 10 on an HP, Lenovo, Asus, or other computer brand since these solutions are universal.
Before proceeding, we suggest using a second device to read these instructions. It should be connected to the Internet, just in case you temporarily lose web access on your primary Windows 10 computer.
What can I do if Windows 10 can’t find any Wi-Fi networks or adapters?
Run initial checkups
Before taking a hands-on approach, it’s essential to identify the root of your missing Wi-Fi network.
Here’s what you need to do:
- Temporarily switch from Wi-Fi to Ethernet (wired) mode to see if you have any Internet access. If you don’t, contact your ISP.
- Try to connect to Wi-Fi by using another device in your household, like a smartphone. It doesn’t matter if it runs Windows 10 or another operating system.
- Move closer to the router. If you have a dual-band router with 5GHz and 2.4GHz networks, try to connect to the 2.4GHz network since it’s made for long-range connections.
- If you have a switch or a button on your laptop that toggles wireless mode, turn it on.
- If you have an external Wi-Fi adapter, make sure it’s plugged into your computer unit. Try using a different USB port in case a specific port is faulty.
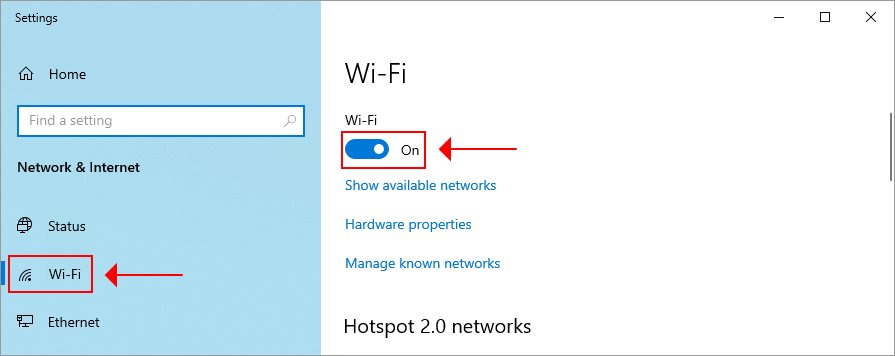
- Check if Windows 10 has Wi-Fi turned on

- Right-click the Start button and select Network Connections
- Click Wi-Fi
- Set Wi-Fi to On
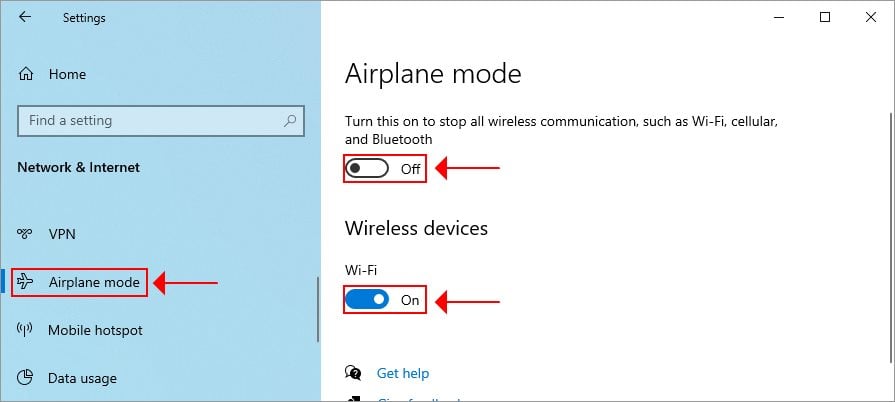
- Disable Airplane mode on your tablet or notebook
- Go to Network Connections
- Click Airplane mode
- Set Airplane mode to Off
- Set Wi-Fi to On
- Reboot your router
- Press and hold the power button
- Wait for at least 30 seconds
- Press the power button again to turn it back on
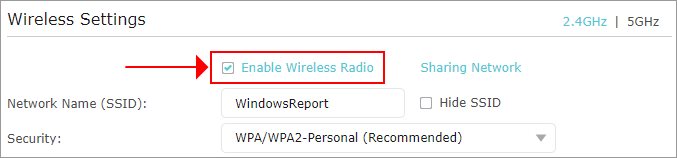
- Access your router admin panel and check if wireless radio is enabled
Roll back the Wi-Fi adapter driver
If you recently updated your network driver the manual way, you might have accidentally installed the wrong version, which is not compatible with your Windows 10 device.
However, if your computer created a backup of the previous network driver, you can restore it using Device Manager.
Here’s what you need to do:

- Right-click the Windows 10 Start button and select Device Manager
- Expand the Network adapters menu
- Right-click your Wi-Fi adapter and go to Properties
- Select the Driver tab
- Click Roll Back Driver* and follow the on-screen instructions
*If the Roll Back Driver button is greyed out, it means that you don’t have a backup of the previous network driver. So, you can skip this step.
Reinstall the corrupt Wi-Fi adapter driver
If your Wi-Fi network driver isn’t compatible with the adapter, you have to get rid of it and allow Windows 10 to automatically install the correct version for your computer.
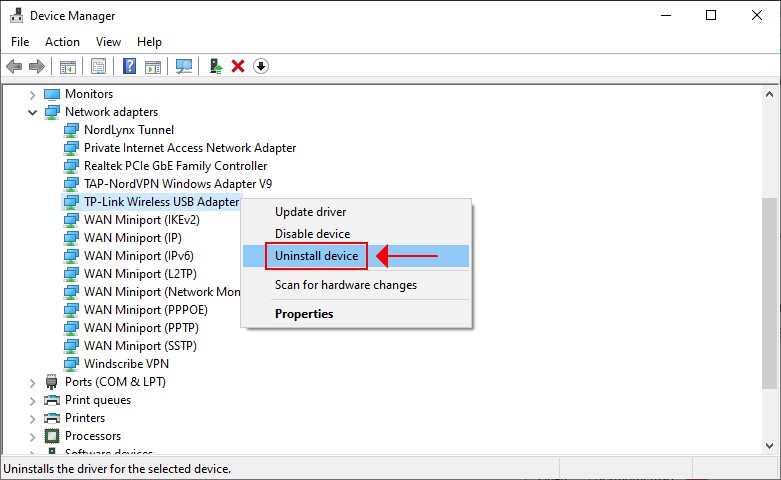
- Go to Device Manager and expand the Network adapters menu
- Right-click your Wi-Fi adapter and select Uninstall device
- Click Uninstall to confirm
- Open the Action menu and select Scan for hardware changes
- Restart your computer
Correctly update your Wi-Fi adapter driver
It’s generally a good idea to update all your drivers to the latest version, in order to avoid device functionality issues.
And that certainly applies to your Wi-Fi interface, too. Try this:
- Head over to Device Manager and extend the Network adapters menu
- Right-click your Wi-Fi adapter and select Update driver
- Click Search automatically for updated driver software
- Follow the on-screen instructions
Normally, this should work. But most users receive The best driver software is already installed error instead, even though newer driver versions are available for download.
If you’re experienced enough to handle this problem on your own, then visit your manufacturer’s website and download the correct Wi-Fi card version. It must be compatible with your Windows 10 PC.
Once downloaded, return to Device Manager, select the Browse my computer for driver software instead of Search automatically for updated driver software, and follow the instructions.
However, if you’re not skilled enough, you risk deactivating all Internet access on your computer. For rookies, we recommend using an automatic driver updating tool, such as DriverFix.
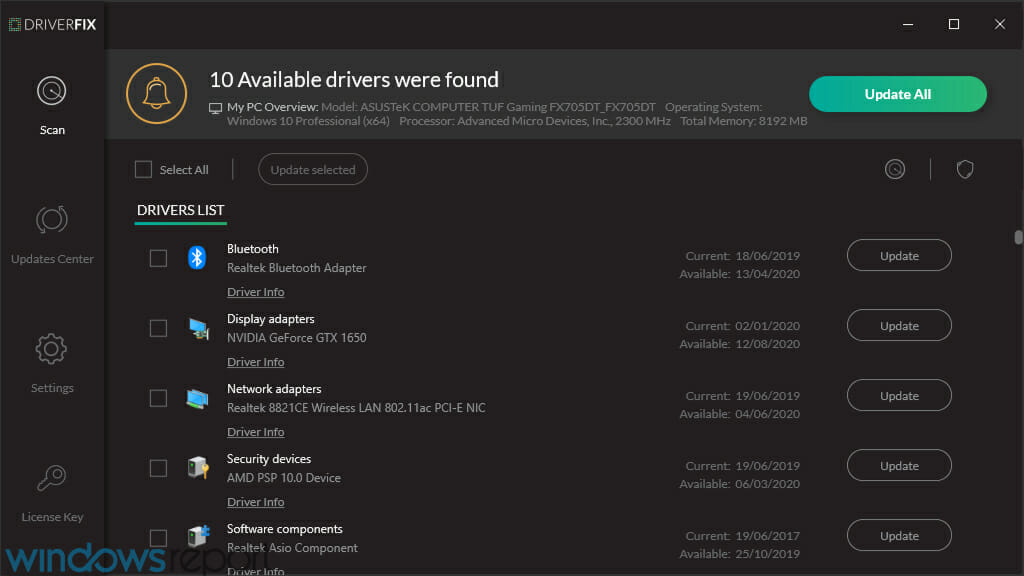
Wrapped in a super-intuitive interface, DriverFix automatically detects all obsolete drivers on your system, not just the network drivers.
It also finds the newer, compatible versions on the web, without asking for your intervention. You just have to select which driver to update (or all).

DriverFix
Run the network adapter troubleshooter
Windows 10 has an integrated troubleshooting tool designed to automatically identify and resolve network connectivity problems on your device.
You can’t rely on it to detect elaborate issues, but it’s free and already comes with your operating system, so it can’t hurt to give it a shot.

- Press the Win key, type troubleshoot, and select Troubleshoot settings
- Scroll down and select Network Adapter
- Click Run the troubleshooter
- Select your Wi-Fi adapter and click Next
- Apply any fixes recommended by Microsoft


