- Resize NTFS Partition With Three Ways without Losing Data
- Introduction NTFS
- How to resize NTFS partition in Windows 10, 8, 7?
- Method 1: Resize NTFS Partition with Disk Management Utility
- Method 2: Resize NTFS Partition with DiskPart.exe Utility
- Method 3: AOMEI Partition Assistant Helps Resize NTFS Partition Safely
- Summary on Resizing NTFS Partition
- How to resize a partition with the Windows 7 Home 64-bit Disk Management utility?
- Resize Windows 10 System Partition
- Replies (6)
Resize NTFS Partition With Three Ways without Losing Data
This article introduces three ways to resize NTFS partition, and the most convenient way is using AOMEI Partition Assistant, this partition magic tool could easily resize NTFS partition without losing data.

By AOMEI  / Last Updated April 8, 2021
Introduction NTFS
NTFS (New Technology File System) is the standard file system applied by the Windows NT operating system, including its advanced versions — Windows 2000, Windows XP, Windows Server 2003, Windows Server 2008, Windows Vista, Windows 7, Windows 8, and Windows 10. NTFS is superior to the FAT file system in performance, extendibility, and reliability; therefore, NTFS is well received as the top choice of file system for Microsoft’s Windows operating systems.
How to resize NTFS partition in Windows 10, 8, 7?
Method 1: Resize NTFS Partition with Disk Management Utility
In Windows Vista or later versions like Windows 7, Windows 8, Windows 10 and Windows Server 2008, it’s easy to resize NTFS partition by built-in Disk Management utility; here introduce the procedure in detail, we set Windows Vista as an example:
1. Right click on «My Computer» and select «Management», In the Computer Management then click «disk management». Disk Management shows the detail condition of all available partitions and disk drives. There is the C: and D: and free space on the Disk 0. look at this screen:
2. Right click on any partition that you wish to resize, and select either Extend (to enlarge the size) or Shrink (to reduce the size) according to your requirements.
Note: because there is an unallocated space near by the D: drive, so the «Extend Volume…» option in the right-shortcut menu is available.
3. Select the «Shrink Volume…» and will open the following windows, you can input the amount of space to shrink, remember that cannot exceed the size of available shrink space. (Attention: system partition just supports to shrink partition to one half at most.)
Please click the «Shrink» button to execute the operation. Windows Vista will reduce the size of the partition online immediately.
4. Right-click the C: partition, in the shortcut menu the Extend Volume is grayed out as following show. The main reason is that there is no unallocated space next to the C: partition, so you have to use other software like AOMEI Partition Assistant Standard, the helpful Windows partition manager to change the location of unallocated space and extend the C: partition.
Method 2: Resize NTFS Partition with DiskPart.exe Utility
You can use Diskpart.exe utility to manage disk partition in a command line (CMD). For a NTFS partition or volume, it can extend by incorporating unallocated space into an existing NTFS volume with preserving the data. Here you can start with the following steps for how to resize NTFS partition by the DiskPart.exe.:
Click Start and type «CMD», then press Enter.
In the command line prompt input: DISKPART.exe.
Type «help» to show its help information.
First, use «select» to choose a right partition that you prefer to.
Execute the «extend» command.
For more information about Diskpart.exe, read on: http://support.microsoft.com/kb/325590/
Note:
1. System partition can not be resized by Diskpart.exe command.
2. If there is no adjacent unallocated space behind the target partition, Diskpart.exe command also can not work like Windows Disk Mangement.
Method 3: AOMEI Partition Assistant Helps Resize NTFS Partition Safely
AOMEI Partition Assistant Standard can resize both NTFS and FAT32 partitions and ensure 100% data security at the same time. The operations can be realized through a few clicks and moves of the mouse. Here, we show you the procedure to extend NTFS system partition.
Step1. You need to download AOMEI Partition Assistant Standard and launch it. In main interface, it shows you local disk information. From the main interface, you see all partitions are NTFS partition.
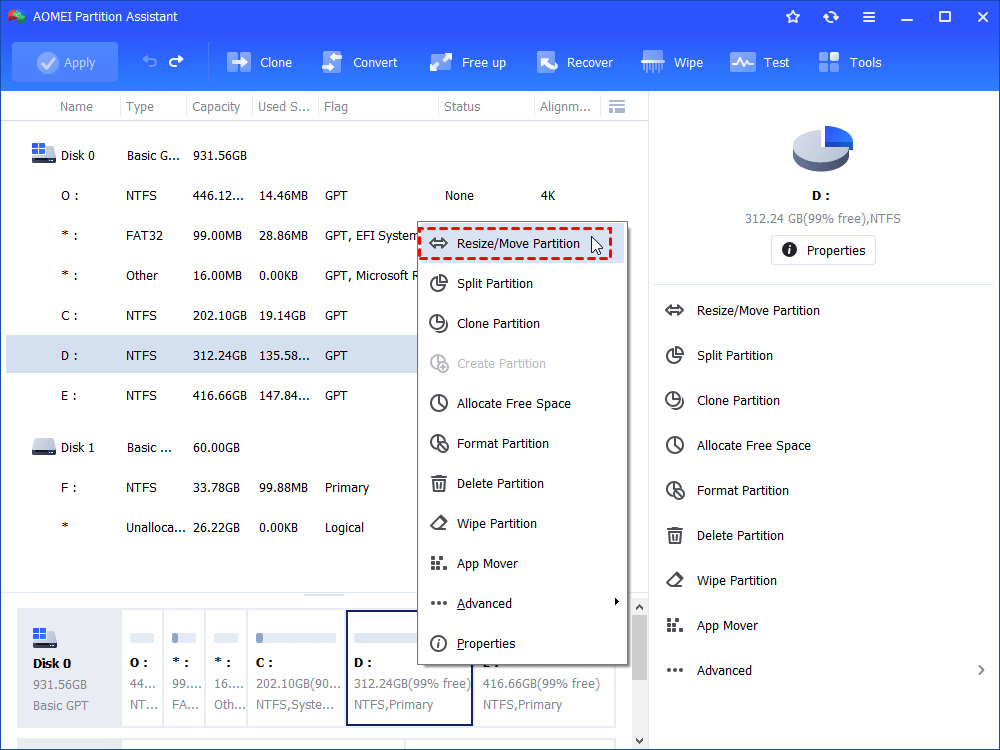
Step2. If you want to extend C: drive NTFS partition, there must be some unallocated space, therefore, right-click on D: NTFS partition and select «Resize Partition». Drag the left slider bar rightwards to free up unallocated space. Then click OK. You will see unallocated space behind C drive.
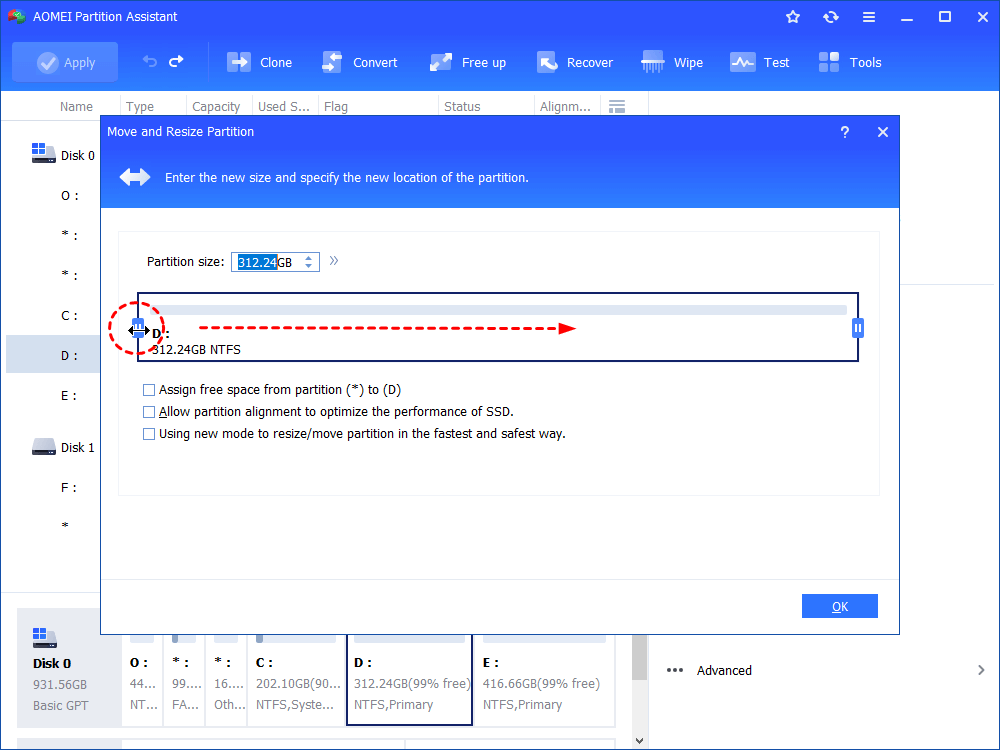
Step3. Right-click on C: NTFS partition and select «Resize Partition». Then drag the right slider bar rightwards to merge the unallocated space and click OK.

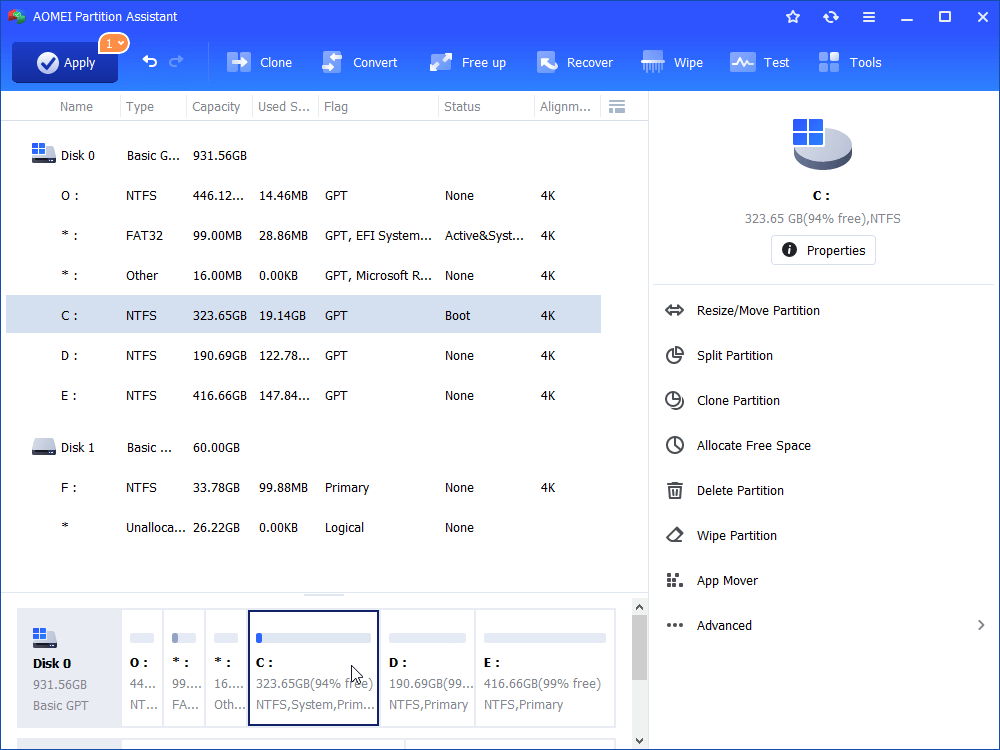
Step4. You will see C drive is 291.45GB (before the operation C drive is 51.86 GB). Then click Apply.
Summary on Resizing NTFS Partition
To sum up, the methods to resize NTFS partition with AOMEI Partition Assistant Standard, Windows Disk Management and DiskPart.exe command line, all show their clear special features. However, how many of our computer users are proficient with computer operations such as Windows Disk Management or DiskPart.exe command line? What’s more, if your system is Windows XP, 2000, 2003, disk management even never support to resize NTFS partition.
Well, if there is free software that can resize partition Windows 7, Windows 8 and Windows 10 simpler and more flexible than Windows built-in tool, why ignore it? It is unnecessary to waste your time and energy on unwanted works. No matter which windows editions you are using, Windows 2000, XP, Vista, Windows 7 or Windows 8, Windows 10 are all supported. If you are using Windows Server 2003 and 2008 or you want to perform more advanced operations, select an appropriate version of the Partition Assistant (such as AOMEI Partition Assistant Professional Edition and AOMEI Partition Assistant Server Edition). Furthermore, this software has many other features which can help you safely merge partitions, convert MBR to GPT, windows to go creator. Stop hesitating! Try now to resize NTFS partition.
How to resize a partition with the Windows 7 Home 64-bit Disk Management utility?
Tried to use the Disk Management utility., reading the list of previous AnwersMicrosoft threads i read from «How to geek» that someone quoted to a previous answer, i learned that the resizing of a partition is only possible with contiguous space.
Well, here is my problem: how do i create unallocated free space sontiguous to my OS partition when the sequence i now have is:
C drive -a 25GB partition NTFS- (which I had created just for the OS),
then a 100MB ‘Healthy’ (System, Active, Primary Partition),
then a 17GB ‘Unallocated’ space,
then D drive -a 102GB NTFS ‘Healthy’ (Priimary partition) and then . ano
then 5GB of’ ‘Unallocated’ Space
So if i do not have contiguous unallocated space to take from.to enlarge the OS partition in C drive (cause the 100Mb (reserved by the OS for itself is in between),. how do i solve this problem?
I did try using the Disk Management utility, followed the instructions.. shrunk the D partition and created the unallocated spaces, now they exist before and after the empty D drive, but the C partition which i want to enlarge is isolated and did not get the extra space (i wanted to make the partition 5 GB bigger like in 30GB.
Windows took less than 19 GB, so i figured i would use D partition to store all the other Software Programs, but it seems that ‘by default’ they all land inside the partition with the OS. Is this something i could avoid, cause i have not uploaded most of my Software yet cause the OS partition is nrunning out of space cause of this last fact. Can i change that? directing my downloads to the D partition drive?
Even if possible i would rather redirect the All other software to the D partition instead of making more room in the OS partition to accommodate the other Software.
It goes without saying that i am hoping that any possible solution would include the preservation of all existing software and data.
Hope this is clear enough to explain what is going on in here, wished I could have made it more summarized but I could not.
Resize Windows 10 System Partition
How can I Extend my Windows 10 system partition (C:60GB to 150GB)?
I have 1HDD 1TB with 2 partitions C: and D:
Replies (6)
![]()
Thank you for posting your query in Microsoft Community.
I understand your concern, and we in Community will try to help you in the best possible way we can.
I suggest you to follow the steps below and check if that helps.
- Run Disk Management. Open Run Command (Windows button +R) a dialog box will open and type «diskmgmt.msc«.
- In the Disk Management screen, just right-click on the partition that you want to shrink, and select “Extend Volume” from the menu
- Locate your system partition — that’s probably the C: partition. Right-click on it and select “Shrink Volume.” If you have multiple partitions on your hard drive, you could also choose to resize a different partition to free up space.
Hope the information helps. Please let us know if the issue persist and we will be happy to assist you further.
102 people found this reply helpful
Was this reply helpful?
Sorry this didn’t help.
Great! Thanks for your feedback.
How satisfied are you with this reply?
Thanks for your feedback, it helps us improve the site.
How satisfied are you with this reply?
Thanks for your feedback.
I have a new computer with a 512GB SSD drive that shipped with the following 7 partitions:
The first and last partition show as unallocated and do not even show up under the Windows Disk Management utility. See below for my Disk Management information: It only shows 4 partitions, not 7, for some reason unknown. This is confusing to me.
My goal is to merge partitions so I only have one primary C: volume that is accessed by default. Is it possible to merge all of the unallocated volumes as well as the Data D: drive into the OS (C:) volume?
And what is the 499 MB Recovery partition used for? It shows it as being empty. I can not extend the C: volume using Disk Management because I tested and I shrunk Volume D: it ends up creating unallocated volumes that cant be extended on to the C: volume.
I am afraid to use the third party Easus Partition master as it seems like it may create even more unallocated and unuseable volumes.
PLEASE HELP if ANYBODY HAS ANY INFORMATION!
12 people found this reply helpful
Was this reply helpful?
Sorry this didn’t help.
Great! Thanks for your feedback.
How satisfied are you with this reply?
Thanks for your feedback, it helps us improve the site.
How satisfied are you with this reply?
Thanks for your feedback.
This is no different than going through Administrative Tools. On my new Surface Book with 1TB SSD, the built-in ‘Shrink Volume’ option provides me with only 4322 MB of recoverable space. ****, this is my second MS computer (Surface Pro 3 was first) and that feature didn’t work either! Can’t Microsoft get something simple like this right?
What do I do now, just use a single partition? I normally like to keep my data separate from the system disk but you’re making it frustratingly impossible!
11 people found this reply helpful
Was this reply helpful?
Sorry this didn’t help.
Great! Thanks for your feedback.
How satisfied are you with this reply?
Thanks for your feedback, it helps us improve the site.
How satisfied are you with this reply?
Thanks for your feedback.
7 people found this reply helpful
Was this reply helpful?
Sorry this didn’t help.
Great! Thanks for your feedback.
How satisfied are you with this reply?
Thanks for your feedback, it helps us improve the site.
How satisfied are you with this reply?
Thanks for your feedback.
22 people found this reply helpful
Was this reply helpful?
Sorry this didn’t help.
Great! Thanks for your feedback.
How satisfied are you with this reply?
Thanks for your feedback, it helps us improve the site.
How satisfied are you with this reply?
Thanks for your feedback.
You can use the Disk Management tool to resize the partition on your C drive. To do this, follow these steps:
- Open Disk Management.
- On the lower part of the Disk Management window, right-click on Data (D:) and select Shrink Volume. from the options.
- In the field provided in the Shrink dialog box, enter the amount of space by which to shrink the disk and click Shrink.
Note: If you want to allocate 100 GB to drive C:, you need to put 100000 on the field provided.
This will create an Unallocated space as shown on the image below.
Click Finish.
Keep us updated with the results of the solution above.


