- Fix: Steam Game Won’t Launch Windows 10
- Repair Corrupt System Files
- Solution 1: Running games in compatibility mode
- Solution 2: Removing the ClientRegistry.blob
- Solution 3: Deleting the AppCache
- Solution 4: Correcting your time zone
- Solution 4: Opening Steam in Big Picture Mode
- Solution 5: Unplug Joystick
- Solution 4: Relocating the Steam client
- Solution 5: Reinstall Graphics Drivers
- Steam Game Won’t Launch On Windows 10? Here’s The Fix
- Verify Integrity Of Game Files On Steam
- Uninstall & Reinstall Game
- Run Older Games In Compatibility Mode & As Administrator
- Delete Steam App Cache
- Check System Requirements & Update GPU Drivers
Fix: Steam Game Won’t Launch Windows 10
Many users may face a problem of their Steam games not working on Windows 10. At the start, this was the problem because the games were not optimized to run on the new Windows. We will list the method on how to run the games in compatibility mode. However, if the problem still persists, it means that something else is either interfering with your Steam client or you have a file or two corrupted.
Repair Corrupt System Files
Download and run Restoro to scan for corrupt files from here, if files are found to be corrupt and missing repair them and then check the Game Launches, if not try the Solutions listed below.
Solution 1: Running games in compatibility mode
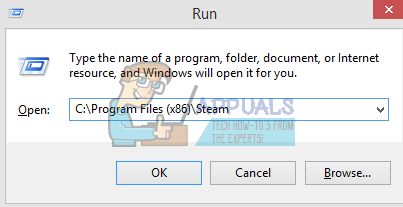
- Navigate to your Steam directory. The default location for your steam folder should be “C:\Program Files (x86)\Steam”.
Press ⊞ Win + R button. This should pop-up the Run application.
In the dialogue box write “C:\Program Files (x86)\Steam”.

Or if you installed Steam in another directory, you can browse to that directory and you can proceed with steps mentioned below.

- Find the folder named “SteamApps”. Open it.
- Click on the folder named “Common”; here you will find a list of a number of games which are installed in your PC.
- Choose the game you are trying to run and right click on it. Choose Properties.
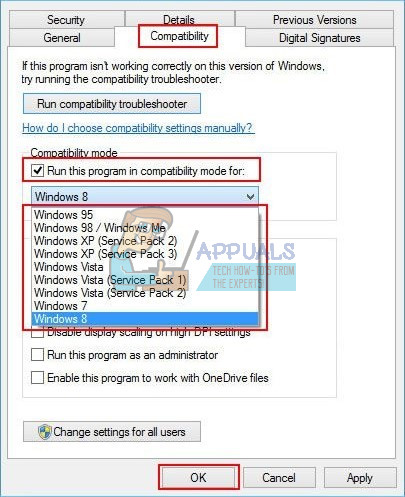
- Choose the “Compatibility” tab and check the box which says “Run this game in compatibility mode for: “.
- Also, check the “Run as Administrator” box.
- In the drop down box, select Windows 8. Apply the changes and save.
- Relaunch the Steam client and start the game you want to play.
Note: If this doesn’t work, do the exact opposite of this and refrain both the steam and the game from running in compatibility mode and check to see if that works.
Solution 2: Removing the ClientRegistry.blob
It is possible that your Steam file named “ClientRegistry.blob” may get corrupted or damaged. This can cause Steam to crash again and again or may lead to games being not able to play. If you see a dialogue box saying “Launching game”, and it is stuck there for an indefinite period of time, it means that the instant Steam tries to launch the game, it crashes. This becomes a loop until you manually cancel the launching process. Below are the steps mentioned to delete the file “ClientRegistry.blob”.
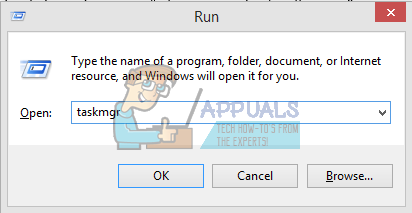
- Launch your Task Manager by pressing ⊞ Win + R button. This should pop-up the Run application.
In the dialogue box write “taskmgr”. This should open up the task manager. End all the Steam related tasks starting from “Steam Client Bootstrapper”.
- The default location for your steam folder should be “C:\Program Files (x86)\Steam”.
Press ⊞ Win + R button. This should pop-up the Run application.
In the dialogue box write “C:\Program Files (x86)\Steam”.
Or if you installed Steam in another directory, you can browse to that directory and you can proceed with steps mentioned below.

- Locate ‘ClientRegistry.blob’.

- Rename the file to ‘ClientRegistryold.blob’.
- Restart Steam and allow the file to be recreated.

Hopefully, your Client will run as expected. If it still doesn’t work, follow the steps listed below.
- Browse back to your Steam directory.
- Locate ‘Steamerrorreporter.exe’’.
- Run the application and relaunch Steam.

Solution 3: Deleting the AppCache
AppCache may contain unwanted/corrupt files which may be preventing your Steam to launch properly. We can delete it after closing all the Steam processes and relaunch Steam. It will download some required files and get rolling like it should.
- Navigate to your Steam directory. The default location for your steam folder should be “C:\Program Files (x86)\Steam”.
Press ⊞ Win + R button. This should pop-up the Run application.
In the dialogue box write “C:\Program Files (x86)\Steam”.

Or if you installed Steam in another directory, you can browse to that directory and you can proceed with steps mentioned below.

- Here on the top, you will find a folder named “appcache”. Delete it after making a copy of it in your Desktop.
- Relaunch Steam using the launcher. It is advised that you use “Run as administrator”. Hopefully, Steam will launch start downloading the missing files.

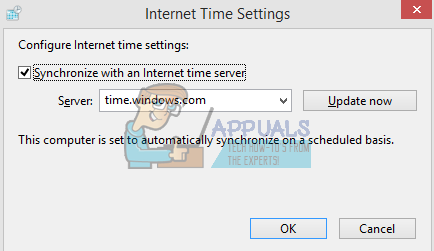
Solution 4: Correcting your time zone
Sometimes after upgrading to Windows 10, your time zone doesn’t match accordingly. This tampers with Steam because it is designed to collect real-time data from your PC accordingly with the time. Below are the steps mentioned to correct your time zone.
- Click Windows button and type “Control Panel”. From the search results, open the Control Panel.
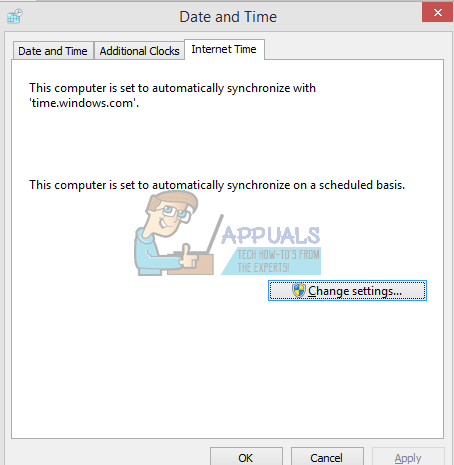
- From the list of categories, choose “Date and time”.
- From the three tabs, choose “Internet Time” and click on “Change Settings”.
- Check the dialogue box which says “Synchronize with Internet time server”. Click on Update now. Click on OK after the time is updated successfully and restart Steam.

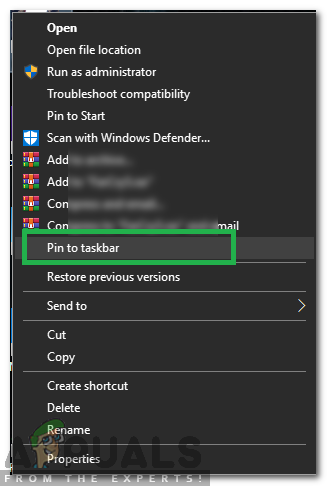
Solution 4: Opening Steam in Big Picture Mode
In some cases, many glitches/bugs are fixed by opening steam in the “Big Picture Mode” therefore, in this step, we will be opening steam in big picture mode. For that:
- Right–click on the “Steam.exe” icon on the desktop
Note: If you don’t have a steam shortcut on the desktop, you can find the “Steam.exe” in the installation directory. - Select the “Pinto Taskbar” option from the list. Selecting the “Pin to Taskbar” option
- Right–click on the “Steam” icon in the taskbar and select “OpeninBigPictureMode“.
- Signin to your account and press “Alt” + “Enter” to access steam in big picture mode.
- Open the Games and check to see if the issue persists.
 Selecting the “Pin to Taskbar” option
Solution 5: Unplug Joystick
Quite weirdly, sometimes steam doesn’t open games when a Joystick has been plugged in. Therefore, it is recommended to unplug any Joystick that has been installed on the computer and check to see if the issue persists.
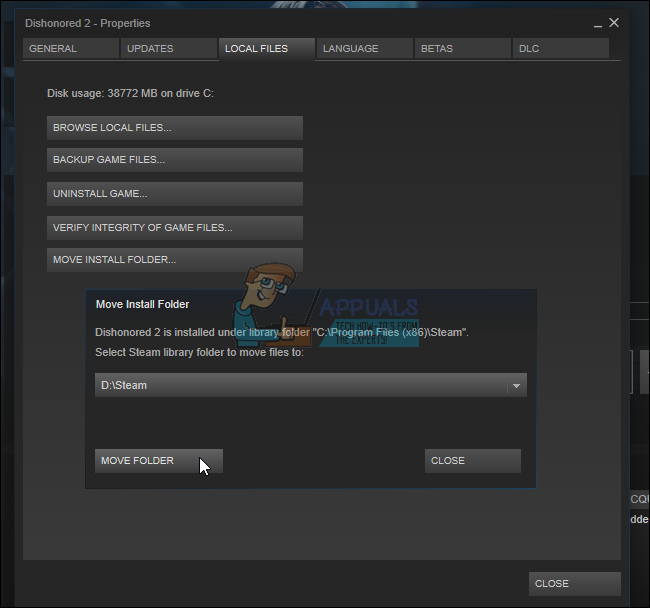
Solution 4: Relocating the Steam client
If the simpler methods didn’t work for you, we have to relocate Steam Installation and Game files. This method is broken down into two parts. In the first part, we try to relocate Steam and hope that it will launch and run as expected. If during the launch, an error occurs, we have to reinstall Steam. The entire process is listed below. Please note that any interruption during the copying process may corrupt the files hence you would have to resort to reinstalling the client again.
- Navigate to your Steam client and click settings.
- Select ‘Downloads’ and click on ‘Steam Library Folders’.
- Click on ‘Add Library Folder’ and select a new path where you want Steam to be located.
- This will define a future path for all the installations to take place. Now we will move to moving existing Steam files to the path you selected.
- Exit the Steam client.
- Navigate to your current Steam directory (default is: C: \Program Files \Steam).
- Delete all the files and folders except SteamApps and UserData folders. Also, don’t delete exe.
- Cut all the folders and paste them to the new directory you decided above.
- Launch Steam and re-login.
Solution 5: Reinstall Graphics Drivers
In some cases, the issue can be fixed by simply reinstalling the Graphics Driver from the device manager. This can help get rid of some outdated configurations and settings by resetting the installation of the driver. You can use DDU to completely uninstall Nvidia Drivers and use AMD utility to remove AMD drivers. After uninstalling, download the latest driver from the manufacturer’s website and install it on your computer. After that, check to see if the issue persists.
If you encounter any problems while moving the steam folder or after launching it, follow the steps listed below.
- Close your Steam.
- Browse to the location where you relocated Steam.
- Relocate the ‘SteamApps’ folder from that directory to your desktop.
- Uninstall Steam (this is done to remove your old Steam settings from your PC).
- Install Steam again to the initial location that you selected.
- Move the SteamApps folder in the new Steam directory. This will copy all of your game content, your saved games, and settings.
- Launch Steam and enter your credentials.
- Verify the integrity of Steam game files and you will be able to play.
- Try to roll back your drivers.
Steam Game Won’t Launch On Windows 10? Here’s The Fix
Will your game on Steam not launch on your Windows 10 system? Here are all the easiest fixes that you can try — one of them is bound to fix it!

Are you stuck with a Steam game that won’t launch? Don’t sweat, we’ve got you covered.
Table of Contents Show
Verify Integrity Of Game Files On Steam
Game files can occasionally fall foul to errors caused by an issue during downloads or updates that restrict the game from launching.
Fortunately, Steam has an inbuilt feature designed to remedy this very problem and verify the integrity of game files. Here’s how to put Steam to work fixing corrupted game files.
- Open up Steam.
- Click on the ”Library” option running horizontally near the top of the Steam window.
- Right-click on the game that is causing problems, then click on ”Properties” at the bottom of the drop-down menu that appears.
- In the game properties window, click on the ”Local Files” tab among the options at the top.

- Click on ”Verify Integrity of Game Files”. Steam will verify the files associated with the game for any issues caused by a bugged download or update. A percentage based progress bar will indicate how the process is going.

- If Steam picks up any issues, it will rectify them.
- When finished, an ”All files successfully validated” message will appear on the screen.
- Try launching the game to see if this resolves the issue.
Uninstall & Reinstall Game
If the above fails, the problem might be more deep-seated and requires an uninstall followed by a fresh install. Here’s how to proceed.
- Load up Steam and click on ‘’Library’’ as above.
- Right-click on the game and choose ‘’Properties’’ from the drop-down menu.
- Click the ‘’Local Files’’ tab.

- Select ‘’Uninstall Game’’.
- When finished, click on the game and select ‘’Install’’.

- Launch the game.
Run Older Games In Compatibility Mode & As Administrator
Some older games are unfortunately not compatible with Windows 10 and as such Steam needs a helping hand to get the games to launch. Enter Compatibility mode, which tricks Windows into starting a game as if it was an older version of the OS.
- Open Steam and select ”Library”.
- Right-click on the game and click on ”Properties” from the drop-down menu.
- Select the ”Local Files” tab. Click on ”Browse local files”.
- In the Windows Explorer window that pops up, find the .exe file for the game (format – title.exe) and right-click on it.
- Choose ”Properties” from the menu.
- Click on the ”Compatibility” tab.

- Tick the ”Run this program in compatibility mode for:” option then select a different version of Windows. Start with Windows 8 and make your way back until the game launches.
- Tick the ”Run this program as an administrator’’ option below.
- Hit ”Apply”, then ”OK”. Launch Steam and then the game.
Delete Steam App Cache
- Close Steam.
- Right-click on the Windows Start menu and select ‘’Run’’.

- In the search field, type the location of the Steam directory, usually ‘’C:Program Files (x86)Steam’’, and hit ‘’Run’’.
- Find the ”appcache” folder (usually the first if displayed alphabetically), right-click and select ”Delete”.

- Launch Steam and let the client download the required files, then launch the game.
Check System Requirements & Update GPU Drivers
The game in question may be too demanding for your current hardware. Visit the developer’s website and ensure the minimum requirements match up with your PC. If the specs are lower than what’s needed, chances are this is what is preventing the game from launching.
Similarly, outdated GPU and DirectX drivers can prevent games from launching. To update your GPU drivers, visit the manufacturer’s support page and search for the latest version for your specific graphics card.
As for DirectX, Windows update automatically downloads the newest version to ensure the machine is up to date with the latest updates from Microsoft.
- Right-click the Windows Start menu and select ”Search”.

- Type ”Update” into the search field and click on the ”Check for updates” result.
- With the Updates window open, click on the grey ”Check for updates” button.

- Install any missing updates and restart your PC.
- To end, launch Steam and then the game.


