- WiFi does not work after installing Windows 10 Update or Feature Upgrade
- No WiFi after Windows 10 Update
- 1] Check Router setting
- 2] Reset your Wi-Fi router
- 3] Disable VPN software
- 4] Disable the Firewall software
- 5] Ensure that Airplane mode is Off
- 6] Check networking protocols
- Top 2 Ways to Fix No Wi-Fi Available after Windows 10 Update Issue
- Windows 10 Wi-Fi Problem: No Wireless Internet Connection and No Wi-Fi after Windows 10 Update
- Why Wi-Fi Is Not Available after Windows 10 Update
- Top 2 Solutions to Fix Windows 10 Wi-Fi Not Available Issue
- Way 1. Update Wi-Fi Adapter Drivers on Windows 10
- Way 2. Enter Command to Fix No Wi-Fi after Windows 10 Update
- Bonus Tip: Optimize Wireless Adapter Settings for Best Wi-Fi Performance
- Updated: Other Workarounds for No Wi-Fi Available after Windows 10 Update
WiFi does not work after installing Windows 10 Update or Feature Upgrade
If you have no WiFi after upgrading to Windows 10, installing Windows Update or installing a Feature Update, or if WiFi gets disconnected randomly, then this post will show you how to try and fix the problem.
No WiFi after Windows 10 Update
After you install Windows Updates or a Feature Upgrade, you may find that no wireless networks are available. Wired Ethernet connections may also not function properly if you are using a built-in Ethernet adapter or a USB Ethernet adapter. This could occur due to the presence of unsupported VPN software.
If there is No WiFi after Windows 10 Update, here are a few things you could try:
- Check Router setting
- Reset your Wi-Fi router
- Disable VPN software
- Disable Firewall software
- Ensure that Airplane mode is Off
- Check networking protocols
- Update WiFi driver
- Use Network Reset feature.
1] Check Router setting
If you do not see the Wi-Fi network’s name at home, first ensure that your router is set to broadcast the network’s name.
2] Reset your Wi-Fi router
Restart your computer. Reset your Wi-Fi router and see if that works.
3] Disable VPN software
Next check if you have any VPN software installed on your computer. If it does not support Windows 10, then uninstall it and see if it resolves the issue. If it does, then visit the software vendors website and download the version which supports Windows 10.
4] Disable the Firewall software
Disable your Firewall and see if that is the cause.
5] Ensure that Airplane mode is Off
Open Settings > Network & Internet > Airplane mode. Ensure that Airplane mode is Off.
6] Check networking protocols
To resolve this issue, KB3084164 recommends the following. First, in a CMD, Run netcfg –s n to see if DNI_DNE is present in the resulting list of networking protocols, drivers and services. If so, proceed.
Run the following commands, one after the other, in an elevated command prompt:
If this does not work for you, c reate a system restore point and then Run regedit to open the Registry Editor. Navigate to the following registry key:
If it exists, delete it. It basically does the same thing as the ‘reg delete‘ command.
6] Update WiFi driver
You may want to update your WiFi driver and check. You may run Windows Update or use the Devices Manager.
Alternatively, you may uninstall your WiFi driver and then download and install the WiFi driver using the manufacturer’s website.
7] Use Network Reset feature
The Network Reset feature in Windows 10 will help you reinstall Network adapters and reset Networking Components to original settings.
To check this, you will have to connect your PC to your router using an Ethernet cable. Next, open your browser and type the IP address for your wireless router in the address bar and hit Enter. Sign in and visit the Wireless Settings page. Now ensure that the settings Enable SSID Broadcast, Wireless SSID broadcast, etc., is set to On.
The issue could affect Surface devices too.
Let us know if anything helped you. Also, see if Demóstenes comment below helps you.
Top 2 Ways to Fix No Wi-Fi Available after Windows 10 Update Issue
Dec. 10, 2020 / Updated by Bessie Shaw to Windows 10
Main Content of this article:
Windows 10 Wi-Fi Problem: No Wireless Internet Connection and No Wi-Fi after Windows 10 Update
Recently, many users encounter the no Wi-Fi available after Windows 10 update issue. The Windows 10 Wi-Fi problems include: Wi-Fi is not available after Windows 10 update (Creators Update / Fall Creators Update 1709 / Spring Creators Update / April 2018 Update 1803 / October 2018 Update 1809 / May 2019 Update 1903), no Wi-Fi connections available or no wireless connection after Windows 10 update (Creators Update / Fall Creators Update 1709 / Spring Creators Update / April 2018 Update 1803 / October 2018 Update 1809 / May 2019 Update 1903), no Wi-Fi in network connection, no Wi-Fi network found or Wi-Fi adapters not showing up in the system. In this case, when you try to connect to wireless network on your Windows 10 laptop or desktop, your Microsoft Edge is not working, or the Google Chrome browser is not working.
Here are some of the reports we’ve received from users about this broken Windows 10 Wi-Fi issue.
There’s no Wi-Fi available on my computer after Windows 10 update.
Can’t turn on WiFi after Windows 10 update. No WiFi adapteroption.
There’s no Wi-Fi connection after Windows 10 Update on my HP laptop.
Why there is dreaded broken Wi-Fi after I installed Windows 10?
No wireless connection after upgrate to Windows 10 Creators Update. No wireless network connections or Wi-Fi.
My Wi-Fi stopped working after update to Windows 10. I have no WiFi settings, no Wi-Fi drivers, and even no sign of Wi-Fi.
Luckily, there are workable solutions to fix this Wi-Fi not working issue after Windows 10 update, applied to Windows 10 Fall Creators Update / Spring Creators Update / Anniversary Update / April 2018 Update 1803 / October 2018 Update 1809 / May 2019 Update 1903. The methods are effective on all brand PCs, like Asus, Acer, Dell, HP, Sony, Lenovo, Samsung, Toshiba, IBM, Alienware, Compaq, Gateway, LG, Microsoft, MSI, etc..
Why Wi-Fi Is Not Available after Windows 10 Update
What causes Windows 10 not connecting to Wi-Fi? There are 2 main reasons why your Wi-Fi is not available after upgrade to Windows 10.
1. The Wi-Fi or the wireless adapter driver is not updated and not compatible with Windows 10 Fall Creators Update / Creators Update / Anniversary Update / April 2018 Update 1803 / October 2018 Update 1809 / May 2019 Update 1903. In some cases, the Wi-Fi driver is missing after Windows 10 update.
2. If reinstalling Wi-Fi drivers doesn’t help, the problem may be triggered by unsupported VPN software present during the Windows 10 upgrade. If you have an old VPN client, specifically the Cisco VPN client, or Sonic Global client, it’s certain that the piece of software is what is causing the no internet connection issue on Windows 10.
Microsoft has explained it: «This issue may occur if older VPN software is installed on Windows 8.1 and is present during the upgrade to Windows 10. Older software versions contain a Filter Driver (the Deterministic Network Enhancer) which is not properly upgraded, leading to the issue.»
You can uninstall the VPN software to troubleshoot the no Wi-Fi issue on Windows 10.
Wired Ethernet connections may also not function properly, if you are using built-in Ethernet adapter or a USB Ethernet adapter. Please note that some connected devices (like the very old ones) may also cause this no Internet issue.
Top 2 Solutions to Fix Windows 10 Wi-Fi Not Available Issue
Try the 2 ways below to solve the Windows 10 Wi-Fi not working or Wi-Fi won’t turn on problem on your laptop, desktop or tablet. Here is how to make Wi-Fi available on your Windows 10 Fall Creators Update / Creators Update / Anniversary Update / April 2018 Update 1803 / October 2018 Update 1809 / May 2019 Update 1903 computer. Also see the Updated information at the end of the post.
Way 1. Update Wi-Fi Adapter Drivers on Windows 10
In this case, you can fix the Wi-Fi driver issue with Driver Talent (formerly called DriveTheLife).
Driver Talent can help to check if the Wi-Fi driver causes the problem and then update the outdated driver either by repairing it or downloading the latest one to match the wireless adapter for Windows 10.
Download and install this tool on your laptop, notebook or desktop to solve your Windows 10 Wi-Fi not working issue.
Step 1. Run Driver Talent and click the Scan button to detect your computer. It can check all driver problems.

Step 2. Click the Update or Repair button on the right of your Wi-Fi or wireless adapter driver to fix the Wi-Fi driver issue.
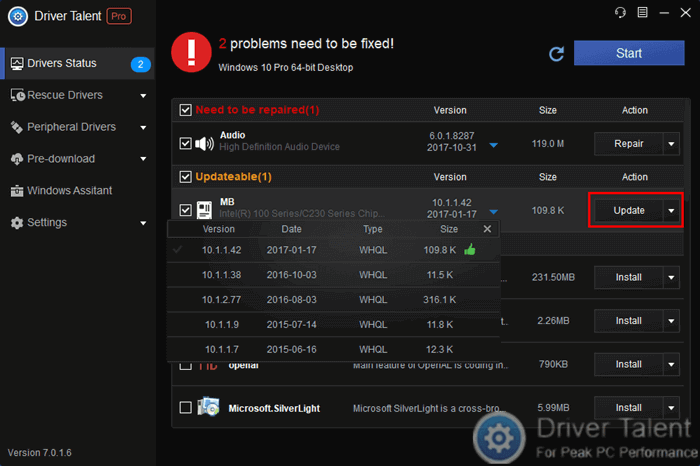
Step 3. Reboot to make your Wi-Fi or wireless adapter driver take effect. Now your wireless network connection is available.
Note: You can also try the network version: Driver Talent for Network Card. This version can help to fix the driver issues without Internet connection. You should install this tool before updating to Windows 10. Alternatively, download it with an available computer that has Internet connection and move it to your computer to install network driver offline.
Way 2. Enter Command to Fix No Wi-Fi after Windows 10 Update
To resolve the Windows 10 Wi-Fi not available issue, way 2 is used to fix the wireless adapter driver that causes the no Wi-Fi issue on Windows 10.
Important: Follow the steps below carefully. Serious problems might occur if you modify the registry incorrectly. Before you modify it, back up the registry for restoration in case problems occur.
You can use command to fix this Windows 10 no Wi-Fi problem if it’s triggered by VPN software.
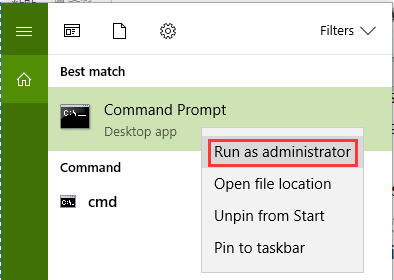
Step 1. Type cmd into the search box on the taskbar and right-click the Command Prompt for Run as administrator. This can launch Command Prompt as Administrator.
Step 2. Enter the following command and hit the Enter key:
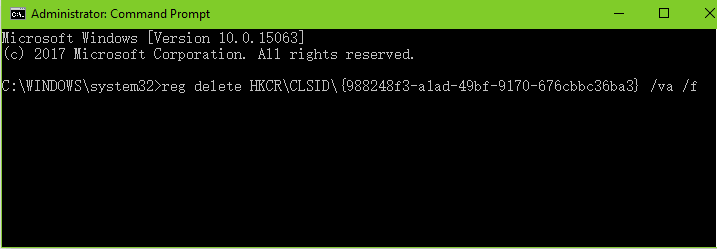
Step 3. Enter the command below in the Command Prompt box and press Enter once more:
netcfg -v -u dni_dne
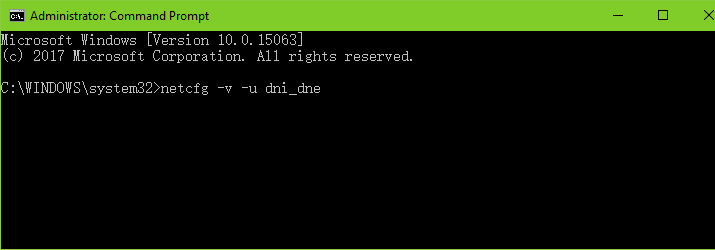
Step 4. Restart the computer and check back with your Wi-Fi settings. You now should see a revived list of all the available networks within range.
Note: If you have the Cisco VPN client, Sonic Global client or other VPN software running on your computer and you are planning to upgrade to Windows 10, you can uninstall the VPN before proceeding.
Bonus Tip: Optimize Wireless Adapter Settings for Best Wi-Fi Performance
If your computer drops Wi-Fi or shows no Wi-Fi available, you could change the wireless adapter power settings to get the best Wi-Fi performance. The default power option is «Power saving mode», which will result in Windows 10 Wi-Fi problem while connecting to distant WAPs. Take the following steps to fix the Wi-Fi issue.
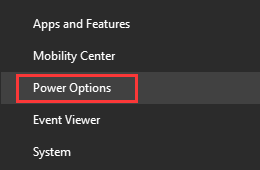
Step 1. Use Windows shortcut keysWin + X or right-click the Start menu. Select Power Options.
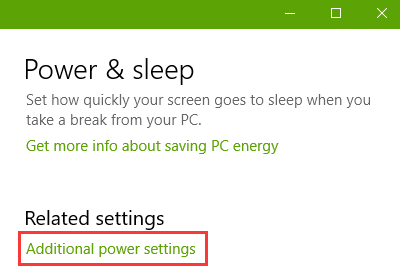
Step 2. Scroll down and click the Additional power settings. (This is available for Windows 10 Fall Creators Update / Creators Update users. For the predecessors, go to Step 3 directly.)
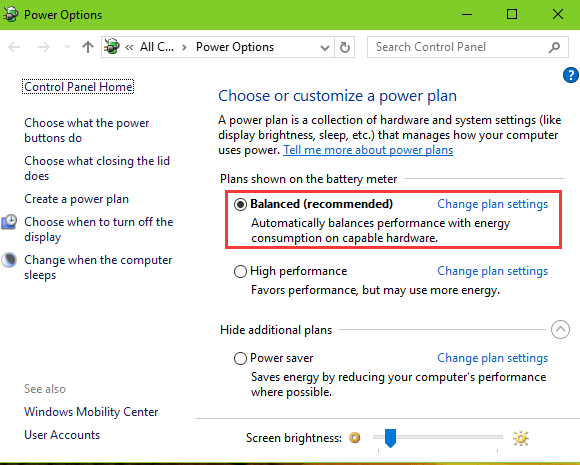
Step 3. Locate your current power plan and click Change plan settings.
Step 4. Click Change advanced power settings.
Step 5. Choose the Maximum Performance under the entry Wireless Adapter settings.
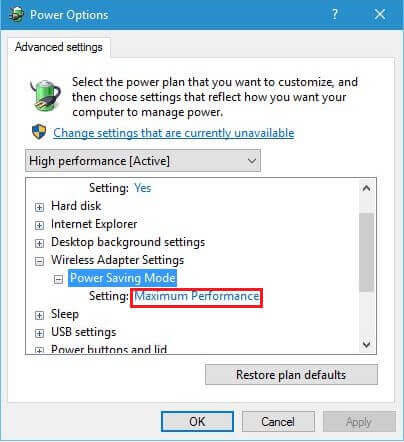
Step 6. Click Apply, and then click OK to fix Windows 10 Wi-Fi issue.
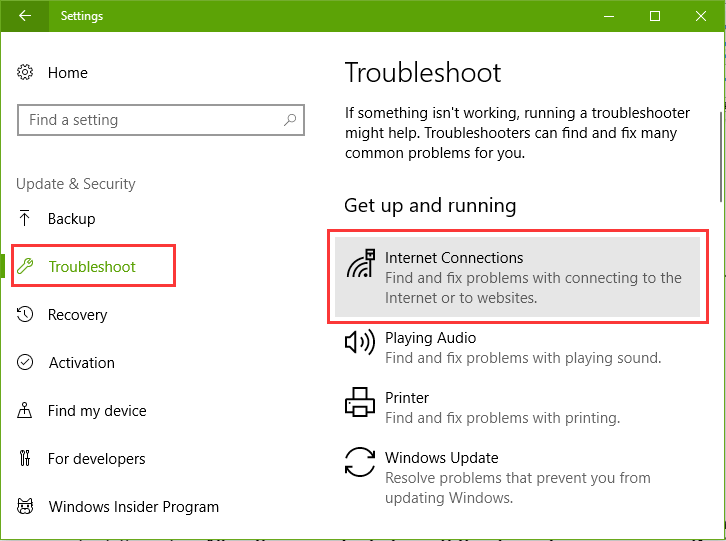
Updated: Other Workarounds for No Wi-Fi Available after Windows 10 Update
Windows 10 offers a built-in tool named Internet Connection Troubleshooter to fix the no wireless connection issue after Windows 10 Fall Creators Update / Creators Update / Anniversary Update / April 2018 Update 1803 / October 2018 Update 1809 / May 2019 Update 1903. You can try this tool to troubleshoot the Wi-Fi not working problem after the update.
Step 1. Use Windows shortcut keys Win + I to open the Settings.
Step 2. Go to the Update & security menu.
Step 3. On the left side, choose the Troubleshoot tab.
Step 4. Click the Internet Connections and detect if there is the no Wi-Fi connection issue.
Step 5. Follow the on-screen instructions to complete the troubleshooting process.
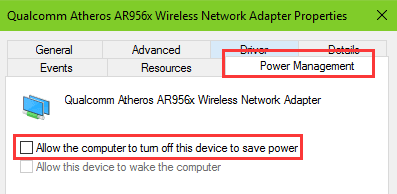
In addition, we’ve seen many users sharing their methods to troubleshoot the Windows 10 Wi-Fi not working problem in the comments. If the above solutions don’t work for you, try to turn on the Wi-Fi again in Settings, or uncheck the option Allow the computer to turn off this device to save power on Device Manager >> Network Adapters >> Properties >> Power Management tab.
You may also like to check out:
If you still fail to fix the Windows 10 no Wi-Fi available or no wireless connection problem with the methods above, you can factory reset your laptop or desktop, or go to the LEFT MENU for special technical support. If you know other ways to solve Wi-Fi not available issue after Windows 10 Fall Creators Update / Creators Update / Anniversary Update / April 2018 Update 1803 / October 2018 Update 1809 / May 2019 Update 1903, share with us in the comments section below.
Any other Windows-10 issues, such as no sound, black screen, blue screen, PC slow, keyboard not working, etc., please go to the Windows 10 section on this site or our blog for solutions. Many thanks.


