- Установка Node.js через пакетный менеджер
- Android
- Arch Linux
- Дистрибутивы Linux на основе Debian и Ubuntu, пакеты Enterprise Linux/Fedora и Snap
- FreeBSD
- Gentoo
- NetBSD
- OpenBSD
- openSUSE и SLE
- macOS
- Альтернативы
- SmartOS и illumos
- Solus
- Void Linux
- Windows
- Альтернативы
- Installing Node.js via package manager
- Android
- Arch Linux
- CentOS, Fedora and Red Hat Enterprise Linux
- Alternatives
- Debian and Ubuntu based Linux distributions
- Alternatives
- FreeBSD
- Gentoo
- IBM i
- macOS
- Alternatives
- NetBSD
- Nodenv
- OpenBSD
- openSUSE and SLE
- SmartOS and illumos
- Solus
- Void Linux
- Windows
- Alternatives
- Установка Node.js на Windows 7
- Решение
- Проверка работы Node.js и npm
- Set up your Node.js development environment directly on Windows
- Install nvm-windows, node.js, and npm
- Alternative version managers
- Install your favorite code editor
- Install Git (optional)
Установка Node.js через пакетный менеджер
Заметка: Пакеты, описанные на этой странице, разрабатываются и поддерживаются соответствующими упаковщиками, а не командой Node.js. Пожалуйста, сообщайте о любых проблемах, с которыми вы сталкиваетесь с конкретным пакетом. Если выяснится, что ваша проблема ― ошибка в самом Node.js, проблема будет передана выше.
Android
Поддержка Android все еще является экспериментальной в Node.js, поэтому предварительно скомпилированные двоичные файлы еще не предоставлены в открытом доступе.
Однако есть и сторонние решения. Например, сообщество Termux предоставляет эмулятор терминала и среду Linux для Android, а также собственный менеджер пакетов и обширную коллекцию многих предварительно скомпилированных приложений. Эта команда в приложении Termux установит последнюю доступную версию Node.js:
В настоящее время двоичные файлы Termux Node.js связаны с system-icu (в зависимости от пакета libicu ).
Arch Linux
Пакеты Node.js и npm доступны в репозитории сообщества.
Дистрибутивы Linux на основе Debian и Ubuntu, пакеты Enterprise Linux/Fedora и Snap
FreeBSD
Самый последний выпуск Node.js доступен через порт www/node.
Установите бинарный пакет через pkg:
Или скомпилируйте свой используя порты:
Gentoo
Node.js доступен в дереве портежей.
NetBSD
Node.js доступен в дереве pkgsrc:
Или установите бинарный пакет (если он доступен для вашей платформы) с помощью pkgin:
Node Version Manager ― это bash-скрипт, используемый для управления несколькими выпущенными версиями Node.js. Он позволяет выполнять такие операции, как установка, удаление, переключение версий и т.д.. Чтобы установить nvm, используйте этот скрипт установки.
В системах Unix/OS X Node.js, созданный из исходного кода, можно установить с помощью nvm путем установки в папку по умолчанию nvm:
После этого вы можете использовать nvm для переключения между выпущенными версиями и версиями построенных из исходного кода. Например, если версия Node.js v8.0.0-pre:
После выхода официального релиза вы захотите удалить встроенную версию:
OpenBSD
Node.js доступен через систему портов.
Использование pkg_add в OpenBSD:
openSUSE и SLE
Node.js доступен в основных репозиториях в следующих пакетах:
- openSUSE Leap 42.2: nodejs4
- openSUSE Leap 42.3: nodejs4 , nodejs6
- openSUSE Tumbleweed: nodejs4 , nodejs6 , nodejs8
- SUSE Linux Enterprise Server (SLES) 12: nodejs4 , nodejs6 («Модуль Web и Scripting» должен быть добавлен перед установкой.)
Например, чтобы установить Node.js 4.x в openSUSE Leap 42.2, запустите следующее от имени пользователя root:
macOS
Просто загрузите установщик macOS прямо с веб-сайта nodejs.org.
Если вы хотите скачать пакет с bash:
Альтернативы
Использование Homebrew:
Использование MacPorts:
Использование pkgsrc:
Установка бинарных файлов:
Или сборка с помощью pkgsrc:
SmartOS и illumos
Образы SmartOS поставляются с предустановленным pkgsrc. В других дистрибутивах Illumos сначала установите pkgsrc, затем вы сможете установить бинарный пакет как обычно:
Или собрать с помощью pkgsrc:
Solus
Solus предоставляет Node.js в своем основном репозитории.
Void Linux
Void Linux поставляет стабильный файл Node.js в основном репозитории.
Windows
Просто загрузите Установщик Windows прямо с веб-сайта nodejs.org.
Альтернативы
Использование Chocolatey:
Использование Scoop:
В© OpenJS Foundation. All Rights Reserved. Portions of this site originally В© Joyent.
Installing Node.js via package manager
Note: The packages on this page are maintained and supported by their respective packagers, not the Node.js core team. Please report any issues you encounter to the package maintainer. If it turns out your issue is a bug in Node.js itself, the maintainer will report the issue upstream.
Android
Android support is still experimental in Node.js, so precompiled binaries are not yet provided by Node.js developers.
However, there are some third-party solutions. For example, Termux community provides terminal emulator and Linux environment for Android, as well as own package manager and extensive collection of many precompiled applications. This command in Termux app will install the last available Node.js version:
Currently, Termux Node.js binaries are linked against system-icu (depending on libicu package).
Arch Linux
Node.js and npm packages are available in the Community Repository.
CentOS, Fedora and Red Hat Enterprise Linux
Node.js is available as a module called nodejs in CentOS/RHEL 8 and Fedora.
where corresponds to the major version of Node.js. To see a list of available streams:
For example, to install Node.js 12:
For CentOS/RHEL 7 Node.js is available via Software Collections.
Alternatives
These resources provide packages compatible with CentOS, Fedora, and RHEL.
Debian and Ubuntu based Linux distributions
Alternatives
Packages compatible with Debian and Ubuntu based Linux distributions are available via Node.js snaps.
Fast and simple Node.js version manager built in Rust used to manage multiple released Node.js versions. It allows you to perform operations like install, uninstall, switch Node versions automatically based on the current directory, etc. To install fnm, use this install script.
fnm has cross-platform support (macOS, Windows, Linux) & all poplar shells (Bash, Zsh, Fish, PowerShell, Windows Command Line Prompt) it’s built with speed in mind and compatibility support for .node-version and .nvmrc files.
FreeBSD
The most recent release of Node.js is available via the www/node port.
Install a binary package via pkg:
Or compile it on your own using ports:
Gentoo
Node.js is available in the portage tree.
IBM i
LTS versions of Node.js are available from IBM, and are available via the ‘yum’ package manager. The package name is nodejs followed by the major version number (for instance, nodejs12 , nodejs14 etc)
To install Node.js 14.x from the command line, run the following as a user with *ALLOBJ special authority:
Node.js can also be installed with the IBM i Access Client Solutions product. See this support document for more details
macOS
Download the macOS Installer directly from the nodejs.org web site.
If you want to download the package with bash:
Alternatives
Using Homebrew:
Using MacPorts:
Using pkgsrc:
Install the binary package:
Or build manually from pkgsrc:
n is a simple to use Node.js version manager for Mac and Linux. Specify the target version to install using a rich syntax, or select from a menu of previously downloaded versions. The versions are installed system-wide or user-wide, and for more targeted use you can run a version directly from the cached downloads.
See the homepage for install methods (boostrap, npm, Homebrew, third-party), and all the usage details.
If you already have npm then installing n and then the newest LTS node version is as simple as:
NetBSD
Node.js is available in the pkgsrc tree:
Or install a binary package (if available for your platform) using pkgin:
Nodenv
nodenv is a lightweight node version manager, similar to nvm . It’s simple and predictable. A rich plugin ecosystem lets you tailor it to suit your needs. Use nodenv to pick a Node version for your application and guarantee that your development environment matches production.
Nodenv installation instructions are maintained on its Github page. Please visit that page to ensure you’re following the latest version of the installation steps.
Node Version Manager is a bash script used to manage multiple released Node.js versions. It allows you to perform operations like install, uninstall, switch version, etc. To install nvm, use this install script.
On Unix / OS X systems Node.js built from source can be installed using nvm by installing into the location that nvm expects:
After this you can use nvm to switch between released versions and versions built from source. For example, if the version of Node.js is v8.0.0-pre:
Once the official release is out you will want to uninstall the version built from source:
OpenBSD
Node.js is available through the ports system.
Using pkg_add on OpenBSD:
openSUSE and SLE
Node.js is available in the main repositories under the following packages:
- openSUSE Leap 42.2: nodejs4
- openSUSE Leap 42.3: nodejs4 , nodejs6
- openSUSE Tumbleweed: nodejs4 , nodejs6 , nodejs8
- SUSE Linux Enterprise Server (SLES) 12: nodejs4 , nodejs6 (The «Web and Scripting Module» must be added before installing.)
For example, to install Node.js 4.x on openSUSE Leap 42.2, run the following as root:
SmartOS and illumos
SmartOS images come with pkgsrc pre-installed. On other illumos distributions, first install pkgsrc, then you may install the binary package as normal:
Or build manually from pkgsrc:
Node.js snaps are available as node on the Snap store.
Solus
Solus provides Node.js in its main repository.
Void Linux
Void Linux ships Node.js stable in the main repository.
Windows
Download the Windows Installer directly from the nodejs.org web site.
Alternatives
Using Chocolatey:
Using Scoop:
IBM® SDK for Node.js — z/OS® is available in two installation formats, SMP/E and PAX. Select the installation format that applies to you:
В© OpenJS Foundation. All Rights Reserved. Portions of this site originally В© Joyent.
Установка Node.js на Windows 7
Привет! Рассмотрим установку Node.js на Windows 7 и протестируем его работу.
При попытке установить на Windows 7 последнюю версию v14.15.4 LTS [ссылка], возникает ошибка о том, что приложение поддерживается на Windows 8.1. и выше:
Решение
1. Находим более раннюю версию, которая подойдёт для Windows 7, перейдем по ссылке.

2. Скачиваем версию v13.14.0 [ссылка] для вашей операционной системы.
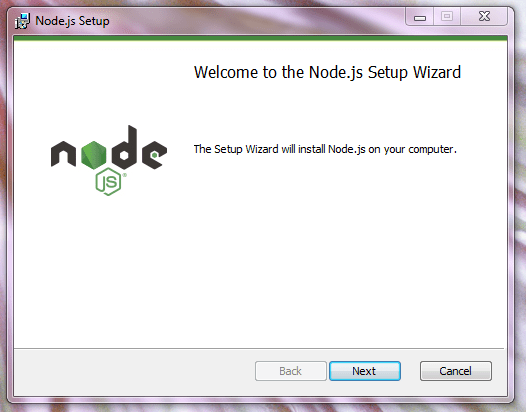
3. Нажимаем Next:
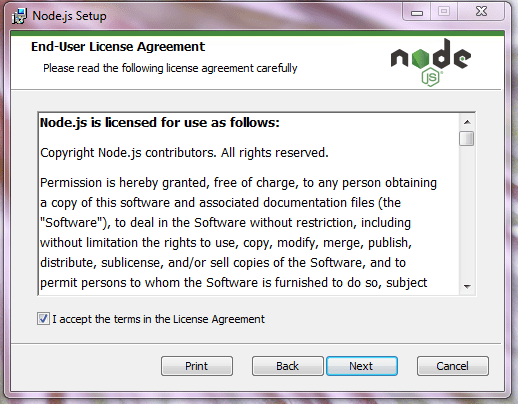
4. Соглашаемся с условиями лицензионного соглашения, ставим галочку и нажимаем Next:
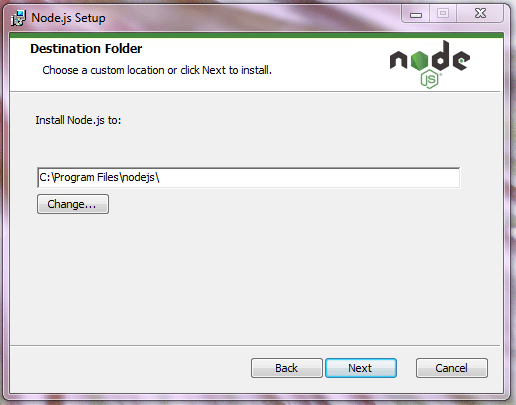
5. По умолчанию, установка Node.js происходит в папку C: \Program Files\nodejs\. Поменяйте, при необходимости, и нажимайте Next:
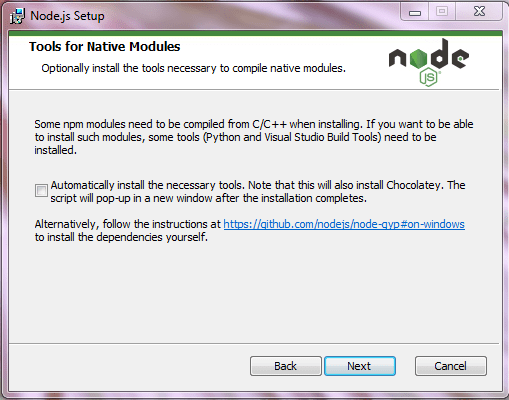
6. Далее идут пользовательские настройки и предлагается установить дополнительные инструменты. Оставляем по умолчанию и нажимаем кнопку Next:
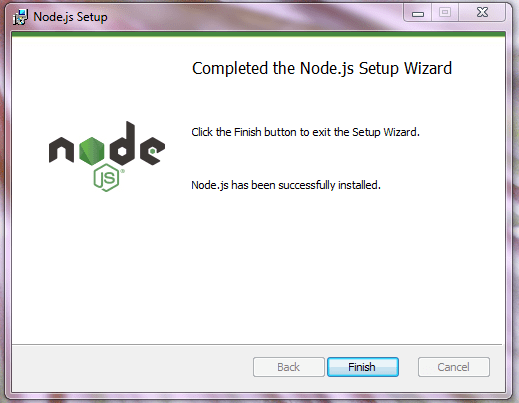
7. Успешная установка, нажимаем Finish:
Мои поздравления 🙂 Node.js установлен.
Проверка работы Node.js и npm
Осталось проверить, для этого:
1. Запускаем консоль в стандартной программе Windows командой cmd:
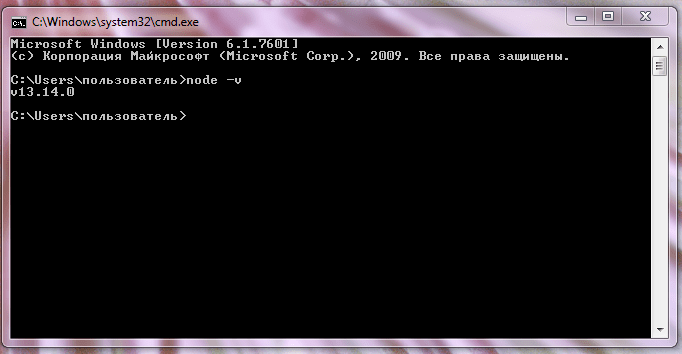
2. Командой node -v (выводится v13.14.0) проверяем работу Node.js:
3. Командой npm -v проверяем npm и видим установленную версию 6.14.4
Set up your Node.js development environment directly on Windows
The following is a step-by-step guide to get you started using Node.js in a native Windows development environment.
Install nvm-windows, node.js, and npm
There are multiple ways to install Node.js. We recommend using a version manager as versions change very quickly. You will likely need to switch between multiple versions based on the needs of different projects you’re working on. Node Version Manager, more commonly called nvm, is the most popular way to install multiple versions of Node.js, but is only available for Mac/Linux and not supported on Windows. Instead, we will walk through the steps to install nvm-windows and then use it to install Node.js and Node Package Manager (npm). There are alternative version managers to consider as well covered in the next section.
It is always recommended to remove any existing installations of Node.js or npm from your operating system before installing a version manager as the different types of installation can lead to strange and confusing conflicts. This includes deleting any existing nodejs installation directories (e.g., «C:\Program Files\nodejs») that might remain. NVM’s generated symlink will not overwrite an existing (even empty) installation directory. For help with removing previous installations, see How to completely remove node.js from Windows.)
Open the windows-nvm repository in your internet browser and select the Download Now link.
Download the nvm-setup.zip file for the most recent release.
Once downloaded, open the zip file, then open the nvm-setup.exe file.
The Setup-NVM-for-Windows installation wizard will walk you through the setup steps, including choosing the directory where both nvm-windows and Node.js will be installed.
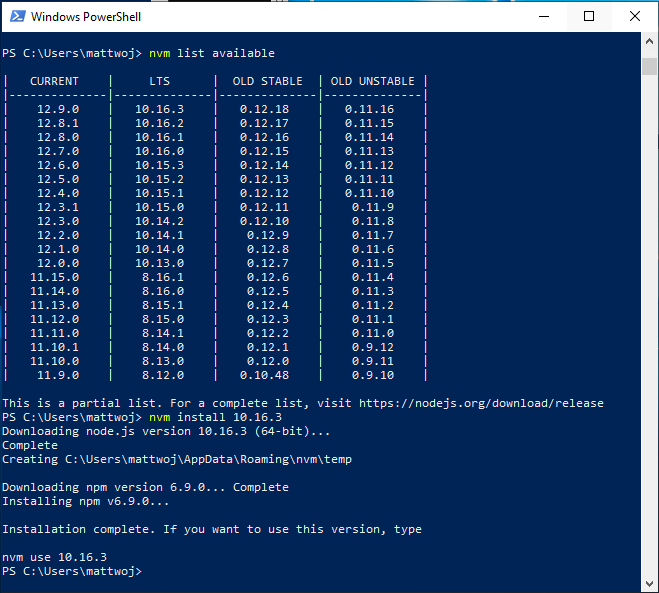
Once the installation is complete. Open PowerShell and try using windows-nvm to list which versions of Node are currently installed (should be none at this point): nvm ls
Install the current release of Node.js (for testing the newest feature improvements, but more likely to have issues than the LTS version): nvm install latest
Install the latest stable LTS release of Node.js (recommended) by first looking up what the current LTS version number is with: nvm list available , then installing the LTS version number with: nvm install (replacing with the number, ie: nvm install 12.14.0 ).
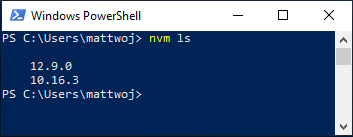
List what versions of Node are installed: nvm ls . now you should see the two versions that you just installed listed.
After installing the Node.js version numbers you need, select the version that you would like to use by entering: nvm use (replacing with the number, ie: nvm use 12.9.0 ).
To change the version of Node.js you would like to use for a project, create a new project directory mkdir NodeTest , and enter the directory cd NodeTest , then enter nvm use replacing with the version number you’d like to use (ie v10.16.3`).
Verify which version of npm is installed with: npm —version , this version number will automatically change to whichever npm version is associated with your current version of Node.js.
Alternative version managers
While windows-nvm is currently the most popular version manager for node, there are alternatives to consider:
nvs (Node Version Switcher) is a cross-platform nvm alternative with the ability to integrate with VS Code.
Volta is a new version manager from the LinkedIn team that claims improved speed and cross-platform support.
To install Volta as your version manager (rather than windows-nvm), go to the Windows Installation section of their Getting Started guide, then download and run their Windows installer, following the setup instructions.
You must ensure that Developer Mode is enabled on your Windows machine before installing Volta.
To learn more about using Volta to install multiple versions of Node.js on Windows, see the Volta Docs.
Install your favorite code editor
We recommend you install VS Code, as well as the Node.js Extension Pack, for developing with Node.js on Windows. Install them all or pick and choose which seem the most useful to you.
To install the Node.js extension pack:
- Open the Extensions window (Ctrl+Shift+X) in VS Code.
- In the search box at the top of the Extensions window, enter: «Node Extension Pack» (or the name of whatever extension you are looking for).
- Select Install. Once installed, your extension will appear in the «Enabled» folder of your Extensions window. You can disable, uninstall, or configure settings by selecting the gear icon next to the description of your new extension.
A few additional extensions you may want to consider include:
- Debugger for Chrome: Once you finish developing on the server side with Node.js, you’ll need to develop and test the client side. This extension integrates your VS Code editor with your Chrome browser debugging service, making things a bit more efficient.
- Keymaps from other editors: These extensions can help your environment feel right at home if you’re transitioning from another text editor (like Atom, Sublime, Vim, eMacs, Notepad++, etc).
- Settings Sync: Enables you to synchronize your VS Code settings across different installations using GitHub. If you work on different machines, this helps keep your environment consistent across them.
Install Git (optional)
If you plan to collaborate with others, or host your project on an open-source site (like GitHub), VS Code supports version control with Git. The Source Control tab in VS Code tracks all of your changes and has common Git commands (add, commit, push, pull) built right into the UI. You first need to install Git to power the Source Control panel.
Download and install Git for Windows from the git-scm website.
An Install Wizard is included that will ask you a series of questions about settings for your Git installation. We recommend using all of the default settings, unless you have a specific reason for changing something.
If you’ve never worked with Git before, GitHub Guides can help you get started.
