- Installing a node.js application as a Windows service
- Настройка среды разработки Node.js напрямую в Windows Set up your Node.js development environment directly on Windows
- Установка nvm-windows, Node.js и npm Install nvm-windows, node.js, and npm
- Альтернативные диспетчеры версий Alternative version managers
- Установка предпочтительного редактора кода Install your favorite code editor
- Установка Git (необязательно) Install Git (optional)
Installing a node.js application as a Windows service
It wasn’t my intention when I started the first article but this has become a series of how to run node applications in production with IIS on Windows. These are the previous articles on the topic:
In the last article a node web application was deployed on a Windows server. With the help of the HTTP platform handler, IIS manages the node process for us. When it receives a request it will start the node process and pass the web request for node to handle it.
In some cases however we don’t want to expose the node.js web application via IIS. I have built an internal API in the past which should not be accessible from the outside for security reasons. The internal API is only consumed by other applications running on the same server. In this case, we can’t rely on IIS to manage the node process for us as IIS would expose the web application to the internet.
We need an alternative to keep the node process running to make the internal API available on the server via localhost. PM2 can manage the node process and keep it up and running. Unfortunately I did not find a reliable way to start PM2 whenever the Windows Server restarts. Every time the server restarted, the internal API was down and had to be manually started.
Luckily there is a NPM package node-windows which can install a node application as a Windows service. This service can be automatically started when the server restarts.
This is the Hello World sample from the Express website, we will install it as a Windows service:
The node-windows NPM package can do this for us. Run the following commands
Once the package is installed it can be used to install the application as a service with the following node script:
Just run the script as any other node script:
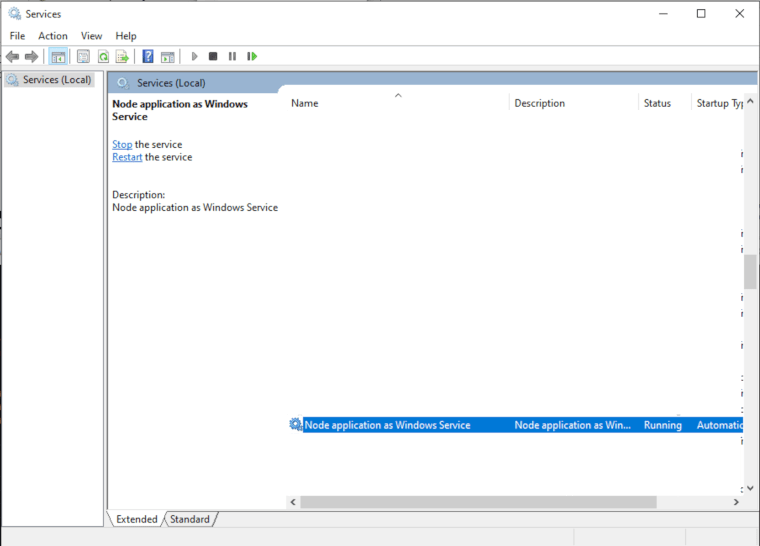
If User Account Control (UAC) is enabled on Windows you will have to give permission a few times to complete the installation. Once this script has finished the service is installed and the application is running. You can find the service in the Services dialog. It will have the name that you have passed to the Service class in the node script.
If the service ever needs to be uninstalled, the Service class also has an uninstall method:
This can also be run as any other node script:
Because the Windows service is set to start automatic, it will start every time the server is restarted. Exactly as expected. Happy deploying!
Настройка среды разработки Node.js напрямую в Windows Set up your Node.js development environment directly on Windows
Ниже приведено пошаговое руководство по началу работы с Node.js в собственной среде разработки Windows. The following is a step-by-step guide to get you started using Node.js in a native Windows development environment.
Установка nvm-windows, Node.js и npm Install nvm-windows, node.js, and npm
Существует несколько способов установки Node.js. There are multiple ways to install Node.js. Мы рекомендуем использовать диспетчер версий, так как версии меняются достаточно быстро. We recommend using a version manager as versions change very quickly. Вероятно, вам придется переключаться между несколькими версиями в зависимости от потребностей для различных проектов, над которыми вы работаете. You will likely need to switch between multiple versions based on the needs of different projects you’re working on. Диспетчер версий Node Version Manager, чаще называемый nvm, является наиболее популярным средством установки нескольких версий Node.js, но он доступен только для Mac и Linux и не поддерживается в Windows. Node Version Manager, more commonly called nvm, is the most popular way to install multiple versions of Node.js, but is only available for Mac/Linux and not supported on Windows. Вместо этого выполним шаги ниже, чтобы установить nvm-windows, а затем используем его для установки Node.js и диспетчера пакетов Node Package Manager (npm). Instead, we will walk through the steps to install nvm-windows and then use it to install Node.js and Node Package Manager (npm). Существуют также альтернативные диспетчеры версий, которые описаны в следующем разделе. There are alternative version managers to consider as well covered in the next section.
Рекомендуем всегда удалять любые имеющиеся установки Node.js или npm из операционной системы перед установкой диспетчера версий, так как эти установки могут создавать необычные и запутанные конфликты. It is always recommended to remove any existing installations of Node.js or npm from your operating system before installing a version manager as the different types of installation can lead to strange and confusing conflicts. Сюда относится удаление всех существующих каталогов установки Node.js (например, C:\Program Files\nodejs), которые могут остаться. This includes deleting any existing nodejs installation directories (e.g., «C:\Program Files\nodejs») that might remain. Созданная символьная ссылка NVM не будет перезаписывать существующий (даже пустой) каталог установки. NVM’s generated symlink will not overwrite an existing (even empty) installation directory. Справку по полному удалению предыдущих установок см. здесь. For help with removing previous installations, see How to completely remove node.js from Windows.)
Откройте репозиторий windows-nvm в Интернет-браузере и щелкните ссылку Загрузить сейчас. Open the windows-nvm repository in your internet browser and select the Download Now link.
Скачайте последний выпуск файла nvm-setup.zip. Download the nvm-setup.zip file for the most recent release.
После скачивания откройте ZIP-файл, а затем запустите файл nvm-setup.exe. Once downloaded, open the zip file, then open the nvm-setup.exe file.
Мастер установки Setup-NVM-for-Windows поможет выполнить все этапы установки, в том числе выбрать каталог, в котором будут установлены репозиторий nvm-windows и Node.js. The Setup-NVM-for-Windows installation wizard will walk you through the setup steps, including choosing the directory where both nvm-windows and Node.js will be installed.

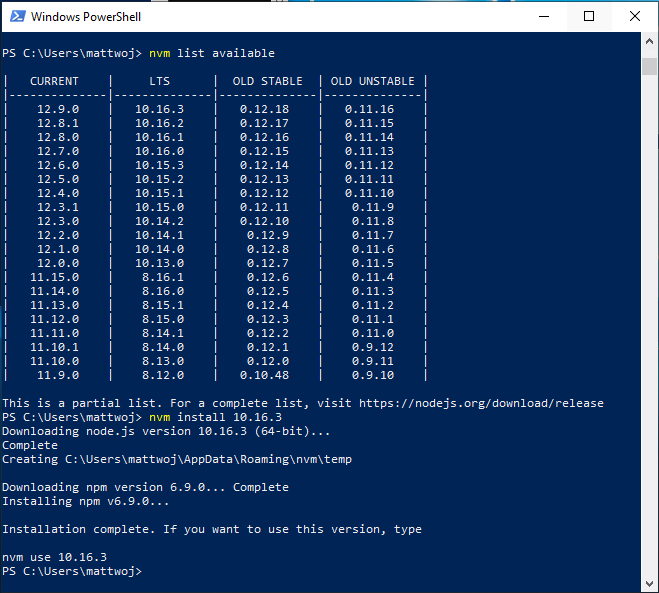
Установка завершится. Once the installation is complete. откройте PowerShell и попробуйте использовать windows-nvm, чтобы просмотреть список установленных версий Node (на этом этапе их еще не должно быть): nvm ls Open PowerShell and try using windows-nvm to list which versions of Node are currently installed (should be none at this point): nvm ls

Установите текущий выпуск Node.js (в нем вы сможете протестировать новейшие улучшенные возможности, но вероятность возникновения проблем при этом будет больше, чем при использовании версии LTS) с помощью команды nvm install latest . Install the current release of Node.js (for testing the newest feature improvements, but more likely to have issues than the LTS version): nvm install latest
Установите последний стабильный выпуск LTS Node.js (рекомендуется). Для этого сначала выполните поиск номера текущей версии LTS с помощью команды nvm list available , а затем установите версию LTS по номеру с помощью команды nvm install (замените номером, например: nvm install 12.14.0 ). Install the latest stable LTS release of Node.js (recommended) by first looking up what the current LTS version number is with: nvm list available , then installing the LTS version number with: nvm install (replacing with the number, ie: nvm install 12.14.0 ).
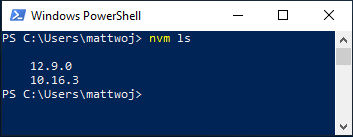
Вызовите список установленных версий Node, выполнив команду nvm ls . Теперь в нем должны отображаться две недавно установленные версии. List what versions of Node are installed: nvm ls . now you should see the two versions that you just installed listed.
После установки требуемых версий Node.js выберите нужную версию, введя nvm use (замените нужным номером, например nvm use 12.9.0 ). After installing the Node.js version numbers you need, select the version that you would like to use by entering: nvm use (replacing with the number, ie: nvm use 12.9.0 ).
Чтобы изменить версию Node.js на ту, которую вы хотите использовать для проекта, создайте каталог проекта с помощью команды mkdir NodeTest и укажите каталог, выполнив команду cd NodeTest . Затем введите nvm use , заменив номером версии, который вы хотите использовать (т. е. версии 10.16.3). To change the version of Node.js you would like to use for a project, create a new project directory mkdir NodeTest , and enter the directory cd NodeTest , then enter nvm use replacing with the version number you’d like to use (ie v10.16.3`).
Проверьте, какая версия npm установлена, с помощью npm —version . Этот номер версии автоматически изменится на номер той версии npm, которая связана с вашей текущей версией Node.js. Verify which version of npm is installed with: npm —version , this version number will automatically change to whichever npm version is associated with your current version of Node.js.
Альтернативные диспетчеры версий Alternative version managers
Несмотря на то что windows-nvm сейчас является самым популярным менеджером версий для Node, есть несколько альтернативных вариантов: While windows-nvm is currently the most popular version manager for node, there are alternatives to consider:
nvs (Node Version Switcher) — это кроссплатформенный вариант nvm с возможностью интеграции с VS Code. nvs (Node Version Switcher) is a cross-platform nvm alternative with the ability to integrate with VS Code.
Volta — это новый диспетчер версий, созданный командой LinkedIn. Заявлено, что он отличается увеличенной скоростью и межплатформенной поддержкой. Volta is a new version manager from the LinkedIn team that claims improved speed and cross-platform support.
Чтобы установить Volta в качестве диспетчера версий (вместо windows-nvm), перейдите в раздел Установка Windows руководства Начало работы, затем скачайте и запустите установщик Windows, следуя инструкциям. To install Volta as your version manager (rather than windows-nvm), go to the Windows Installation section of their Getting Started guide, then download and run their Windows installer, following the setup instructions.
Перед установкой Volta необходимо убедиться, что на компьютере с Windows включен режим разработчика. You must ensure that Developer Mode is enabled on your Windows machine before installing Volta.
Дополнительные сведения об использовании Volta для установки нескольких версий Node.js в Windows см. в документации по работе с Volta. To learn more about using Volta to install multiple versions of Node.js on Windows, see the Volta Docs.
Установка предпочтительного редактора кода Install your favorite code editor
Для разработки с помощью Node.js в Windows рекомендуется установить VS Code, а также пакет расширений Node.js. We recommend you install VS Code, as well as the Node.js Extension Pack, for developing with Node.js on Windows. Установите их все или выберите наиболее полезные для вас. Install them all or pick and choose which seem the most useful to you.
Чтобы установить пакет расширений Node.js, сделайте следующее: To install the Node.js extension pack:
- Откройте в VS Code окно Расширения (нажав клавиши CTRL+SHIFT+X). Open the Extensions window (Ctrl+Shift+X) in VS Code.
- В поле поиска в верхней части окна расширений введите: Node Extension Pack (Пакет расширений Node) (или имя любого расширения, которое необходимо найти). In the search box at the top of the Extensions window, enter: «Node Extension Pack» (or the name of whatever extension you are looking for).
- Выберите пункт Установить. Select Install. После установки расширение появится в папке «Включено» в окне Расширения. Once installed, your extension will appear in the «Enabled» folder of your Extensions window. Вы можете отключить, удалить или настроить параметры, выбрав значок шестеренки рядом с описанием вашего нового расширения. You can disable, uninstall, or configure settings by selecting the gear icon next to the description of your new extension.
К дополнительным рекомендуемым расширениям относятся следующие: A few additional extensions you may want to consider include:
- Отладчик для Chrome — после завершения разработки на стороне сервера с помощью Node.js вам нужно будет выполнить разработку и тестирование на стороне клиента. Debugger for Chrome: Once you finish developing on the server side with Node.js, you’ll need to develop and test the client side. Это расширение интегрирует редактор VS Code со службой отладки браузера Chrome, что увеличивает эффективность выполнения операций. This extension integrates your VS Code editor with your Chrome browser debugging service, making things a bit more efficient.
- Раскладки клавиатуры других редакторов — эти расширения позволят использовать необходимую раскладку при переходе в другой текстовый редактор (например, Atom, Sublime, Vim, eMacs, Notepad++ и т. п.). Keymaps from other editors: These extensions can help your environment feel right at home if you’re transitioning from another text editor (like Atom, Sublime, Vim, eMacs, Notepad++, etc).
- Расширение синхронизации параметров — позволяет синхронизировать параметры VS Code в разных установках, используя GitHub. Settings Sync: Enables you to synchronize your VS Code settings across different installations using GitHub. Если вы работаете на разных компьютерах, это обеспечит согласованность среды между ними. If you work on different machines, this helps keep your environment consistent across them.
Установка Git (необязательно) Install Git (optional)
Если вы планируете работать совместно с другими пользователями или размещать проект на сайте с открытым исходным кодом (например, GitHub), примите во внимание, что VS Code поддерживает управление версиями с помощью Git. If you plan to collaborate with others, or host your project on an open-source site (like GitHub), VS Code supports version control with Git. Вкладка системы управления версиями в VS Code отслеживает все изменения и содержит общие команды Git (добавление, фиксация, принудительная отправка, извлечение) прямо в пользовательском интерфейсе. The Source Control tab in VS Code tracks all of your changes and has common Git commands (add, commit, push, pull) built right into the UI. Сначала необходимо установить Git для включения панели управления версиями. You first need to install Git to power the Source Control panel.
Скачайте и установите Git для Windows с веб-сайта git-scm. Download and install Git for Windows from the git-scm website.
В комплект входит мастер установки, который задает вам ряд вопросов о параметрах установки Git. An Install Wizard is included that will ask you a series of questions about settings for your Git installation. Рекомендуется использовать все параметры по умолчанию, если у вас нет конкретной причины изменить какой-либо из них. We recommend using all of the default settings, unless you have a specific reason for changing something.
Если вы никогда не использовали Git, обратитесь к руководствам по GitHub. Они помогут вам приступить к работе. If you’ve never worked with Git before, GitHub Guides can help you get started.


