- Плитки, индикаторы событий и уведомления в приложениях для Windows Tiles, badges, and notifications for Windows apps
- Windows Push Notification Services (WNS) overview
- How it works
- Registering your app and receiving the credentials for your cloud service
- Requesting a notification channel
- Important notes
- Authenticating your cloud service
- Important notes
- Sending a notification
- Important notes
- Expiration of tile and badge notifications
- Push notifications and battery saver
Плитки, индикаторы событий и уведомления в приложениях для Windows Tiles, badges, and notifications for Windows apps
Узнайте, как использовать плитки, индикаторы событий, всплывающие и простые уведомления, чтобы предоставлять точки входа в свои приложения и держать пользователей в курсе последних событий. Learn how to use tiles, badges, toasts, and notifications to provide entry points into your app and keep users up-to-date.
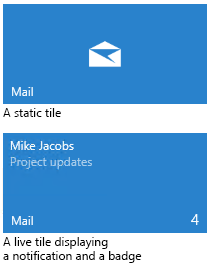 Плитки используются для представления приложений в меню «Пуск». A tile is an app’s representation on the Start menu. У каждого приложения для Windows есть своя плитка. Every Windows app has a tile. Можно включить несколько размеров плиток (маленькая, средняя, широкая и большая). You can enable different tile sizes (small, medium, wide, and large).
Можно использовать уведомление на плитке, чтобы сообщать пользователю новую информацию, например, заголовки новостей или тему последнего непрочитанного сообщения. You can use a tile notification to update the tile to communicate new information to the user, such as news headlines, or the subject of the most recent unread message.
Можно использовать индикатор событий для предоставления сводной информации или информации о статусе в виде предоставленных системой глифов или числа от 1 до 99. You can use a badge to provide status or summary info in the form of a system-provided glyph or a number from 1-99. Индикаторы событий также отображаются на значке приложения в панели задач. Badges also appear on the task bar icon for an app.
Всплывающее уведомление — это уведомление, которое ваше приложение отправляет пользователю с помощью элемента всплывающего пользовательского интерфейса под названием всплывающее уведомление (или баннер). A toast notification is a notification that your app sends to the user via a pop-up UI element called a toast (or banner). Уведомление отображается независимо от того, включено ли приложение. The notification can be seen whether the user is in your app or not.
Push-уведомление или необработанное уведомление – это уведомление, отправляемое приложению из служб push-уведомлений Windows (WNS), или уведомление от фоновой задачи. A push notification or raw notification is a notification sent to your app either from Windows Push Notification Services (WNS) or from a background task. Ваше приложение может реагировать на эти уведомления, либо сообщая пользователю о том, что произошло какое-то значимое событие (путем обновления индикатора событий, плитки или с помощью всплывающего уведомления), либо другим способом на ваш выбор. Your app can respond to these notifications either by notifying the user that something of interest happened (via badge update, tile update, or toast) or it can respond in any way of your choice.
Windows Push Notification Services (WNS) overview
The Windows Push Notification Services (WNS) enable third-party developers to send toast, tile, badge, and raw updates from their own cloud service. This provides a mechanism to deliver new updates to your users in a power-efficient and dependable way.
How it works
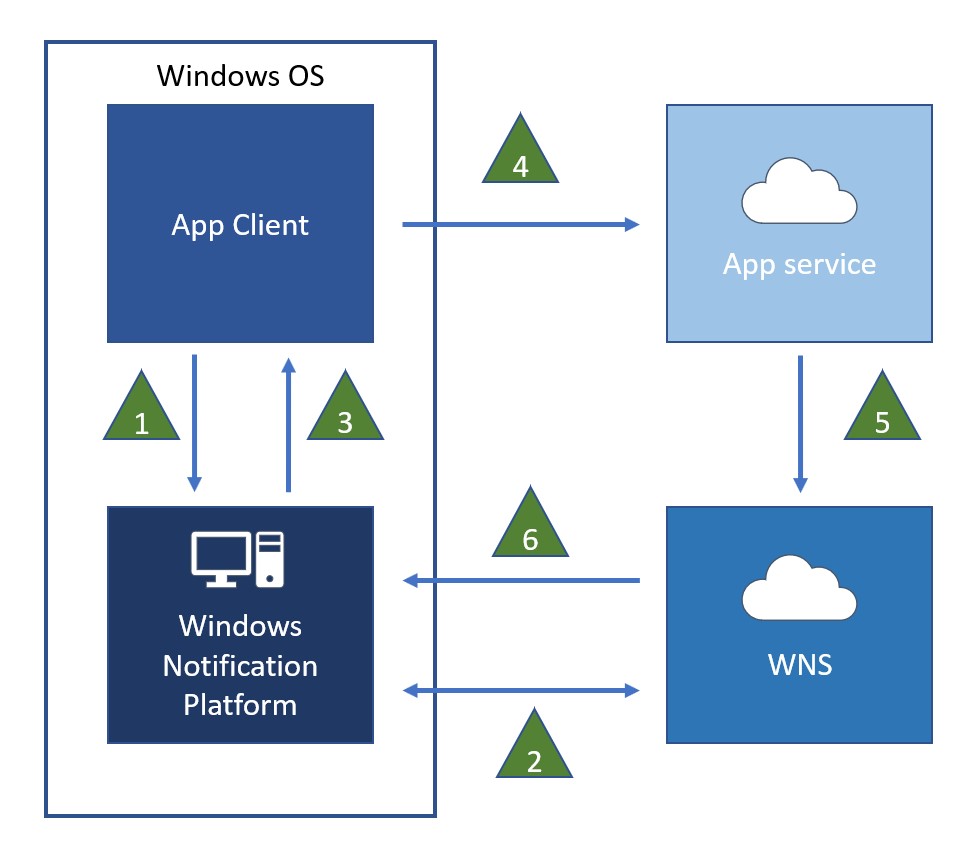
The following diagram shows the complete data flow for sending a push notification. It involves these steps:
- Your app requests a push notification channel from WNS.
- Windows asks WNS to create a notification channel. This channel is returned to the calling device in the form of a Uniform Resource Identifier (URI).
- The notification channel URI is returned by WNS to your app.
- Your app sends the URI to your own cloud service. You then store the URI on your own cloud service so that you can access the URI when you send notifications. The URI is an interface between your own app and your own service; it’s your responsibility to implement this interface with safe and secure web standards.
- When your cloud service has an update to send, it notifies WNS using the channel URI. This is done by issuing an HTTP POST request, including the notification payload, over Secure Sockets Layer (SSL). This step requires authentication.
- WNS receives the request and routes the notification to the appropriate device.
Registering your app and receiving the credentials for your cloud service
Before you can send notifications using WNS, your app must be registered with the Store Dashboard, as described here.
Requesting a notification channel
When an app that is capable of receiving push notifications runs, it must first request a notification channel through the CreatePushNotificationChannelForApplicationAsync. For a full discussion and example code, see How to request, create, and save a notification channel. This API returns a channel URI that is uniquely linked to the calling application and its tile, and through which all notification types can be sent.
After the app has successfully created a channel URI, it sends it to its cloud service, together with any app-specific metadata that should be associated with this URI.
Important notes
- We do not guarantee that the notification channel URI for an app will always remain the same. We advise that the app requests a new channel every time it runs and updates its service when the URI changes. The developer should never modify the channel URI and should consider it as a black-box string. At this time, channel URIs expire after 30 days. If your WindowsВ 10 app will periodically renew its channel in the background then you can download the Push and periodic notifications sample for WindowsВ 8.1 and re-use its source code and/or the pattern it demonstrates.
- The interface between the cloud service and the client app is implemented by you, the developer. We recommend that the app go through an authentication process with its own service and transmit data over a secure protocol such as HTTPS.
- It is important that the cloud service always ensures that the channel URI uses the domain «notify.windows.com». The service should never push notifications to a channel on any other domain. If the callback for your app is ever compromised, a malicious attacker could submit a channel URI to spoof WNS. Without inspecting the domain, your cloud service could potentially disclose information to this attacker unknowingly.
- If your cloud service attempts to deliver a notification to an expired channel, WNS will return response code 410. In response to that code, your service should no longer attempt to send notifications to that URI.
Authenticating your cloud service
To send a notification, the cloud service must be authenticated through WNS. The first step in this process occurs when you register your app with the Microsoft Store Dashboard. During the registration process, your app is given a Package security identifier (SID) and a secret key. This information is used by your cloud service to authenticate with WNS.
The WNS authentication scheme is implemented using the client credentials profile from the OAuth 2.0 protocol. The cloud service authenticates with WNS by providing its credentials (Package SID and secret key). In return, it receives an access token. This access token allows a cloud service to send a notification. The token is required with every notification request sent to the WNS.
At a high level, the information chain is as follows:
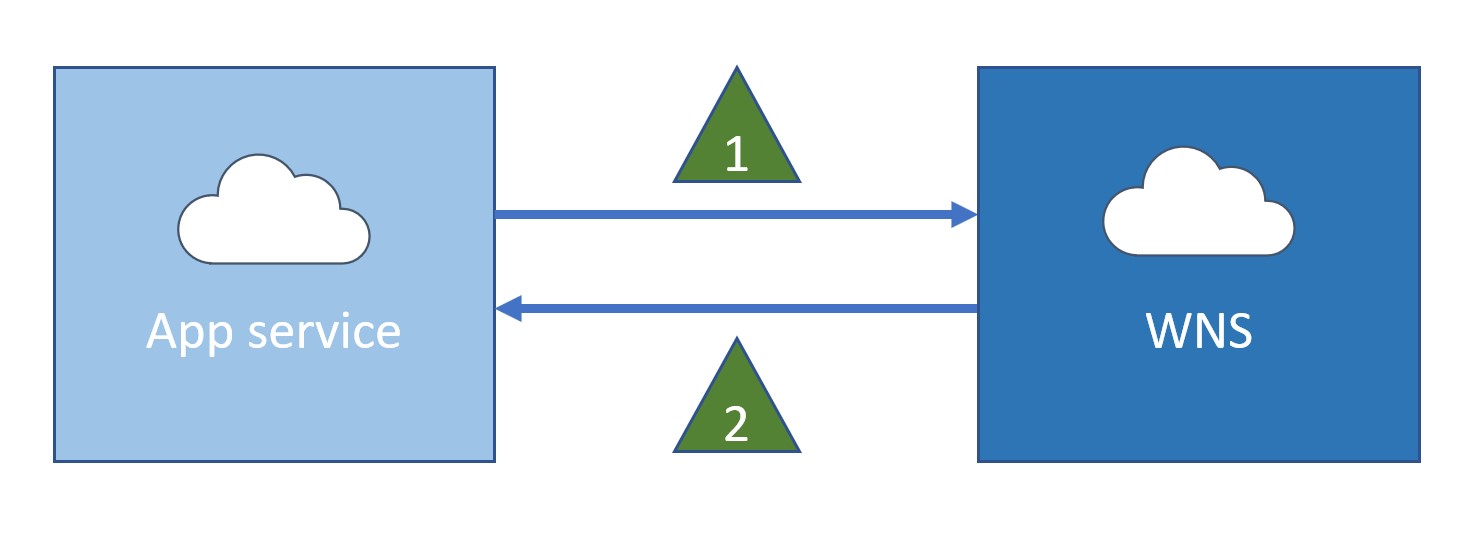
- The cloud service sends its credentials to WNS over HTTPS following the OAuth 2.0 protocol. This authenticates the service with WNS.
- WNS returns an access token if the authentication was successful. This access token is used in all subsequent notification requests until it expires.
In the authentication with WNS, the cloud service submits an HTTP request over Secure Sockets Layer (SSL). The parameters are supplied in the «application/x-www-for-urlencoded» format. Supply your Package SID in the «client_id» field and your secret key in the «client_secret» field as shown in the following example. For syntax details, see the access token request reference.
This is just an example, not cut-and-paste code that you can successfully use in your own code.В
The WNS authenticates the cloud service and, if successful, sends a response of «200 OK». The access token is returned in the parameters included in the body of the HTTP response, using the «application/json» media type. After your service has received the access token, you are ready to send notifications.
The following example shows a successful authentication response, including the access token. For syntax details, see Push notification service request and response headers.
Important notes
- The OAuth 2.0 protocol supported in this procedure follows draft version V16.
- The OAuth Request for Comments (RFC) uses the term «client» to refer to the cloud service.
- There might be changes to this procedure when the OAuth draft is finalized.
- The access token can be reused for multiple notification requests. This allows the cloud service to authenticate just once to send many notifications. However, when the access token expires, the cloud service must authenticate again to receive a new access token.
Sending a notification
Using the channel URI, the cloud service can send a notification whenever it has an update for the user.
The access token described above can be reused for multiple notification requests; the cloud server is not required to request a new access token for every notification. If the access token has expired, the notification request will return an error. We recommended that you do not try to re-send your notification more than once if the access token is rejected. If you encounter this error, you will need to request a new access token and resend the notification. For the exact error code, see Push notification response codes.
The cloud service makes an HTTP POST to the channel URI. This request must be made over SSL and contains the necessary headers and the notification payload. The authorization header must include the acquired access token for authorization.
An example request is shown here. For syntax details, see Push notification response codes.
For details on composing the notification payload, see Quickstart: Sending a push notification. The payload of a tile, toast, or badge push notification is supplied as XML content that adheres to their respective defined Adaptive tiles schema or Legacy tiles schema. The payload of a raw notification does not have a specified structure. It is strictly app-defined.
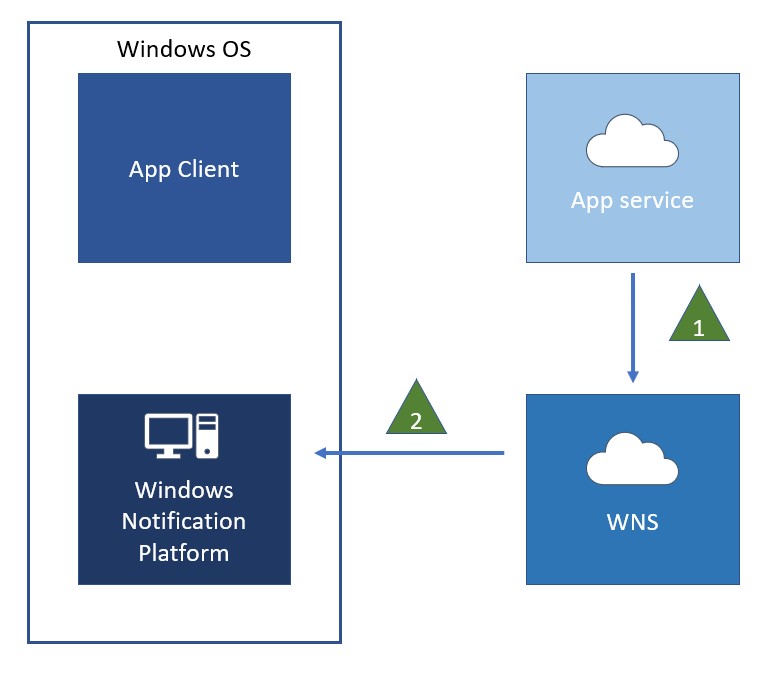
WNS responds to indicate that the notification has been received and will be delivered at the next available opportunity. However, WNS does not provide end-to-end confirmation that your notification has been received by the device or application.
This diagram illustrates the data flow:
Important notes
- WNS does not guarantee the reliability or latency of a notification.
- Notifications should never include confidential or sensitive data.
- To send a notification, the cloud service must first authenticate with WNS and receive an access token.
- An access token only allows a cloud service to send notifications to the single app for which the token was created. One access token cannot be used to send notifications across multiple apps. Therefore, if your cloud service supports multiple apps, it must provide the correct access token for the app when pushing a notification to each channel URI.
- When the device is offline, by default WNS will store up to five tile notifications (if queuing is enabled; otherwise, one tile notification) and one badge notification for each channel URI, and no raw notifications. This default caching behavior can be changed through the X-WNS-Cache-Policy header. Note that toast notifications are never stored when the device is offline.
- In scenarios where the notification content is personalized to the user, WNS recommends that the cloud service immediately send those updates when those are received. Examples of this scenario include social media feed updates, instant communication invitations, new message notifications, or alerts. As an alternative, you can have scenarios in which the same generic update is frequently delivered to a large subset of your users; for example, weather, stock, and news updates. WNS guidelines specify that the frequency of these updates should be at most one every 30 minutes. The end user or WNS may determine more frequent routine updates to be abusive.
- Windows Notification Platform maintains a periodic data connection with WNS to keep the socket alive and healthy. If there are no applications requesting or using notification channels then the socket will not be created.
Expiration of tile and badge notifications
By default, tile and badge notifications expire three days after being downloaded. When a notification expires, the content is removed from the tile or queue and is no longer shown to the user. It’s a best practice to set an expiration (using a time that makes sense for your app) on all tile and badge notifications so that your tile’s content doesn’t persist longer than it is relevant. An explicit expiration time is essential for content with a defined lifespan. This also assures the removal of stale content if your cloud service stops sending notifications, or if the user disconnects from the network for an extended period.
Your cloud service can set an expiration for each notification by setting the X-WNS-TTL HTTP header to specify the time (in seconds) that your notification will remain valid after it is sent. For more information, see Push notification service request and response headers.
For example, during a stock market’s active trading day, you can set the expiration for a stock price update to twice that of your sending interval (such as one hour after receipt if you are sending notifications every half-hour). As another example, a news app might determine that one day is an appropriate expiration time for a daily news tile update.
Push notifications and battery saver
Battery saver extends battery life by limiting background activity on the device. WindowsВ 10 lets the user set battery saver to turn on automatically when the battery drops below a specified threshold. When battery saver is on, the receipt of push notifications is disabled to save energy. But there are a couple exceptions to this. The following WindowsВ 10 battery saver settings (found in the Settings app) allow your app to receive push notifications even when battery saver is on.
- Allow push notifications from any app while in battery saver: This setting lets all apps receive push notifications while battery saver is on. Note that this setting applies only to WindowsВ 10 for desktop editions (Home, Pro, Enterprise, and Education).
- Always allowed: This setting lets specific apps run in the background while battery saver is on — including receiving push notifications. This list is maintained manually by the user.
There is no way to check the state of these two settings, but you can check the state of battery saver. In WindowsВ 10, use the EnergySaverStatus property to check battery saver state. Your app can also use the EnergySaverStatusChanged event to listen for changes to battery saver.
If your app depends heavily on push notifications, we recommend notifying users that they may not receive notifications while battery saver is on and to make it easy for them to adjust battery saver settings. Using the battery saver settings URI scheme in WindowsВ 10, ms-settings:batterysaver-settings , you can provide a convenient link to the Settings app.
When notifying the user about battery saver settings, we recommend providing a way to suppress the message in the future. For example, the dontAskMeAgainBox checkbox in the following example persists the user’s preference in LocalSettings.
Here’s an example of how to check whether battery saver is turned on in WindowsВ 10. This example notifies the user and launches the Settings app to battery saver settings. The dontAskAgainSetting lets the user suppress the message if they don’t want to be notified again.
This is the XAML for the ContentDialog featured in this example.


