- Mac OS и NTFS: проблема и её лучшее решение
- Enabling NTFS write in macOS the Open source way
- How to access Windows disks from Mac
- Why can’t macOS just write NTFS?
- How can macOS write NTFS?
- Enabling NTFS write in macOS
- Are there alternatives to NTFS?
- Which macOS does it work on?
- Ntfs ��� mac os capitan
- How to verify, repair or format NTFS partitions under Mac OS X 10.11 El Capitan. Quick troubleshooting guide
- 19 thoughts on “How to verify, repair or format NTFS partitions under Mac OS X 10.11 El Capitan. Quick troubleshooting guide”
Mac OS и NTFS: проблема и её лучшее решение
Поговаривают, что если хоть раз столкнёшься с компьютером Apple и операционной системой Mac OS, то возвращаться на Windows больше не захочешь. И всё «творчество» Microsoft после «прикосновения к прекрасному» моментально начнешь воспринимать с изрядной долей скепсиса (кроме, разве что, мышек, которые у корпорации Стива Балмера Сатьи Наделлы чудо как хороши). Правда это или нет – судить не берёмся: кому-то ближе Mac OS, кому-то – Windows. Но факт в том, что пользователям Mac OS достаточно часто приходится сталкиваться с «пришельцами» из мира Windows, и ничего с этим, увы, не поделаешь. Что понимать под пришельцами? Да очень много чего, если совсем уж откровенно. Но сейчас мы поговорим о таком «виндомонстре», как родная файловая система Windows – NTFS. А точнее, о накопителях, форматированных в этой файловой системе. Увы, полноценно работать с ними на компьютерах под управлением Mac OS по умолчанию нереально – операционка Apple поддерживает только чтение данных с таких накопителей, а вот запись информации на них – увы и ах.

На практике это приводит к проблемам с внешними винчестерами. Скажем, если пользователь Windows даст вам «хард» с неким массивом данных, то вы сможете только просмотреть их, а вот как-либо изменить (удалить, отредактировать, добавить файл) – уже нет. Хорошо, если друг – фанат Windows вручил вам винчестер с каким-нибудь фильмом и настоятельной рекомендацией о его просмотре; кино можно запустить прямо с подключенного к «Маку» диска и не столкнуться с «проблемой NFTS». Но как быть, если жизненно необходимо что-то записать на чужой винчестер с NTFS, не прибегая к форматированию? Например, клиент попросил скинуть на его винт вашу видеопрезентацию (или векторный макет большого объёма, или что угодно ещё), и от этого зависит многомиллионный контракт?
Стоит подчеркнуть, что это даже может быть вовсе и не жёсткий диск, а USB-флешка. Ещё недавно большинство таких накопителей было форматировано в FAT32, с которой одинаково хорошо работают и Mac OS, и Windows. Однако современные флешки все чаще идут именно с NTFS. Потому что FAT32 имеет ограничение на объём файла: он не может быть больше 4 Гб, так что фильм в действительно высоком качестве на неё уже не запишешь, и производители USB-флешек это отлично понимают. Вот и форматируют их в NTFS. Так что сложности у пользователей компьютеров Apple могут возникнуть и с накопителями такого рода…
Методов «обучения» Mac OS полноценной работе с NTFS несколько. Например, можно попытаться отредактировать файл fstab в Mac OS, однако, делать это не рекомендуется: последствия могут быть непредсказуемыми, вплоть до проблем с работоспособностью компьютера. Для решения рассматриваемой в этом материале проблемы есть и бесплатные утилиты, и платные. У подавляющего большинства «безвозмездных» вариантов (SLNTFS, NTFS-3G и другие), правда, имеется один существенный недостаток: они не обеспечивают должной скорости работы. Грубо говоря, записывать что-либо на форматированные в NTFS накопители вы сможете, однако, с черепашьей скоростью. Стоит ли связываться с такими решениями – вопрос открытый.
На мой взгляд, куда логичнее заплатить, благо «скоростной» драйвер стоит не так уж и дорого. Своего рода эталонным решением в этой области является Paragon NTFS for Mac 12 за 990 рублей. В чем преимущества этого варианта?
Во-первых, как раз в скорости. Разработчики гарантируют, что это единственный продукт на рынке, предоставляющий полный доступ к файлам NTFS (чтение/запись) на той же скорости, что и встроенный драйвер Mac OS к файлам в HFS+, её родной системе. Для сравнения: бесплатному решению требуется порядка 10 минут на запись фильма объёмом 10 Гб, а при установленном драйвере Paragon NTFS for Mac 12 – около минуты с небольшим.
Отмечу также, что Paragon NTFS for Mac – первый NTFS-драйвер с полной поддержкой Mac OS 10.10 Yosemite. В этом, кстати, заключается важное преимущество платных решений над бесплатными: последние могут перестать развивать хоть завтра, плюс в их случае никто не ответит за сохранность ваших данных. А вот у shareware (в данном случае в лице Paragon NTFS for Mac 12) и качественная техническая поддержка есть, и своевременные обновления.
И вот ещё какой момент. Знаем, что далеко не все обладатели MacBook и iMac любят общаться на эту щекотливую тему, и всё же… Практика показывает, что весьма и весьма часто на компьютерах Apple соседствуют Mac OS и Windows. Последнюю ставят, прежде всего, для запуска приложений, существующих для Windows, но отсутствующих для Mac OS. Перечислять сотни разных примеров программ «Только для Windows» не будем, просто отметим, что большая их часть относится к категории игр. Так вот, если с помощью Boot Camp поставить на «Мак» Windows, отформатировав для этого часть винчестера в NTFS, то этот раздел будет доступен из-под Mac OS только для чтения.
И если вы создадите в среде Windows, скажем, документ MS Word, то после переключения на Mac OS он не будет доступен для редактирования. Ситуация не шибко приятная, но Paragon NTFS for Mac 12 поможет справиться и с ней. То есть этот драйвер относится к категории must have не только для активных пользователей внешних накопителей, но и для всех желающих «усидеть на двух стульях», используя обе популярные операционки. По некоторым данным, в России такими сомнительными (с точки зрения ортодоксальных «маководов») делами занимается почти треть обладателей компьютеров Apple.
Купить Paragon NTFS for Mac 12 можно здесь. Тот, кто введёт код ntfs1210 при оформлении покупки, получит скидку в 30%. Следовательно, драйвер обойдётся не в 990 рублей, а в 693 рубля.
Пользуйтесь на здоровье и спасибо за внимание!
Источник
Enabling NTFS write in macOS the Open source way
How to access Windows disks from Mac

Do you have an old Windows external HDD or do you share your data with Windows computers and your macOS is unable to write NTFS file system? You can change it in several ways.

Why can’t macOS just write NTFS?
NTFS is a proprietary file system standard from Microsoft used in Windows since the early 90s. It was first used in Windows NT 3.1 and is present since.
Microsoft is not providing a full specification of NTFS as open source standards and it is quite possible that Apple would need to pay pricey licenses in order to fully use it in their systems. And why would they support the protocol of their main competitor?
How can macOS write NTFS?
There are several ways to do so. You can use paid software like Paragon NTFS for Mac or Microsoft NTFS for Mac by Tuxera. There is also freeware iBoyosft NTFS for Mac. Or you can use open source software. But open source solution requires some messing in terminal. Let’s have a look at this option.
Enabling NTFS write in macOS
Then you will need to download and install the latest version of macFUSE (osxFUSE) either using installer from GitHub releases page.
Reboot your maxOS. After that, install package ntfs-3g from Terminal.
Since OS X 10.11 El Capitan you need to disable System Integrity Protection for a while. Restart or shut down your Mac and while starting, press Command + R key combination. This will get you to Recovery mode.
In Recovery mode, open Terminal application from Utilities in the top menu. Disable System Integrity Protection with command:
Restart your Mac and go to your normal macOS.
Since macOS 10.15 Catalina, you have to do one extra step. Apple is trying to protect you more by making some crucial parts of the file system read-only and we have to make it writable again. Until next restart. Enter this command into your Terminal:
After that, we can just back up the old NTFS handler and replace it with the new one.
If NTFS write doesn’t work yet, you can try to add one additional parameter to NTFS mount script. Open it in your favourite console editor, for example nano.
Find flag “-o allow_other \” and add “-o auto_xattr \” as next flag. Save using “ctrl+x” and “yes”.
After that, you have to go to Recovery mode again and enable System Integrity Protection again. You will also have your read-only parts of system protected again.
That’s it. Enjoy writing to NTFS.
Unfortunately, you have to repeat this procedure every time you update to a new major release of macOS. So you’re good until next October.
Are there alternatives to NTFS?
Yes, if you want to share external HDD between Mac and PC, you can format your HDD to exFAT file system. You will lose all the data on disk during format but otherwise, it’s usable.
If you want to stick with the Apple ecosystem, you are free to use Apple APFS or HFS+.
If you want to be compatible with everybody and everything, use old FAT32. But you will be able to place there files of maximum size
Which macOS does it work on?
This article was originally written for macOS 10.15 Catalina. Now I am running macOS 11.0 Big Sur and things are still working well. According to macFUSE, this should work for 10.12+.
Источник
Ntfs ��� mac os capitan
After you install Xcode, Homebrew, etc. by following the instructions below or the ones at Install Xcode, Homebrew, Git, Ruby which may or may not be needed for the NTFS to work on OS X, but I am sure they are needed for other occasions.
you only need to download and install the package NTFS.mpg from from my Dropbox or from from Mackintosh.zone
This install the necessary Fuse for OS X and NTFS-3G packages that seem to work just fine, at least for my MacBook Pro hackintosh laptop (Sony Vaio SVS13A1S9ES).
First you must have installed the «homebrew» package manager
3 brew install caskroom/cask/brew-cask
Then install necessary packages (osxfuse, rtfs-3g)
—————–
Install osxfuse
Goto osxfuse github download osxfuse 3.0.9+ dmg file. And install.
p.s. The 2.x versions of osxfuse has a problem of not to delete the folders in /Volume, resulting in incremental number of mounted ntfs drive names.
The following steps are not required by OSX El Capitan.
brew info osxfuse
This will show some installation information. Run the last two commands.
1 sudo /bin/cp -RfX /usr/local/opt/osxfuse/Library/Filesystems/osxfusefs.fs /Library/Filesystems/
2 sudo chmod +s /Library/Filesystems/osxfusefs.fs/Support/load_osxfusefs
install ntfs-3g
1 brew install ntfs-3g
After that replace the original mount_ntfs in mac os,
open terminal, run
1 sudo mv /sbin/mount_ntfs /sbin/mount_ntfs.orig
2 sudo ln -s /usr/local/Cellar/ntfs-3g/*/sbin/mount_ntfs /sbin/mount_ntfs
In case you are not allowed by the system to execute the above commands, it might be necessary to do some terminal based work to simlink the new ntfs parts (like mount_nfs) to the system commands
You must do the following to :
[reboot by holding CMD+R to get in recovery mode]
choose utilities>terminal, then write in the terminal the command below
csrutil disable
[reboot normally]
open terminal and run the commands
sudo mv /sbin/mount_ntfs /sbin/mount_ntfs.orig
sudo ln -s /usr/local/Cellar/ntfs-3g/*/sbin/mount_ntfs /sbin/mount_ntfs
[reboot by holding CMD+R to get in recovery mode]
again Utilities>terminal, run
csrutil enable
[reboot normally]
You might also need to do the following (in case the NTFS disks or USB flash disks do not get mounted automatically)
run again
brew install nfs-3g
if it comes back with a message:
Warning: homebrew/fuse/ntfs-3g-2015.3.14 already installed, it’s just not linked
run
brew link –overwrite ntfs-3g
you must get something like
Linking /usr/local/Cellar/ntfs-3g/2015.3.14… 86 symlinks created
Now it all must be OK
Writing on NTFS (even USB 3.0) is a bit slow, but…it is free.
Источник
How to verify, repair or format NTFS partitions under Mac OS X 10.11 El Capitan. Quick troubleshooting guide
Since the release of Mac OS X 10.11 El Capitan, Paragon Software Сustomer Service have received over a 1000 requests concerning the verify/repair/format disk utility options, which disappeared from the Disk Utility in OS X 10.11 El Capitan. To address this issue, we integrated the functionality directly to NTFS for Mac Preference Pane.
Additionally we have recently released a new professional maintenance tool, Paragon Hard Disk Manager for Mac, to help you perform these basic and numerous advanced file system and volume partitioning operations.
If you are in need of such a solution, you can try Paragon HDM for Mac now.
However, in this article we going to show you how to format, verify and repair NTFS volumes with built-in partitioning tools in NTFS for Mac 14 under Mac OS X 10.11 El Capitan.
Disk Utility vs. Third-Party Drivers
The El Capitan version of Disk Utility has been through major changes — both cosmetically and under the hood. Once you get used to the glossy new user interface, veteran users might notice Disk Utility no longer manages disks mounted by third-party drivers, at least not through the program’s graphical user interface. The reasons for the change don’t make a whole lot of sense to outsiders, especially when disks mounted by non-native drivers can still be mounted, formatted, or repaired by using the command-line diskutil.
In addition to the under the hood changes outlined above, the familiar NTFS for Mac preferences pane has been overhauled with version 14. Since Disk Utility can no longer be used to work with Windows-formatted volumes, NTFS for Mac 14 now includes built-in format, verify, and mount functionality.
In addition to Windows NTFS, other file systems supported by OS X can also be used with this preference pane — for example, if Paragon’s ExtFS for Mac driver is already installed on the same system, NTFS for Mac will also be able to format, verify, or mount Linux-native Ext2/3/4 disks as well.
Here’s what NTFS for Mac 14 looks like when launched:
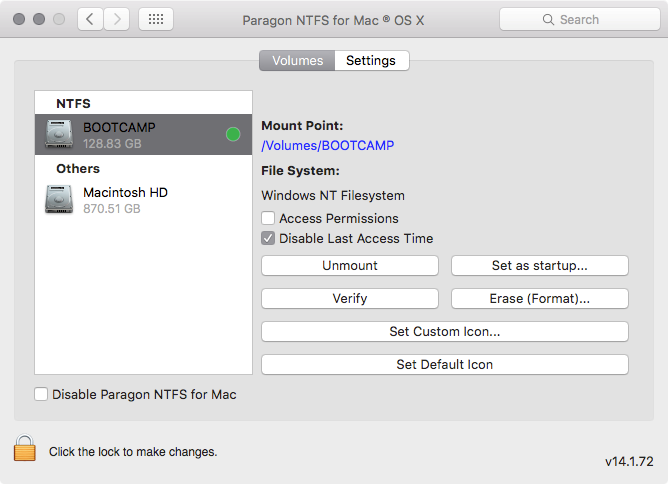
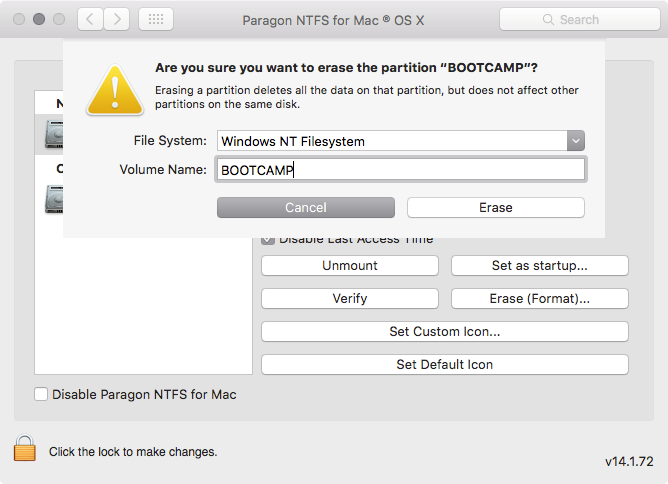
In order to verify or format your NTFS or ExtFS volumes with Paragon drivers, you need to launch the app Preference Pane, select a volume and click “Verify” or “Erase”, depending on what operation you need.
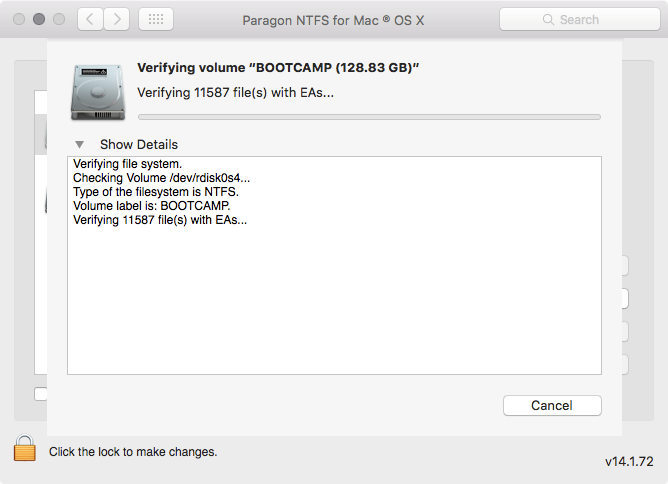
NTFS for Mac 14 also fixes found file system errors during the volume verification process:
For those comfortable with Terminal, the same actions can also be performed with Paragon’s command-line utilities. Advanced users familiar with Unix will have access to additional options through this interface:
- fsck_ufsd_NTFS finds and repairs errors on NTFS disks.

- newfs_ufsd_NTFS formats a volume to NTFS.
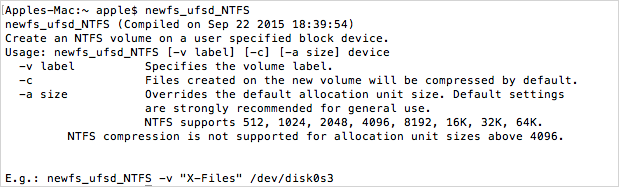
- mount_ufsd_NTFS mounts or unmounts NTFS disks.
Support of the Windows NT file system is automatically added to the command-line diskutil during installation of the NTFS for Mac driver.
In case you quite often need not only to verify and format NTFS volumes, but perform more advanced tasks, such as move, resize, copy or even undelete partitions formatted to HFS+, NTFS, ExtFS, FAT and exFAT, try the new Paragon Hard Disk Manager for Mac.
HDM for Mac is not just for backup — it’s a powerful application that covers all aspects of the computer’s life cycle, including drive partitioning, file system optimization and repair functions, data backup capabilities, and irreversible data wiping. It already works with macOS Sierra 10.12 Preview.

19 thoughts on “How to verify, repair or format NTFS partitions under Mac OS X 10.11 El Capitan. Quick troubleshooting guide”
“The reasons for the change don’t make a whole lot of sense to outsiders, especially when disks mounted by non-native drivers can still be mounted, formatted, or repaired by using the command-line diskutil.”
So what are these reasons?
Well, according to Apple, the main reason for SIP and all these difficulties is improved user security (agains malware and hackers and obviously in general again popular system software).
It’s actually a sort of a bug.
All file system drivers used to be here: /System/Library/Filesystems
After El Capitan and SIP is out, the new way for system drivers is /System/Library/Filesystems , and for 3rd party drivers /Library/Filesystems.
However, GUI version of diskutil ignores new folder with 3rd party drivers.
At the same time diskutil supports 3rd party via terminal with ease, like “diskutil eraseDisk ufsd_NTFS VOLUMELABEL disk2”
It is possible to install the old version of the disk utility app in addition to the new version published with El Capitan. I did it and it works.
https://justus.berlin/2015/10/restore-old-disk-utility-in-os-x-el-capitan/
Props for doing this. I had no idea that DiskUtil had changed in El Cap until I got a new external HDD (to add to the fleet I currently have).
Had to laugh at the command line ‘fsck_ufsd_NTFS’ though. Given the first part, I can’t help but imagine the middle bit stands for ‘Un-F%$# Sodding Disk’…
@Gerald Schlatte Great article, but kinda risky, isn’t it?
I use three external hard discs on iMac El Capitan: FREECOM USB MS-DOS (FAT); Samsung USB exFAT; Toshiba OS X esteso (journaled). No partitions on the discs.
Paragon NTFS for Mac is installed.
Is this your new release useful for my machine? Do I need it?
@Assunta A. Berardi It’s a very useful piece of software. It includes drive partitioning, file system optimization, repair functions, data backup capabilities and data wiping. It also supports all file systems of OS X, Windows, and Linux. You can try for yourself, it has 10-day trial 🙂
Another try to rip me off my money?! YES.
The main reason I’ve uninstalled Paragon’s NTFS for Mac, is I can no-longer see/select my Bootcamp partition from El Crapitan pref. pane when P-NTFS-Mac is active…
Onyx can do this for free so the price is unjustified in my view if it was $9.99 I would have bought it right away.
No mention of whether it will allow the set up and repair of RAID arrays using multiple external disks, just as the original Apple utility did. Does it have this feature?
@Wim
Just an offer, nothing more 🙂
@Kuloskap
Since OS X El Capitan, built-in utilities like Startup Disk and Disk Utility won’t show drives mounted with third-party file system drivers anymore.
With that in mind, we have introduced additional features in NTFS for Mac preference pane.
You have to use NTFS for Mac’s Set as Startup option to boot from BootCamp partition.
@Ben
Onyx can’t do the rest of features like file system optimization, repair functions, data backup capabilities, data wiping, etc.
@David W
No, it doesn’t have this feature now, but we might add it in the future updates.
I apologize for not being more clear, Sergey:
I WAS referring to the Bootcamp partition disappearing from the “Startup Disk” Preference Pane (OSX 10.11.6) — when Paragon NTFS Mac (v.14) is active.
(Option-selecting a boot volume during startup does not persistently change the default startup, which causes a reboot into the WRONG partition when the WIN OS triggers reboots during software updates…)
@Kuloskap
Ok, did you try Set as Startup option? If it’s not working properly for you, we should take a look at the system logs to find the issue.
So far so good. I’ll let you know if there’s any problem I see.
I couldn’t find the same subject for Yosemite so I decided to ask my question here.
Have NTFS 14 (14.2.359) & run Yosemite (10.10.5). Tried to format several flash drives (initially MacOS Extended) to NTFS using either DiskUtility or NTFS 14 Preference Pane. All cases ended up with a single non-mountable “NTFS” partition. These flash drives were unreadable by Windows systems (7 or 10) too. Also, when I was trying to format them in a Windows environment, the only option I was getting was to format 200MB to whatever file system I wanted (NTFS, FAT etc), not the whole capacity (i.e. several GBs). Only solution was to format them using Windows Command Line and get a fully functional NTFS flash drive.
Any ideas why is this happening?
Thanx in advance for any response!
-Michael-
@Michael P
Hi! That’s because Windows doesn’t support GPT-formatted flash drives.
You have to format your flash in Disk Utility from GPT to MBR (Master Boot Record), and then you format this partition in NTFS via NTFS for Mac.
@Sergey
That was really helpful, thank you!
I haven’t noticed that the default in my mac was GPT instead of MBR.
So, I took an MBR formatted usb drive with one NTFS partition, working properly in both Mac & Windows, and with Disk Utility I created 1 NTFS partition by deleting the previous one, keeping in mind to check in “Options…” that MBR is selected again. Result is a non-mountable partition.
I used NTFS 14 Preference Pane, & tried to erase/format using NTFS. The message was:
“Unmounting disk
Erasing
Progress
Formatting Volume …
Creating file system structures.
Creating $UpCase for use in Windows 7 and later versions
NTFS format complete.
Bytes per sector 512.
Bytes per cluster 4K.
115.69 GB total disk space.
115.23 GB available.
Mounting disk
Could not mount disk3s1 with name 129 after erase”
The solution was to erase/format it with FAT32 filesystem first, and then do it again with NTFS (both done with NTFS 14 Preference Pane) and now its working again properly everywhere.
Is Disk Utility not indicated for formatting a drive in NTFS under Yosemite and should it always be done via NTFS 14 & why?
Again, many thanks in advance for any response!
-Michael-
Источник


