- ИТ База знаний
- Полезно
- Навигация
- Серверные решения
- Телефония
- Корпоративные сети
- Как смонтировать раздел NTFS в Linux
- Смонтировать раздел NTFS с разрешением только для чтения
- Определить раздел NTFS
- Создать точку монтирования и смонтировать раздел NTFS
- Смонтировать раздел NTFS с разрешениями на чтение и запись
- Обновить репозитории пакетов
- Установите Fuse и ntfs-3g
- Смонтировать раздел NTFS
- Media UniX
- freebsd команды, настройка, установка сервера и не только
- Подключаем диск с ntfs на ubuntu server 20.04
- Добавить комментарий Отменить ответ
- Как монтировать NTFS в Linux
- Установка компонентов
- Ручное монтирование
- Автоматическое монтирование
- Ubuntu Documentation
- Using the File Manager
- File System Differences
- FAT32
- Configuring /etc/fstab
- Preface
- Automatic Configuration
- Manual Configuration
- Other Resources
- Footnote
ИТ База знаний
Курс по Asterisk
Полезно
— Узнать IP — адрес компьютера в интернете
— Онлайн генератор устойчивых паролей
— Онлайн калькулятор подсетей
— Калькулятор инсталляции IP — АТС Asterisk
— Руководство администратора FreePBX на русском языке
— Руководство администратора Cisco UCM/CME на русском языке
— Руководство администратора по Linux/Unix
Навигация
Серверные решения
Телефония
FreePBX и Asterisk
Настройка программных телефонов
Корпоративные сети
Протоколы и стандарты
Как смонтировать раздел NTFS в Linux
New Technology File System
3 минуты чтения
NTFS — это система хранения файлов, стандартная для компьютеров Windows, но системы Linux также используют ее для организации данных.
Мини — курс по виртуализации
Знакомство с VMware vSphere 7 и технологией виртуализации в авторском мини — курсе от Михаила Якобсена

Большинство систем Linux монтируют диски автоматически. Однако в конфигурациях с двойной загрузкой, где требуется обмен файлами между двумя системами с разделами NTFS, эта процедура выполняется вручную.
Эта статья покажет вам, как смонтировать раздел NTFS в Linux с разрешениями только для чтения или чтения и записи.
Смонтировать раздел NTFS с разрешением только для чтения
Выполните следующие действия, чтобы смонтировать раздел NTFS с доступом только для чтения.
Примечание. Раздел только для чтения позволяет пользователям читать файлы. Чтобы включить запись в раздел NTFS, обратитесь ко второму разделу статьи.
Определить раздел NTFS
Перед монтированием раздела NTFS определите его с помощью команды parted :
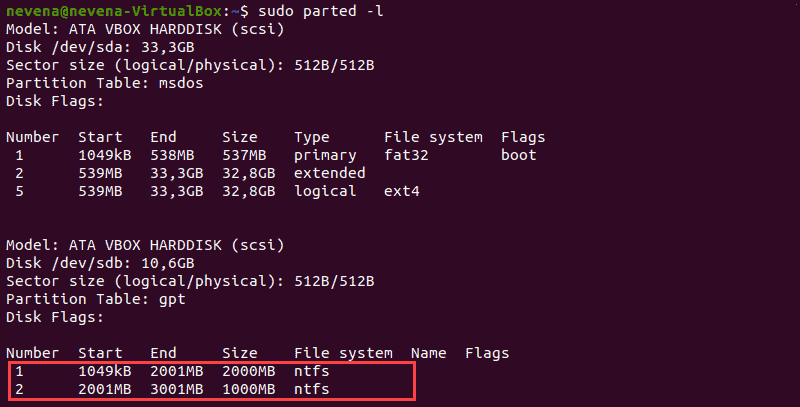
В приведенном выше примере два раздела NTFS находятся на диске /dev/sdb . Прежде чем продолжить, запишите номер раздела, который вы хотите смонтировать.
Вы также можете использовать команды fdisk и grep , чтобы показать на диске только разделы NTFS:
Создать точку монтирования и смонтировать раздел NTFS
В этом примере мы смонтируем раздел /dev/sdb1 с разрешением только для чтения.
Сначала создайте точку монтирования с помощью команды mkdir :
Затем смонтируйте раздел в созданный вами каталог. Используйте команду mount и путь к разделу, который вы указали ранее:
Используйте инструмент для освобождения диска, чтобы проверить подробную информацию обо всех файловых системах и убедиться, что вы успешно смонтировали раздел:
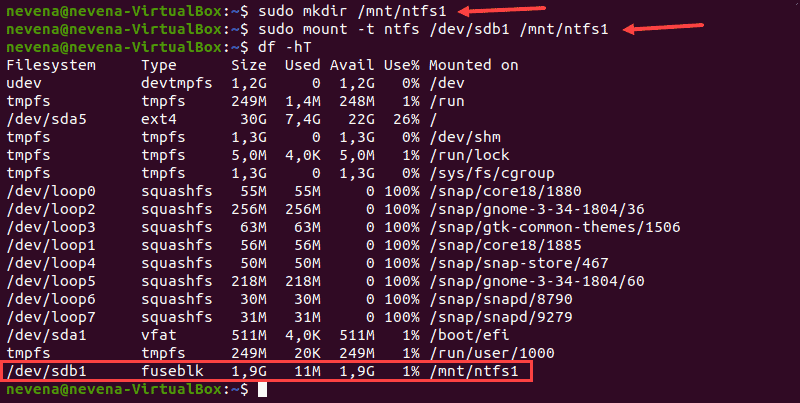
Раздел /dev/sdb1 отображается как смонтированный в нижней части списка. Теперь у вас есть доступ только для чтения к этому разделу NTFS.
Смонтировать раздел NTFS с разрешениями на чтение и запись
Чтобы смонтировать раздел NTFS с разрешениями на чтение и запись, вам необходимо установить fuse и ntfs-3 в вашей системе.
Выполните следующие действия, чтобы завершить процесс монтирования.
Примечание. В некоторых дистрибутивах Linux по умолчанию уже установлены fuse и ntfs-3g .
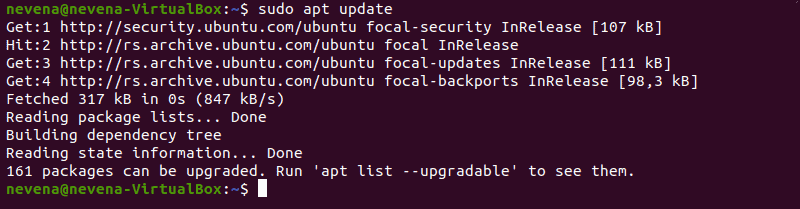
Обновить репозитории пакетов
Выполните следующую команду, чтобы загрузить и обновить репозитории пакетов:
Установите Fuse и ntfs-3g
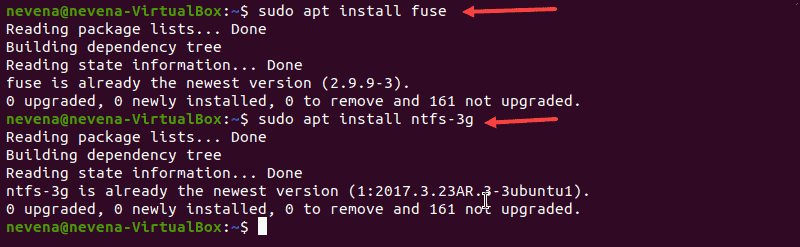
Чтобы установить fuse в вашей системе Linux из репозитория по умолчанию, используйте соответствующий менеджер пакетов. В нашем примере мы используем apt в Ubuntu.
Когда установка завершится, установите ntfs-3g , запустив:
В случае, если fuse и ntfs-3g уже установлены, вывод выглядит примерно так, как показано ниже:
Смонтировать раздел NTFS
После установки пакетов программного обеспечения fuse и ntfs-3g смонтируйте раздел NTFS.
Сначала создайте точку монтирования с помощью команды mkdir :
Затем используйте команду mount , чтобы смонтировать нужный раздел. Например, /dev/sdb2 :
Чтобы проверить, смонтирован ли раздел, выполните команду df :

Теперь у вас есть права на чтение и запись для подключенного раздела NTFS.
Примечание. Для монтирования раздела через ntfs-3g рекомендуется ядро Linux версии 2.6.20 или новее.
Мини — курс по виртуализации
Знакомство с VMware vSphere 7 и технологией виртуализации в авторском мини — курсе от Михаила Якобсена
Источник
Media UniX
freebsd команды, настройка, установка сервера и не только
Подключаем диск с ntfs на ubuntu server 20.04
Небольшая заметка о том, как подключить диск с файловой системой ntfs на ubuntu server. Это может быть необходимо при переходе с ОС w!nd0w$ на альтернативную операционную систему для получения доступа к уже имеющимся на диске файлам. Подобная статья уже была на сайте, но здесь информация актуализирована, учитывая новую версию ubuntu server. Без долгого предисловия, сразу переходим к делу. Имеется ubuntu server версии 20.04 и диск с ntfs.
Ставим:
sudo apt-get update
sudo apt-get install ntfs-3g fuse
На ubuntu server версии 20.04 пакеты уже установлены.
Физически подсоединяем диск с файловой системой ntfs
Смотрим, что подсоединилось:
sudo parted -l
В моём случае я вижу:
Model: ATA VBOX HARDDISK (scsi)
Disk /dev/sda: 10.7GB
Sector size (logical/physical): 512B/512B
Partition Table: gpt
Disk Flags:
Number Start End Size File system Name Flags
1 1049kB 2097kB 1049kB bios_grub
2 2097kB 1076MB 1074MB ext4
3 1076MB 10.7GB 9661MB
Model: ATA VBOX HARDDISK (scsi)
Disk /dev/sdb: 7516MB
Sector size (logical/physical): 512B/512B
Partition Table: loop
Disk Flags:
Number Start End Size File system Flags
1 0.00B 7516MB 7516MB ntfs
Model: Linux device-mapper (linear) (dm)
Disk /dev/mapper/ubuntu—vg-ubuntu—lv: 9659MB
Sector size (logical/physical): 512B/512B
Partition Table: loop
Disk Flags:
Number Start End Size File system Flags
1 0.00B 9659MB 9659MB ext4
Чётко видно раздел размером 7 Гб:
Disk /dev/sdb: 7516MB
1 0.00B 7516MB 7516MB ntfs
Далее создаём раздел для монтирования диска (вы можете указать свою любую директорию):
sudo mkdir -p /mnt/ntfs
Монтируем диск:
sudo mount -t ntfs /dev/sdb /mnt/ntfs
Смотрим, что примонтировалось:
df -h
Вижу следующую картину (у вас должно быть нечто подобное):
Filesystem Size Used Avail Use% Mounted on
udev 939M 0 939M 0% /dev
tmpfs 197M 1.1M 196M 1% /run
/dev/mapper/ubuntu—vg-ubuntu—lv 8.8G 4.0G 4.5G 48% /
tmpfs 982M 0 982M 0% /dev/shm
tmpfs 5.0M 0 5.0M 0% /run/lock
tmpfs 982M 0 982M 0% /sys/fs/cgroup
/dev/sda2 976M 105M 805M 12% /boot
/dev/loop0 72M 72M 0 100% /snap/lxd/16099
/dev/loop1 55M 55M 0 100% /snap/core18/1880
/dev/loop2 30M 30M 0 100% /snap/snapd/8542
tmpfs 197M 0 197M 0% /run/user/1000
/dev/sdb 7.0G 4.7G 2.4G 67% /mnt/ntfs
Примечание:
Если надо отмонтировать диск, то выполняем:
sudo umount /mnt/ntfs
Чтобы монтирование происходило автоматически сразу после перезагрузки операционной системы надо сделать следующее.
Редактируем файл:
sudo nano /etc/fstab
В конце файла добавляем:
/dev/sdb /mnt/ntfs ntfs defaults 0 0
Можно перезагружать ubuntu server и проверять, примонтировался ли наш новый диск с файловой системой ntfs:
sudo reboot
Добавить комментарий Отменить ответ
Для отправки комментария вам необходимо авторизоваться.
Источник
Как монтировать NTFS в Linux
Инструкция на примере Linux CentOS 7.
Установка компонентов
Для начала необходимо установить пакет ntfs-3g. В противном случае, при попытке запустить команду на монтирование раздела NTFS мы получим ошибку mount: unknown filesystem type ‘ntfs’.
Сначала устанавливаем расширенный репозиторий:
yum install epel-release
Затем сам пакет ntfs-3g
yum install ntfs-3g
После установки данного пакета в системе появятся дополнительные команды mount.ntfs-fuse и mount.ntfs-3g., а также команда mount распознает опцию -t ntfs.
Ручное монтирование
Монтирование NTFS на чтение и запись выполняется любой из трех команд:
mount -t ntfs /dev/sdb1 /mnt
mount -t ntfs-3g /dev/sdb1 /mnt
mount.ntfs-3g /dev/sdb1 /mnt
* в данном примере, примотировано устройство /dev/sdb1 в раздел /mnt. Понять, какой устройство нужно монтировать можно при помощи команды fdisk -l
Автоматическое монтирование
Чтобы раздел автоматически монтировался при перезапуске компьютера, открываем на редактирование файл:
/dev/sdb1 /mnt ntfs defaults 0 0
* в данном примере мы раздел /dev/sdb1 будем монтировать в каталог /mnt.
Чтобы применить настройку и проверить ее, вводим:
Посмотреть примонтированные разделы и файловые системы можно командой:
Источник
Ubuntu Documentation
Ubuntu is capable of reading and writing files stored on Windows formatted partitions. These partitions are normally formatted with NTFS, but are sometimes formatted with FAT32. You will also see FAT16 on other devices.
Ubuntu will show files and folders in NTFS/FAT32 filesystems which are hidden in Windows. Consequently, important hidden system files in the Windows C:\ partition will show up if this is mounted. Since it is all-too-easy to accidentally modify or delete files which are essential for Windows, it is advisable to mount your Windows C:\ partition as seldom as possible, preferably not at all, or read-only by configuring /etc/fstab (see below). If you have data which you want to access regularly from both Windows and Ubuntu, it is better to create a separate data partition for this, formatted NTFS.
Whether you write to your Windows C:\ partition or a shared NTFS data partition, be aware that if you are using Windows 7, and Windows 7 is in a hibernated state when you write to the NTFS partition from Ubuntu, you will lose all your changes. This is because when Windows 7 is hibernated it writes the system state to a file stored on disk and restores from that file when the system is re-awakened, thus restoring the whole fileystem to a state before any changes made from Ubuntu. In Windows 7 you must avoid using hibernation. With Windows 8, the situation is more complex in that, by default, it uses a hybrid hibernation/shutdown when you shut the system down. Any changes made by Ubuntu will be lost when you reboot into Ubuntu.
With both Windows 7 and Windows 8 (when installed to a legacy mbr partition table) there is usually a 100-200MB boot partition labelled «SYSTEM». Do not mount it — you do not need to. Similarly it is highly advisable to leave any recovery partitions unmounted.
Using the File Manager
For those using a desktop version of Ubuntu, or one of its offical derivatives, the easiest and quickest way of mounting NTFS or FAT32 partitions is from the file manager: Nautilus in Ubuntu, Thunar in Xubuntu, Dolphin in Kubuntu and PCManFM in Lubuntu. Simply look in the left pane of the file manager for the partition you wish to mount and click on it — it will be mounted and its contents will show up in the main pane. Partitions show with their labels if labelled, or their size if not.
Unless you require your Windows partition — or a NTFS/FAT32 partition for data shared with Windows — mounted every time you boot up for one of the reasons given below, mounting from the file manager in this way should suffice.
If you are using a Wubi version of Ubuntu and you wish to browse the host partition, you do not need to mount it — it is mounted already in the «host» folder. Click on «File System» in the left pane of the Nautilus file browser and then open the host folder which you will see in the main pane.
File System Differences
For a more in depth analysis, see LinuxFilesystemsExplained, but here are some basics:
- Windows 7, Vista, XP, 2000, older NT systems, and Windows Server 2003 and 2008 are formatted with NTFS. In rare cases, OEM manufacturers have pre-installed Windows XP and Windows 2000 to FAT32 filesystems.
- Older versions of Windows such as Windows ME, 98, and 95 are formatted with FAT32.
- Flash drives, such as a USB thumb drive or a camera’s flash card are typically formatted as FAT16. Some Flash drives are formatted with Microsoft’s proprietary exFAT file system.
In Windows, you can check which filesystem your partition is formatted with by right-clicking the partition in Windows Explorer and selecting Properties. In Ubuntu, run from terminal:
The ntfs-3g driver is used in Linux-based systems to read from and write to NTFS partitions.
NTFS (New Technology File System) is a file system developed by Microsoft and used by Windows computers (Windows 2000 and later). Until 2007, Linux distros relied on the kernel ntfs driver which was read-only. The userspace ntfs-3g driver now allows Linux-based systems to read from and write to NTFS formatted partitions.
The ntfs-3g driver is pre-installed in all recent versions of Ubuntu and healthy NTFS devices should work out of the box without further configuration. In Ubuntu versions 11.10 and later the ntfs-3g package included the functionality previously provided by ntfsprogs. Trying to install ntfsprogs in 11.10 (and possibly in 12.04) will cause the package-manager to ask if you wish to remove ntfs-3g. Users who have installed ntfsprogs and failed to notice the message from the package manager have unintentionally uninstalled ntfs-3g, after which the system falls back to the read-only kernel ntfs driver. Loss of the ntfs-3g driver for similar reasons has also been reported when upgrading from 11.04 to 11.10. If you are experiencing inability to write to a NTFS formatted partition or device, check whether or not the ntfs-3g package is installed.
FAT32
The vfat driver is used in linux to read and write FAT32 and FAT16 partitions.
Configuring /etc/fstab
Preface
If you require one or more of your Windows partitions mounted automatically during bootup, it is necessary to add one line to the file /etc/fstab for each partition that is to be mounted. Some reasons for mounting partitions by means of /etc/fstab, rather than relying on the file manager, include:
- Convenience.
- Where more than one user account is in use during a session. Partitions mounted from one user account by means of the file manager are not accessible to the other account(s).
- Where libraries have been set up in applications such as Banshee or Rhythmbox (for music) or Shotwell (for photos). If those libraries contain files on partitions mounted by means of the file manager, an error will occur in a subsequent session if the partition is not mounted first.
Where more advanced or special mount options are needed. Three working configurations for different needs are given below, but anything more advanced is beyond the scope of this wiki page. The NTFS-3G manual gives a list of mount options suitable for NTFS filesystems.
Automatic Configuration
Although there are a number of GUI applications available from the Ubuntu Software Centre, none of these can be recommended at the time of this writing, unfortunately. They are obsolete and unmaintained and can all cause problems. Two examples are ntfs-config and PySDM. (PySDM is no longer in the repository with effect from 12.10.) If you find a recommendation anywhere for either of these applications, it is likely to be an old one, and should not be followed. At this time it is advisable to configure /etc/fstab manually.
Manual Configuration
First, you need to find the device locations of the partition(s) you wish to mount. Open a terminal and run:
For illustration purposes, an example output from a computer setup with a Vista/Ubuntu dual-boot and shared NTFS data partition is shown here:
The first three partitions, all NTFS, are the ones that concern us here. There are no FAT32 partitions. In this instance, all three NTFS partitions have partition labels, which makes it easier to identify the purpose of each. If your blkid output does not include partition labels, this means that the partitions do not have labels and you will have to determine which partition you wish to mount by another means. Of the three NTFS partitions, we are going to configure /etc/fstab with only the third, the Data partition. Partition /dev/sda1 is the OEM manufacturer’s recovery partition and should be left unmounted, or as described below. Partition /dev/sda2 is the Windows C:\ partition and is best not included in /etc/fstab for the reasons described above, or mounted read-only — see below.
You will now need to create a mountpoint for each NTFS partition that you wish to mount by means of /etc/fstab. In our illustration we are going to add one entry only for /dev/sda3. From a terminal:
In this case we have created a mountpoint with the same name – Data – as the partition label. You may use (almost) any string you wish.
Before editing /etc/fstab directly, it is a good idea to make a backup. From a terminal:
Now open /etc/fstab in a text editor with root privileges. In Ubuntu:
In Xubuntu or Lubuntu:
For a general-purpose read-write mount, add this line to the end of /etc/fstab:
Replace the UUID with the one relevant for your partition as shown in your blkid output. “519CB82E5888AD0F” will not work for you.
Also, substitute your mountpoint for “/media/Data”. In case you have a blank space in the name of the mountpoint you want to use like «New Volume» instead of «Data» located in «/media» use «/media/New\040Volume». The space character is created by using «\040» in the fstab.
You will also need to change the “locale=en_US.utf8” option to one suitable for your location and language if you are not in the USA. You can determine your locale with this terminal command:
Or for a list of all locales available on your system:
Now save your edited /etc/fstab and close the text editor. The partition(s) you have configured will be mounted the next time you reboot, but to mount them now:
Two special cases
Sample /etc/fstab lines are suggested for two special cases.
Option 1 — for mounting read-only access. For example, this would be suitable for mounting your Windows C:\ partition if you need to access it. Modify the line below with your UUID and mountpoint:
Option 2 — to ensure that Ubuntu does not mount the partition and also disables graphical mounting from the file manager. For example, you may wish to ensure that recovery and system partitions are never inadvertently mounted and do not appear in the file manager. In this case you need to create a mountpoint in /mnt, not /media. Modify the line below with your UUID and mountpoint:
Note: with these mount options, the partition does not appear in the Devices list in the left pane of Nautilus (the Ubuntu file manager), but it still appears in Dolphin, the Kubuntu File Manager. Clicking on the partition in Dolphin causes the display of an error message. This solution is less elegant in Dolphin than with Nautilus, but the desired effect is achieved — the partition cannot be mounted.
If you need to revert to the original configuration:
Substitute your mountpoint in the second line.
FAT32 Partition
FAT32 partitions are mostly only found in older systems. If you are creating a partition to be used for data to be shared between Windows and Ubuntu, it is better to choose NTFS. Should you have a FAT32 partition which you need to mount using /etc/fstab, this will work to mount it read-write:
Replace with the UUID that blkid reveals for your partition, and adjust for your mountpoint. These mount options will make all files in the partition executable. If you have other needs, you will need to modify the options, but this is beyond the scope of this wiki page.
Other Resources
Footnote
This page has recently been subject to significant revision. If you have any comments about current content, or suggestions for further additions or edits, please head over to this Ubuntu forums discussion thread so that we can co-ordinate our efforts.
MountingWindowsPartitions (последним исправлял пользователь jeremiah-l-marks 2014-11-16 06:31:46)
The material on this wiki is available under a free license, see Copyright / License for details
You can contribute to this wiki, see Wiki Guide for details
Источник


