- Синхронизация времени по NTP в Linux
- Time Synchronization
- Synchronizing your systems time
- Configuring timedatectl and timesyncd
- Serve the Network Time Protocol
- chrony(d)
- Installation
- Chronyd Configuration
- Serving the NTP Protocol
- View status
- PPS Support
- Example configuration for GPSD to feed Chrony
- NTS Support
- NTS Server
- NTS Client
- Установка и настройка NTP-клиента в Linux
- Установка временной зоны
- Настройка синхронизации NTP-клиента с NTP-сервером
- Запуск службы NTP
- Проверка состояния NTP
- Ручная синхронизация времени
Синхронизация времени по NTP в Linux
Оригинал: How to Synchronize Time with NTP in Linux
Автор: Matei Cezar
Дата публикации: 20 апреля 2018 года
Перевод: А. Кривошей
Дата перевода: декабрь 2018 г.
Network Time Protocol (NTP) — это протокол, используемый для автоматической синхронизации системных часов компьютера по сети. Машина может выставлять системные часы по Coordinated Universal Time (UTC), а не по местному времени.
Наиболее распространенный метод синхронизации системного времени по сети на десктопах или серверах Linux — выполнение команды ntpdate, которая может установить системное время с сервера времени NTP. В этом случае на компьютере, на котором введена команда ntpdate, должен быть остановлен демон ntpd.
В большинстве систем Linux команда ntpdate не устанавливается по умолчанию. Чтобы установить ее, выполните приведенную ниже команду.
Пример команды ntpdate:

Чтобы просто запросить время сервера и не устанавливать часы, используя непривилегированный порт для отправки пакетов, чтобы обойти брандмауэры, выполните команду ntpdate со следующими флагами:
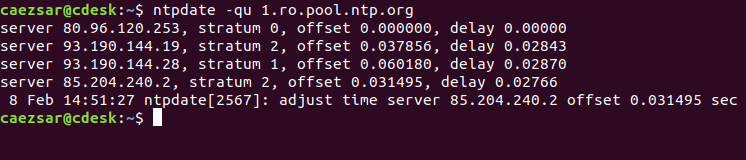
Всегда старайтесь запрашивать и синхронизировать время с ближайшими NTP-серверами, доступными для вашей зоны. Список пулов серверов NTP можно найти по следующему адресу:
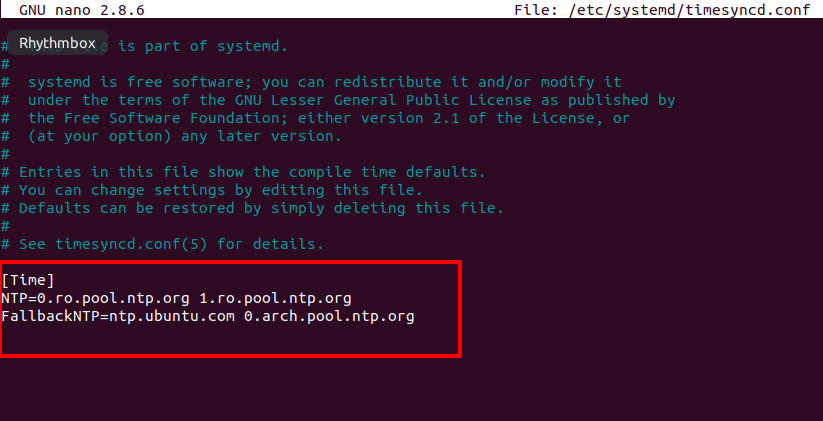
В новых дистрибутивах Linux, которые используют Systemd, вы также можете синхронизировать время через файл timesyncd.conf. Просто откройте файл для редактирования.
И добавьте или раскомментируйте следующие строки после оператора [Time], как показано ниже:
После редактирования файла введите команду timedatectl, чтобы активировать сборку клиента NTP в systemd.
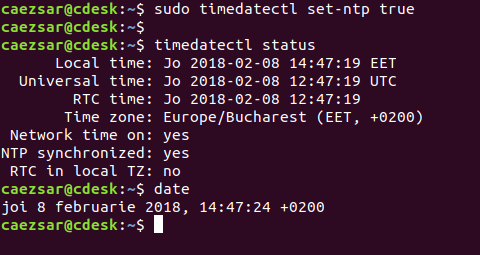
После этого введите команду date для отображения системных часов.
Источник
Time Synchronization
NTP is a TCP/IP protocol for synchronizing time over a network. Basically a client requests the current time from a server, and uses it to set its own clock.
Behind this simple description, there is a lot of complexity — there are tiers of NTP servers, with the tier one NTP servers connected to atomic clocks, and tier two and three servers spreading the load of actually handling requests across the Internet. Also the client software is a lot more complex than you might think — it has to factor out communication delays, and adjust the time in a way that does not upset all the other processes that run on the server. But luckily all that complexity is hidden from you!
Ubuntu by default uses timedatectl / timesyncd to synchronize time and users can optionally use chrony to serve the Network Time Protocol.
Synchronizing your systems time
Since Ubuntu 16.04 timedatectl / timesyncd (which are part of systemd) replace most of ntpdate / ntp.
timesyncd is available by default and replaces not only ntpdate, but also the client portion of chrony (or formerly ntpd). So on top of the one-shot action that ntpdate provided on boot and network activation, now timesyncd by default regularly checks and keeps your local time in sync. It also stores time updates locally, so that after reboots monotonically advances if applicable.
If chrony is installed timedatectl steps back to let chrony do the time keeping. That shall ensure that no two time syncing services are fighting. While no more recommended to be used, this still also applies to ntpd being installed to retain any kind of old behavior/config that you had through an upgrade. But it also implies that on an upgrade from a former release ntp/ntpdate might still be installed and therefore renders the new systemd based services disabled.
ntpdate is considered deprecated in favor of timedatectl (or chrony) and thereby no more installed by default. timesyncd will generally do the right thing keeping your time in sync, and chrony will help with more complex cases. But if you had one of a few known special ntpdate use cases, consider the following:
If you require a one-shot sync use: chronyd -q
If you require a one-shot time check, without setting the time use: chronyd -Q
Configuring timedatectl and timesyncd
The current status of time and time configuration via timedatectl and timesyncd can be checked with timedatectl status .
If chrony is running it will automatically switch to:
Via timedatectl an admin can control the timezone, how the system clock should relate to the hwclock and if permanent synronization should be enabled or not. See man timedatectl for more details.
timesyncd itself is still a normal service, so you can check its status also more in detail via.
The nameserver to fetch time for timedatectl and timesyncd from can be specified in /etc/systemd/timesyncd.conf and additional config files can be stored in /etc/systemd/timesyncd.conf.d/ . The entries for NTP= and FallbackNTP= are space separated lists. See man timesyncd.conf for more.
Serve the Network Time Protocol
If in addition to synchronizing your system you also want to serve NTP information you need an NTP server. There are several options with chrony, ntpd and open-ntp. The recommended solution is chrony.
chrony(d)
The NTP daemon chronyd calculates the drift and offset of your system clock and continuously adjusts it, so there are no large corrections that could lead to inconsistent logs for instance. The cost is a little processing power and memory, but for a modern server this is usually negligible.
Installation
To install chrony, from a terminal prompt enter:
This will provide two binaries:
chronyd — the actual daemon to sync and serve via the NTP protocol
chronyc — command-line interface for chrony daemon
Chronyd Configuration
Edit /etc/chrony/chrony.conf to add/remove server lines. By default these servers are configured:
See man chrony.conf for more details on the configuration options. After changing the any of the config file you have to restart chrony:
Of the pool 2.ubuntu.pool.ntp.org as well as ntp.ubuntu.com also support ipv6 if needed. If one needs to force ipv6 there also is ipv6.ntp.ubuntu.com which is not configured by default.
Serving the NTP Protocol
You can install chrony (above) and configure special Hardware (below) for a local synchronization
and as-installed that is the default to stay on the secure and conservative side. But if you want to serve NTP you need adapt your configuration.
To enable serving the NTP protocol you’ll need at least to set the allow rule to which controls which clients/networks you want chrony to serve NTP to.
An example would be
See the section “NTP server” in the man page for more details on how you can control and restrict access to your NTP server.
View status
Use chronyc to see query the status of the chrony daemon. For example to get an overview of the currently available and selected time sources.
Certain chronyc commands are privileged and can not be run via the network without explicitly allowing them. See section Command and monitoring access in man chrony.conf for more details. A local admin can use sudo as usually as this will grant him access to the local admin socket /var/run/chrony/chronyd.sock .
PPS Support
Chrony supports various PPS types natively. It can use kernel PPS API as well as PTP hardware clock. Most general GPS receivers can be leveraged via GPSD. The latter (and potentially more) can be accessed via SHM or via a socket (recommended). All of the above can be used to augment chrony with additional high quality time sources for better accuracy, jitter, drift, longer-or-short term accuracy (Usually each kind of clock type is good at one of those, but non-perfect at the others). For more details on configuration see some of the external PPS/GPSD resource listed below.
Note: at the release of 20.04 there was a bug which until fixed you might want to add this content to your /etc/apparmor.d/local/usr.sbin.gpsd .
Example configuration for GPSD to feed Chrony
For the setup you need
$ sudo apt install gpsd chrony
But you will want to test/debug your setup and especially the GPS reception, therefore also install
$ sudo apt install pps-tools gpsd-clients
GPS devices usually will communicate via serial interfaces, yet the most common type these days are USB GPS devices which have a serial converter behind USB. If you want to use this for PPS please be aware that the majority does not signal PPS via USB. Check the GPSD hardware list for details. The examples below were run with a Navisys GR701-W.
When plugging in such a device (or at boot time) dmesg should report serial connection of some sorts, example:
We see above that it appeared as ttyUSB0 . To later on have chrony accept being feeded time information by that we have to set it up in /etc/chrony/chrony.conf (Please replace USB0 to whatever applies to your setup):
Then restart chrony to make the socket available and waiting.
sudo systemctl restart chrony
Next one needs to tell gpsd which device to manager, therefore in /etc/default/gpsd we set:
DEVICES=»/dev/ttyUSB0″
Furthermore the default use-case of gpsd is, well for gps position tracking. Therefore it will normally not consume any cpu since it is not running the service but waiting on a socket for clients. Furthermore the client will then tell gpsd what it requests and gpsd will only do that.
For the use case of gpsd as PPS-providing-daemon you want to set the option to:
- immediately start even without a client connected, this can be set in GPSD_OPTIONS of /etc/default/gpsd :
- GPSD_OPTIONS=»-n»
- enable the service itself and not wait for a client to reach the socket in the future:
- sudo systemctl enable /lib/systemd/system/gpsd.service
Restarting gpsd will now initialize the PPS from GPS and in dmesg you will see
In case you have multiple PPS the tool ppsfind might be useful to identify which PPS belongs to which GPS. You could check that with:
To get any further you need your GPS to get a lock.
Tools like cgps or gpsmon need to report a 3D Fix for the data being any good.
Then you’d want to check to really have PPS data reported on that with ppstest
Next one might want to ensure that the pps device really submits PPS data, to do so run ppstest :
Ok, gpsd is now running, the GPS reception has found a fix and this is fed into chrony .
Now lets check that from the point of view of chrony .
Initially (e.g. before gpsd has started or before it has a lock) those will be new and “untrusted” sources marked with an “?”. If your devices stay in the “?” state and won’t leave it even after quite some time then gpsd seems not to feed any data to chrony and you’d need to debug why.
Over time chrony will classify them as good or bad.
In the example case the raw GPS had too much deviation but PPS is good.
And finally after a while it used the hardware PPS input as it was better:
The PPS might also be ok but used in a combined way with e.g. the selected server.
See man chronyc for more details about how all these combinations will look like.
And if you wonder if your shm based GPS data is any good, you can check for that as well.
First of all chrony will not only tell you if it classified it as good or bad. Via sourcestats you can also check the details
You can also track the raw data that gpsd or other ntpd compliant refclocks are sending via shared memory by using ntpshmmon :
NTS Support
In Chrony 4.0 (first appeared in Ubuntu 21.04 Hirsute) support for Network Time Security “NTS” as added.
NTS Server
To set up your server with NTS you’ll need certificates so that the server can authenticate itself and based on that allow to encrypt and verify the NTP traffic.
In addition to the allow statement that any chrony working as NTP server needs there are two mandatory config entries that will be needed. Those for the certificates like
Example entries would look like:
It is important to note that for isolation reasons chrony by default runs as user and group _chrony . Therefore you need to grant access to the certificates for that user.
$ sudo chown _chrony:_chrony /etc/chrony/*.pem
Then restart chrony systemctl restart chrony and it will be ready to provide NTS based time service.
A running chrony server has various statistics, one also accounts the number of NTS connections that were established (or dropped):
And there is also a per-client statistic which can be enabled by the -p option of the clients command.
For more complex scenarios there are more advanced options to configure NTS documented in the man page.
A Note about certificate placement:
Chrony by default is isolated via apparmor and in addition uses all kind of protect* features of systemd. Due to that there are not many paths chrony can access for the certificates. But /etc/chrony/* is allowed as read-only and that is enough.
Check /etc/apparmor.d/usr.sbin.chronyd if you want other paths or allow custom paths in /etc/apparmor.d/local/usr.sbin.chronyd .
NTS Client
The client needs to specify server as usual ( pool directives do not work with NTS). As usual after the server adress options can be listed and there nts has to be added.
server iburst nts
One can check the authdata of the connections the client established like
Again there are more advanced options documented in the man page. Common use cases are specifying an explicit trusted certificate.
Bad Clocks and secure time syncing — “A Chicken and Egg” Problem:
There is one problem with systems that have very bad clocks. NTS is based on TLS and that needs a a somewhat correct clock. Due to that an NTS based sync might fail. On Hardware affected by this one can consider using the nocerttimecheck option which allows to set a number of times time can be synced without checking validation and expiration.
Источник
Установка и настройка NTP-клиента в Linux
В статье рассмотрим настройку NTP клиента.
Установка временной зоны
Для начала смотрим какая у нас установлена временная зона. Для этого используем команду date.
Если временная зона установлена неправильно, то устанавливаем правильную временную зону. Для этого создаем симлинк на файл /etc/localtime с соответствующей временной зоны из каталога /usr/share/zoneinfo/. Например для Москвы.
Настройка синхронизации NTP-клиента с NTP-сервером
Устанавливаем пакет ntp
Для синхронизации локальной клиентской машины на Linux с NTP-сервером требуется отредактировать файл /etc/ntp.conf. В следующем примере указывается несколько серверов времени, что полезно на случай недоступности одного из них. Или можете прописать другие внешние сервера, например pool.ntp.org
iburst: данный параметр повышает точность синхронизации, вместо одного пакета отправляется восемь. Когда сервер не отвечает, пакеты отправляются каждые 16 секунд, когда отвечает – каждые 2 секунды.
Далее нужно указать в файле конфигурации ваш NTP-сервер, который мы настроили в предыдущей статье. Если у вас в сети нет своего ntp сервера, то этот параметр указывать не нужно.
prefer: если указана данная опция, заданный сервер считается предпочтительным перед остальными, но если ответ этого сервера будет значительно отличаться от ответов остальных серверов, он будет игнорироваться. Вместо 192.168.1.1 укажите ip адрес вашего сервера
Запуск службы NTP
После изменения ntp.conf и задания необходимых параметров запустите службу (демон) NTP. В зависимости от настроек, она может работать и как сервер, и как клиент.
и добавьте его в автозагрузку
для проверки времени наберите команду
Проверка состояния NTP
Проверить состояние NTP можно при помощи команды ntpq. Если вы получите ошибку отказа в соединении, значит, сервер времени не отвечает, не запущена служба NTP на клиенте или закрыт порт.
remote – имя или адрес сервера времени. Перед ним указан служебный символ, в данном случае «*», что означает используемый сервер. «+» означает, что сервер пригоден для обновления, «-» — что непригоден, «x» — сервер недоступен;
refid – вышестоящий в иерархии Stratum сервер;
st – уровень сервера в иерархии Stratum;
t – тип соединения (u – unicast, одиночное соединение, b – broadcast, широковещательное соединение, l – локальные часы);
when – время, прошедшее с момента последнего ответа;
poll – период опроса в секундах;
reach – состояние доступности (при представлении в двоичном виде 1 означает успешную попытку, 0 – сбой. После 8 успешных попыток устанавливается значение 377);
delay – время двойного оборота пакета;
offset – текущее смещение времени относительно сервера;
jitter – среднеквадратичное отклонение времени.
Значение jitter должно быть низким, если это не так, проверьте смещение относительно часов в файле погрешности (driftfile). Если оно слишком велико, может потребоваться смена NTP-сервера. Следующая команда вручную синхронизирует время с NTP-сервером:
Ручная синхронизация времени
Для опроса NTP-сервера и установки даты и времени в ручную используется команда ntpdate. Обычно это требуется только один раз.
Для начала отключите ntp службу
Запустите синхронизацию указав сервер с которого нужно синхронизировать время
Запустите службу ntp
После такой первоначальной синхронизации NTP-клиент будет регулярно опрашивать NTP-сервер для обеспечения соответствия локального времени точному времени.
Если вы нашли ошибку, пожалуйста, выделите фрагмент текста и нажмите Ctrl+Enter.
Источник


